
Home > Directory Home > Drawing Lessons > Sketching Nature >Getting Started with Drawing Your Sketches
DRAWING AND SKETCHING and how to start to draw your sketches
|


GO BACK TO THE HOME PAGE FOR TUTORIALS FOR BEGINNING ARTISTS
[The above words are pictures of text, below is the actual text if you need to copy a paragraph or two]
ON BEGINNING A SKETCH.
ALL nature appears to the eye as a series of flat patches of colour and shade of different strengths; the most tender are generally the most distant, while strength is characteristic of near objects. The difference, also, between shadow and light is less sudden and less strong in distant objects than in near ones. It sometimes happens that in very clear atmospheres, especially at the tops of mountains, this difference between the light and shade in distant objects even many miles away is nearly as strong as in those close by. The distance then ceases to look far off, and the spectator is deluded completely. Be very careful, then, in painting and drawing to make the light and shade in the distance approach nearly to the same depth of tone, in order to make it " go back," as in nature. When both are merged into one, so that form is only distinguished by the objects being in silhouette, the greatest appearance of distance is obtained. This is why fog gives such an appearance of enormous size to objects close by, for they appear far off; and therefore must be huge to look so large. A rocky hill, when partly shrouded in mists, impresses us with its vastness, yet when they clear away we find perhaps it is but a very small one. It is therefore almost impossible to exaggerate the importance of representing this quality of delicate difference (or simplicity) of tone in distant objects, especially in monochrome drawings, where the greys and purples of aerial perspective cannot be represented.
On account of the natural colours being varied and altered by every change of light, and also by each slight alteration of general effect, the difficulty of working in colour is so great that it is impossible to attain anything like certainty until we have gained a sound knowledge of light and shade. This, then, will be our first consideration.
Each varying tone has a relation to every other that gives a value to it which is marred or frequently lost altogether if it is not truly rendered. This is so well understood in France that special study is given to relative tones or " values," till a
mastery is obtained in dealing with them, and that gives the great strength of the French school as opposed to the English.
Choose a subject, then, where the relative tones are simple and plainly marked, and the masses are not too complex. This we shall obtain best in a simple landscape with stones, a wall, an open gate, or some well-marked object in the foreground, trees in the middle distance, and hills on the horizon. It is as well to place one's self looking rather towards the sun, so that three- quarters of the objects in the picture are in shade.
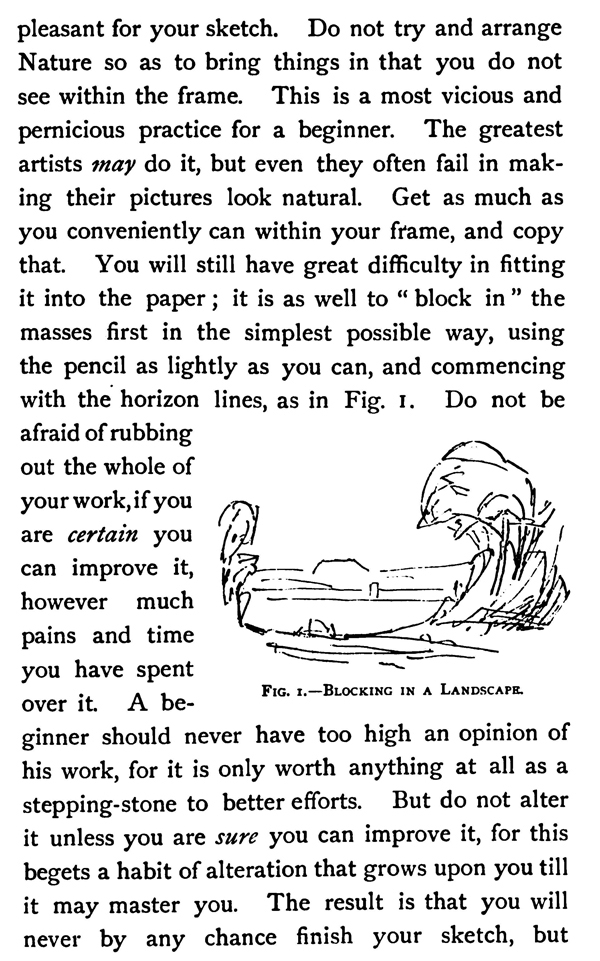
Now take a block of not too rough paper, " Whatman's medium not hot-pressed," is best, and a hardish pencil, No. 3 of Faber. Sit in the shade, if possible, and begin to sketch in the outline. You will find the greatest difficulty in fitting your subject to the shape and size of the paper. Either it will be too square, or too large, or too long, so that when you have commenced at one point, you will find that, on the scale you have chosen, a pet stone, tree, or piece of distance, cannot be got in. To obviate this difficulty it is sometimes at first convenient to carry a light frame of wood the size of your paper (that may be jointed so as to fold up for carrying) and hold it up vertically, in front of you. Look at what you see through the frame, and imagine it to be a picture. Move the frame about till you get all you want to draw within it. Very likely you will find that either you cannot get all you wish within the frame, or else that the scale will become too small to be pleasant for your sketch. Do not try and arrange Nature so as to bring things in that you do not see within the frame. This is a most vicious and pernicious practice for a beginner. The greatest artists may do it, but even they often fail in making their pictures look natural. Get as much as you conveniently can within your frame, and copy that. You will still have great difficulty in fitting it into the paper ; it is as well to " block in " the masses first in the simplest possible way, using the pencil as lightly as you can, and commencing with the horizon lines, as in Fig. I. Do not be afraid of rubbing out the whole of your work, if you are certain you can improve it, however much pains and time you have spent over it.
FIG. 1.-BLOCKING IN A LANDSCAPE.
Beginners should never have too high an opinion of his work, for it is only worth anything at all as a stepping-stone to better efforts. But do not alter it unless you are sure you can improve it, for this begets a habit of alteration that grows upon you till it may master you. The result is that you will never by any chance finish your sketch, but always go on altering and altering, hoping against hope that it will improve. Now it is the finish that is the delightful part to do, and to look at when done. But it can never be delightful unless the early part is well begun, therefore do not be afraid to take some time over this early part, for the more correctly it is done the more easy will be the finishing.
After the " blocking-in " is done as nearly true as you can, commence outlining the distance with the utmost delicacy, and then outline the more foreground parts. Now close one eye and hold the block upright in front of you and compare it carefully with nature. You will almost certainly find that you have exaggerated the size of the distance and made the foreground too small, also the fields far off do not look as fiat as in nature, they take up too much vertical room on the paper. These faults are made more or less by every one, even experienced artists are not free from them. The reason is simple, for we know the objects are large in the distance, and we think we see them larger than we do. We must then devise some means for seeing them without taking their size for granted. This we shall do by looking at them in a fresh way, so that we shall consider the scene as a whole, not regarding each thing individually in the way we ordinarily and unconsciously do.
We can get our required result in three ways.
1. By looking at the objects in a mirror. This is such a good and easy way that a pocket-mirror should form part of the paraphernalia of every artist. By turning your back on the object and placing the mirror in front of you, and then turning it slightly on an imaginary vertical pivot, the reflection of the object can easily be obtained. You will most likely be surprised at the way the distance shrinks, and the mountains and hills become level. It is as well to take into the reflection one's own sketch, and then very likely it will be seen that not only is the distance exaggerated, but that the vertical lines are not upright. The mirror is a most useful aid in correcting one's own work, as well as looking at nature. It is convenient to have a very small one, and it should be held close to one eye (say the right), with the corner against the nose, and the plane of the glass slightly turned away from the face. The plane of the mirror must be vertical, and the sketch should be so also, or it will appear distorted, and in endeavouring to correct the drawing you may in reality be altering it for the worse.
2. By placing the head horizontally or upside down. Most of us have looked at things through our legs when we were children. The landscape always looked so pretty, yet so small, and the colours appeared brighter than when looked at in the ordinary dull routine manner right way up. Things looked small because we seldom looked at anything but the distance, and, viewed in this new light, we saw them in true proportion to the foreground, and the colours looked bright because we were not looking for details in the form. Few adults will feel much inclined to try the youthful experiment, but nearly the same effect can be produced by simply turning the head on one side till it becomes horizontal. Observe carefully how the distance shrinks, while things in the immediate foreground remain the same. Yet, if we measure part of the distance against the foreground we find it is the same in both cases. If also we look at nature with both eyes and suddenly close one, a similar but not quite so marked effect will be produced.
3. By half closing the eyes, so that objects are seen through the eyelashes. This is perhaps the most easy and useful way of helping ourselves to see nature freshly, and without knowing too much of what the objects are, only how they appear. Not only will the distance shrink to its proper size, but the most important and salient features of the landscape will come out more strongly, the light and shade will mass itself undisturbed by all the smaller broken lights and shades, and the colour will be seen to best advantage. In fact, the simple elements of the picture will display themselves. We know that a photograph never gives a good idea of mountain scenery, it reduces all the heights, till mountains look like mole-hills, and it makes things in the foreground look enormous when they are really small. Yet it is generally correct in perspective.
It is true a certain amount of latitude must be given to the artist to give more importance to distance than with perfectly correct drawings. Before we can begin to arrange a picture we must know exactly what correct drawing is, otherwise we shall soon get lost in a tangle of exaggeration that looks, and is, the result of ignorance. Also the more finished a picture is, the more necessary it is to have the drawing correct, therefore accustom yourself to correct drawing from the first. Hills may have the same outline and take up the same space in the picture even when they vary vastly in actual size, for the space depends on the angle which the top and base of each makes with the eye. A hill of a certain size and at a certain distance would give the same angle as a hill twice the height at twice the distance. It is only by noting its value or colour that we know how far off, and therefore how large, the hill is. We can only express it by these means, and not by unduly exaggerating its size. Exaggerated size of distance is a distinguishing mark of the work of an amateur.
Drawings that are correct will always hold their own against those that are incorrect. For this reason some distinguished amateurs habitually use the camera lucida, and their drawings become known among their friends for their correctness, that quality being recognised by every one at a glance. Yet the use of such an instrument is to be deprecated, as it rapidly takes away the power of drawing without it, and in many a fine subject its use is impossible, such as moving clouds, water, etc. It is chiefly useful in the rapid drawing of exclusively architectural subjects.
To return to the sketch. After having corrected the drawing by the methods alluded to for seeing nature correctly, draw the distant hills in delicate outlines with a No. 4 Faber, and shade in the middle distance with the same pencil but pressing a little harder. Be careful to make the lights and shades only slightly different in depth of tone, and to make the edges of the shadows distinct and sharp, but not hard. Take a slightly darker pencil, No. 3 or No, 2, for the foreground, and draw in each stone if it be a wall, or each branch if a tree, and put on the shade in strong flat masses as seen with the eye half closed.
In doing this sketch, doubtless great difficulty will be experienced in getting the drawing at all correct. Much assistance to this end can be obtained from a slight knowledge of Perspective This will form the subject of the next chapter.
Privacy Policy ..... Contact Us