
Home > Directory Home > Drawing Lessons > Sketching Nature >Drawing Nature in Perspective
perspective drawing techniques : how to draw nature and outdoors in correct perspective
|


GO BACK TO THE HOME PAGE FOR TUTORIALS FOR BEGINNING ARTISTS
[The above words are pictures of text, below is the actual text if you need to copy a paragraph or two]
LESSONS ON DRAWING IN PERSPECTIVE.
If our eyes were sufficiently accurate we should only have to place our picture upright beside the subject to be drawn, shut one eye, and copy exactly from nature, in order to get a representation in perfect perspective. The writer has known such a draughtsman who, without any knowledge of perspective, yet drew Nature correctly. He could see with only one eye, and therefore had seen, as it were, a picture always before him, for all our drawings are but the representation of what we see with one eye.
Most people see with two eyes, and yet are unable to see things properly till they know them, so a certain knowledge of perspective becomes imperative. A complete knowledge can only be gained by studying it as a branch of Descriptive ,Geometry. As this is impossible to most people, so a few hints and rules are given here, that will be of an exclusively practical nature, bearing directly on its use in sketching from nature.
If a sheet of glass, say the window, be placed upright between the spectator and the subject he is about to draw, and then with one eye only open, and fixed at one point,' he carefully draws the outline on this glass, in Chinese White or Indian ink, of everything he sees, the result will be a drawing in perfect perspective. The glass will be what is called the "plane of his picture," and the distance of his eye from that plane should be measured. If he places his eye nearer the glass he will find he can take in a greater range of subject, and, if farther, the range will be comparatively smaller. The eye ought never to be nearer to the glass than two feet, and had best be at a distance of twice the width of the picture.
On examining the outline, and noting carefully where the sloping lines of buildings run to, he will find that those that are level in nature all run towards points on what would be the horizon if we could see it. That those running in nature directly away from him (or at right angles to the plane of the picture) go towards the centre of the picture, called It is impossible to keep the eye fixed without either looking through a small hole or over a fixed point. Make a hole about half an inch in diameter through a piece of card, or look over the corner of a box or book placed upright on the table.
the Point of Sight, and those sloping obliquely go to points to the right and left, called Vanishing Points, called so because the side of the buildings, if carried out to infinity, would vanish from sight at that point. It may here be remarked that the kind of perspective generally taught has no exact counterpart in nature, as it supposes the earth to be flat, which it is not.
The horizon is therefore imaginary, and yet it is sufficiently accurate, for ordinary purposes of a picture, to take the horizon as if it were the visible edge of the smooth sea.
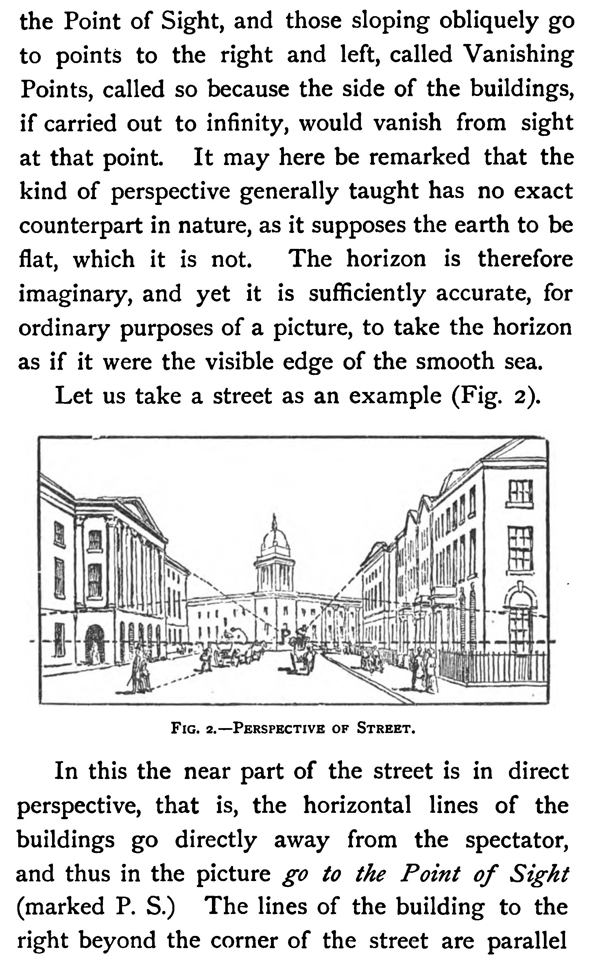
Let us take a street as an example (Fig. 2).
In this the near part of the street is in direct perspective, that is, the horizontal lines of the buildings go directly away from the spectator, and thus in the picture go to the Point of Sight (marked P. S.) The lines of the building to the right beyond the corner of the street are parallel to the plane of the picture, and must be drawn horizontal. The mouldings and plinths, etc., of the sides of the porticoes to the houses on the right must be drawn horizontal, as well as all lines that run straight across from right to left. In the distance is a building at the junction of two streets that go off right and left obliquely to the plane of the picture, and here the lines run off to Vanishing Points right and left that are outside the picture. All the horizontal lines run to these points ; the tops and sills of the windows, the cornices of the tower, and the little short plinths on the pinnacles round the dome. If the courses of the stones were shown these would also go to the same points. It will be observed that all vertical lines in nature are vertical in the drawing, and houses are not drawn smaller as they ascend higher.
In nature they appear to do so, yet perspective is perfectly right, for if the picture be held vertically in the right place, as regards the eye, the tops of the buildings will be farther off and appear smaller in the exact proportion that they appear to be in nature. When also the eye of the spectator is in the right place the horizontal lines exactly facing us also taper off right and left, as in nature. In other words, each part of a perspective picture must itself be seen in perspective in order to appear right, and any apparent exaggeration of perspective then becomes softened down,and the drawing has a look of reality and solidity.
It should be the object of the artist to so place and design his picture that the spectator should naturally place himself in the right position, and obtain this air of reality that is not to be got by any other means.
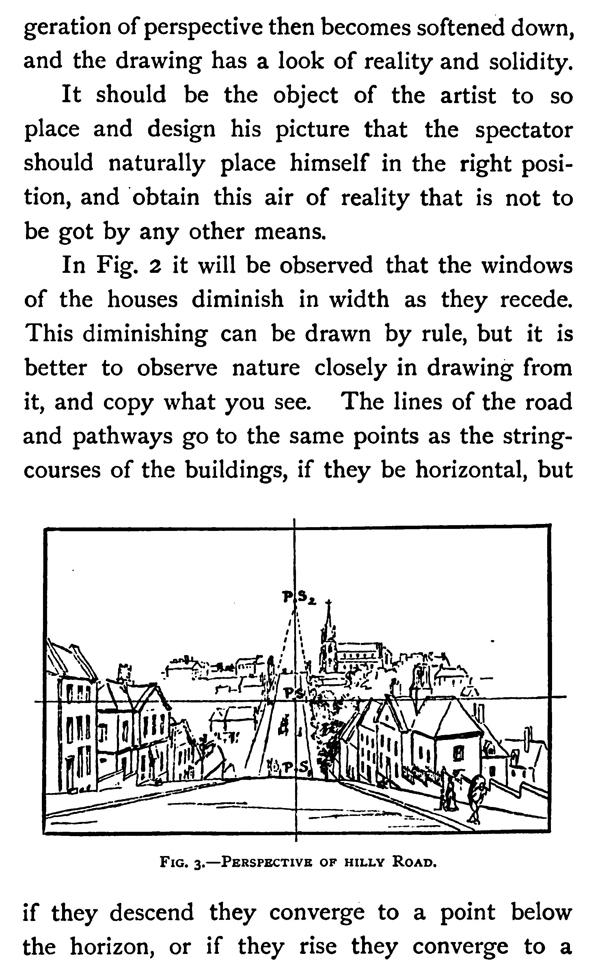
FIG. 3.—PERSPECTIVE OF HILLY ROAD.
In Fig. 2 it will be observed that the windows of the houses diminish in width as they recede. This diminishing can be drawn by rule, but it is better to observe nature closely in drawing from it, and copy what you see. The lines of the road and pathways go to the same points as the string-courses of the buildings, if they be horizontal, but if they descend they converge to a point below the horizon, or if they rise they converge to a point above it. Here (Fig. 3) is an example. The street goes down at first to P. S. No. 1, and then up again to P. S. No. 2, the horizontal lines of the houses all the time going to P. S., the real point of sight of the picture. Below the horizon (the line running from right to left) the level lines of the houses run up, but above they run down, even when on the descending hill, as in the upper storey of the house to the left or the top houses on the hill opposite. That hill comes above the horizon line, and it shows that its summit is above the eye of the spectator.
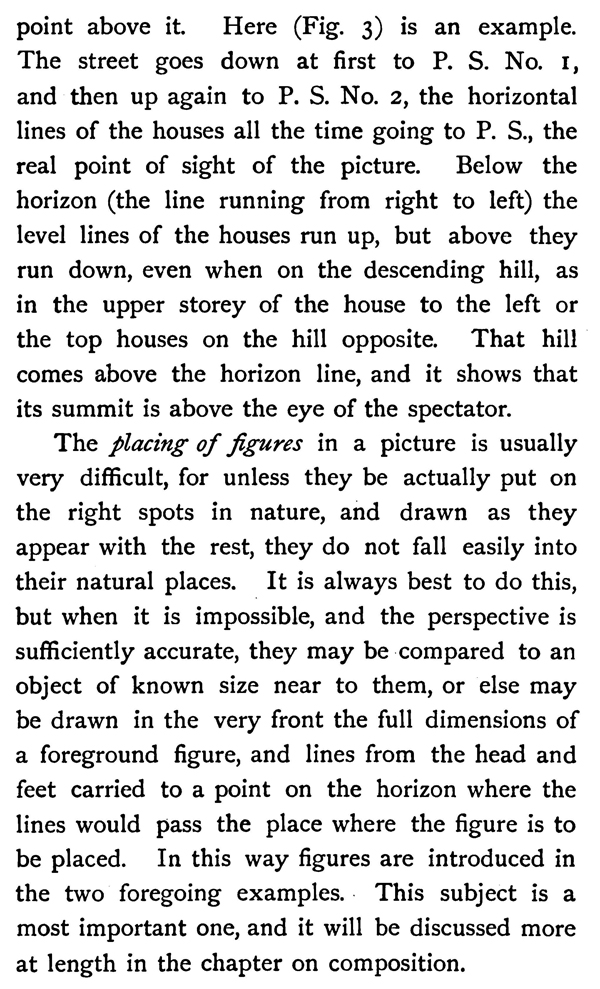
The placing of figures in a picture is usually very difficult, for unless they be actually put on the right spots in nature, and drawn as they appear with the rest, they do not fall easily into their natural places. It is always best to do this, but when it is impossible, and the perspective is sufficiently accurate, they may be compared to an object of known size near to them, or else may be drawn in the very front the full dimensions of a foreground figure, and lines from the head and feet carried to a point on the horizon where the lines would pass the place where the figure is to be placed. In this way figures are introduced in the two foregoing examples. This subject is a most important one, and it will be discussed more at length in the chapter on composition.
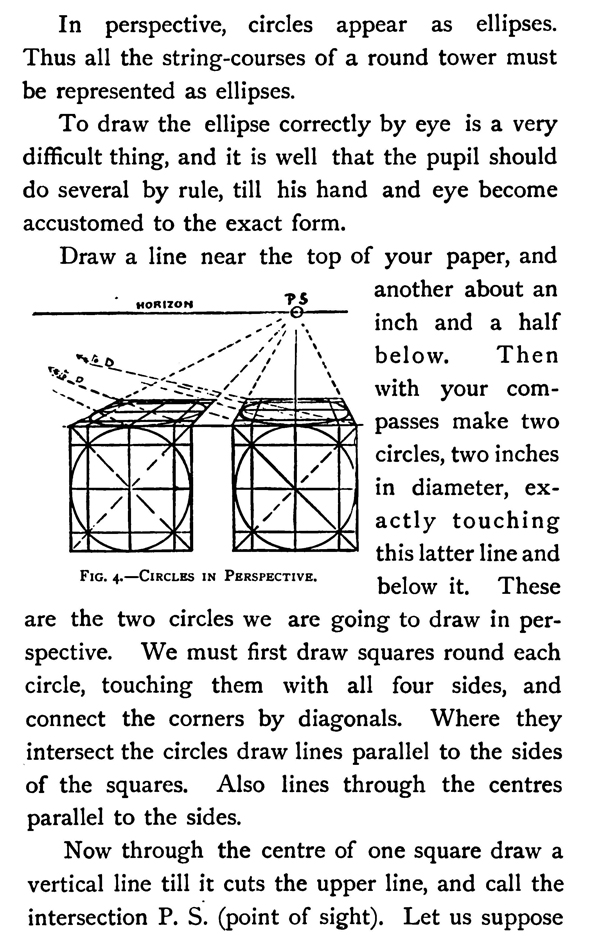
In perspective, circles appear as ellipses. Thus all the string-courses of a round tower must be represented as ellipses.
To draw the ellipse correctly by eye is a very difficult thing, and it is well that the pupil should do several by rule, till his hand and eye become accustomed to the exact form.
Draw a line near the top of your paper, and another about an inch and a half below. Then with your compasses make two circles, two inches in diameter, exactly touching this latter line and below it. These going to draw in per-spective. We must first draw squares round each circle, touching them with all four sides, and connect the corners by diagonals. Where they intersect the circles draw lines parallel to the sides of the squares. Also lines through the centres parallel to the sides.
FIG. 4.—CIRCLES IN PERSPECTIVE.
Now through the centre of one square draw a vertical line till it cuts the upper line, and call the intersection P. S. (point of sight). Let us suppose that to see our picture rightly we ought to look at it from a distance of six inches. Mark off to the left of P. S., six inches from it, a point on the upper line or horizon, and call it D. It comes too far off to show in this figure.
Draw lines from the corners of both squares and from the ends of the subsidiary lines within them to P. S. ; also from the same points to D. These lines will intersect the others at certain points, and from these intersections draw lines parallel to the horizon, as shown in the figure. We shall have obtained the perspective drawings of the squares with the subsidiary lines, and if they are drawn correctly we shall be able to connect the corners of our square with diagonals that shall exactly cut the intersections of the subsidiary lines as in our figure below.
With a fine pointed pencil and a steady hand draw in the perspective circles, cutting and touching the lines exactly as in the lower figure. You will by this means obtain an idea of the look of a circle in perspective that you will be able to recognise in nature afterwards in a way you would never have been able to do without going through this at first tedious and somewhat uninteresting exercise. Having now got your eye accustomed to the appearance of a circle in perspective, it will be good practice to draw vases, cups, plates, etc., placed on a table before you.
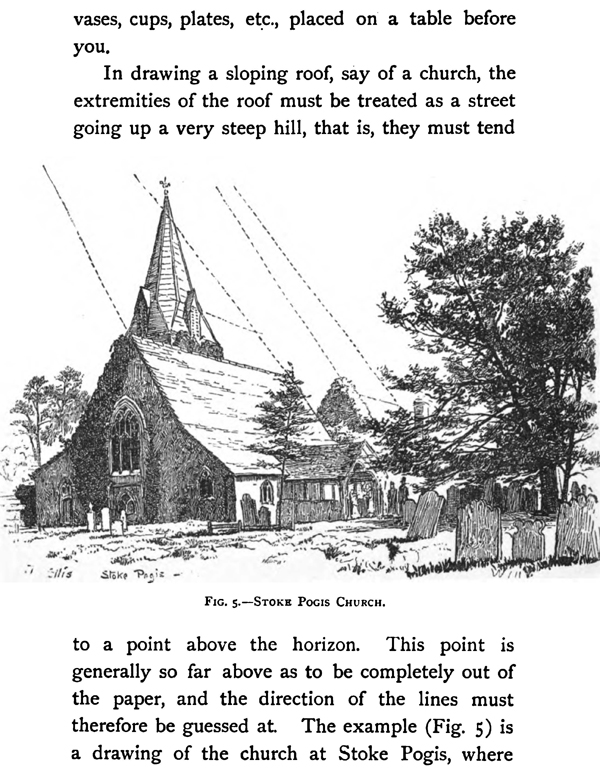
In drawing a sloping roof, say of a church, the extremities of the roof must be treated as a street going up a very steep hill, that is, they must tend to a point above the horizon. This point is generally so far above as to be completely out of the paper, and the direction of the lines must therefore be guessed at. The example (Fig. 5) is a drawing of the church at Stoke Pogis, where Gray was supposed to have written his celebrated Elegy. The smaller roof behind is in a different plane to the larger one, and has a different slope, so the lines and edges of its extremities go to a different point than those of the other. To give the rules for finding all these points would expand the size of this book beyond its limits, besides being puzzling to those not initiated in mathematics. The points must therefore be guessed by eye. It is generally sufficient to make the lines at the two ends nearly, but not quite, parallel, and sloping towards each other a little at the top.
If the pupil bears these simple rules of perspective in mind he will have enough to greatly assist him in sketching from nature, but should he take up architecture as a speciality he will have to go into the subject more thoroughly. Yet perspective is very simple and easily learnt, and, if the mind once grasps the principle, rules soon become almost unnecessary.
The proper size of the sun or moon in a perspective drawing should be three-eighths of an inch if the picture is intended to be seen at a distance of three feet, and smaller or larger in proportion as the picture is to be seen nearer or farther off than that distance. In other words, its diameter should always subtend an angle of about half a degree with the eye. Though this is really the correct size it will always appear too small. The sun's glory cannot be given in such a narrow compass. We must therefore enlarge it a little to satisfy the cravings of the eye, but not much, as it would then look absurd to the educated.
Privacy Policy ..... Contact Us