
|


The above text is actually made up of images, so if you need to copy some of the text, please do so below. Thanks.
THE REGULAR HEXAGONAL PLANE.
This lesson is preparatory to drawing the Regular Hexagonal Prism in the next lesson. Place a large regular hexagonal plane, cut from stiff pasteboard or thin wood, before the class in a vertical position and resting on one edge, first with the plane at right angles to the line of direction, as in Fig. 59, and afterwards so as to present foreshortened views, as in Figs. 6o, 61, 62, 63, 64, 65, 66, 67, 68, and 69; or the pupils can easily cut out small hexagonal planes having edges two inches long, and place them on their desks or model supports in the required positions. This lesson is to be drawn on blank page 9, the vertical positions on the upper half of the page and the horizontal positions on the lower half.
When the hexagonal plane is vertical, at right angles to the line of direction, and :nesting on one edge, as in Fig. 59, the point 6 will be directly above 8, the point 7 above 9, and the vertical lines 6 -8 and 7 - 9 will cross the horizontal line 1 - 2 one fourth from either 'nd, at the points 4 and 5. Hence, for this position, Fig. 59, draw the horizontal diagonal 1-2 and convenient length, and divide it into four equal parts at the points 3, 4, and 5. Through 4 and 5 draw the vertical lines 6 - 7 and 8 - 9 of the proper length, and draw the lines 1 - 6, 1 - 8, 2 - 7, 2 - 9, 6 - 7, and 8 - 9.
When the plane is vertical and foreshortened as in Figs. 6o, 61, 62. and 63 proceed as before. Draw 1- 2 of the proper apparent slant, and divide it into four parts very slightly unequal, r -5 being very slightly larger than 5 -3, and so on. Through 4 and 5 draw vertical lines of the proper length to 6, 7, 8, and 9, from which points draw 6 - 2, 6 - 8, 8 -1, 1 - 9, 9 - 7, and 7 - 2. Notice that 6 - 8 and 7 - 9 will be slightly converging with 1-2 from the point r.
When the plane is horizontal, as in Figs. 64, 65, 66, 67, 68, and 69, draw any diagonal through the center, as r - 2, and divide it into four equal parts, if 1- 2 is horizontal, or very slightly unequal if I —2 is not horizontal, the largest part being nearest the eye. Through 4 and 5 draw lines of the proper apparent slant and length to 6, 7, 8, and 9, from which points draw 6 — 8, 7-9, I —9, 1—8, 2— 7, and 2 — 6.
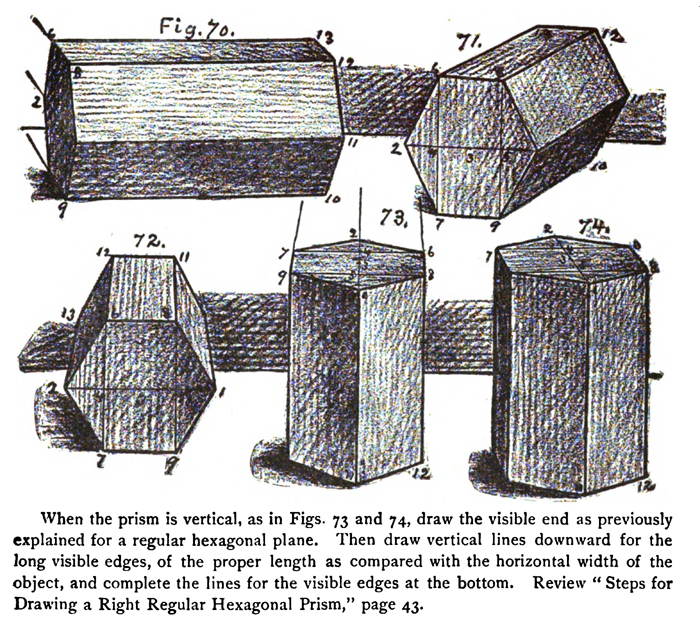
THE RIGHT REGULAR HEXAGONAL PRISM.
Place a large right regular hexagonal prism before the class, first with one rectangular face on a horizontal plane, in several positions, and afterwards standing on one end in several positions, as shown on a small scale in Figs. 7o, 71, 72, 73, and 74; or
small cardboard prisms, four or five inches long, may be easily
constructed by the pupils by marking out, cutting, folding, and Fig. U. pasting the form shown in Fig. U. This lesson is to be drawn on blank page
When the prism is horizontal, as in Figs. 70, 71, and 72, draw the visible end as previously explained for, a vertical regular hexagonal plane. Then draw the edges 9 — 10, I —11, 8 —12, and 6 — 13 of the proper apparent slant and comparative length, as compared with the vertical line 8 — 9, which may be about two and a half inches long. Complete the work by drawing the lines 10-11, 11 — 12, and 12 — 13.
When the prism is vertical, as in Figs. 73 and 74, draw the visible end as previously explained for a regular hexagonal plane. Then draw vertical lines downward for the long visible edges, of the proper length as compared with the horizontal width of the object, and complete the lines for the visible edges at the bottom.
THE RIGHT REGULAR HEXAGONAL PYRAMID.
Place a large right regular hexagonal pyramid before the class, first when standing on its base, in several positions, and afterwards resting with one of its triangular faces on a horizontal plane, in several positions, as shown on a small scale in Figs. 75, 76, 77, 78, 79, and 80 ; or the pupils can easily make small pyramids, four or five inches high, from cardboard, by marking out, cutting, folding, and pasting the form shown in Fig. V. This lesson is to be drawn on blank page I t, the vertical positions on the upper part of the page, five or six inches in height, and the horizontal positions on the lower part of the page.
When the pyramid stands on its base, as in Figs. 75, 76, and 77, the base 1— 8 — 6, 2 - 7 — 9 should be first drawn as directed for horizontal regular hexagonal planes. Draw any two diagonals through opposite corners of this base, so as to find the center, 3, at which erect a vertical line the proper height for the apex, 10. Join the apex to the visible corners of the base by means of straight lines.
When the pyramid lies on one triangular face and the whole base is visible, as in Figs. 79 and 80o, the base may be drawn first as previously described for regular hexagonal planes. By careful estimation and pencil measurement fix a point for the vertex, and join it to the corners of the base so as to represent the visible edges. If all the edges of the base are not visible, as in Fig. 78, determine the apparent slant and draw the longest edge On the floor ; then of the edges connected with it, and so on until the drawing is complete.
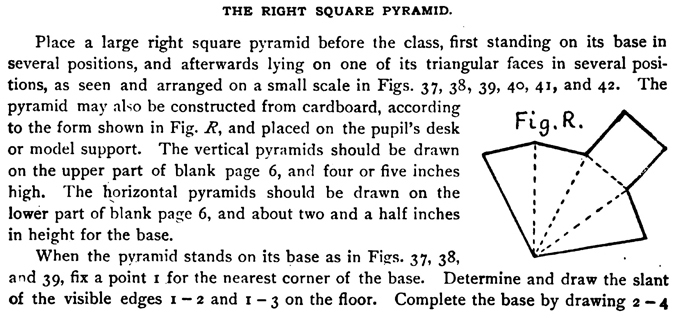
THE RIGHT SQUARE PYRAMID.
Place a large right square pyramid before the class, first standing on its base in several positions, and afterwards lying on one of its triangular faces in several positions, as seen and arranged on a small scale in Figs. 37, 38, 39, 4o, 41, and 42. The pyramid may also be constructed from cardboard, according to the form shown in Fig. R, and placed on the pupil's desk or model support. The vertical pyramids should be drawn on the upper part of blank page 6, and four or five inches high. The horizontal pyramids should be drawn on the lower part of blank page 6, and about two and a half inches in height for the base.
When the pyramid stands on its base as in Figs. 37, 38, and 39, fix a point it for the nearest corner of the base. Determine and draw the slant of the visible edges 1 — 2 and 1 — 3 on the floor. Complete the base by drawing 2 —4
converging with 1 —3, and 3 — 4 converging with 1— 2. Draw the diagonals of the base, 1 — 4 and 2 — 3, so as to find the center 5, at which point erect a vertical line the proper height for the vertex 6, since the vertex of a right pyramid standing on its base will be directly over the center of its base. From the vertex 6 draw straight lines to the visible corners of the base.
When the pyramid lies on one of its triangular faces as in Figs. 40, 41, and 42, first find the apparent slant of the visible edges on the floor, then of the edges connected with these, until the whole is complete.
For a home lesson the pupils may sketch the tower or belfry of a church or other building, or some pyramidal object, and afterwards ,draw it on one of the unnumbered blank pages of the drawing-book.
A SQUARE FRAME.
This object may be constructed from cardboard by laying off and cutting cut the form similar to that in Fig. S, folding it on the dotted lines and pasting the edges together as previously directed. The size of the frame when completed is to be about four inches.
|


