
Home > Directory of Drawing Lesson > Drawing People > Drawing People & Artistic Anatomy
Drawing Lesson of the Human Body : How to Draw People with the Help of Artistic Anatomy Knowledge |
|


The text above is made up of images, so, if you need to copy any of the text for a school assignment, please copy some of the text below.
ARTISTIC ANATOMY OF THE HUMAN FIGURE
Artistic Anatomy, so-called, like perspective, when ill-digested, often leads a student astray. Many drawings from the figure are mere anatomical diagrams, looking as if the model had been flayed. Fresh from their books of diagrams students search the figure for anatomical details. They even ask the model to tighten the knee or the armpit, so that they may mark more definitely the forms of those regions. This does not mean that anatomy should not be studied, but that it should be used as a key to the construction of the figure, rather than displayed for its own sake, Moody, in his "Lectures and Lessons on Art," a book now out of print, but one well worth the careful study of the art student, says :-
"Intellectual work is the hardest work of all. . . . Just consider, for instance, the result of avoiding the effort necessary to master the position and details of the ankle. The want of that knowledge will probably plague you at least twice a week : it will delay your work, you will get into trouble every time you draw the figure, making altogether a sum total of annoyance, unsatisfactory work and feelings a hundred times greater than the expenditure of time and thought which would have been necessary to surmount the difficulty at first."
First in importance is a clear knowledge of the bony framework and its articulations. It settles the movement and the proportions, and at the joints where the bone crops up and shows almost its actual build, it indicates the important accents of form by a square-ness and clear cut shape, which must be appreciated if the drawing is to avoid woolliness. On the other hand the muscular masses fill up the gaps and suggest the first great lines of the pose.
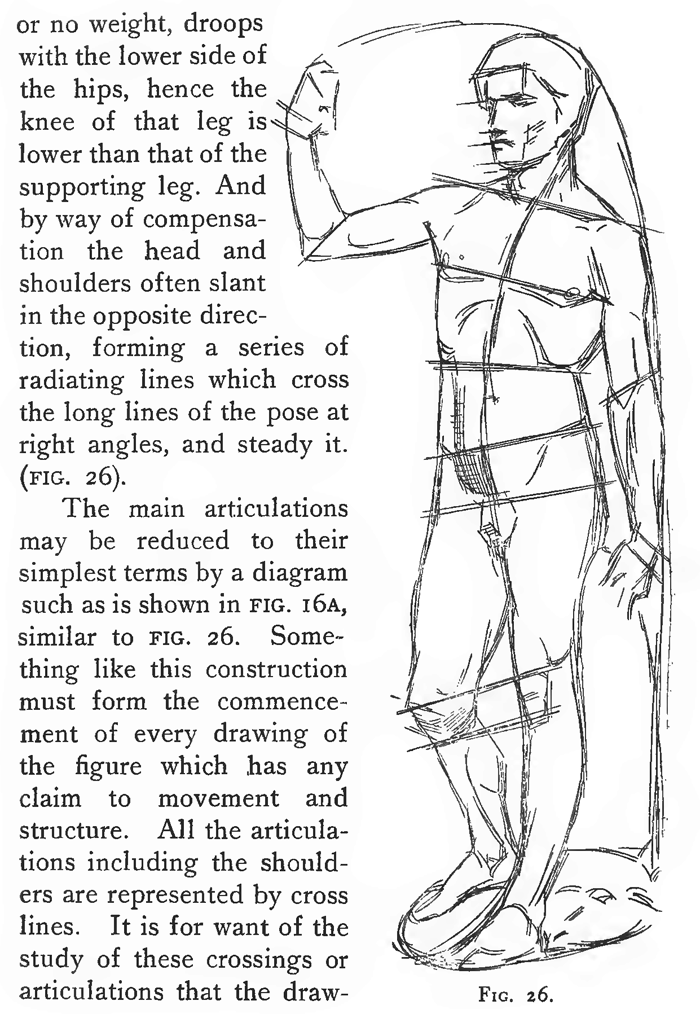
All the parts of the skeleton which determine the surface forms should be carefully studied, and especially the shoulders and hips. The former may be described as a floating girdle, for they are attached only by the collar bones (to the notches in the breastbone), the remainder being free except for muscular and tendinous attachments. Hence the comparative freedom of action, while the complexity of structure, the combination of clavicle, humerus and scapula, add to the difficulty of expressing the forms. The hips, on the other hand, form a fixed girdle, firmly attached to the backbone. The two halves of the shoulder girdle can move independently, but the hip girdle moves only as a whole, like a basket tilted. When in a standing pose the hips are aslant, this means that the model is resting the weight on the leg to the side where the hip basket is higher, and therefore a vertical line `drawn, say, through the pit of the neck, will pass through the ankle of that leg, which slants inwards in order to support the weight. The other leg, which carries little or no weight, droops with the lower side of the hips, hence the knee of that leg is lower than that of the supporting leg. And by way of compensation the head and shoulders often slant in the opposite direction, forming a series of radiating lines which cross the long lines of the pose at right angles, and steady it.
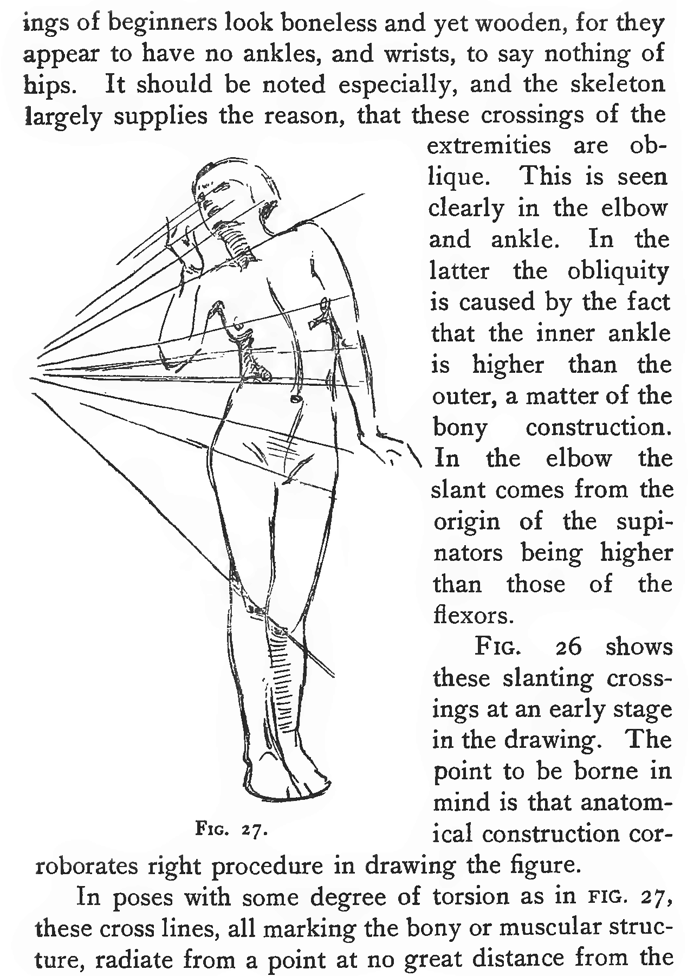
The main articulations may be reduced to their simplest terms by a diagram such as is shown in FIG. 16A, similar to FIG. 26. Something like this construction must form the commencement of every drawing of the figure which has any claim to movement and structure. All the articulations including the shoulders are represented by cross lines. It is for want of the study of these crossings or articulations that the drawings of beginners look boneless and yet wooden, for they appear to have no ankles, and wrists, to say nothing of hips. It should be noted especially, and the skeleton largely supplies the reason, that these crossings of the extremities are oblique. This is seen clearly in the elbow and ankle. In the latter the obliquity is caused by the fact that the inner ankle is higher than the outer, a matter of their bony construction.
In the elbow the slant comes from the origin of the supinators being higher than those of the flexors.
FIG. 26 shows these slanting crossings at an early stage in the drawing. The point to be borne in mind is that anatomical construction corroborates right procedure in drawing the figure.
In poses with some degree of torsion as in FIG. 27, these cross lines, all marking the bony or muscular structure, radiate from a point at no great distance from the figure. The greater the movement the closer in is the point of radiation. The matter has an interest for students as showing a structural basis for the composition of line which sometimes mystifies them. They are apt to think that these rhythmical lines, whether in the direction of or across the figure, are imagined by the teacher, and a real service is rendered by showing them. cause and effect.
The old fashion of learning the muscles singly and detached is answerable for much of the wrongly applied anatomical drawing mentioned above. Usually they are seen in groups, and should be studied as such.
Too often the only glimpse students have of the nude figure in action is when the model walks to and from the throne. A regular exercise should consist in the model moving freely at will, the students marking the changes of form which take place.
This is not a book on artistic anatomy, for which students should study the regular manuals.
An anatomical detail often misinterpreted is the function of the neck muscle (sternocleido mastoid) in turning the head. When the neck muscle on the right contracts, the skull rotates, the mastoid process of the skull being brought forward, and it follows that the head is turned to the left.- It is often supposed that the contraction of a sterno-cleido turns the head to that side, but observation of what takes place will correct the error.
FIG. 28—A drawing with black and white chalk on gray Michallet paper. The reticent use of the white chalk should be noted.
FIG. 29—A drawing on blue paper with black and white chalk by J. M. Swan. The simplicity of the work should be noted and the way the white chalk is owed to divide the figure into a few planes. Large areas are untouched.