
Home > Directory of Drawing Lesson > Human Face > Learn How to Draw Faces by Drawing Cast Heads
DRAWING CAST HEADS DRAWING LESSON : to Learn How to Draw Human Faces & Heads |
|


The text above is actually made up of images...so if you need to copy some text for a school assignment, please do so below. Thank you.
Say that you are going to draw the cast of a head (see diagram in this chapter). Place it directly before you in a light that will keep the shadows as much as possible in large masses, and the side in light not too much broken up with spots or shadows. This trying to get a pleasing distribution of light and shade on the cast is part of the business of learning to draw. The doing of it will impress on your mind the importance of getting a good light-andshade effect. Of course, you will remember that in trying to get a good distribution of light and shade, the half-tints must be considered. They are needed in order to bring out the forms. Now place yourself distant from the cast a little more than three times its greatest dimension—breadth or height, whichever is greater. Never get nearer.
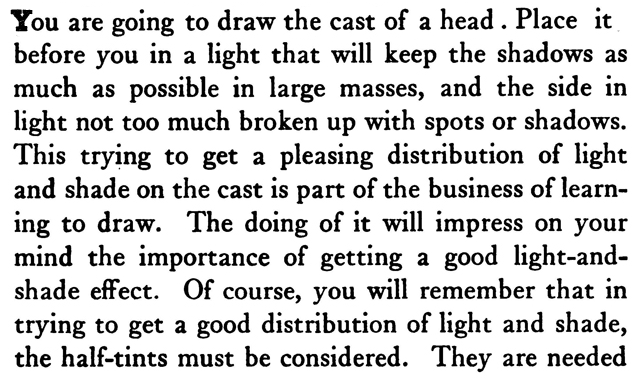
CHARACTER OF OUTLINE.
A. Simple straight lines, assuring vigor and a certainty in the drawing.
B. Fumbling and vacillating lines, exact contour doubtful.
C. Weak and indefinite strokes. Drawing likely to be absolutely characterless.
something on your paper. This does not mean to blunder in hastily without thought. It is presumed that you have studied the cast first for a few minutes by mentally analyzing it, and seeing what it is that gives it its particular character; that is to say, what differentiates it from other casts.
To continue: Get something of the plan or the contour of the subject as soon as possible for a basis
on which to begin to criticize. The faculty of being a good critic of your own drawing, whether you work in a classroom or your own studio, is one of the most important matters connected with the study of art.
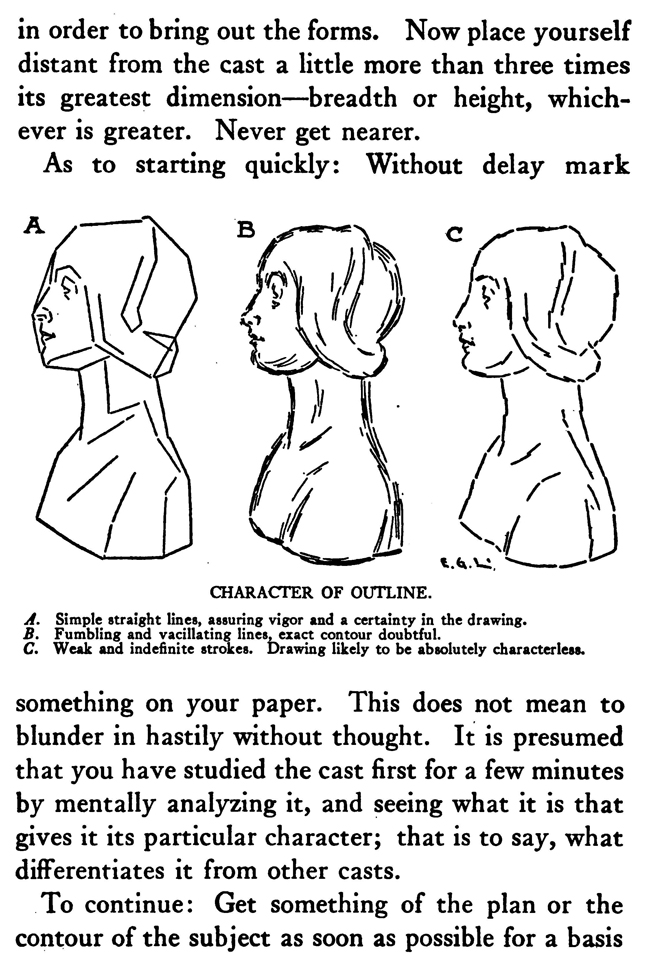
METHODS OF BEGINNING THE SHADING.
An even tone put on first, nearly that of the half-tint. Try to work this way; and in continuing keep the shadings in simple unbroken tones.
Shading reduced to an aggregation of flat areas of tints from the darkest to the lightest. A good way to work if not overdone or carried too far.
Trying to get the exact effect of roundness with the first strokes of the pencil or charcoal. This way of starting will result in uncertain and vague forms, looking less like the subject than a drawing made in simple fiat tints. Not a good way to start.
Think "big" and your drawing will have that quality of bigness necessary for a complete work of art. The habit of working on one little part of a. drawing and finishing that first, and then going on to another part is not likely to inculcate any aptitude for doing things expressing unity, agreement, and harmony—all qualities which are essentially present in any composition to which the term "bigness" can be applied.
HINTS ON DRAWING THE CAST OF A HEAD (SEE DIAGRAMS)
Sketch in the outline of the general mass of the head, in lightly drawn lines, simple and straight, rather than curved ones.
As it is not possible to make this whole contour in one single operation, it is important to know which of the lines forming it should be the first to be put down on the paper.
Now, the first line to draw is the longest, the most characteristic or prominent one. In all cases it should be the one that you think fits the above requirements. If you have made a mistake, you will find it out during the making of the drawing. This self-discovery will be of more educational value to you than if some one had told you of it.
The next line is that of secondary importance, following on to the third and then the fourth, and so on until the general contour is suggested. Keep the idea in mind that the lines are only suggested, drawing them lightly so that they can be erased and changed without difficulty.
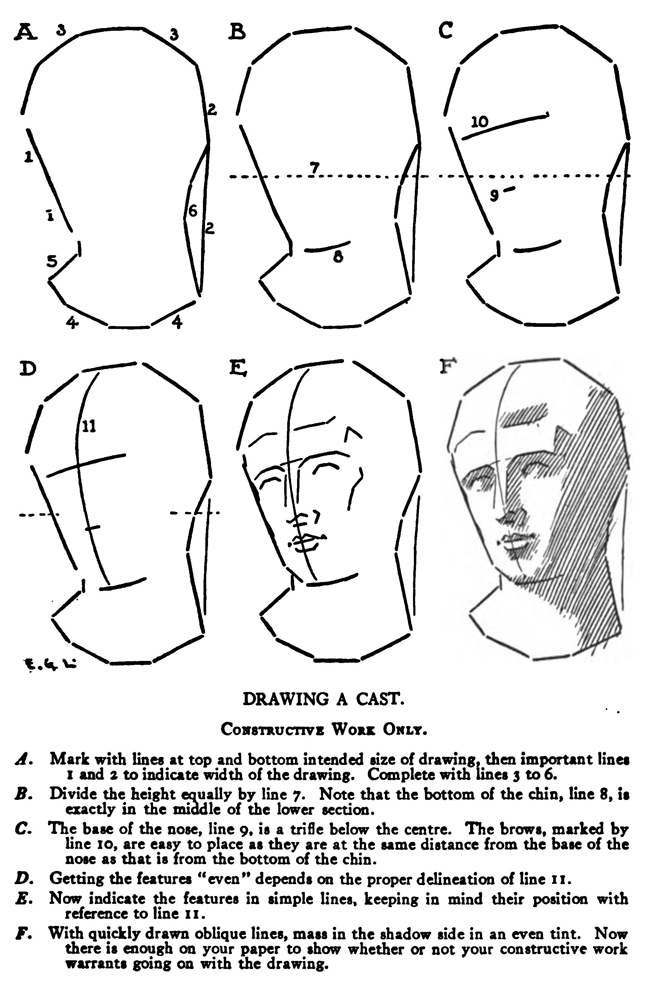
DRAWING CAST HEADS.
A. Mark with lines at top and bottom intended size of drawing, then important lines and to indicate width of the drawing. Complete with lines 3 to 6.
B. Divide the height equally by line 7. Note that the bottom of the chin, line 8, is exactly in the middle of the lower section.
C. The base of the nose, line 9, is a trifle below the center. The brows, marked by line 10, are easy to place as they are at the same distance from the base of the nose as that is from the bottom of the chin.
D. Getting the features "even" depends on the proper delineation of line II.
E. Now indicate the features in simple lines, keeping in mind their position with reference to line is.
F. With quickly drawn oblique lines, mass in the shadow side in an even tint. Now there is enough on your paper to show whether or not your constructive work warrants going on with the drawing.
When lines are vertical or horizontal it is easy enough to judge them; but when they slant it is an entirely different matter. The way to estimate the degree of the slant in any oblique line is to compare it with a line that can be readily judged; i. e., a vertical or a horizontal one. As it is plainly apparent that a plumb-line is the simplest thing to use as an example of a vertical line, so it seems only natural to use one in testing degrees of inclination of oblique lines.
The great danger of a too frequent application of such a mechanical aid as the plumb-line is that its use may become a habit. It is so easy to hold up one to see how a particular line slants that a slothful practice may be formed of not depending upon yourself. Use a plumb-line if you wish, but remember that, sooner or later, your unaided eyes must be relied upon in judging slanting lines.
Sometimes it helps a little to hold up the pencil horizontally at arm's length—if you can hold it actually horizontal—and note the angle that the sloping lines make with the straight edge of the pencil. Or perhaps hold the pencil out and move it between your eye and the model as if tracing the direction of the line in the air. Getting the feeling of the line, this might be called. It will help in understanding the cast to make occasionally such invisible drawings in the air. It may look odd to a spectator to see you make mysterious gestures in space, but what of it ? The practice serves its purpose of giving you a better notion of the subject and making the pictorial rendering easier.