
Home > Directory of Drawing Lesson > Human Face > Drawing Children's Faces and Heads from Front View
Drawing Child's Face From the Front : How to Draw Kids's Heads From the Front View
|


[The above words are pictures of text, below is the actual text if you need to copy a paragraph or two]
THE HEAD FRONT VIEW
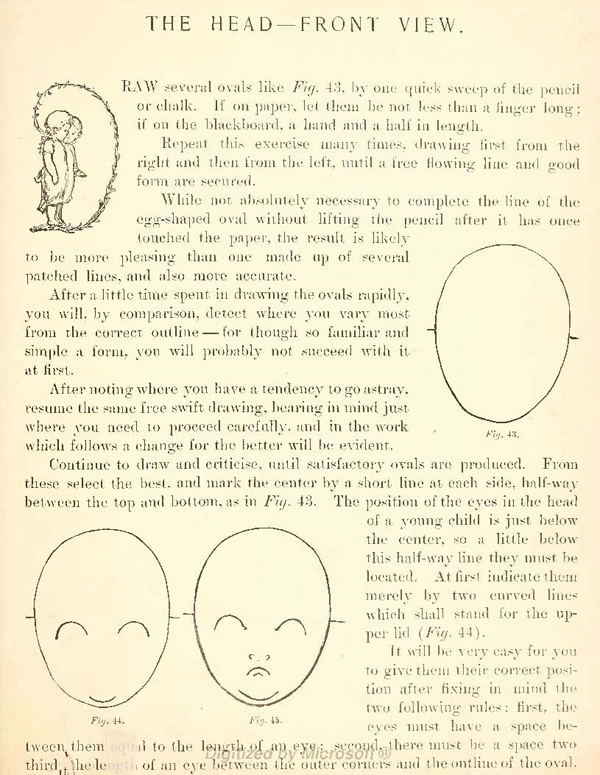
Draw several ovals like Fig. 43, by one quick sweep of the pencil or chalk. If on paper, let them be not less than a finger long; if on the blackboard, a. hand and a half in length.
Repeat this exercise many times, drawing first from the right and then from the left, until a free flowing line and good form are secured.
While not absolutely necessary to complete the line of the egg-shaped oval without lifting the pencil after it has once touched the paper, the result is likely to be more pleasing than one made up of several patched lines, and also more accurate.
After a little time spent in drawing the ovals rapidly, you will, by comparison, detect where you vary most from the correct outline — for though so familiar and simple a form, you will probably not succeed with it at first.
After noting where you have a tendency to go astray, resume the same free swift drawing, bearing in mind just where you need to proceed carefully, and in the work which follows a change for the better will be evident.
Continue to draw and criticize, until satisfactory ovals are produced. From these select the best, and mark the center by a short line at each side, half-way between the top and bottom, as in Fig. 43. The position of the eyes in the head of a young child is just below the center, so a little below this half-way line they must he located. At first indicate them merely by two curved lines which shall stand for the upper lid (Fig. 44).
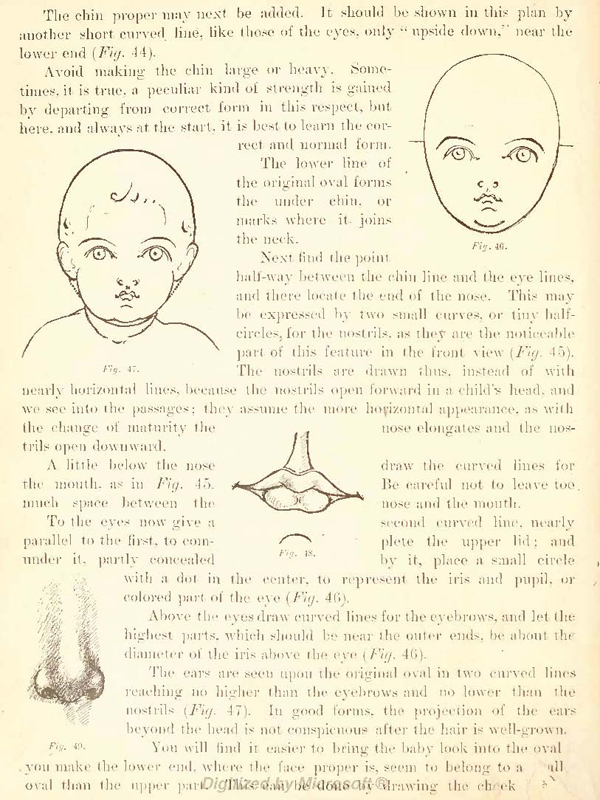
The chin proper may next be added. It should be shown in this plan by another short curved line, like those of the eyes. only " upside down," near the lower end (Fig. 44).
Avoid making the chin large or heavy. Sometimes. it. is true. a peculiar kind of strength is gained by departing, from correct form in this respect, but here, and always at the start., it is best to learn the correct. and normal form.
The lower line of the original oval forms the under chin. or marks where it joins the neck.
Next find the point half-way between the chin line and the eye lines, and there locate the end of the nose. This may be expressed by two small curves. or tiny half-circles, for the nostrils. as they are the noticeable part of this feature in the front view (17 and 4.5). Fig. 47. The nostrils are drawn thus. instead of with Fig. 46.nearly horizontal lines. because the nostrils open forward in a child's head. and we see into the pLissa,(they assume the more horizontal appearance. as with the change of maturity the nose elongates and the nostrils open downward. A little below the nose the mouth, as in Fig. 4
Above the eyes draw curved lines for the eyebrows. and let the highest parts. which should be near the outer ends. be about the diameter of the iris above the eye. The ears are seen upon the original oval in two curved lilies reaching no higher than the eyebrows and no lower than the nostrils (Fig, -17). in good forms, the projection of the ears beyond the head is not conspicuous after the hair is well-grown. Fig. 49. You will find it easier to bring the baby look into the oval you make the lower end.
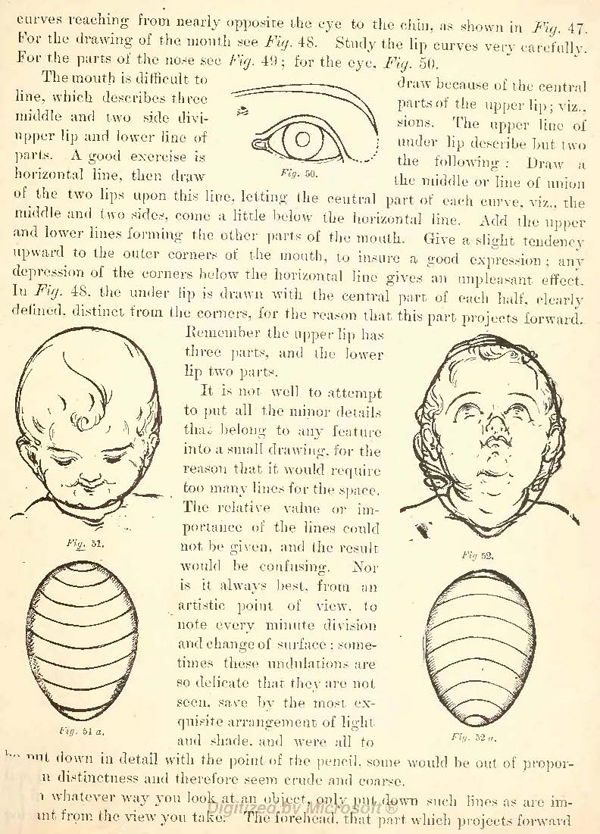
where the face proper is. seem to belong to a wall oval than the upper part. the chin curves reaching from nearly opposite the eye to the chin, as shown in Fig. 47. For the drawing of the, mouth see Fig. 48. Study the lip curves very carefully. For the parts of the nose see Fig. 49; for the eye, Pig. 50. The mouth is difficult to draw because of the central line, which describes three middle and two side upper lip and lower line of parts. A good exercise is horizontal line, then draw parts of the upper lip; visions. The upper line of under lip describe but two the following : Draw a the middle or line of union of the two lips upon this line, letting the central part of each curve, viz., the middle and two sides, come a little below the horizontal line. Add the upper and lower lines forming the other parts of the mouth. Give a slight tendency upward to the outer corners of the mouth, to insure a good expression ; any depression of the corners below the horizontal line gives an unpleasant effect. In Fig. 48, the under lip is drawn with the central part of each half, clearly defined, distinct from the corners, for the reason that this part projects forward. Remember the upper lip has three parts, and the lower lip two parts.
It is not well to attempt to put all the minor details that belong to any feature into a small drawing, for the reason that it would require too many lines for the space. The relative value or importance of the lines could not be given, and the result would be confusing. Nor is it always best, from an artistic point of view. to note every minute division and change of surface : sometimes these undulations are so delicate that they are not seen, save by the most exquisite arrangement of light and shade, and were all to -nut down in detail with the point of the pencil. some would be out of proportion. distinctness and therefore seem crude and coarse.
The eves are the only feature that can be enlarged without serious result, but even they must not be noticeable for size only.
When the head. in front view. is looking op or down, the lines of the features must be drawn to conform to the curve of the oval.
just as bands painted about an egg will curve up or down as it is turned toward or from you. Figs. 51 and 51 a, and 52 and 53 a will illustrate this principle.
While working. carry all the parts of the drawing along together : that is, do not finish one part before others are worked Upon.
Then add the finishing touches, while considering all the parts together — while regarding the parts as forming one complete whole.