
Home > Directory of Drawing Lesson > Drawing People > Human Proportions > Proportions of the Human Body adn Form
Proportions of the Human Figure and How to Draw People with Lines, Contour, Planes, and Shapes |
|


Contents of This Human Figure Article
Drawing Based on Rounded Forms
The Proportion of the Human Figure
Drawing Human Figures with Lines and Geometric Shapes
Drawing in Line.
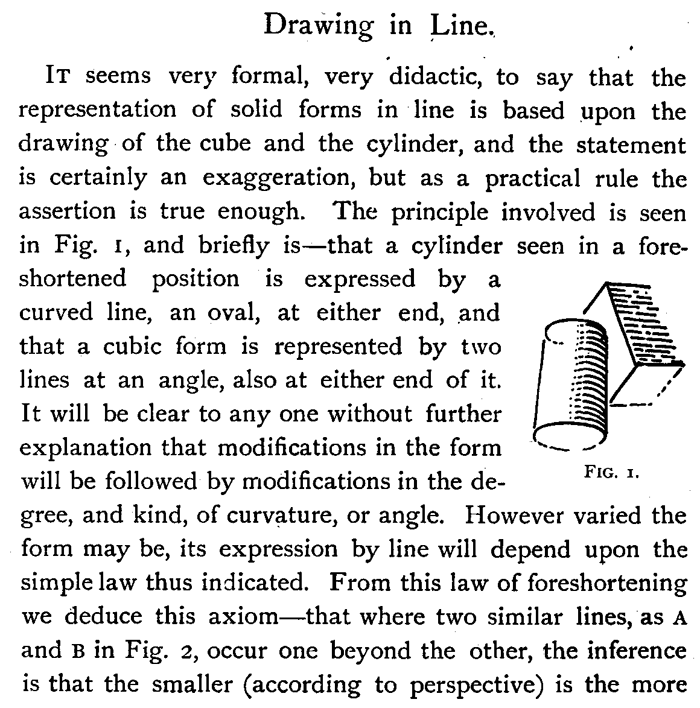
It seems very formal, very didactic, to say that the representation of solid forms in line is based upon the drawing of the cube and the cylinder, and the statement is certainly an exaggeration, but as a practical rule the assertion is true enough. The principle involved is seen in Fig. 1, and briefly is—that a cylinder seen in a foreshortened position is expressed by a curved line, an oval, at either end, and that a cubic form is represented by two lines at an angle, also at either end of it. It will be clear to any one without further explanation that modifications in the form will be followed by modifications in the degree, and kind, of curvature, or angle. However varied the form may be, its expression by line will depend upon the simple law thus indicated. From this law of foreshortening we deduce this axiom—that where two similar lines, as A and B in Fig. 2, occur one beyond the other, the inference is that the smaller (according to perspective) is the more remote, and that the surface from A to B recedes. Such a
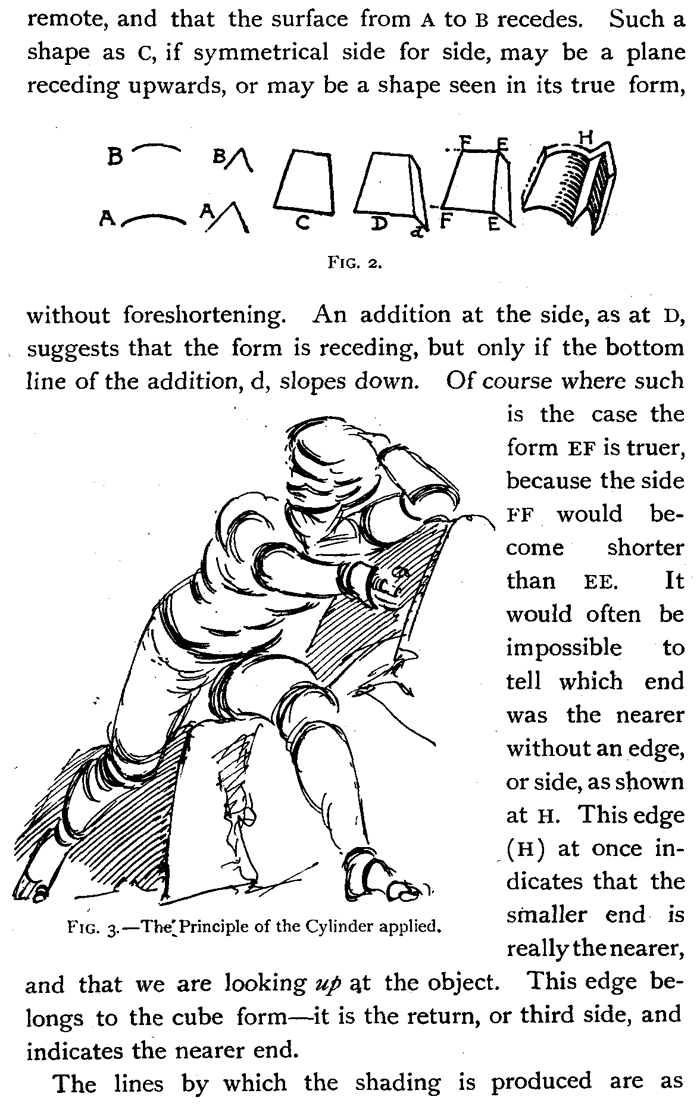
shape as c, if symmetrical side for side, may be a plane receding upwards, or may be a shape seen in its true form, without foreshortening. An addition at the side, as at D, suggests that the form is receding, but only if the bottom line of the addition, d, slopes down. Of course where such is the case the form EF is truer, because the side FF would become shorter than EE. It would often be impossible to tell which end was the nearer without an edge, or side, as shown at H. This edge at once indicates that the smaller end is really the nearer, and that we are looking up a the object. This edge belongs to the cube form—it is the return, or third side, and indicates the nearer end.
The lines by which the shading is produced are as important as the end-lines themselves ; indeed, in line-drawing the shading-lines are often the chief exponents of the form. The application of the principle of the cylinder is seen in Fig. 3. Each part of the body recedes in a certain direction. The near and far ends of each part come, therefore, under the principle, that is, they curve backward, or away from the spectator. The drawing here given is marred by being made to show the application of the rule. Its curves are too regularly circular, and the near and far ends of each part are too equal.
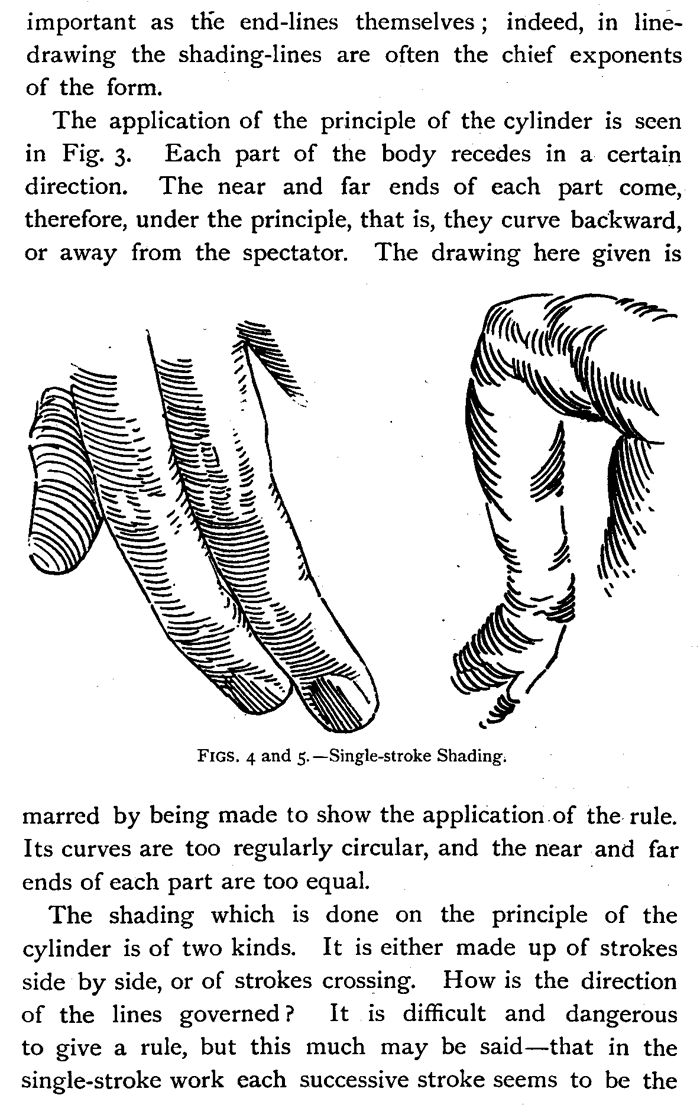
The shading which is done on the principle of the cylinder is of two kinds. It is either made up of strokes side by side, or of strokes crossing. How is the direction of the lines governed ? It is difficult and dangerous to give a rule, but this much may be said—that in the single-stroke work each successive stroke seems to be the edge of a new section parallel to the last, and all at right-angles to the direction of the limb. This is illustrated in Fig. 4, where the curvature of the lines varies according to the form to be expressed. It will readily be believed that this method is a dangerous one—a slight misdirection of line, or of curvature, produces false form. But dangers such as these carry with them compensating qualities—directness, and the evidence of good workmanship when things go well. What has one to guard against ? I fancy Albert Diirer would have said—making the lines too straight.
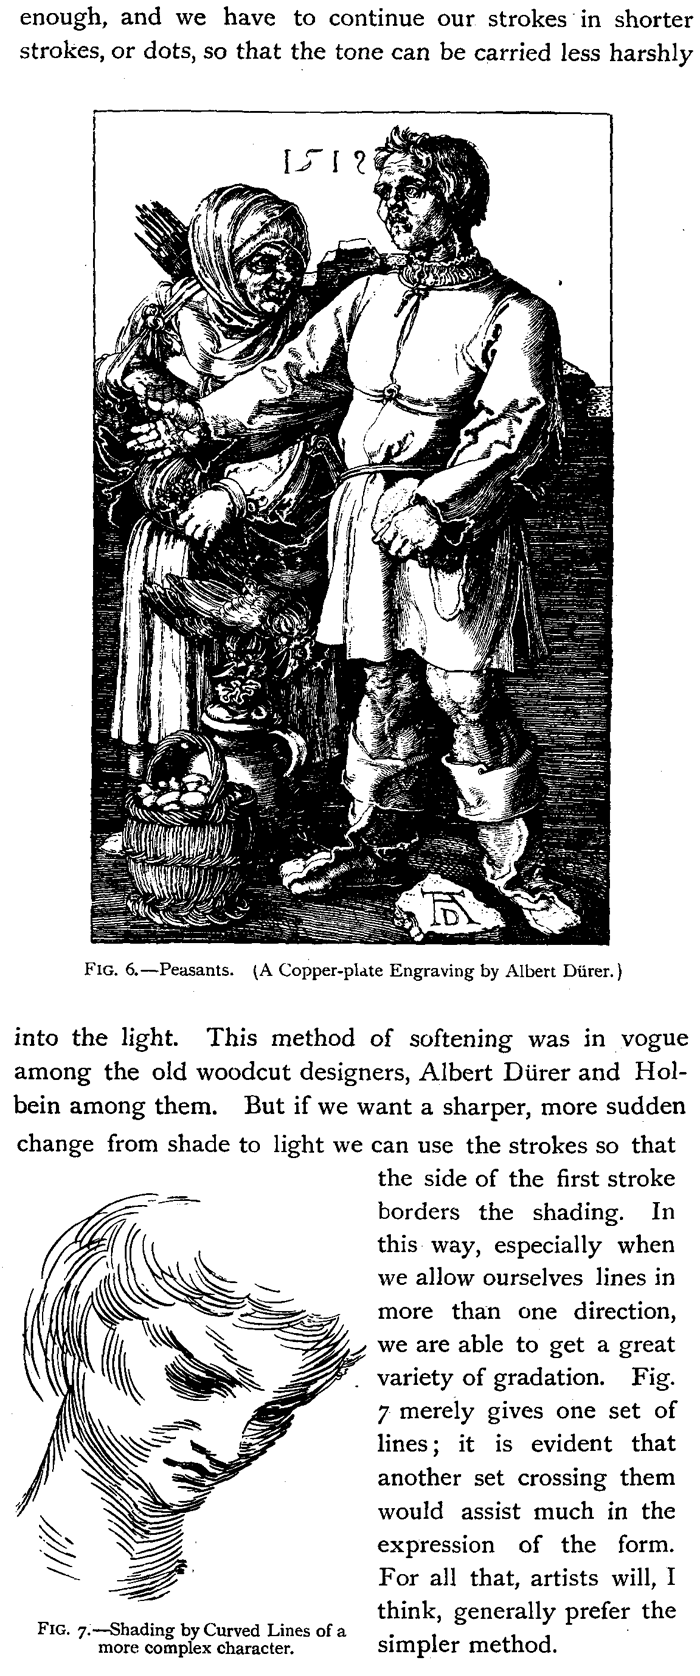
If the reader will examine carefully the lines on the engraving by Diirer reproduced (Fig. 6), more particularly in the legs, he will see that the lines are well curved. This curliness of the lines is characteristic of Dtirer's work, and indeed of the work of his time, and its effect is to over-model, rather than under-model, the form. Such curly shading is seen over and over again in that work, so that one is tempted to say that they preferred not to make the curve the true curve as produced by the section.
The shading by curved lines, of which we have been treating, is not the only kind. There is the cross-hatched variety. I suppose nothing could seem more merely pedantic, more superfluous than to give any instructions as to the direction the curves should take. For it seems so evident that the directions are chosen by each individual artist differently, as suits his style, his hand, and his knowledge. We may say this, however, that cross-hatching owes its origin to the fact that sometimes we want an edge of shade against light which is sharp in character, sometimes an edge which is soft. Now the little strokes, more or less parallel, terminate against the light with a comb-like edge. This is the soft edge. Sometimes it is not soft
enough, and we have to continue our strokes in shorter
strokes, or dots, so that the tone can be carried less harshly into the light. This method of softening was in vogue among the old woodcut designers, Albert Diirer and Holbein among them. But if we want a sharper, more sudden
change from shade to light we can use the strokes so that the side of the first stroke borders the shading. In this way, especially when we allow ourselves lines in more than one direction, we are able to get a great variety of gradation. Fig. 7 merely gives one set of lines ; it is evident that another set crossing them would assist much in the expression of the form. For all that, artists will, I think, generally prefer the simpler method.
Drawing Human Figure by Drawing Planes
Drawing by Planes.
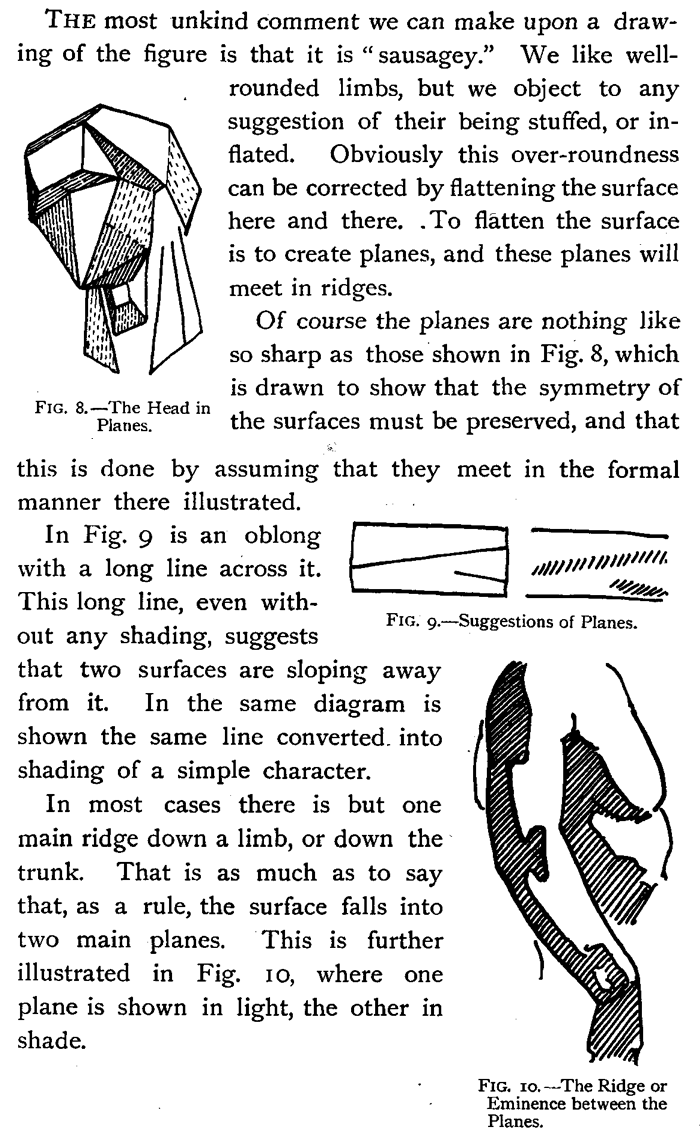
The most unkind comment we can make upon a drawing of the figure is that it is " sausagey." We like well-rounded limbs, but we object to any suggestion of their being stuffed, or inflated. Obviously this over-roundness can be corrected by flattening the surface here and there. .To flatten the surface is to create planes, and these planes will meet in ridges. Of course the planes are nothing like so sharp as those shown in Fig. 8, which is drawn to show that the symmetry of the surfaces must be preserved, and that this is done by assuming that they meet in the formal manner there illustrated.
In Fig. 9 is an oblong with a long line across it. This long line, even without any shading, suggests that two surfaces are sloping away from it. In the same diagram is shown the same line converted. into shading of a simple character. In most cases there is but one main ridge down a limb, or down the trunk. That is as much as to say that, as a rule, the surface falls into two main planes. This is further illustrated in Fig. 10, where one plane is shown in light, the other in shade.
Drawing Human Figures by Contour Drawing

Drawing by Contour.
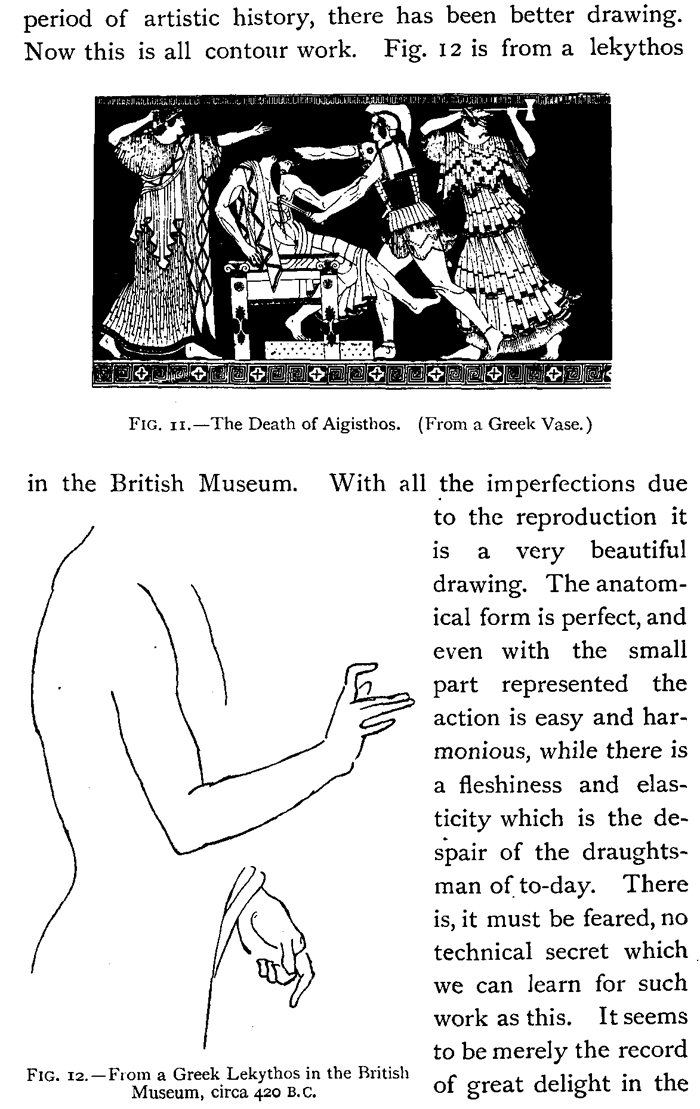
The oldest method of drawing is drawing by contour, or outline. In Fig. i 12 we have an illustration of a Greek vase-painting, or rather drawing, for there is no " painting " in these beautiful pieces of work. In these Greek vase-paintings the drawing is of the highest excellence, and should receive more attention than it does. The form is extremely well and sensitively rendered, and when we consider that with only an outline to work with there is much truth, bone, muscle, tendon; fleshiness, we may well doubt whether, at any subsequent period of artistic history, there has been better drawing.
Now this is all contour work. Fig. 12 is from a lekythos in the British Museum. With all the imperfections due to the reproduction it is a very beautiful drawing. The anatomical form is perfect, and even with the small part represented the action is easy and harmonious, while there is a fleshiness and elasticity which is the despair of the draughts man of to-day. There is, it must be feared, no technical secret which we can learn for such work as this. It seems to be merely the record of great delight in the human form, in its mechanism, and its harmonious properties. Like Nature herself, the draughtsmanship. seems to care nothing for the show of cleverness, or of knowledge, but to be solely the reflection of unalloyed delight in the subject portrayed.
No draughts man will, however, doubt that the Greek artist possessed great knowledge, and that because he possessed great knowledge he worked with the ease his drawings exhibit. No one will pretend that this drawing is drawn by a man who cares nothing for the form, and who tries to forget any fact about it he may happen to observe, or that he made this drawing from a model, posed for the purpose, and for evermore forgotten. There was then, as there always must be, a body of knowledge diffused through the artistic fraternity, kept fresh and vital by a zeal for their craft and an enthusiasm for nature.
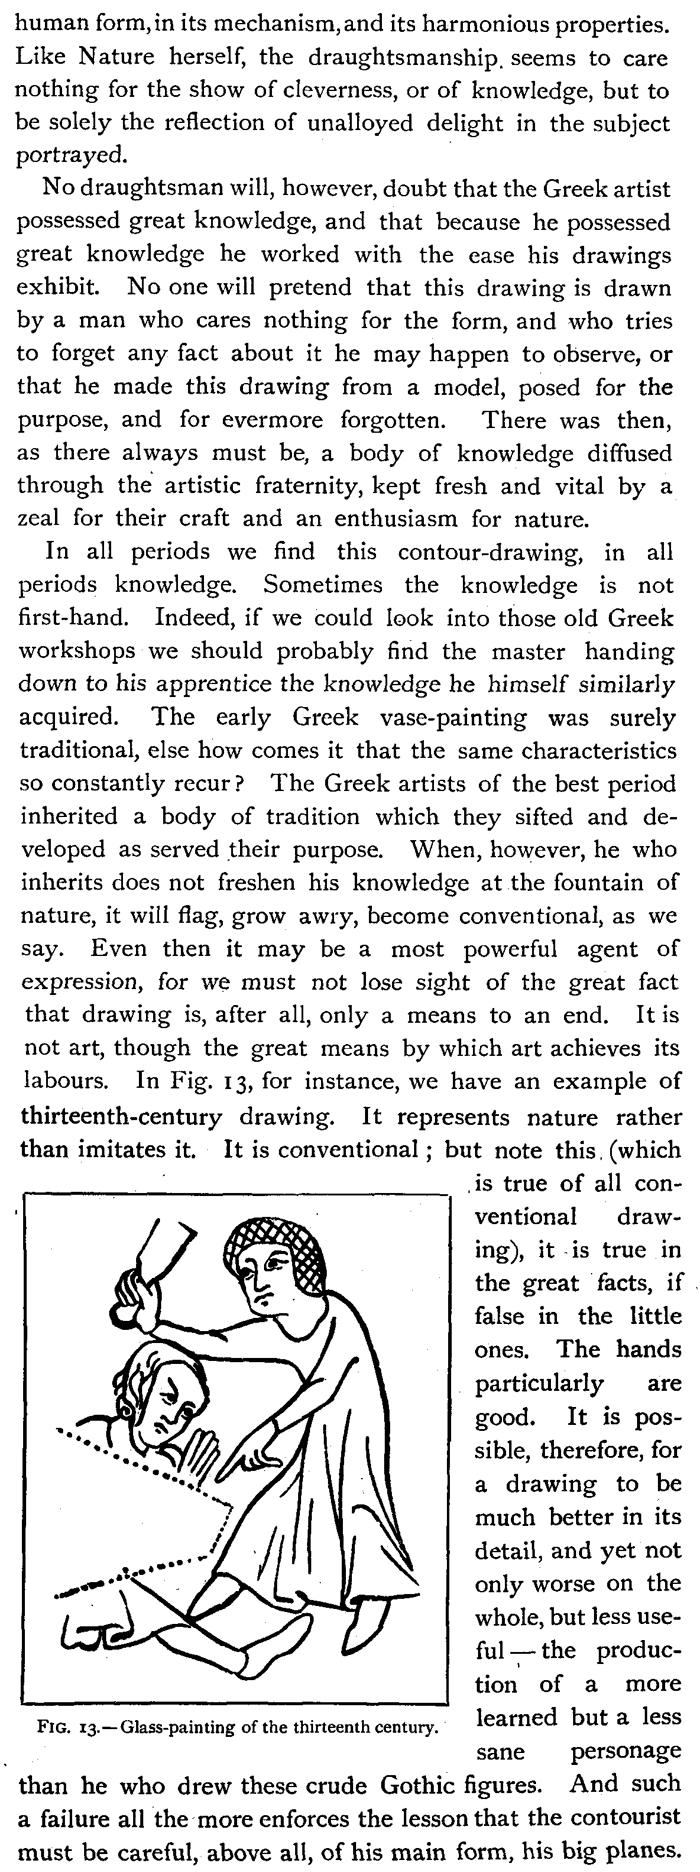
In all periods we find this contour-drawing, in all periods knowledge. Sometimes the knowledge is not first-hand. Indeed, if we could look into those old Greek workshops we should probably find the master handing down to his apprentice the knowledge he himself similarly acquired. The early Greek vase-painting was surely traditional, else how comes it that the same characteristics so constantly recur ? The Greek artists of the best period inherited a body of tradition which they sifted and developed as served their purpose. When, however, he who inherits does not freshen his knowledge at the fountain of nature, it will flag, grow awry, become conventional, as we say. Even then it may be a most powerful agent of expression, for we must not lose sight of the great fact that drawing is, after all, only a means to an end. It is not art, though the great means by which art achieves its labors. In Fig. 13, for instance, we have an example of thirteenth-century drawing. It represents nature rather than imitates it. It is conventional ; but note this, (which is true of all conventional drawing), it is true in the great facts, if false in the little ones. The hands particularly are good. It is possible, therefore, for a drawing to be much better in its detail, and yet not only worse on the whole, but less useful — the production of a more learned but a less sane personage than he who drew these crude Gothic figures. And such a failure all the more enforces the lesson that the contourist must be careful, above all, of his main form, his big planes.
Drawing Human Figure with Thick Lines

Drawing Human Figure with Thick Lines
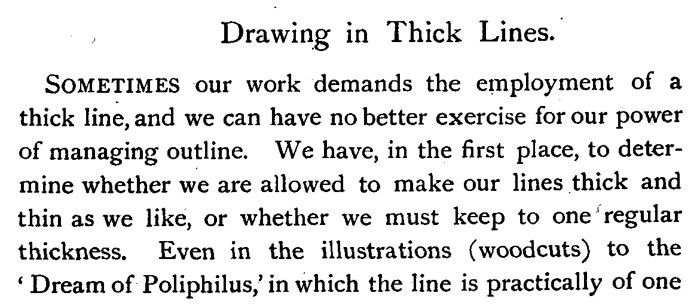
Sometimes our work demands the employment of a thick line, and we can have no better exercise for our power of managing outline. We have, in the first place, to determine whether we are allowed to make our lines thick and thin as we like, or whether we must keep to one' regular thickness. Even in the illustrations (woodcuts) to the ' Dream of Poliphilus,' in which the line is practically of one thickness throughout, there continually, occur slender lines, and all the lines are more or less jagged, as may be
expected in woodcuts. As a rule, in all such work the line round the figure is very bold. There is a reason for this, and the reason is that the thick line concentrates the broad light of the figure —hems it in. A form surrounded by a thick line is more readily regarded as modeled than one surrounded by a thin line. This is because the thick lines, being very evident, are easily associated with one another—will associate themselves, in fact—and the form between seems to be bumped up or modeled It is of course only when the outline is at all curved that this suggestion of modeling is produced. The indentations in the form no doubt suggest channels, or depressions, in the surface, but it would be of little service to us to enter upon a detailed inquiry into such a matter.
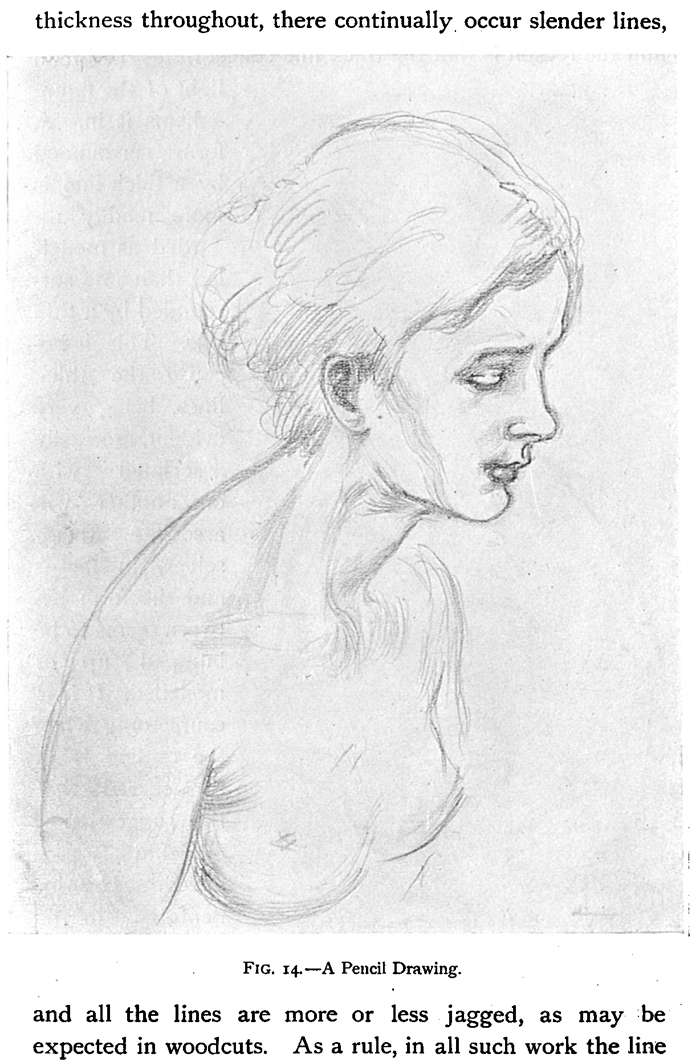
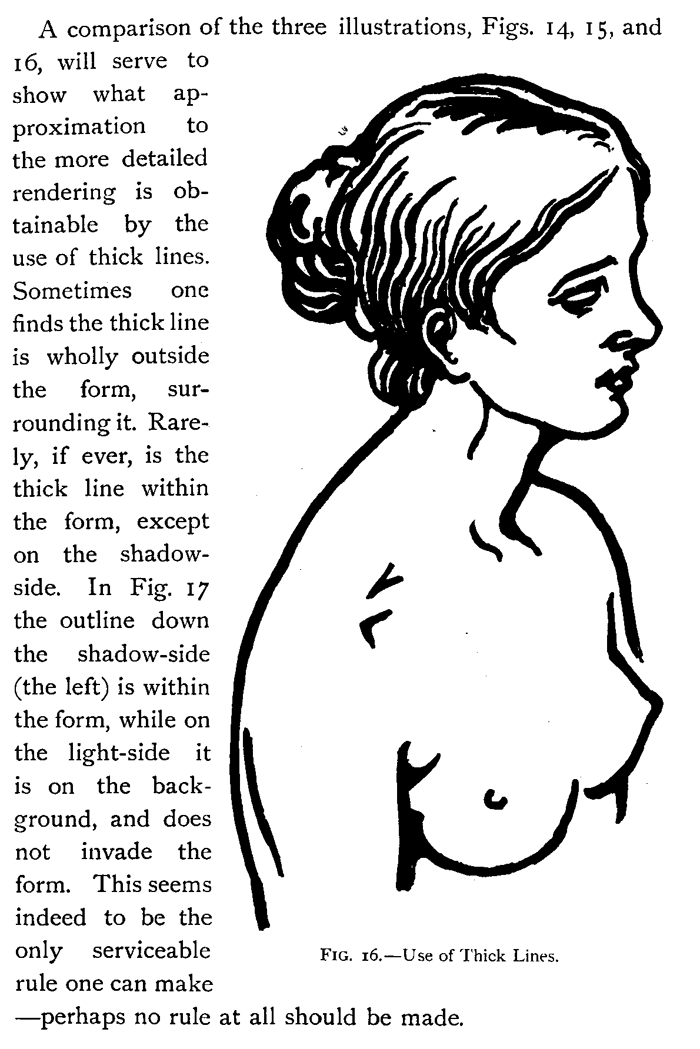
A comparison of the three illustrations, Figs. 14, 15, and i6, will serve to show what approximation to the more detailed rendering is obtainable by the use of thick lines. Sometimes one finds the thick line is wholly outside the form, surrounding it. Rarely, if ever, is the thick line within the form, except on the shadow side. In Fig. 7 the outline down the shadow-side (the left) is within the form, while on the light-side it is on the background, and does not invade the form. This seems indeed to be the only serviceable rule one can make —perhaps no rule at all should be made.
Drawing Figures Based Upon Rounded Forms
Drawing based upon Rounded Forms.
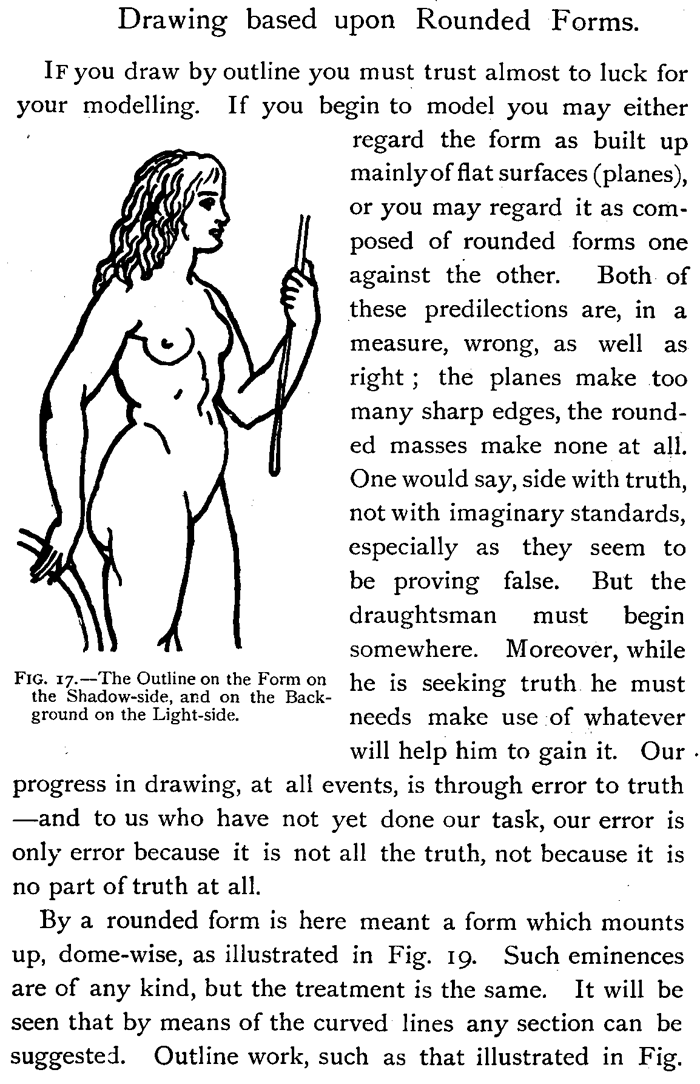
If you draw by outline you must trust almost to luck for your modeling If you begin to model you may either regard the form as built up mainly of flat surfaces (planes), or you may regard it as composed of rounded forms one against the other. Both of
these predilections are, in a measure, wrong, as well as right ; the planes make too many sharp edges, the rounded masses make none at all. One would say, side with truth, not with imaginary standards, especially as they seem to be proving false. But the
draughts man must begin somewhere. Moreover, while the Shadow-side, and on the Background on the Light-side. needs make use of whatever will help him to gain it. Our progress in drawing, at all events, is through error to truth —and to us who have not yet done our task, our error is only error because it is not all the truth, not because it is no part of truth at all.
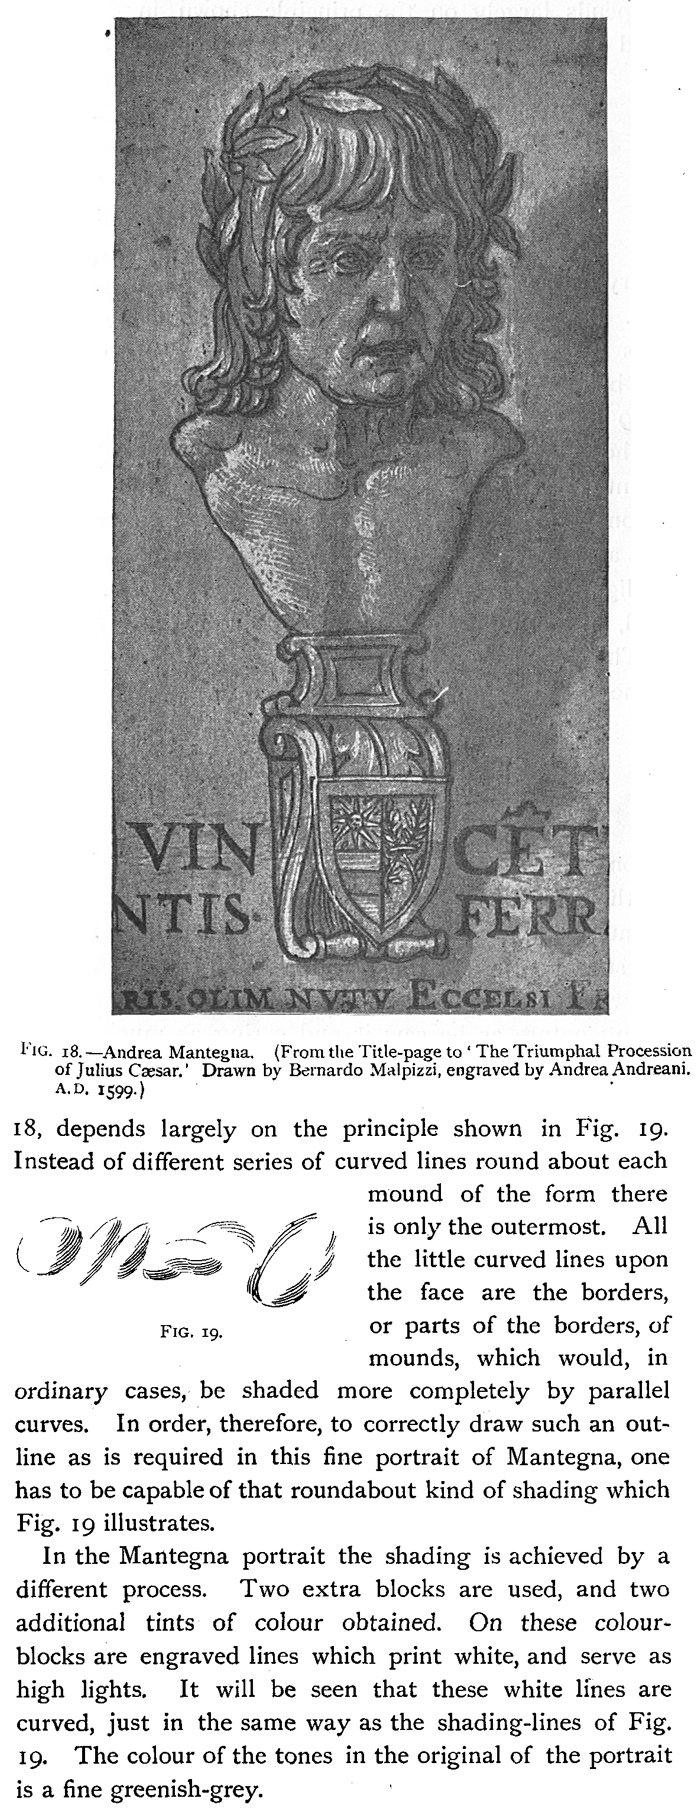
By a rounded form is here meant a form which mounts up, dome-wise, as illustrated in Fig. 19. Such eminences are of any kind, but the treatment is the same. It will be seen that by means of the curved lines any section can be suggested. Outline work, such as that illustrated in Fig. 18, depends largely on the principle shown in Fig. 19. Instead of different series of curved lines round about each mound of the form there is only the outermost. All the little curved lines upon the face are the borders, or parts of the borders, of mounds, which would, in ordinary cases, be shaded more completely by parallel curves. In order, therefore, to correctly draw such an outline as is required in this fine portrait of Mantegna, one has to be capable of that roundabout kind of shading which Fig. 19 illustrates.
In the Mantegna portrait the shading is achieved by a different process. Two extra blocks are used, and two additional tints of color obtained. On these color are engraved lines which print white, and serve as high lights. It will be seen that these white lines are curved, just in the same way as the shading-lines of Fig. 19. The color of the tones in the original of the portrait is a fine greenish-grey.
Drawing the Human Figure with Colors

Drawing with Color
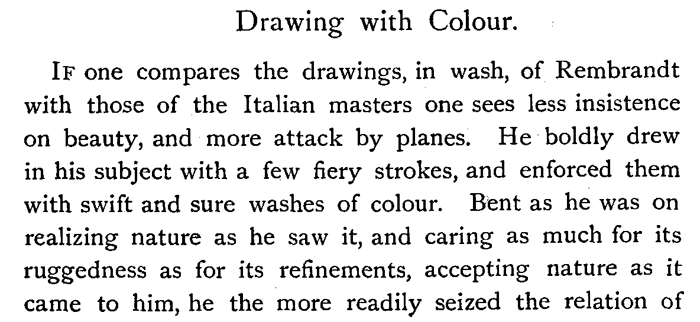
IF one compares the drawings, in wash, of Rembrandt with those of the Italian masters one sees less insistence on beauty, and more attack by planes. He boldly drew in his subject with a few fiery strokes, and enforced them with swift and sure washes of color Bent as he was on realizing nature as he saw it, and caring as much for its ruggedness as for its refinements, accepting nature as it came to him, he the more readily seized the relation of plane to plane, because it gave character, foreshortening, and light and shade.
It will be seen from Figs. 20 and 21 that wash is a method which gives a class of form not readily obtained by the less rugged stroke of the pen or pencil.
The introduction of tone suggests the ever-recurring problem of its limitations, or, rather, of the limitations it imposes on the draughts man The Impressionist principle is not merely perception of aspect, but expression by aspect, as distinguished from expression by known fact.
Thus it is a known fact that the fingers join on to the hand, the hand on to the wrist, the wrist to the arm, and so on. In an Italian work we should probably see this connection palpably expressed by the contour flowing evenly through all the parts, and the brush forms following the lines of construction. But in actual aspect there is no such connection. Each speck of tone and color is on its own account and independent of the rest except in that general effect, of which it is, as it were, unconscious.
It is obvious that the fall of the light cannot always result in an elucidation of the form. Indeed, the painter has to learn quite as much how to lose as to express form, for he has to express something besides. He has to represent the whole effect of his subject, and often the great masses of form demand a treatment which tends to the obliteration of the minor details. While the painter must attend to these matters, and will not be much of a painter if he does not, yet when he is drawing the figure, and particularly when he is studying it, he must adopt methods which lead to clearness and knowledge, for all study must be directed to tangible results. It is clear, therefore, that he who would master the figure must not adopt vague and obliterative methods when he is studying. The student, consequently, who omits that incessant investigation into form which all the great masters found so necessary, will some day find a lack of strength and a lack of interest in his work, and will find himself driven out of the fold of the figure-draughtsmen.
Hints on Drawing the Human Model in Figure Drawing
Some Hints on Drawing the Figure from the Model.
The drawing must be made in as long lines as possible, there must be no patching together of little bits. Indeed drawing must be done very much as writing, except that the whole arm should be moved and not the wrist and fingers only. The letter W is in writing as complicated a letter as we have, and yet he would be a sorry penman who wrote it in little strokes.
The general mass and shape of the figure must first be built up, so that the proportion and pose can be secured and tested. It is a great mistake to expect to begin at the top of the head and gradually work down to the feet, putting in all the details, and with proper proportion and pose. No error is greater than to regard the rough blocking of the figure as a waste of time. It is no doubt very nice to pass all down once, and have it done, and get to something else, but not unfrequently such
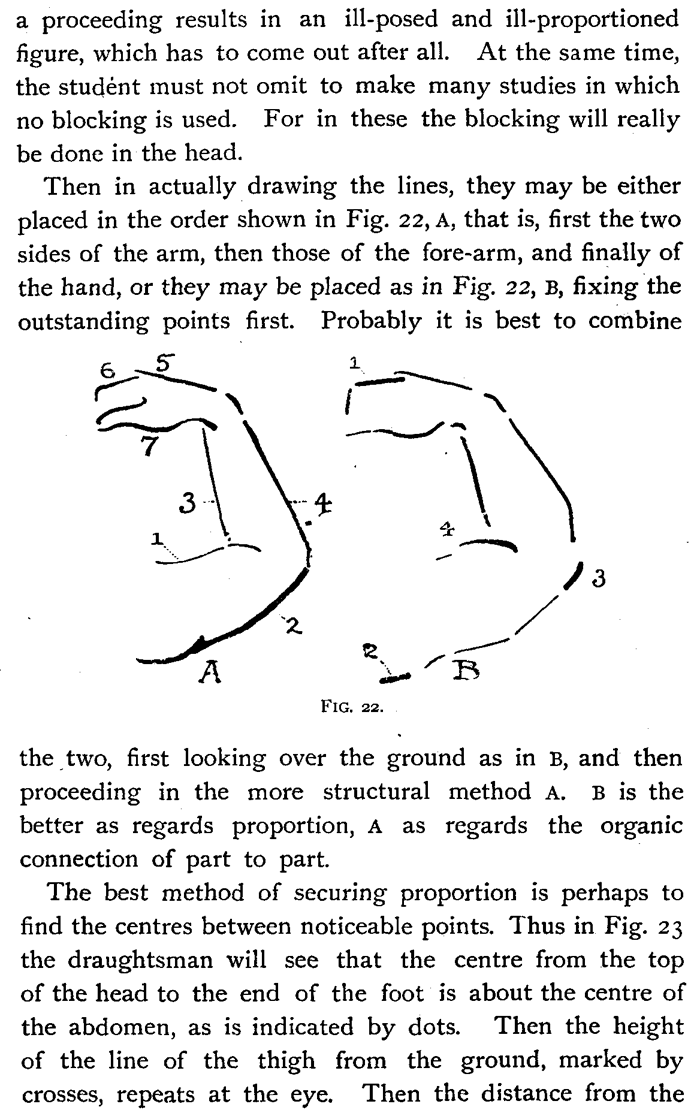
a proceeding results in an ill-posed and ill-proportioned figure, which has to come out after all. At the same time, the student must not omit to make many studies in which no blocking is used. For in these the blocking will really be done in the head.
Then in actually drawing the lines, they may be either placed in the order shown in Fig. 22, A, that is, first the two sides of the arm, then those of the fore-arm, and finally of the hand, or they may be placed as in Fig. 22, B, fixing the outstanding points first. Probably it is best to combine the two, first looking over the ground as in B, and then proceeding in the more structural method A. B is the better as regards proportion, A as regards the organic connection of part to part.
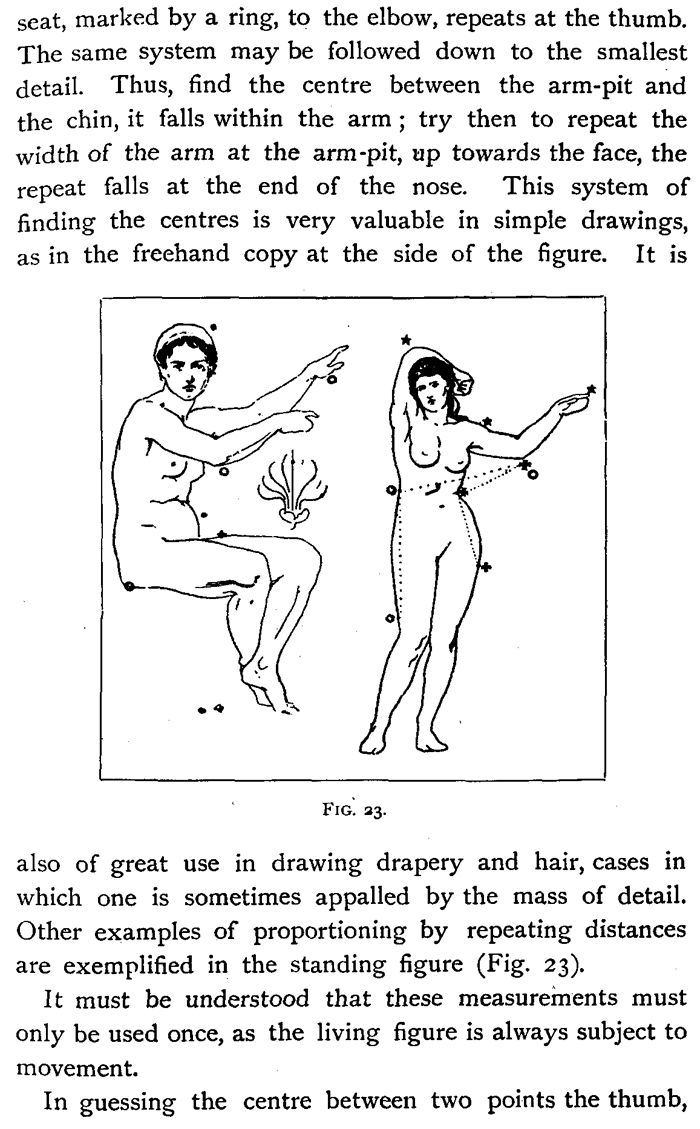
The best method of securing proportion is perhaps to find the centers between noticeable points. Thus in Fig. 23 the draughts man will see that the center from the top of the head to the end of the foot is about the center of the abdomen, as is indicated by dots. Then the height of the line of the thigh from the ground, marked by crosses, repeats at the eye. Then the distance from the
seat, marked by a ring, to the elbow, repeats at the thumb. The same system may be followed down to the smallest detail. Thus, find the center between the arm-pit and the chin, it falls within the arm ; try then to repeat the width of the arm at the arm-pit, up towards the face, the repeat falls at the end of the nose. This system of finding the centers is very valuable in simple drawings, as in the freehand copy at the side of the figure. It is
also of great use in drawing drapery and hair, cases in which one is sometimes appalled by the mass of detail. Other examples of proportioning by repeating distances are exemplified in the standing figure (Fig. 23).
It must be understood that these measurements must only be used once, as the living figure is always subject to movement.
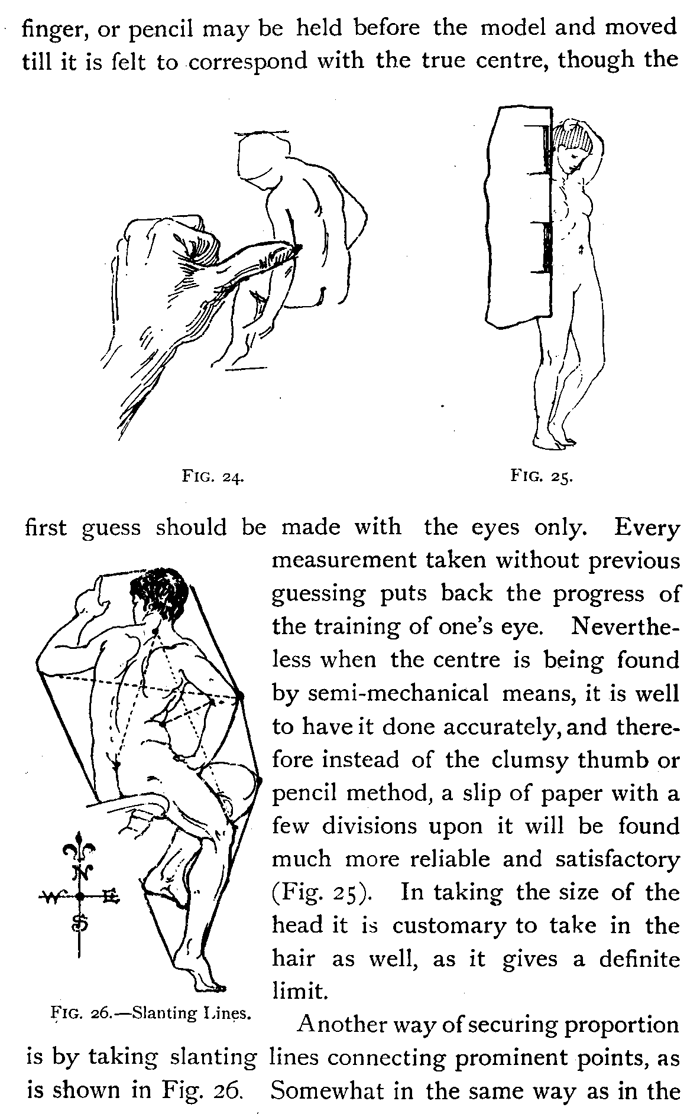
In guessing the center between two points the thumb, finger, or pencil may be held before the model and moved till it is felt to correspond with the true center, though the first guess should be made with the eyes only. Every measurement taken without previous guessing puts back the progress of the training of one's eye. Nevertheless when the center is being found by semi-mechanical means, it is well to have it done accurately, and therefore instead of the clumsy thumb or pencil method, a slip of paper with a few divisions upon it will be found much more reliable and satisfactory (Fig. 25). In taking the size of the head it is customary to take in the hair as well, as it gives a definite limit.
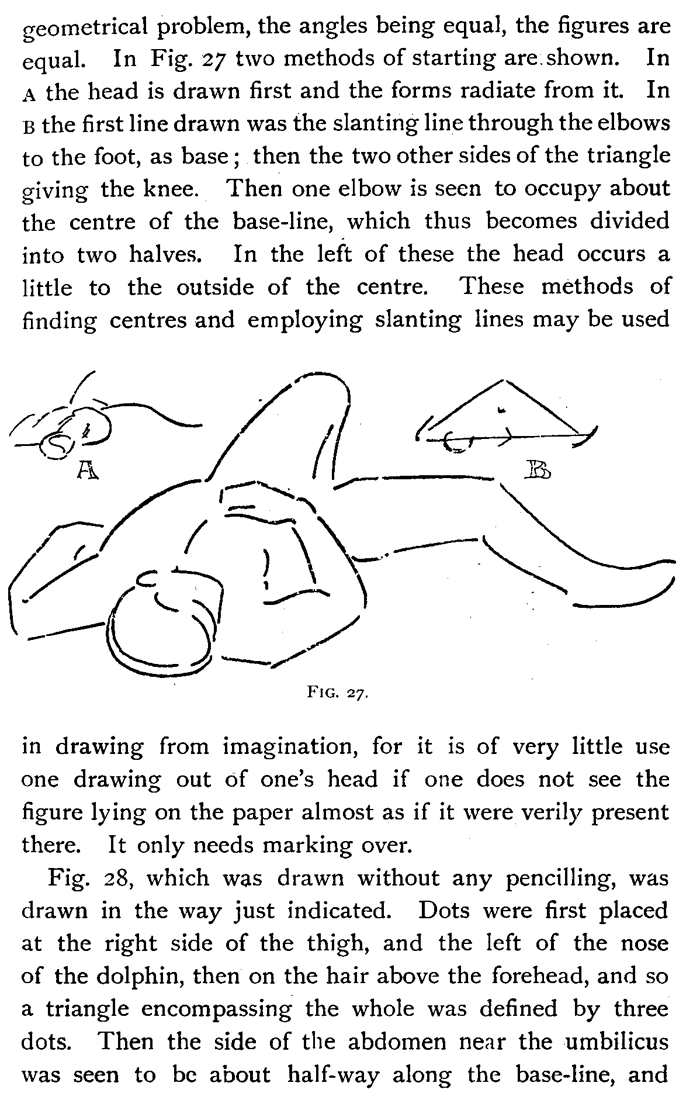
Another way of securing proportion is by taking slanting lines connecting prominent points, as is shown in Fig. 26. Somewhat in the same way as in the geometrical problem, the angles being equal, the figures are equal. In Fig. 27 two methods of starting are shown. In A the head is drawn first and the forms radiate from it. In B the first line drawn was the slanting line through the elbows to the foot, as base ; then the two other sides of the triangle giving the knee. Then one elbow is seen to occupy about the center of the base-line, which thus becomes divided into two halves. In the left of these the head occurs a little to the outside of the center These methods of finding centers and employing slanting lines may be used in drawing from imagination, for it is of very little use one drawing out of one's head if one does not see the figure lying on the paper almost as if it were verily present there. It only needs marking over.
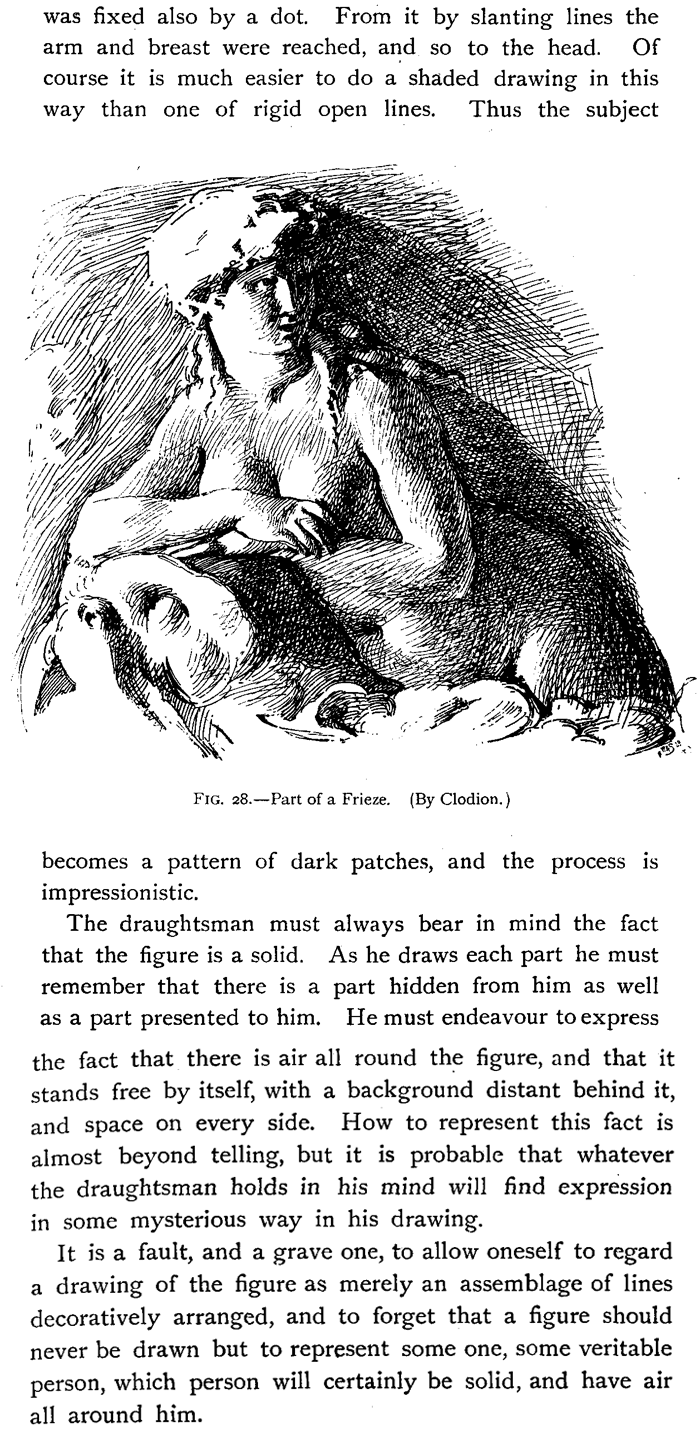
Fig. 28, which was drawn without any penciling, was drawn in the way just indicated. Dots were first placed at the right side of the thigh, and the left of the nose of the dolphin, then on the hair above the forehead, and so a triangle encompassing the whole was defined by three dots. Then the side of the abdomen near the umbilicus was seen to be about half-way along the base-line, and
was fixed also by a dot. From it by slanting lines the arm and breast were reached, and so to the head. Of course it is much easier to do a shaded drawing in this way than one of rigid open lines. Thus the subject
becomes a pattern of dark patches, and the process is impressionistic.
The draughts man must always bear in mind the fact that the figure is a solid. As he draws each part he must remember that there is a part hidden from him as well as a part presented to him. He must endeavor to express the fact that there is air all round the figure, and that it stands free by itself, with a background distant behind it, and space on every side. How to represent this fact is almost beyond telling, but it is probable that whatever the draughts man holds in his mind will find expression in some mysterious way in his drawing.
It is a fault, and a grave one, to allow oneself to regard a drawing of the figure as merely an assemblage of lines decoratively arranged, and to forget that a figure should never be drawn but to represent some one, some veritable person, which person will certainly be solid, and have air all around him.
The Proportion of the Human Figure

The Proportions of the Figure.
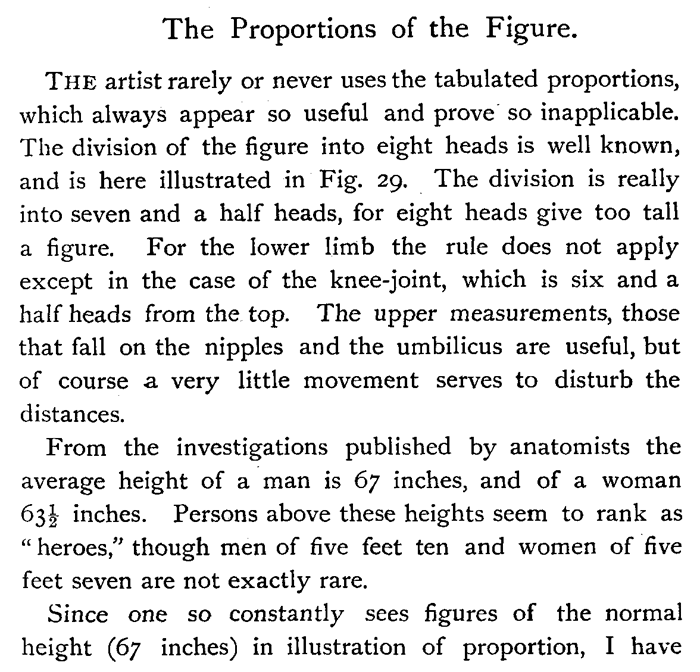
The artist rarely or never uses the tabulated proportions, which always appear so useful and prove so inapplicable. The division of the figure into eight heads is well known, and is here illustrated in Fig. 29. The division is really into seven and a half heads, for eight heads give too tall a figure. For the lower limb the rule does not apply except in the case of the knee-joint, which is six and a half heads from the top. The upper measurements, those that fall on the nipples and the umbilicus are useful, but of course a very little movement serves to disturb the distances.
From the investigations published by anatomists the average height of a man is 67 inches, and of a woman 63 1/2- inches. Persons above these heights seem to rank as " heroes," though men of five feet ten and women of five feet seven are not exactly rare.
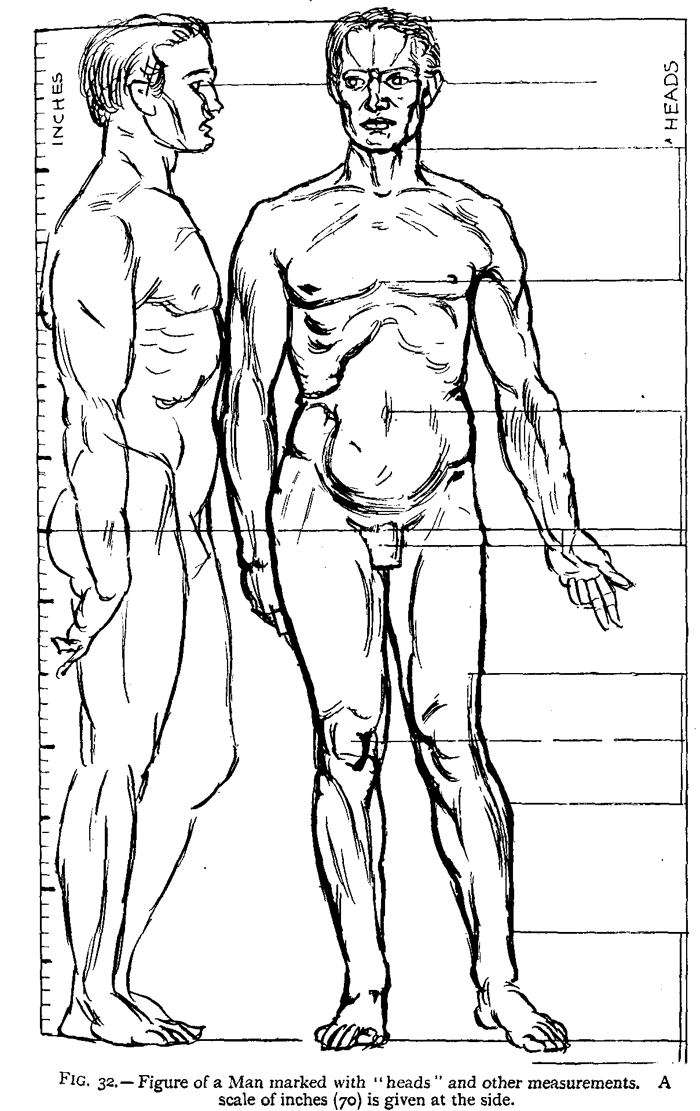
Since one so constantly sees figures of the normal height (67 inches) in illustration of proportion, I have
here drawn one of 70 inches, and I find that my guesswork figure corresponds fairly accurately with Schadow's 70-inch hero. Head 9", chin to pit of neck 3 1/2", calf 5", knee 4 1/2", waist 11 1/2", across external oblique12 1/2", across chest 11 1/2", middle of chest to outside of deltoid 9 1/2".
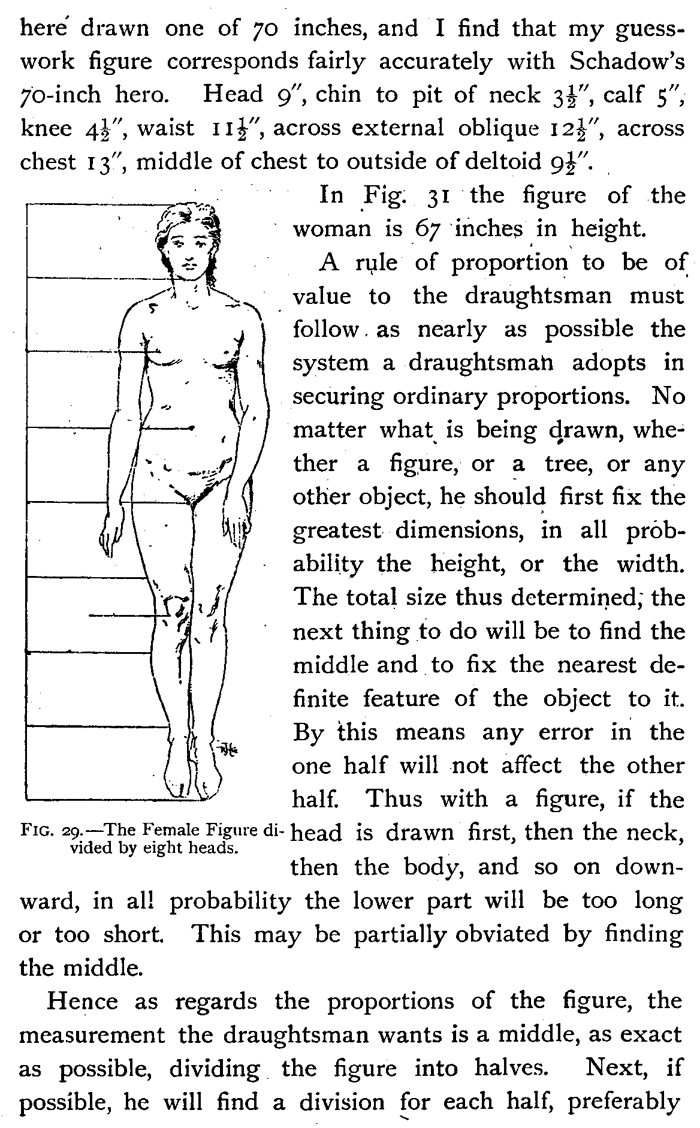
In Fig. 31 the figure of the woman is 67 inches in height.
A rule of proportion to be of value to the draughts man must follow as nearly as possible the system a draughts man adopts in securing ordinary proportions. No matter what, is being drawn, whether a figure, or a tree, or any other object, he should first fix the greatest dimensions, in all probability the height, or the width. The total size thus determined; the next thing to do will be to find the middle and to fix the nearest definite feature of the object to it. By this means any error in the one half will not affect the other half. Thus with a figure, if the then the body, and so on downward, in all probability the lower part will be too long or too short. This may be partially obviated by finding the middle.
Hence as regards the proportions of the figure, the measurement the draughts man wants is a middle, as exact as possible, dividing the figure into halves. Next, if possible, he will find a division for each half, preferably
at the middle of each, or at the thirds, as being the next easiest to fix rapidly.
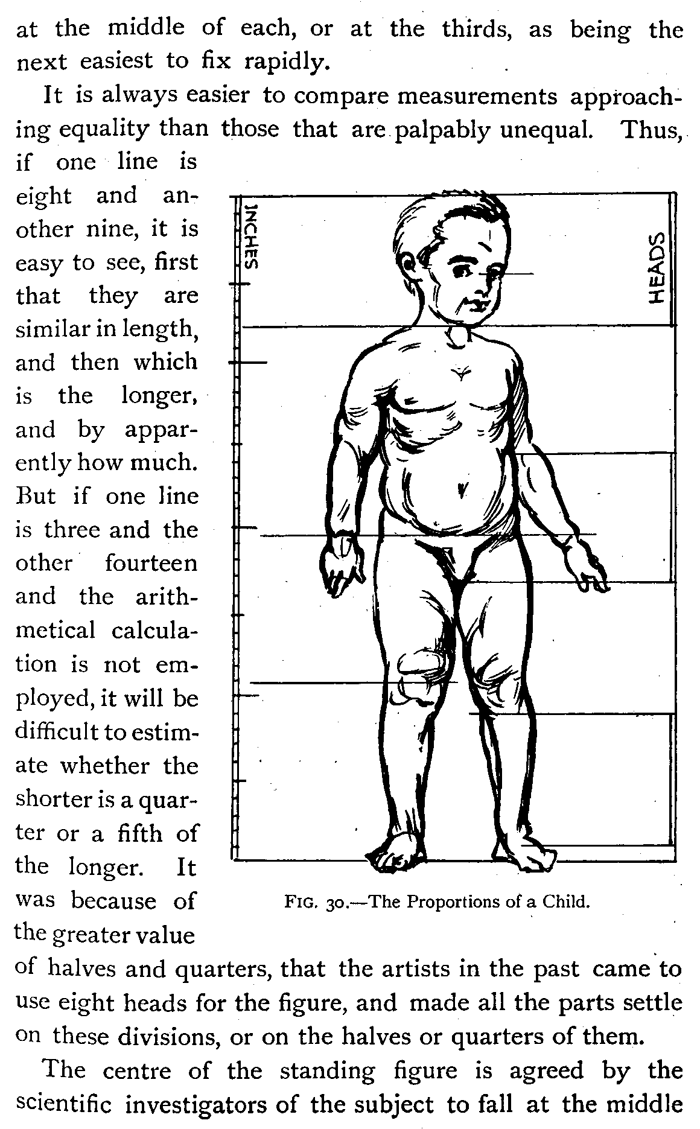
It is always easier to compare measurements approaching equality than those that are palpably unequal. if one line is eight and another nine, it is in easy to see, first ("A that they are similar in length, and then which is the longer, and by apparently how much. But if one line is three and the other fourteen and the arithmetical calculation is not employed, it will be difficult to estimate whether the shorter is a quarter or a fifth of the longer. It was because of the greater value of halves and quarters, that the artists in the past came to use eight heads for the figure, and made all the parts settle on these divisions, or on the halves or quarters of them.
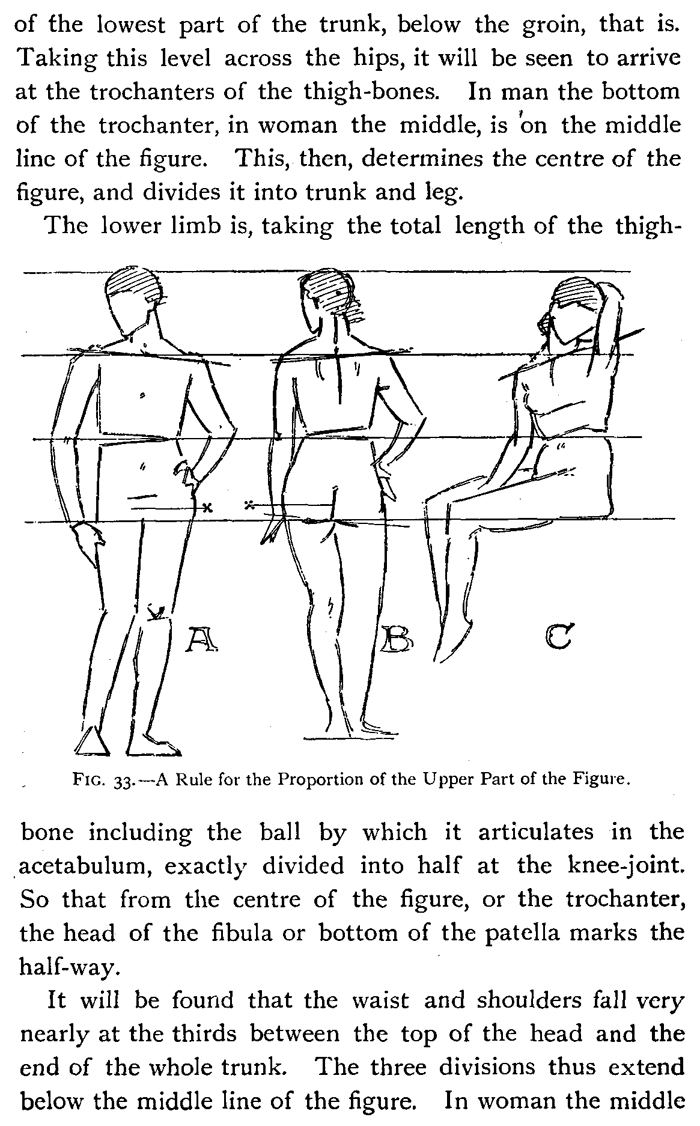
The center of the standing figure is agreed by the scientific investigators of the subject to fall at the middle of the lowest part of the trunk, below the groin, that is. Taking this level across the hips, it will be seen to arrive at the trochanters of the thigh-bones. In man the bottom of the trochanter, in woman the middle, is on the middle line of the figure. This, then, determines the center of the figure, and divides it into trunk and leg.
The lower limb is, taking the total length of the thigh bone including the ball by which it articulates in the acetabulum, exactly divided into half at the knee-joint. So that from the center of the figure, or the trochanter, the head of the fibula or bottom of the patella marks the half-way.
It will be found that the waist and shoulders fall very nearly at the thirds between the top of the head and the end of the whole trunk. The three divisions thus extend below the middle line of the figure. In woman the middle space is rather smaller than the other two ; it must be diminished by lowering the line of the shoulders, and raising the line of the waist. In man the line of the waist should be lowered. These alterations we easily remember because the thorax is smaller in woman, and relatively large in man. The rule applies in the back view as well as in the front view, and also in the seated figure.
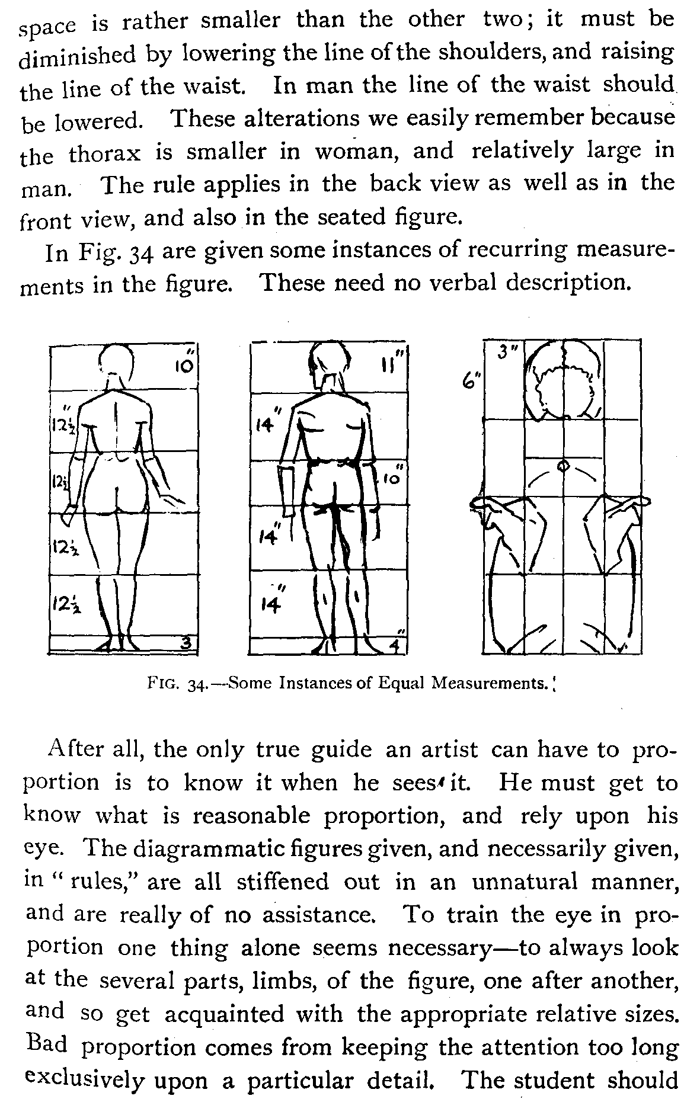
In Fig. 34 are given some instances of recurring measurements in the figure. These need no verbal description. After all, the only true guide an artist can have to proportion is to know it when he sees it. He must get to know what is reasonable proportion, and rely upon his eye. The diagrammatic figures given, and necessarily given, in " rules," are all stiffened out in an unnatural manner, and are really of no assistance. To train the eye in proportion one thing alone seems necessary—to always look at the several parts, limbs, of the figure, one after another, and so get acquainted with the appropriate relative sizes. Bad proportion comes from keeping the attention too long exclusively upon a particular detail. The student should train himself by drawing, detached from one another, several parts of the same body—a thigh, then an ear, then a foot, then the trunk, and so on.
It is in the width of the shoulders and the hips that the figure of a woman differs from that of a man, so far as casual observation is concerned, but an even more important difference is to be found in the length of the limbs. A man's limbs are longer than a woman's, as if they were more developed, for the hands and feet are larger and more serviceable. By observing the position of the wrist in relation to the middle of the height, we see at once the comparative shortness of the arm in woman—a shortness even more pronounced in the child.
The proportion of the different parts are dealt with in their proper places.
![]()