Home > Directory of Drawing Lessons >How to Draw People > Eyes > How to Draw Eyes and Facial Expressions of the Eyes
DRAWING SHAPES OF EYES & THEIR EXPRESSIONS LESSON : How to Draw Eyes and How to Draw Facial Expressions and Emotions of the Eyes
|


|
Drawing The Form of the Eye : How to Draw Facial Expressions Within EyesBecause of its complicated structure, the beginner finds the eye the most difficult part of the anatomy to draw correctly. However, by following a few simple rules you will find it little more troublesome than other features of the human anatomy. To begin with, the eye, as you see it for the purpose of a drawing, is, in most cases, almond shaped. Thus you make an almond-shaped outline. Therein you must place the cornea, the iris and the pupil.
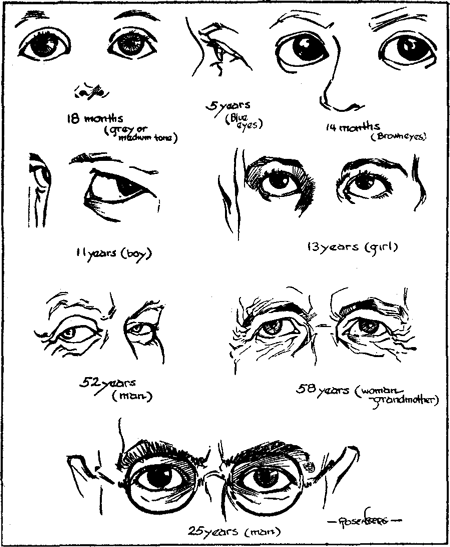
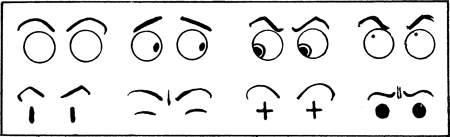
The eyes, and the change which they undergo from babyhood to mature age. The eyelids are more drooping in some people than others, and also have longer lashes. The upper eyelid casts a shadow, and therefore is usually drawn with a dark line. The lower eyelid catches the light, and is thus shown by a highlight left there for the purpose of suggesting the thickness of the lower lid. Thus, quite often a drawing showing no lower lid line is successfully made. Normally, however, a line should be suggested there, also a few hairs, cropping out towards the outside half of the lid. Often the two eyes differ in the same person, although in the greater number of cases the eyes are the same. In drawing the details of the eyes, such as the direction of the lid lines, they should be carefully, correctly depicted, for thereupon depends the likeness, although suggestion of color does, of course, enter into the matter. First draw a line across the paper, next drawing an almond shape, the far points centering on the horizontal line. Then place in the center a circle that will reach from the top to the bottom lid, or slightly larger. In the center you may place a large black spot, occupying half the circle. Thus you have a front view of the eye, a view made with an almond, a button, and a large period. For various other views, other than profile, you have but to show the same construction, but foreshortened, or placed in perspective. The baby has clear, large eyes, unencircled by wrinkles and crows' feet, as is the case with elderly people. At birth the eye is seemingly very large, and, in comparison with the body, it really is —since it does not change in size, being fully developed in this respect. In drawing glasses and spectacles, it is well to show a highlight on the rims and bridge. This adds a liveliness to the drawing, and artistically is correct. Never forget your high-light, for it adds life and interest to a drawing. THE DIRECTION OF VISIONThe young artist has particular difficulty in making the eyes in his drawing gaze at the place desired. This difficulty can easily be overcome by remembering that the pupil should be moved to the point that peers out in the direction desired. Should you desire to show your figure as looking more to the right, turn the pupil and iris to the right; if to the left, move them more in that direction; to make the eyes seem to be gazing more in an upward direction, shift them accordingly, and reverse the position to cause them to look downward. Practise this lesson by making circles, or capital "O's," and placing almond or "0" shaped circles in where the eyei would be — one-third from the top. In these circles draw in the pupils or iris, in various positions. You will learn very quickly how to place the iris and pupil with reference to vision direction. To determine where the line of vision would run, imagine a line drawn from the eye to the spot desired. Then if there is a discrepancy, the iris can be changed until the correct angle is determined. DRAWING CARTOON EYESThis method' is especially applicable in drawing cartoon eyes. These should be simple and expressive. Where the cartoon character is broadly comic, a heavy dot alone is often used, with semi-circular lines to indicate the lids. Another form is to represent the pupil by means of a dot, encircled by a line to represent the iris, this enclosed in an almond-shaped space to represent the eye-lid. The eye thus formed can be made light or dark by following a simple plan —for a dark eye draw the iris circle heavy and the pupil fairly large — with plenty of white space, however, between the pupil and the iris. For a light eye, draw the iris circle thin, and the pupil either as a blank circle or grayed by means of tones ; or the iris circle can be made thin, the pupil small and black, and the space between the pupil and iris made white.
Another form for the cartoon eye is to draw a short black line vertically in the space left for the eye, or else horizontally, with the ends bent downward slightly if you wish to express a smile. Both these latter forms are sometimes combined in a cross — and even a cross for one eye and a horizontal line for the other, the latter thus represented as closed are sometimes used, especially in comic strips. |