
Home > Directory of Drawing Lessons > How to Improve Your Drawings > Measuring Methods > Drawing Lesson : Measuring with the Rule of Thumbs and a Pencil
USE A PENCIL AND THUMB TO MEASURE THE SIZE AND ANGLE OF THE OBJECT / SUBJECT THAT YOU ARE DRAWING
|


|
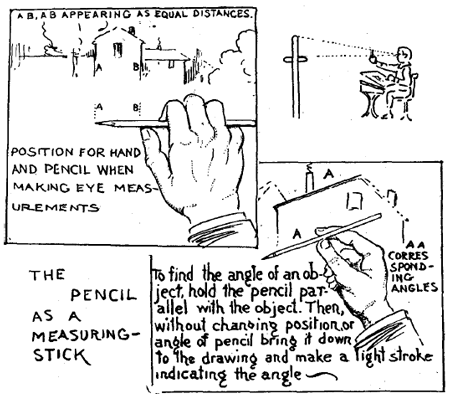
How to MeasureHow to Measure with the Rule of ThumbsWhen drawing from any object the proportion can be measured by holding up a pencil and measuring or gaging-on it with the thumb, and comparing the length of one point with another, as shown in the accompanying diagram, pictured below.
To insure accuracy the pencil must be held at arm's length and at right angles to the line of vision. Hold the pencil so that the end comes between the eye and some certain point on the object to be drawn ; for instance, in drawing a house, the height of the chimney might be taken as a standard of measurement. Hold the pencil upright, the top on a line with the chimney top. Now move the thumb downward until the end of the thumb comes between the eye and the bottom of the chimney. Then draw the chimney. ' Repeat the measuring" operation, finding where the length of the chimney corresponds to other parts of the building. That is to say, the pencil may be moved between the object and the eye and by using the chimney length as a standard, corresponding length and width thereof may be estimated. The Scale on Which Drawings Should Be MadeOne of the greatest faults of the beginner, and a very natural fault, is to draw on too small a scale. In copying from printed pictures, taken from periodicals of any kind, the beginner very naturally imitates the pictures as he sees them, not knowing that in ninety-nine cases out of a hundred the picture is the reduced reproduction of a drawing which was originally much larger than it appears in print. It is well to vary the size of the drawingA pupil working long on a very small scale would in time acquire a cramped style; on the other hand, a pupil working for an extended period at the blackboard would find it difficult to draw on a more minute scale. Drawing from ModelsMaterial for models is found in many of the familiar objects which surround us, such as balls, oranges, apples, potatoes, and small paper boxes. These should be drawn singly at first and in groups as the study progresses. Such objects present fairly dull surfaces and are therefore recommended. Objects having very glossy or shiny surfaces are to be avoided in all early practice. Models with dull surfaces present only light and shade in varying degree and cast simple shadows. Shiny surfaces receive and reflect complex lights and shades, hence the objection to their use. Avoiding ConfusionIn order not to confuse the eye of the pupil objects of a single color are best. The eye is centered then on form and outline rather than color. The simplest way to effect this when plaster casts are not available is to prepare a basin one-quarter full of whiting to which a small quantity of glue has been added and mixed with water until the consistency of cream is obtained. Then dip in this pigment articles to be used for models, such as a brick, a potato, a carrot, a turnip or even an old shoe. When dry these objects will serve temporarily nearly as well as clay or plaster models. Let these be drawn singly or in groups. For the earliest exercises more than one object at a time is not desirable. Placing the ModelUnless there is contrast in light or color it is difficult for the eye to discern the shape of an object. For example, place a piece of cardboard against the blackboard, its outline is easily distinguished. On the other hand, place the same piece of paper flat against another and larger piece of cardboard of the same color, and its form can scarcely be perceived. Keep this experiment in mind when drawing from any model. If the latter is dark, place it against a light background, if you wish the best effect. Reverse the process if the article used is light in color. Light and ShadeFor models for early work in light and shade, small objects with simple outlines should be selected. They should be free from polished surfaces. Select, instead, any piece of dull earthenware or wooden object; or, best of all, something made of plaster of paris. A small wooden or paper box is good; anything, in fact, that has a well defined outline with a fairly dull surface. Place the object selected in front of the pupil on a sheet of white paper and, if possible, in such a position that it receives the light from one direction only. If the object receives light from more than one direction, multiplicity of undefined shadows will cause a confusing effect. Shoes as ModelsShoes, the older the better, are excellent models. Their study leads to more natural appearance to the clothed human figure in subsequent drawings from memory or imagination. Feet are generally considered very difficult things to draw—meaning feet enclosed in the usual footwear of mankind. In drawing shoes, it is well to place them well below the eye, since that is the position in which they are generally seen. |
Privacy Policy ...... Contact Us