
Home > Directory of Drawing Lessons > How to Improve Your Drawings > Shadows > How to Shade Your Drawings by Adding Shadows
TECHNIQUES TO ADDING SHADOWS TO YOUR DRAWINGS : How to Shade with Crosshatching, Parallel Lines, Blending, Directions of Lines and Other Methods
|


|
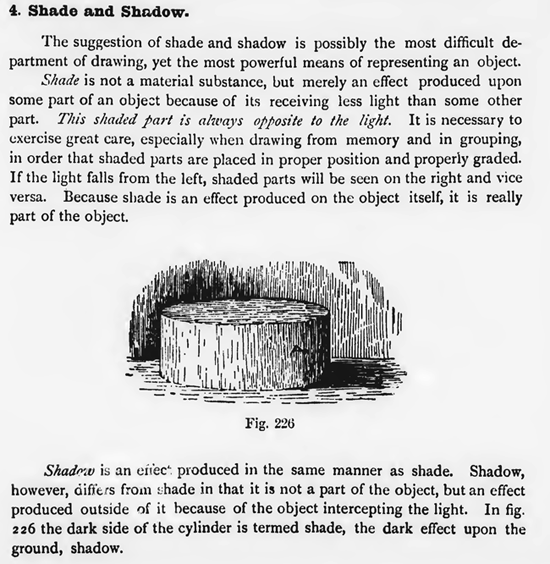
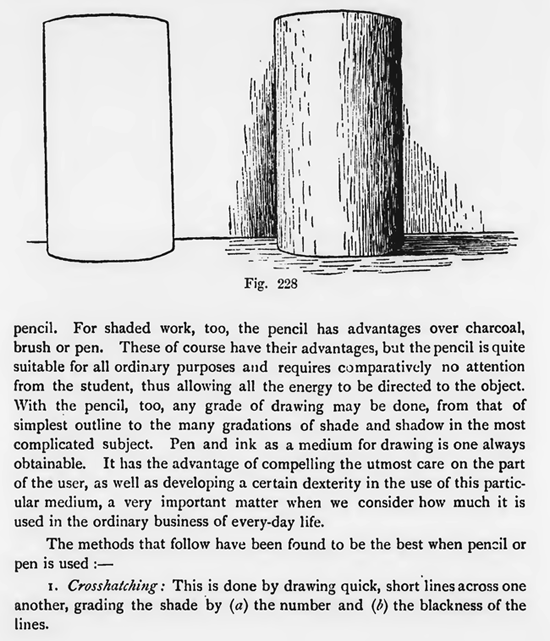
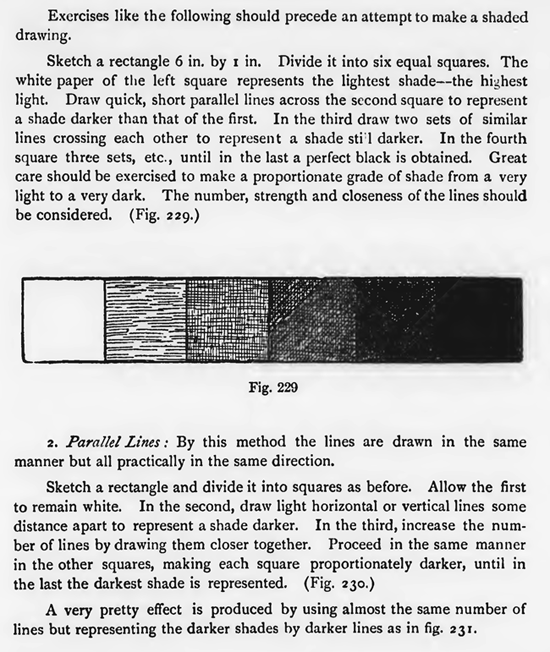
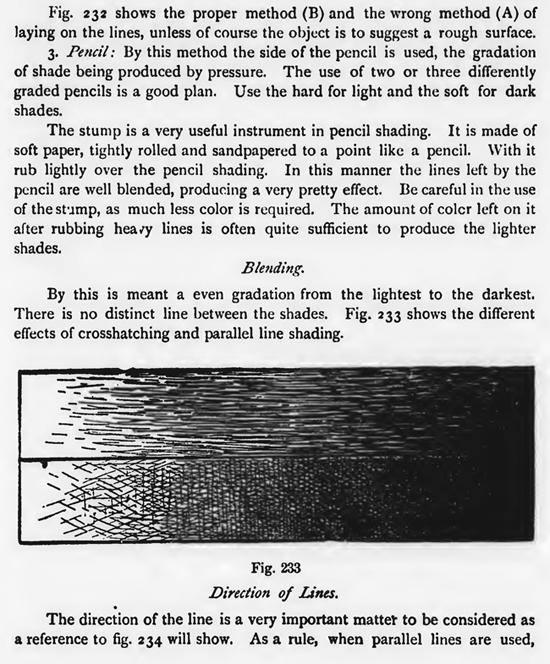
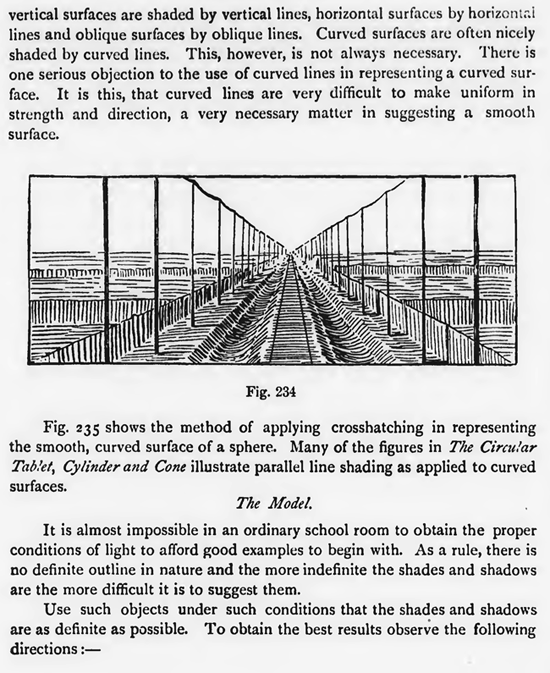
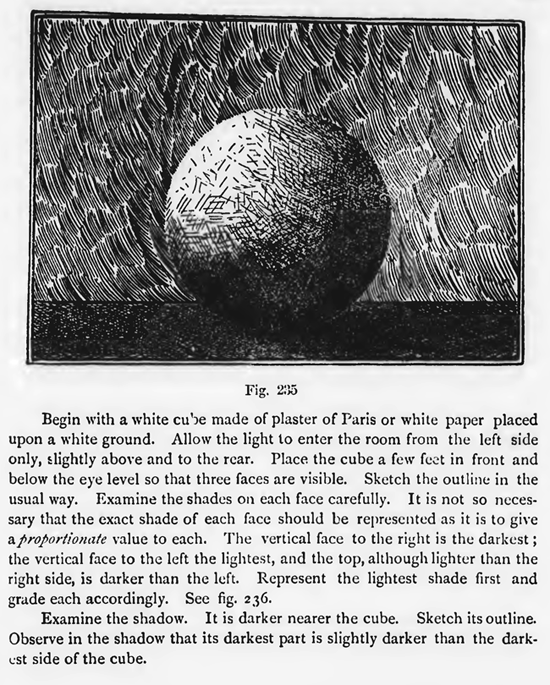
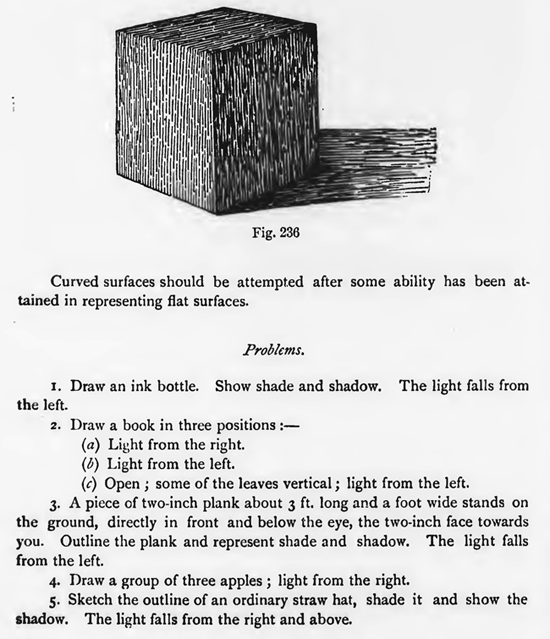
Shade and Shadow.The suggestion of shade and shadow is possibly the most difficult department of drawing, yet the most powerful means of representing an object. Shade is not a material substance, but merely an effect produced upon some part of an object because of its receiving less light than some other part. This shaded part is always oplosite to the light. It is necessary to exercise great care, especially when drawing from memory and in grouping, in order that shaded parts are placed in proper position and properly graded. If the light falls from the left, shaded parts will be seen on the right and vice versa. Because shade is an effect produced on the object itself, it is really part of the object. Shadow is an effect produced in the same manner as shade. Shadow, however, ciiffe,s from ;bade in that it is not a part of the object, but an effect produced outside of it because of the object intercepting the light. In fig. 226 the dark side of the cylinder is termed shade, the dark effect upon the ground, shadow. The application of shade and shadow will aid in making the drawing of an object stand out from the background and from surrounding objects. This effect is called relief and is well illustrated in fig. 226. It will aid, too, in giving prominence to any part of a picture. The house, for example, in fig. 227, attracts attention before the trees, the hills or the ship. Emphasis is given to the house. Compare the drawings of the cylinder in fig. 228. A much better idea of the roundness of the object is given by B than A, although ene is an exact tracing of the other. Shade and shadow here again aid in suggesting roundness or thickness. This is termed solidity. That medium which requires the least attention is the best for a beginner. For outline drawing and sketching there is nothing better than the pencil. For shaded work, too, the pencil has advantages over charcoal, brush or pen. These of course have their advantages, but the pencil is quite suitable for all ordinary purposes and requires comparatively no attention from the student, thus allowing all the energy to be directed to the object. With the pencil, too, any grade of drawing may be done, from that of simplest outline to the many gradations of shade and shadow in the most complicated subject. Pen and ink as a medium for drawing is one always obtainable. It has the advantage of compelling the utmost care on the part of the user, as well as developing a certain dexterity in the use of this particular medium, a very important matter when we consider how much it is used in the ordinary business of every-day life. The methods that follow have been found to be the best when pencil or pen is used :-1. Crosshatching :This is done by drawing quick, short lines across one another, grading the shade by (a) the number and (b) the blackness of the lines. Exercises like the following should precede an attempt to make a shaded drawing. Sketch a rectangle 6 in. by i in. Divide it into six equal squares. The white paper of the left square represents the lightest shade—the highest light. Draw quick, short parallel lines across the second square to represent a shade darker than that of the first. In the third draw two sets of similar lines crossing each other to represent a shade sti 1 darker. In the fourth square three sets, etc., until in the last a perfect black is obtained. Great care should be exercised to make a proportionate grade of shade from a very light to a very dark. The number, strength and closeness of the lines should be considered. (Fig. 229.) 2. Parallel Lines :By this method the lines are drawn in the same manner but all practically in the same direction. Sketch a rectangle and divide it into squares as before. Allow the first to remain white. In the second, draw light horizontal or vertical lines some distance apart to represent a shade darker. In the third, increase the number of lines by drawing them closer together. Proceed in the same manner in the other squares, making each square proportionately darker, until in the last the darkest shade is represented. (Fig. 230.) A very pretty effect is produced by using almost the same number of lines but representing the darker shades by darker lines as in fig. 231. A combination of these is a better method than either. These methods are adapted to the use of pen or pencil, but more espe cially the pen. Even when the pencil is used, if the lines are drawn as in fig. 230 a richer shade is produced than by using the flat side. The white of the paper as seen through the lines gives a cleaner, clear-cut appearance. The method that is best to use is largely determined by the object represented. Fig. 232 shows the proper method (B) and the wrong method (A) of laying on the lines, unless of course the object is to suggest a rough surface. 3. Pencil:By this method the side of the pencil is used, the gradation of shade being produced by pressure. The use of two or three differently graded pencils is a good plan. Use the hard for light and the soft for dark shades. The stump is a very useful instrument in pencil shading. It is made of soft paper, tightly rolled and sandpapered to a point like a pencil. With it rub lightly over the pencil shading. In this manner the lines left by the pencil are well blended, producing a very pretty effect. Be careful in the use of the stump, as much less color is required. The amount of colcr left on it after rubbing heavy lines is often quite sufficient to produce the lighter shades. Blending.By this is meant a even gradation from the lightest to the darkest. There is no distinct line between the shades. Fig. 233 shows the different effects of crosshatching and parallel line shading. Direction of Lines.The direction of the line is a very important matter to be considered as a reference to fig. 234 will show. As a rule, when parallel lines are used, vertical surfaces are shaded by vertical lines, horizontal surfaces by horizontal lines and oblique surfaces by oblique lines. Curved surfaces are often nicely shaded by curved lines. This, however, is not always necessary. There is one serious objection to the use of curved lines in representing a curved surface. It is this, that curved lines are very difficult to make uniform in strength and direction, a very necessary matter in suggesting a smooth surface. Fig. 235 shows the method of applying crosshatching in representing the smooth, curved surface of a sphere. Many of the figures in The Circular Tablet, Cylinder and Cone illustrate parallel line shading as applied to curved surfaces. The Model.It is almost impossible in an ordinary school room to obtain the proper conditions of light to afford good examples to begin with. As a rule, there is no definite outline in nature and the more indefinite the shades and shadows are the more difficult it is to suggest them. Use such objects under such conditions that the shades and shadows are as definite as possible. To obtain the best results observe the following directions :— Begin with a white cube made of plaster of Paris or white paper placed upon a white ground. Allow the light to enter the room from the left side only, :lightly above and to the rear. Place the cube a few feet in front and below the eye level so that three faces are visible. Sketch the outline in the usual way. Examine the shades on each face carefully. It is not so necessary that the exact shade of each face should be represented as it is to give aproportionate value to each. The vertical face to the right is the darkest ; the vertical face to the left the lightest, and the top, although lighter than the right side, is darker than the left. Represent the lightest shade first and grade each accordingly. See fig. 236. Examine the shadow. It is darker nearer the cube. Sketch its outline. Observe in the shadow that its darkest part is slightly darker than the darkest side of the cube. Curved surfaces should be attempted after some ability has been attained in representing flat surfaces. Problems.1. Draw an ink bottle. Show shade and shadow. The light falls from the left. |


Privacy Policy ...... Contact Us