A pen-and-ink drawing is a work executed with a pen in black ink on pure white paper and intended, primarily, for reproduction by the ordinary line or zinc engraving. In the early days of photoengraving whenever a draftsman made a drawing for that process, he was strictly enjoined by the engraver to use nothing but smooth white cardboard, and not only to make the lines intensely black, but to be most particular as to what kind of a pen-line he made.
This was when the photochemical engraving process was in its infancy, but since then there have been so many improvements in the craft, and the engravers have become so expert, that almost any kind of a line can be reproduced by them very satisfactorily. So in, these days an illustrator need not trouble himself very much about the mechanical requirements of the process.
This does not mean, however, that the artist should disregard the rule in respect to the intense black ink and the use of a good quality of cardboard or paper. Kind and quality of line should be considered, too. And so before starting in to work, the student of pen-and-ink drawing will find it profitable to give some attention to the different sorts of pen lines and their distinctive qualities.
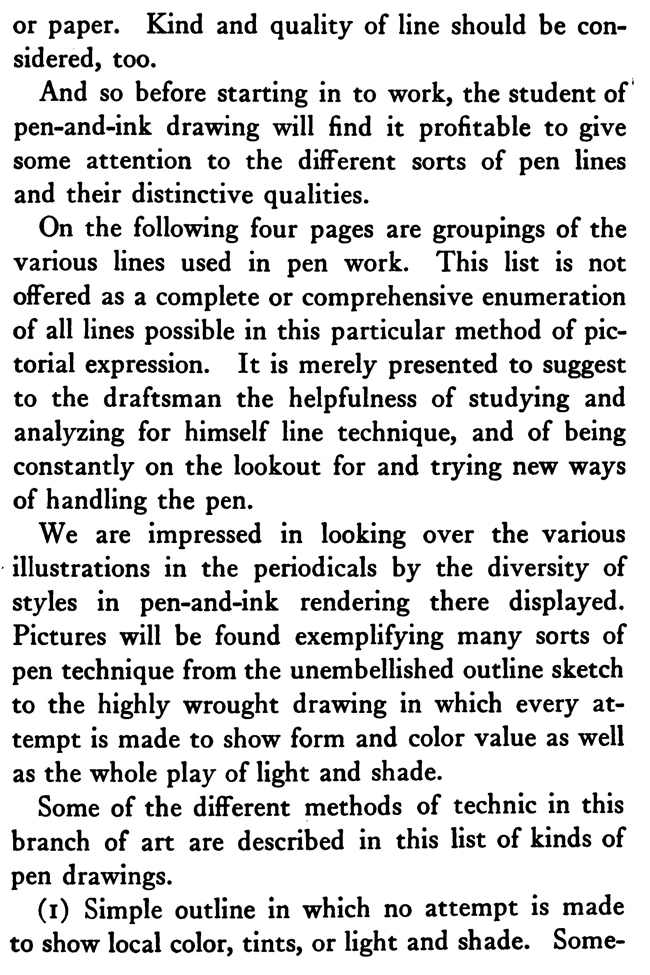
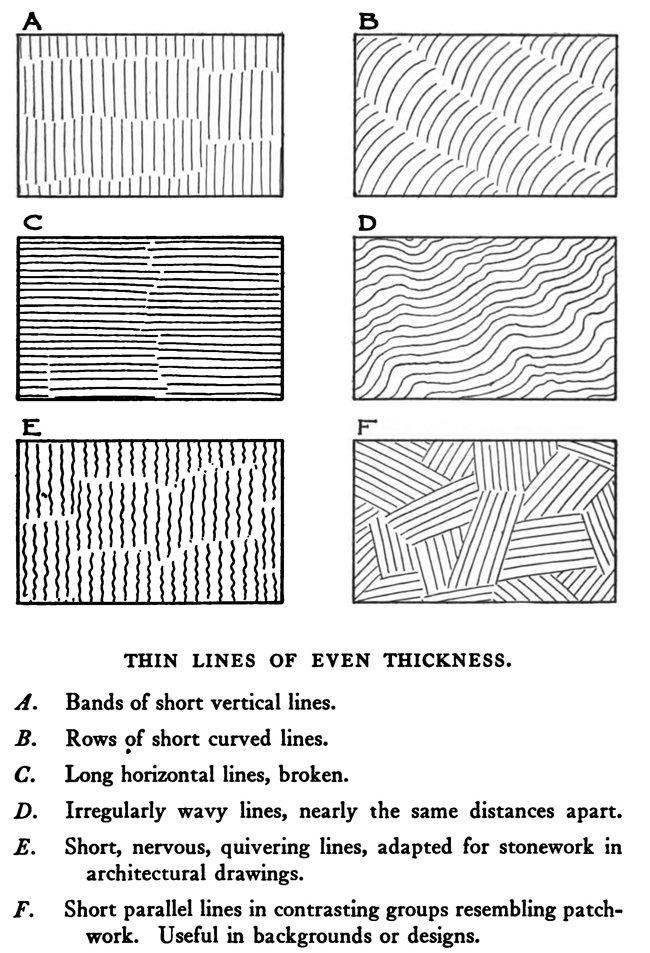
On the following four pages are groupings of the various lines used in pen work. This list is not offered as a complete or comprehensive enumeration of all lines possible in this particular method of pictorial expression. It is merely presented to suggest to the draftsman the helpfulness of studying and analyzing for himself line technique, and of being constantly on the lookout for and trying new ways of handling the pen.
We are impressed in looking over the various illustrations in the periodicals by the diversity of styles in pen-and-ink rendering there displayed. Pictures will be found exemplifying many sorts of pen technique from the unembellished outline sketch to the highly wrought drawing in which every attempt is made to show form and color value as well as the whole play of light and shade.
Some of the different methods of technic in this branch of art are described in this list of kinds of pen drawings.
A. Bands of short vertical lines.
B. Rows of short curved lines.
C. Long horizontal lines, broken.
D. Irregularly wavy lines, nearly the same distances apart.
E. Short, nervous, quivering lines, adapted for stonework in architectural drawings.
F. Short parallel lines in contrasting groups resembling patchwork. Useful in backgrounds or designs.
G. Writing-pen strokes.
H. Abruptly ending lines. A stub pen used.
I. Heavy lines made with a very broad nibbed pen, leaving a thin white line between them.
J. Coarse pen strokes, irregular as to length and direction. A large writing-pen used.
K. Wriggling lines, somewhat imitating thumb impressions. For decorative designs. Drawn with a round-pointed pen and using but little pressure on the pen.
L. Imitating woodwork or graining. Try a double-pointed pen to get this effect.
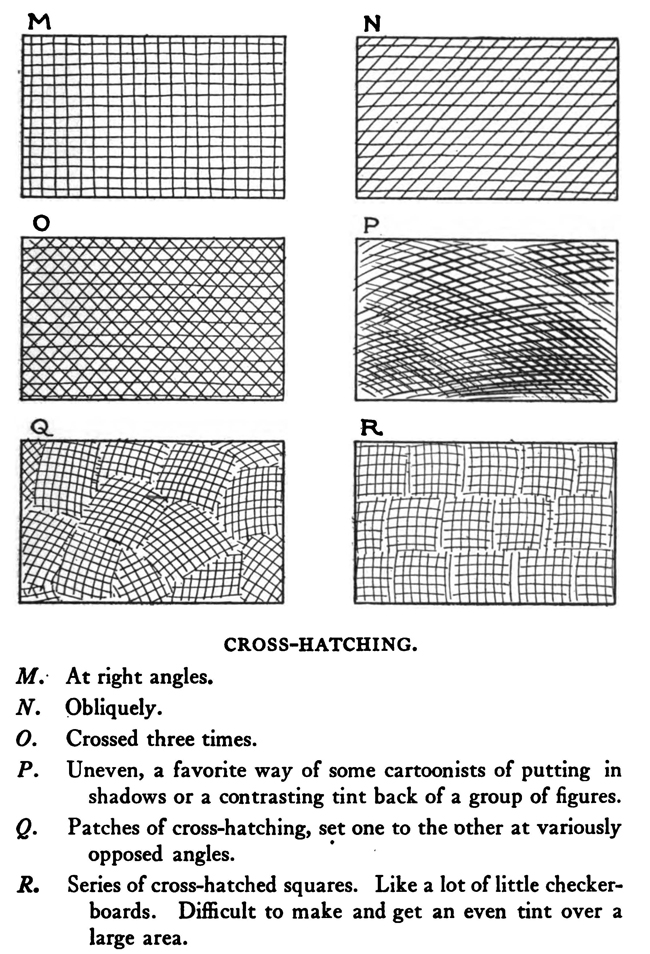
M. At right angles.
N. Obliquely.
0. Crossed three times.
P. Uneven, a favorite way of some cartoonists of putting in shadows or a contrasting tint back of a group of figures.
Q. Patches of cross-hatching, set one to the other at variously opposed angles.
R. Series of cross-hatched squares. Like a lot of little checkerboards. Difficult to make and get an even tint over a large area.
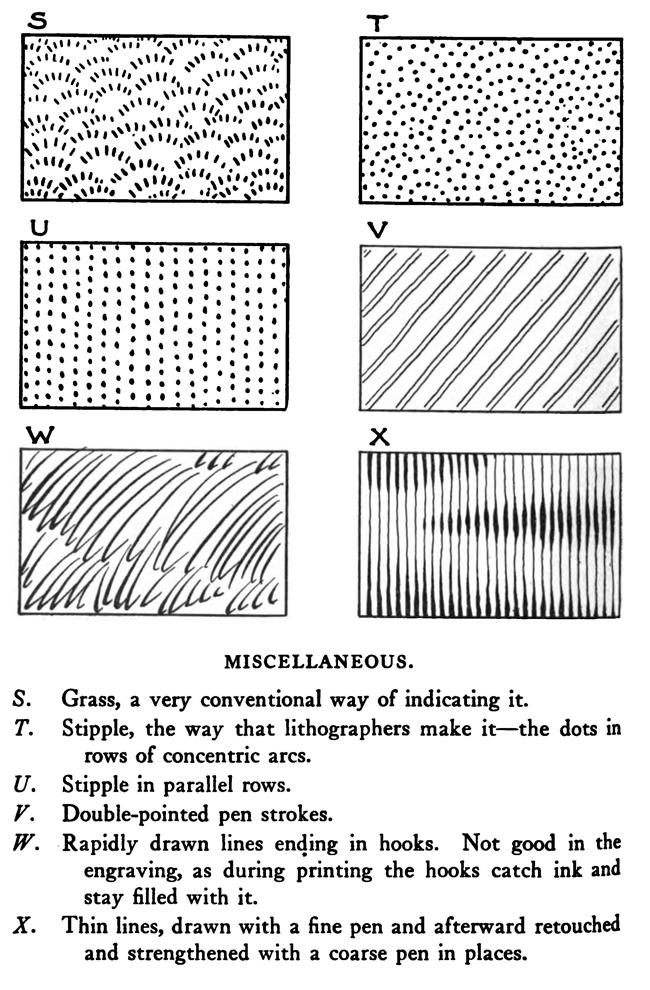
S. Grass, a very conventional way of indicating it.
T. Stipple, the way that lithographers make it—the dots in rows of concentric arcs.
U. Stipple in parallel rows.
V. Double-pointed pen strokes.
W. Rapidly drawn lines ending in hooks. Not good in the engraving, as during printing the hooks catch ink and stay filled with it.
X. Thin lines, drawn with a fine pen and afterward retouched and strengthened with a coarse pen in places.
Sometimes certain lines are made a little heavier to indicate the shadow side of a form. The lines are sketchy, broken here and there, yet intelligent and sensitive in feeling.
(2) Pure outline only, with flat tints in places to suggest local color and take away from the monotony of mere outline. A large mass of solid black or a pattern-like background is sometimes worked in.
(3) Outlines, bold and sketchy, broken in places where there are wrinkles and angles. The only shading is a general effect, in places, of tinting with oblique lines. These are drawn in a direction natural to a right-handed person; that is, slanting from the upper right side to the diagonally opposite lower corner. This way of shading is the favorite method of those who must do quick work for newspapers and who must evolve pictures without the use of models. Plenty of white spaces are left, and the parallel oblique line tints are put in where they will give the maximum of effect with the minimum of labor.
(4) Expressive and impressionistic lines. These are as few as possible. The artist seems to be most sparing with pen strokes and ink; but very liberal with leaving areas of pure white paper. The lines have been quickly drawn, but much thought is shown by their forcible interpretative qualities. There is never a superfluous line. Drawings of
this kind are best made on thin transparent paper laid over a previously worked-out pencil sketch. In this way you can see what to leave out and only draw the absolutely essential.
(5) Thin lines, very dainty and drawn with the finest pen. More thought given to attaining this daintiness than to what is ordinarily called, "drawing." Meaningless lines put in sometimes merely to fill spaces. A style characterized by leaving large spaces of untouched paper, or it may be marked with only a few sketchy lines in big curves—all leaving much to the imagination and saving the artist a lot of hard work, that is, serious drawing. A charming style but if carried to extremes lacking all qualities but that of daintiness and a certain decorative feeling. Working in this style is sometimes the refuge of those who cannot draw.
(6) Impressionistic patchwork of tints. The whole work characterized by a series of irregularly shaped patterns of tints. Each one of these patches is composed of nearly parallel-lined shadings, the different patches contrasted and relieved one against the other by their strength and the contrary directions of the lines. Sometimes special pens have been used for the lines of different weights. There is hardly any cross-hatching, which is a good point, by the way. A drawing in this style always makes a good printing plate, is attractive, and engages the attention. But if this patchwork way of "thinking" is carried too far, the result seems more like an exercise in pen strokes and not, as it should be, a sympathetic art work. The drapery rendering of figures in this style is apt to be merely a study of drapery and not a picture of a clothed human being. There is lacking a sympathy for life. At no times does the artist lose sight of the fact that he is handling a pen.
(7) Sketchy lines, confidently put in and easy-flowing. The lines are drawn quickly and in long strokes. In important places, as a face, the lines are marked with more deliberation. The whole drawing has a finished appearance in spite of the sketchiness of the pen work. There is a perceptible touch in the boldness and vigor of the technical skill which assures one that the artist can draw and that he does not work in this manner to conceal any bad draftsmanship. Such drawings are generally made with a fine but tractable pen point.
(8) Marked by a grayish quality of nearly all the tints over the entire drawing; unless, perhaps, a forcible dark spot has been happily placed in a contrasting position. There is no cross-hatching, to speak of. No hard outlines, nor tints bounded by a line. Places where ordinarily a limiting outline would be marked, are left blank. The imagination supplies the line.
(9) A style full of power that shows skill and ability. The pen handled with perfect freedom. Distinctly a pen drawing, yet showing that the artist never once thought of the point in his hand as a pen point. The general effect only thought of, and not the individual lines. The certainty with which the masses of lines are drawn and the confidence exhibited in the delineation show that the artist knew exactly what he was about and had a mental picture all the time of what he was striving for.
(10) Conventional and matter-of-fact style. All the component parts of the composition faithfully drawn. An endeavor to represent the full roundness of form and copy all the lights and shades. Principal figures usually strongly outlined. No broken lines. The directions of the pen strokes suggested by the forms of the objects, casts of the drapery folds, or the way the shadows fall. There is much cross-hatching and a proneness to cover the entire surface of the picture with pen lines.
(11) Pen-and-ink etching. A contradictory term, but descriptive of the style under consideration, as it simulates somewhat the work of the etcher's needle. A steady hand is required for this manner of drawing, as it must be executed with a very fine pen. The pen, too, must be firm and respond to every degree of pressure that the artist imparts to it. No definitely fixed character of line prescribed for this manner of working. The lines are mostly characterized by a zigzaginess and any kind of cross-hatching. This peculiar pen technique if indulged in by one not gifted is likely to occasion a scratchy or mushy mess of lines. The sure hand of the matured artist is needed to make a successful pen drawing of this sort.
(12) Decorative and ornamental pen drawings made by lines that are not put in carelessly nor by slipshod methods. Every line marked with not only deliberation, but plain intent. Quality and kind of line definitely indicated—clearly shown and no attempt to disguise the fact that they are anything else but lines. Diversity and dissimilarity in styles and manners are characteristics of decorative pen drawings. For the purpose of studying this mode of handling the pen, the student can find excellent examples among old wood-cuts and copperplate engravings.
(13) Heavy lines and black blots and white spaces. Vigorously drawn with a coarse pen, or even in places with a brush. Very little outlining with a continuous line. Forms and the drawing mainly indicated by the contrasting relationship of tints of various strengths. Very heavy dark shades drawn in thick lines with a thin white line between them. These thin lines appearing as if painted in over a solid black. In fact, in some places, a method of painting in lines with a small brush charged with white has most probably been employed.
Bristol-Boards and Papers.—Bristol-board is mostly used for making pen drawings for engraving. The white of some cardboards is of a creamy tinge, but it is best to use that with as pure a white as it is possible to get. A perfectly smooth surface is to be preferred in bristol-boards, but another surface called "kid finish" can be used at times. Bristol-boards come in a number of sizes; the most economical way is to get the regular size as handled by cardboard dealers or printers' supply men. This is 22 by 28 inches. Ordinary cardboards should not be used, as they are mainly of a porous texture and will cause the ink to spread or give ragged lines. The right kind of a surface is necessary, too, to stand an occasional scratching out of ink lines. Writing paper if smooth makes a good surface on which to draw with the pen. Your stationer should be able to get you large sheets of it, if the art-material dealer cannot supply you. Ask for heavy linen ledger paper.
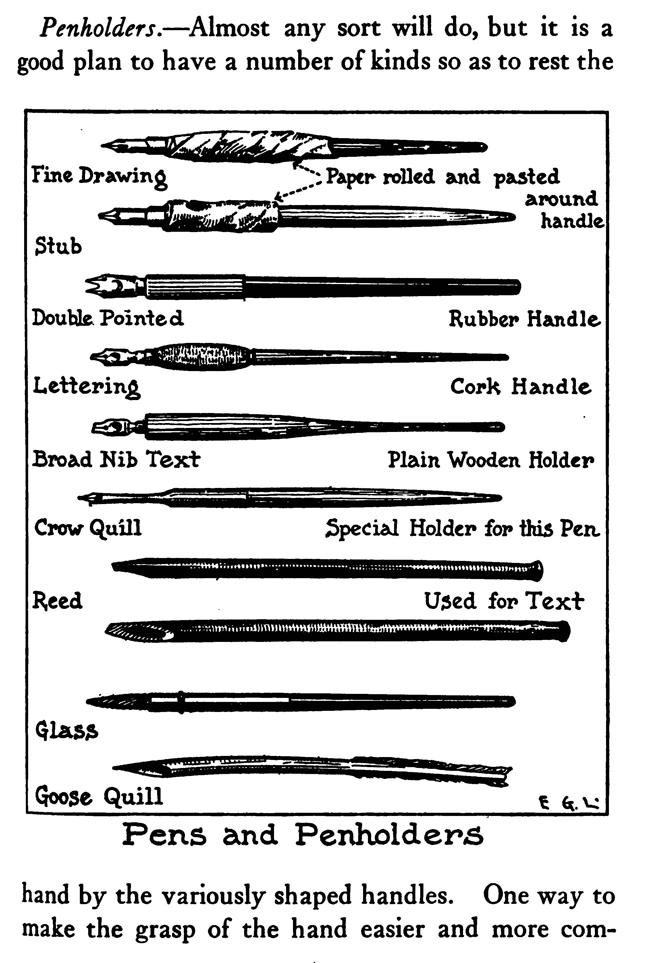
Penholders.—Almost any sort will do, but it is a good plan to have a number of kinds so as to rest the hand by the variously shaped handles. One way to make the grasp of the hand easier and more comfortable is to roll and paste strips of paper around the socket of the handle. Make this as thick as you desire, then if you grasp it before the paper and paste are completely dry, the roll of paper will conform, cushion-like, to the grasp of your fingers.
Pens.—For many years Gillott's pens, Nos. 290 and 170, have been the favorites with pen artists. You will find also other good makes of drawing-pens in the art-material shops. The crow-quill is a very good pen that fills nearly all the requirements of the pen draftsman. It can make the finest hair line and has a point that responds to enough pressure to make a line nearly one-eighth of an inch thick. First-class stationers now keep a supply of drawing-pens on hand together with many other kinds that can be used in line drawing. Stub pens, for instance, are sometimes very good in coarse work; likewise large writing and double-pointed pens. When a line is wanted thicker than any pen will make, it is advisable to try a showcard writer's brush. This is a sable brush with very long hairs. If it is managed with a steady hand, long firm lines can be made with it.
Ink.—The water-proof variety is the one generally employed. Some who like to work in delicate thin lines choose the soluble ink. Bourgeois's French ink comes in a bottle which is conveniently held in the hand. Most workers, to be sure, fix the ink-bottle in some sort of a stand that is not easily upset; but artists who work on large, easel-like tables with the paper fastened down, work with the pen in one hand and hold a bottle of ink in the other. It saves a little time in charging the pen with ink. If long and thick lines are made, the fine drawing-pens hardly hold enough ink for two such lines, and reaching over to a table to dip the pen in an ink-bottle every two strokes means a real loss of time.
Lead Pencils.—A medium pencil is best to use, as the markings of a very soft pencil will soil the paper and necessitate so much erasing that the surface is somewhat spoiled for pen work. Hard-pencil markings are difficult to erase. Some find it expedient to first draw their composition on manila paper and then transfer it to a sheet of cardboard. This is accomplished by rubbing pencil dust on the back of the manila paper and then tracing the details of the drawing through with a hard pencil or a stylus. As pale -blue markings do not photograph when set up before the photoengraver's camera, newspaper pen artists sometimes make their preliminary sketching with a blue pencil. It is not necessary, in this case, if the blue markings are not too heavy, to clean off the drawing with the eraser.
Erasers.—A very soft white rubber eraser is the best kind to use while making the preparatory pencil sketch for a pen drawing. Take care not to use an eraser in which the rubber has lost its elasticity and is hard and lifeless, as it will smudge the pencil marks. And other rubbers have a way of breaking up into particles that stray around the board and table, get into the ink, and cause the pen to get clogged up. Be sure and have the right kind of an eraser on your drawing-table. For cleaning the drawing at the last, use a sponge rubber; it will take off the pencillings and yet not weaken the black of the ink.
Making Corrections.—If the right kind of bristolboard has been used, any ink lines not wanted can be taken out with an ink-scraper or a sharp-bladed penknife. The roughened surface of the scratched cardboard can be smoothed over with a bone burnisher (make one out of an old tooth-brush handle) before redrawing with pen and ink. Where a change is to be made over a large surface it is better to paste over it a piece of linen paper. Use a very thin, but not transparent, paper and see that the edges do not come at any important part of the picture, as any break in the tint or shading is likely to show in the engraving. Shaving the back of the paper along its edge, so that this edge shows hardly any line where it clings to the cardboard, will preclude any possibility of a break in an ink line or tint drawn over it. If any corrections are to be made by painting in white, or to sharpen ragged ink lines, be sure and use a pigment that will photograph white. Albanine or one of the process whites should be employed.
Sometimes the effort to get good, firm lines in pen work results instead in a series of hard lines. Now here the ink-scraper can be used to soften them by zigzagging scratches across the ends of the lines or borders of the tints. This procedure, however, is not recommended as an habitual practice, as it has a tendency to roughen the paper and lines and give poor printing lines in the plate. It is only applicable to bold and vigorous drawings that are to be reduced igreat deal.
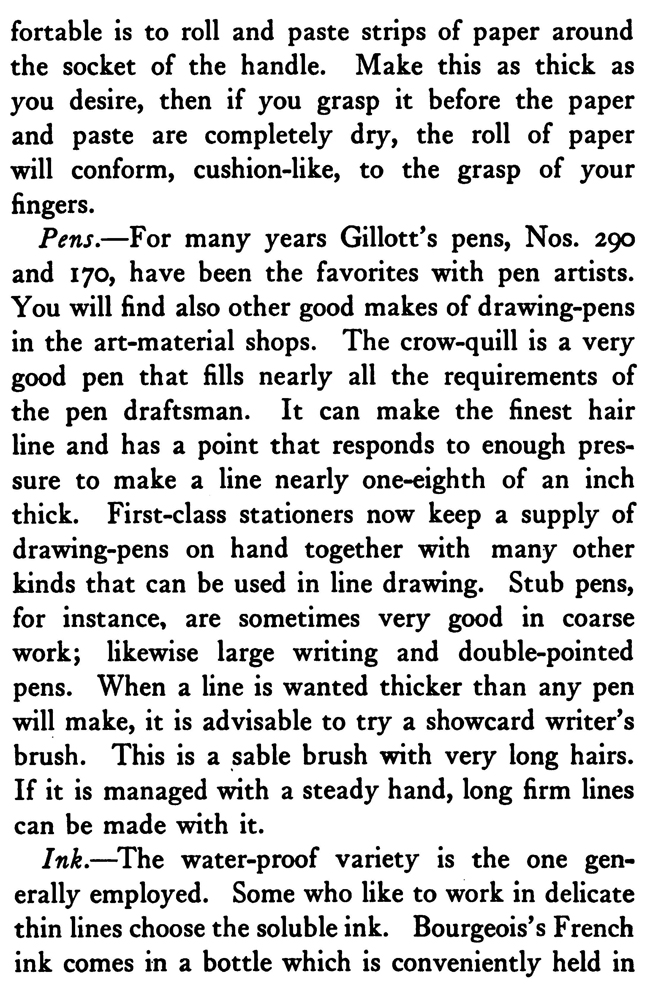
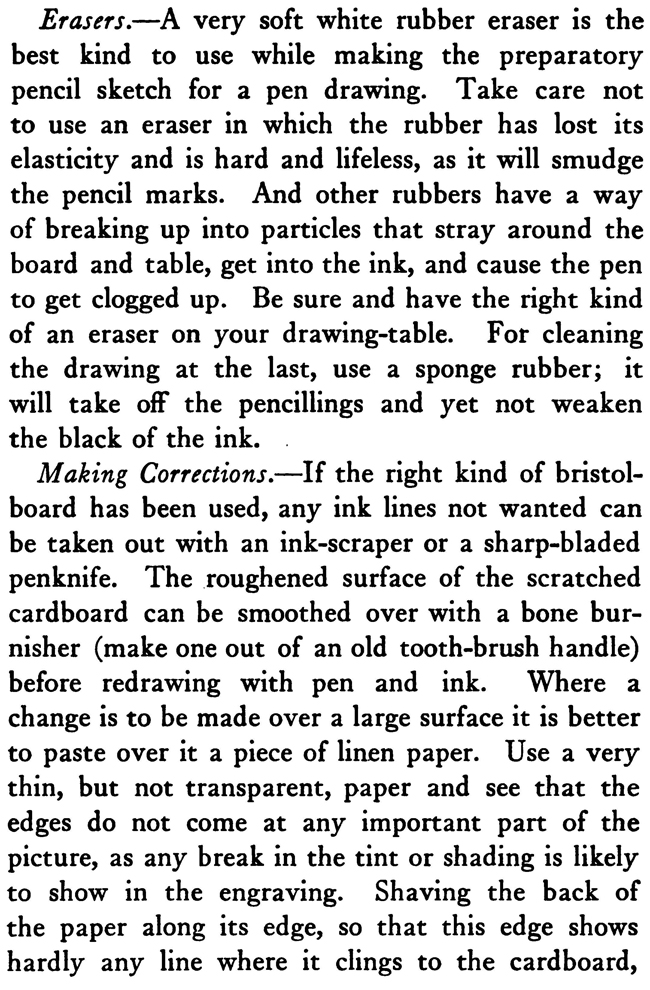
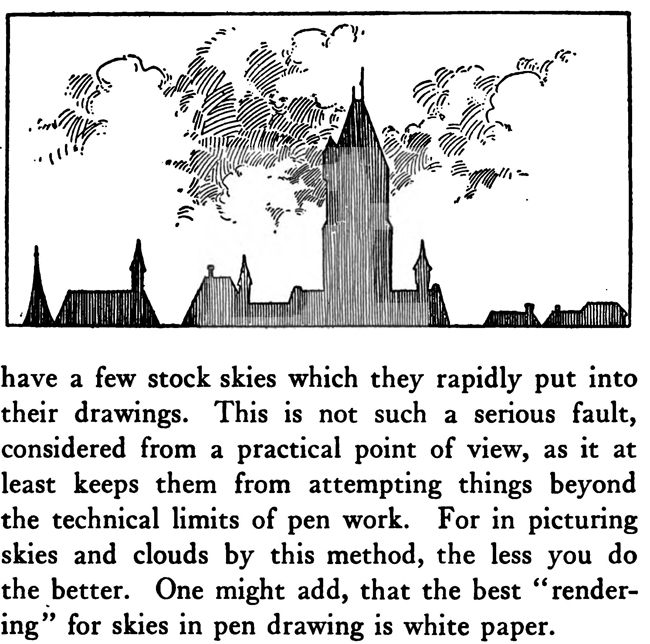
The term chiaroscuro is generally applied to, or used to describe, the picturing of things in blended and graduated tints. This is the way of working in oil and water-color painting and charcoal drawing. Although pen drawings can be made that nearly render the whole effect of light and shade, the art is for the most part to be considered as having certain limitations. The gifted technician, even though he be one of the best, must not expect to use his tools and medium in representing every subject with the many advantages possible in oil or water-color. In this branch of art—pen-andink—we cannot ordinarily disassociate ourselves from the idea of lines, and are compelled to be mindful of how and what kind of lines we draw. Skies and clouds, for example, are very hard to draw with the pen point. The best we can do, with the possible exceptions of very dark and heavy clouds, is to make something more or less diagrammatic or symbolic.
When the artist is putting in a sky to fill out the background of a "commercial drawing" of a building, or he wishes to indicate cloud masses to help the composition in a landscape pen drawing, he should keep before him the idea of simplicity and not attempt to do too much. Above all, in drawing clouds in line work, avoid cross-hatching. Keeping tints open with lines wide apart gives a luminous quality to skies. Some pen artists who turn out a great quantity of drawings and are compelled to do them hurriedly have a few stock skies which they rapidly put into their drawings. This is not such a serious fault, considered from a practical point of view, as it at least keeps them from attempting things beyond the technical limits of pen work. For in picturing skies and clouds by this method, the less you do the better. One might add, that the best "rendering" for skies in pen drawing is white paper.
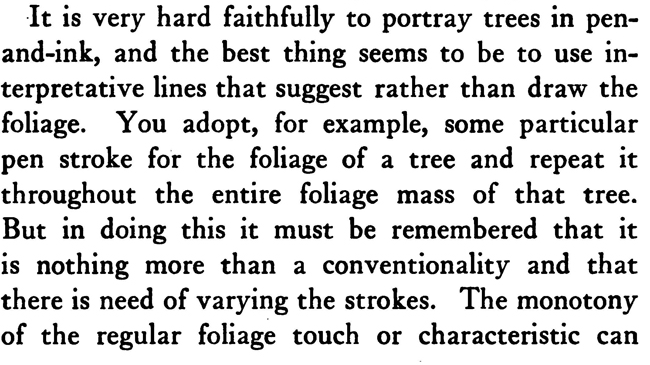
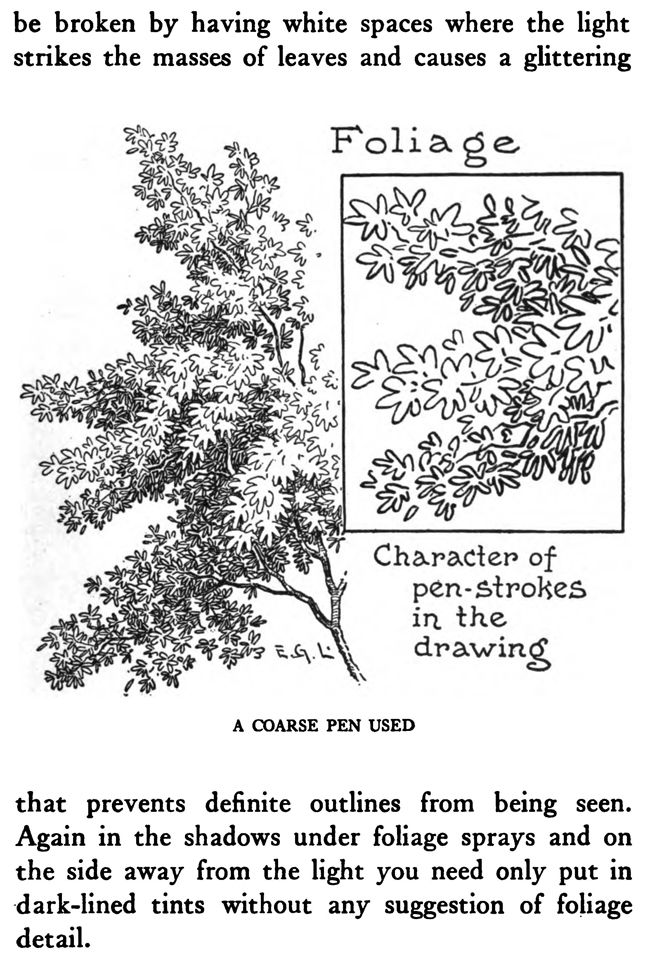
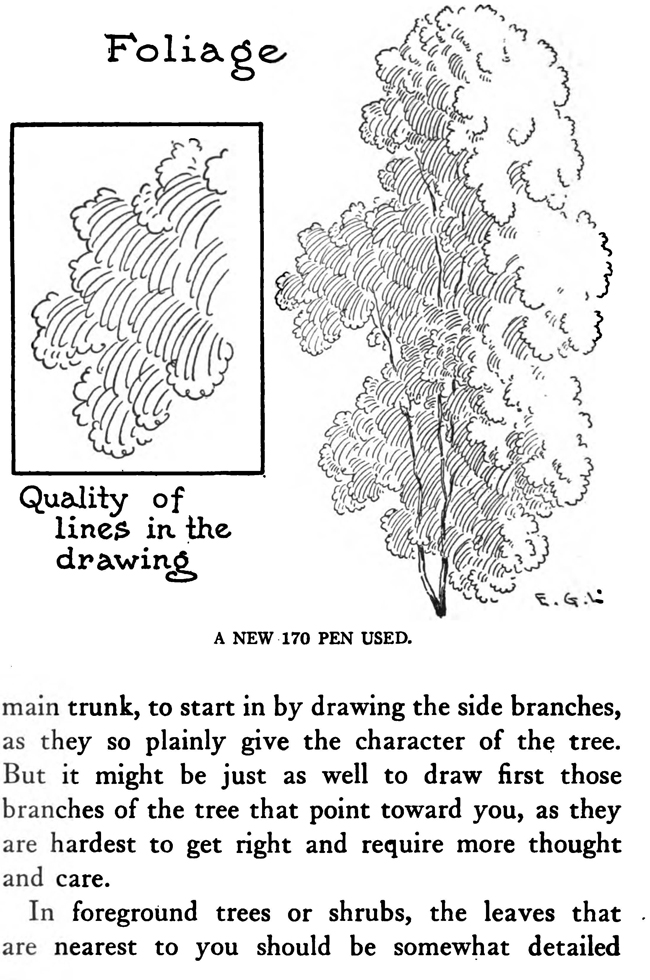
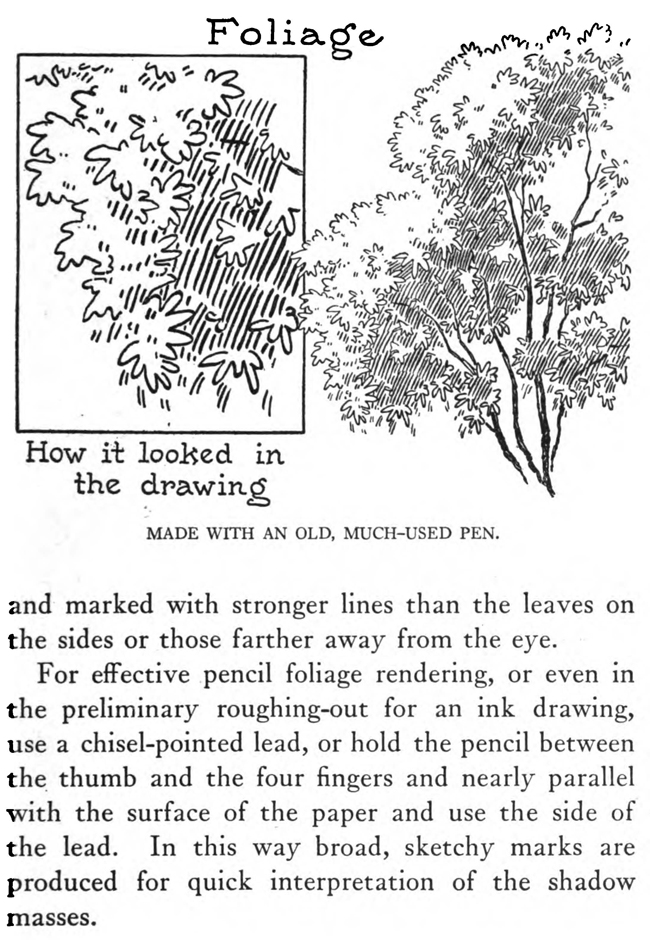
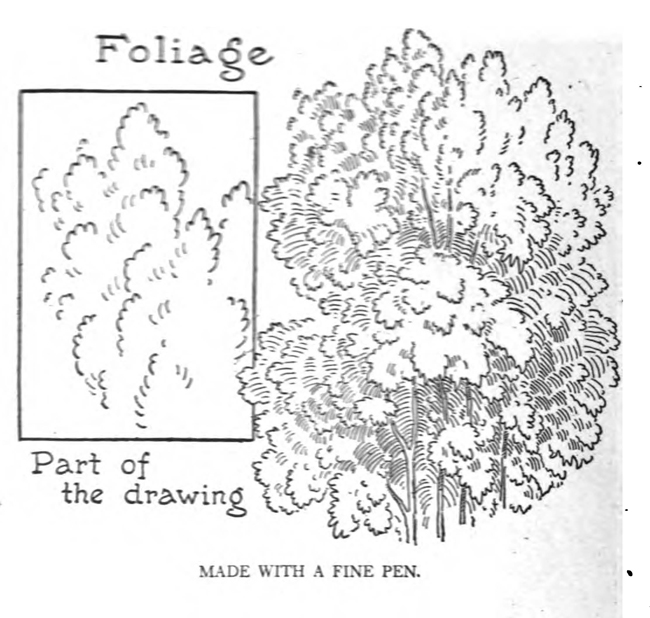
It is very hard faithfully to portray trees in penand-ink, and the best thing seems to be to use interpretative lines that suggest rather than draw the foliage. You adopt, for example, some particular pen stroke for the foliage of a tree and repeat it throughout the entire foliage mass of that tree. But in doing this it must be remembered that it is nothing more than a conventionality and that there is need of varying the strokes. The monotony of the regular foliage touch or characteristic can be broken by having white spaces where the light strikes the masses of leaves and causes a glittering that prevents definite outlines from being seen. Again in the shadows under foliage sprays and on the side away from the light you need only put in dark-lined tints without any suggestion of foliage detail.
As a rule, when drawing foliage, the direction of the lines, whether in pencil or with the pen, should be as if they radiated from the central part of the tree. Keep thinking how leaves radiate from a spray, and the sprays from branches and these again from the main trunk. Give a great deal of attention to the branches that point toward you, and to the pointing-towardyou leaves on these branches. It is easy enough to draw the side branches, as they are nearly always so clearly silhouetted against a background—.usually the sky.
It only seems natural, after marking the general form of the tree and a line for the main trunk, to start in by drawing the side branches, as they so plainly give the character of the tree. But it might be just as well to draw first those branches of the tree that point toward you, as they are hardest to get right and require more thought and care. In foreground trees or shrubs, the leaves that are nearest to you should be somewhat detailed and marked with stronger lines than the leaves on the sides or those farther away from the eye.
For effective pencil foliage rendering, or even in the preliminary roughing-out for an ink drawing, use a chisel-pointed lead, or hold the pencil between the thumb and the four fingers and nearly parallel with the surface of the paper and use the side of the lead. In this way broad, sketchy marks are produced for quick interpretation of the shadow masses.