
Home >Directory of Drawing Lessons > Drawing Objects & Things > Geometric Shapes > Drawing Geometric Shapes and Forms
Teaching Kids How to Draw Geometrical Shapes and Forms with Drawing Lesson
|


|
How to Teach Children About Geometrical Shapes and FormsThere are certain forms to which certain names are applied. They occur frequently in the simplest subjects. Therefore, while these forms are known under the formidable title of geometrical figures, nevertheless most of these shapes are so simple as to be easily recognized and with a little exercise of the memory can be called by name. The easiest way for the child to form their acquaintance is to make and draw them. Their application will readily follow. Teach the kids about shapes by cutting the following shapes from cardboard or card stock. The Square. The Rectangle. The Triangles (right, acute, obtuse and equilateral triangles). The Circle. The Oval.
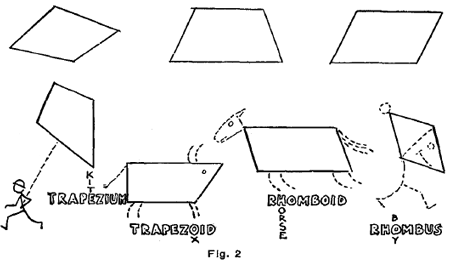
Explain Simple Geometrical Pictures.Try to explain matters connected with the study of lines and form by means of simple illustrations. For instance, a child may not understand the meaning of parallel lines. Draw for him a little picture of a ladder, showing that no matter how far extended the lines would never meet. Then draw a picture of a half-closed umbrella, and explain the meaning of converging and diverging lines, as shown in Fig. 1. above. Tell him that the lines 1, 2 and 3 in the umbrella illustration are converging lines, as they approach toward the top of the umbrella—that converging lines tend to get close On the other hand, as the lines mentioned approach the handle they diverge because they tend to get farther and farther apart. Aids to Remembering the Geometrical Shapes' NamesThe trapezium, trapezoid, rhomboid and rhombus are terms difficult to remember. Therefore, these little wiggles are added. Let the pupil memorize the trapezium by drawing it with the addition of the boy and the kite. And so on with the other forms. By combining the forms with other objects that are suggested below in the illustrations, interest will be aroused and the memorizing will be helped.
Memory ExercisesDraw the forms in Fig. 2 above on the blackboard and require the students to give the name of the first form. When that is answered correctly, request another student to name the second shape, and so on to the last. Erase the figures from the blackboard, and name one of the figures, asking a pupil to draw it, as, for instance, a trapezium. Then ask a pupil to draw a trapezoid and so on with each successive figure. Many pupils memorize forms more quickly if their meaning is combined with adjectives describing the kind of forms. Like the following:
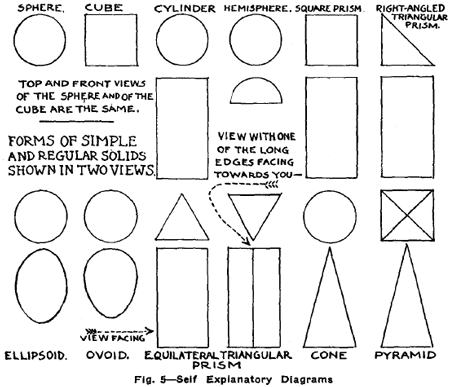
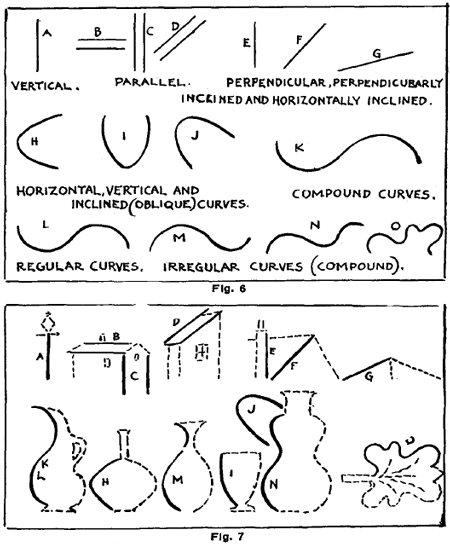
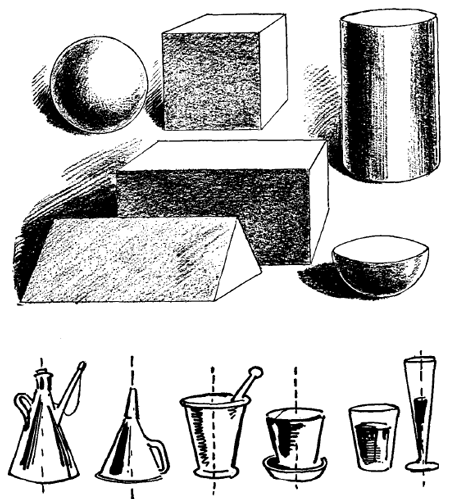
Lines Used in Drawing.Fig. 6 shows the lines used in drawing. Their forms and definitions should be thoroughly memorized. In Fig. 7 their application is shown by combination and by repetition. Parts of this exercise may prove too difficult for many beginners. In such cases, the exercises may be omitted for the time being, to be taken up later when they are older. The lines are made heavier in the examples merely to indicate their position. The letters A, B, C, etc., are repeated in the upper and lower diagrams as an additional aid in this respect. Geometrical Forms and Shapes StudyThe sphere, the cube, the cylinder, the square prism, the hemisphere and the right-angled triangular-ed prism. These may be considered in the following order: . 1. The surfaces and faces. The surface is the outside of any object. In the case of the cube, for instance, we find the surface limited and broken up by edges and faces. The face is a limited part of a surface. An edge is formed by the meeting of two faces. When passing the fingers over the surface of one of the solids, the pupil discovers decided differences. He notes a plain or flat surface, a curved surface and a round surface. He finds that all are not the same shape, and learns that edges may be curved or straight. Corners will be noted, as well as the difference in shape, if he is shown how to study them. Having familiarized himself by a study of each, it is well for the pupil to take the sphere and cube together, in order that he may observe their resemblances and their differences. Explain to them carefully the meaning of dimension. Dimension is an extent in one direction. Considered as to surfaces, their differences are notable. The surface of the sphere is curved equally in all its parts, while the cube's surface has six equal plane faces. Two of these six faces coming in contact form an edge, which is the subject of a second topic in the study of solids. While the cube has twelve edges, the sphere has none. As to Corners.The sphere has none; there can be no corners where there are no edges. The cube has eight corners. Three or more faces must come in contact to form a corner. The angles of the plane faces of a cube are right angles, therefore on each cube twenty-four right angles are found. Cylinder and Square Prism.Considered as a whole, the points of resemblance are these: The dimensions are the same in each. As to Surface and Faces.The cylinder has both curved and plane surfaces; a square prism has only plane surfaces. Considered as to their edges, the cylinder has curved edges; the square prism, straight edges. Considered as to corners, the square prism has the same number of corners as the cube; the cylinder has no corners. Two cubes will make one square prism. Faces are parallel to each other when they extend in the same direction. Faces are perpendicular when they are at right angles to each other. A square corner would be formed by the intersection of three. Faces are oblique to each other when they form angles other than right angles. The solids are considered, first, as "wholes"; second, as "to surfaces and faces," and, third, "as to edges." An edge is formed by the meeting of two faces. Edges may be curved or straight. The surface of the sphere is curved equally in all parts, while the surface of the cube is composed of six equal plane faces. When any two of these faces come in contact an edge is formed. A profile limits the part that we see of any round or curved surface. Profiles and edges limit and give visible shape to the faces and parts of faces.
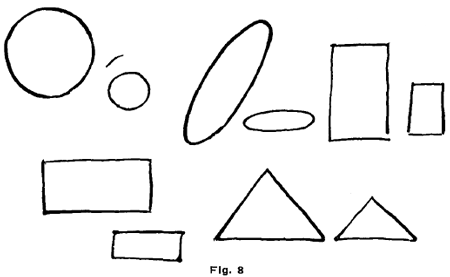
Begin by drawing the circles, ovals, oblongs and triangles in Fig. 8. above. Now let the student base the construction of objects along these lines as in Fig. 9 below. It is not necessary to adhere very closely to the outlines.
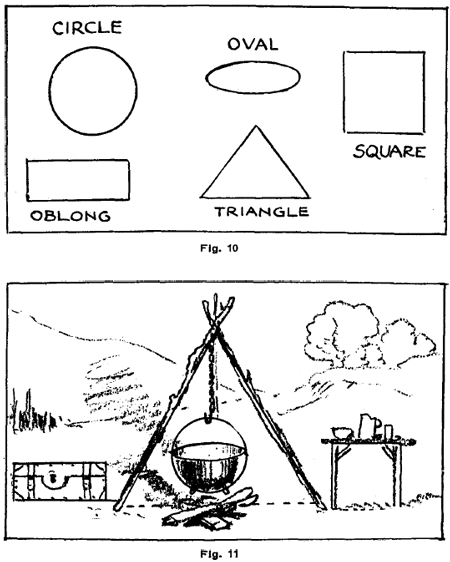
In Fig. 11 below, the circle, oval, square, oblong and triangle in Fig. 10 are all introduced into a single picture. Request the students to make another drawing in which these forms are indicated. Tell him that the oblong may indicate the body of a cart; the circle, one of the wheels; the square, a box on the cart; the oval, a bag of flour on the box. The triangle may show the angle of the roof of the house.
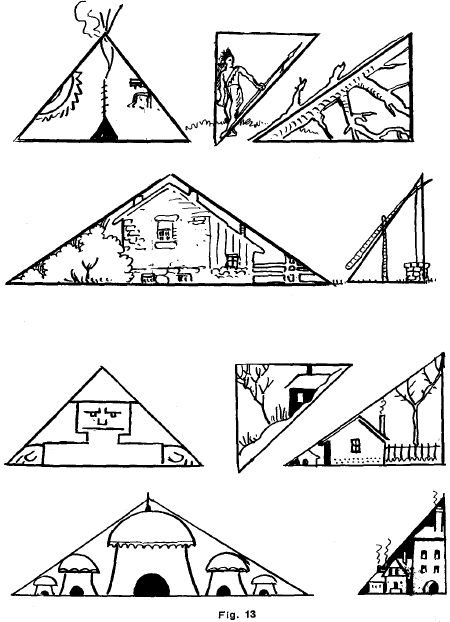
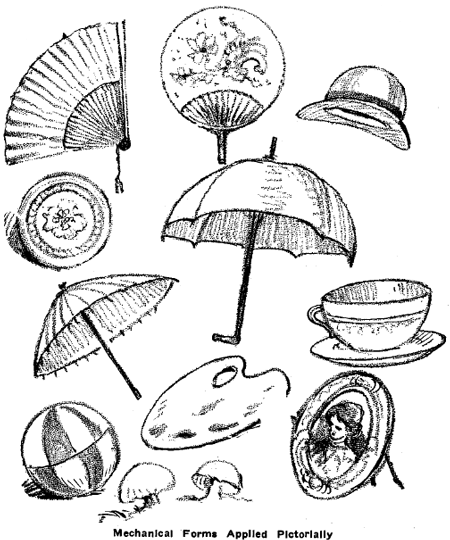
The examples in Fig. 13 above show the application of triangles as guides to the drawing of various objects.
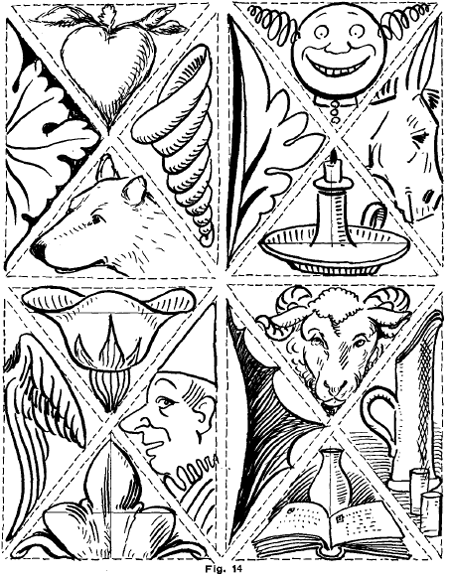
In Fig. 14 above, are given varied examples of the application of triangulation in design and composition. The designs do not need to adhere closely to the outlines of the triangles. How to Draw Triangles, Squares, Pentagons, Hexagons and Other Multi-Faced and Multi-Pointed FormsDrawing an Equilateral Triangle.
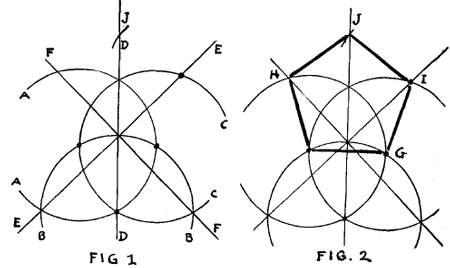
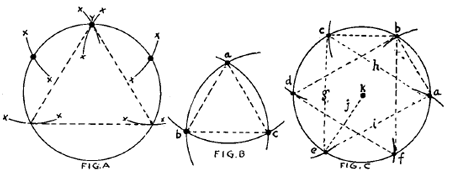
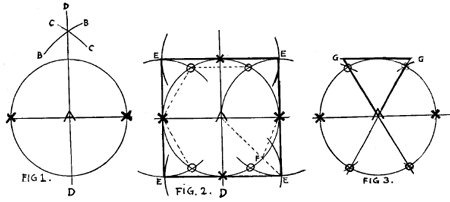
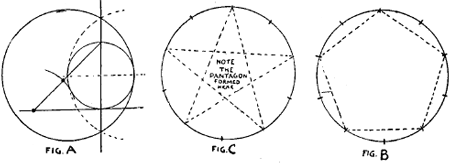
To draw an equilateral triangle within a circle. Describe a circle, Fig. A. Without changing the radius place the point of the compass at each of the black dots, starting at the dot Y (at top of circle) and intersect the circle. The formation of the triangle is shown by the dotted lines. Fig. B shows a simpler manner of making an equilateral triangle. Start at any of the dots, say, dot A, and describe a segment of a circle. At any point, as at dot B, with the compass at the same radius, intersect the first segment. At intersection C place point of compass and intersect the other curves as at B and A. Lines drawn from A to B, B to C, and C to A, as shown in dotted lines, will form the triangle. Fig. C. To make a hexagon or six-pointed star. Describe a circle. From the point A at the circumference, with a compass (radius remaining the same) intersect the circumference at B. Repeat with C, D, and so forth, until the point A is intersected. Lines drawn as shown in dotted lines from A to B and B to C, if continued to D, E, and so forth, will make a hexagon. For a six-pointed star draw lines as in dotted lines G, lines as shown in the sample dotted line from E to K. Proceed thus to make the six divisions of the drawing. To Draw a Square.To make an absolutely accurate quadrangle proceed as follows : Describe a circle as in Fig. I. Bisect it through its center at A to XX. Make a segment of an arc, CC, by placing the point of the compass at X at the left. The line BB is made the same way from X at the right. A vertical line prolonged through the circle from the intersection of the lines BB and CC and intersecting the horizontal line at A, and continued to the base of the circle, completes four right angles.
On the same drawing (Figs.1 and 2 being in reality a single drawing, but, for the sake of plainness, is made in two diagrams) describe arcs of circles of the same size or circumference, by placing the point of the compass at each X. The segments meet or intersect at EEEE. They also meet the circumference of the original circle at 0000, but this has nothing to do with making the quadrangle or square. Now extend four lines from each E to the other and they will touch the circle at each X. A perfect square is formed by these four lines. Other Forms Produced by This Operation To Make a Hexagon. To Make an Octagon.Extend the lines from each E to the center at A (Fig. 2). Now make eight lines as shown by the dotted line X to F, which gives one section of an octagon. To Make an Equilateral Triangle.A triangle having all sides of an equal length—draw a line GG parallel to XX at the top of the circle. Extend lines from the center A through the 00's (as produced in Fig. 2) to the line GG, and an equilateral is shown in the heavy lines as a result. Pentagon.To construct a pentagon, draw parts of three circles as A A, B B and C C, as in Fig. i. Next draw the vertical line D D. Then the oblique lines E E and F F. From the intersection of line E E at upper part of circular line C C describe segment of circle J. On the same drawing (as in Fig. 2) now construct the pentagon as shown by the heavy lines G, H, I and J. Another Pentagon.Method of drawing a pentagon by first locating the points required to make a decagon : Describe a circle as at A. Then half a circle as shown by dotted lines (same radius as large circle). Then the vertical line; next the dotted horizontal line. Now describe small circle; now the lower horizontal line. Extend a line from the intersection of the vertical line and the top of the small circle, thence to its intersection with the dotted horizontal line. Now describe a segment of a circle, starting at intersection of oblique line and lower horizontal line, and touching the small circle. The black dots on the oblique line indicate a distance that is the tenth part of a decagon, as shown in C and B. Use alternate spaces to form a pentagon, as at B, or five-pointed star at C. This exercise is not so wearisome as it looks.
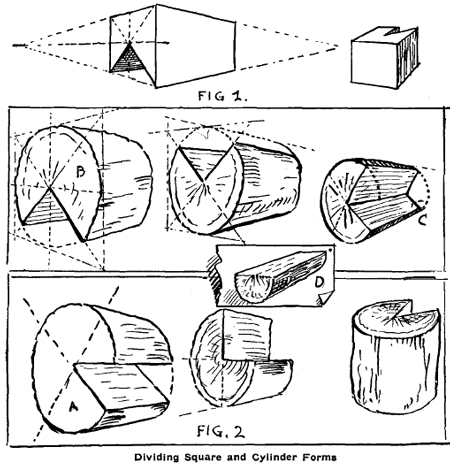
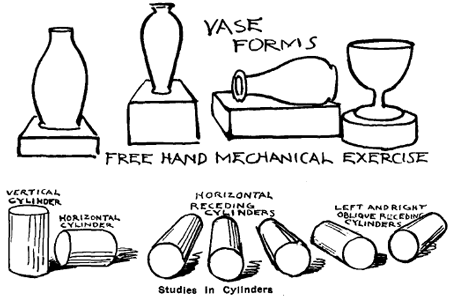
Logs as Cylinder Models.Small logs or branches of trees cut into suitable lengths make excellent model-S: The length of each piece may vary from one to two times the diameter. Saw out sections as shown in Fig. 2; that is, cut away one-eighth, one-quarter, one-third or one-half of four logs, as in A, B, C, D. Fig. 1 is made to show that the same methods are used for drawing cubes, prisms and other square-shaped objects as for curved ones. The perspective principle is the same for all.
The logs may be drawn in various positions, as vertical, horizontal, receding and right and left receding cylinders.
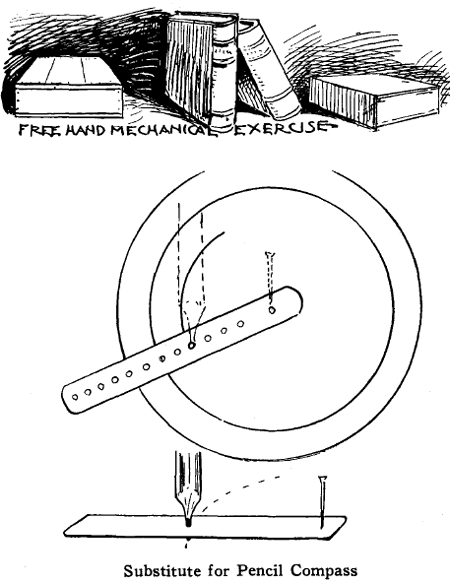
Substitute for Pencil Compass
Take a strip of cardboard about 1 x 4 inches in size. Prick holes at intervals of N inch along the middle of its length. Stick pin through cardboard and drawing paper into the drawing board. Place point of pencil through any of the holes and circles are easily made. The diagram explains its construction and use.
|


Privacy Policy ..... Contact Us