
|

DRAWING THE SPHERE.
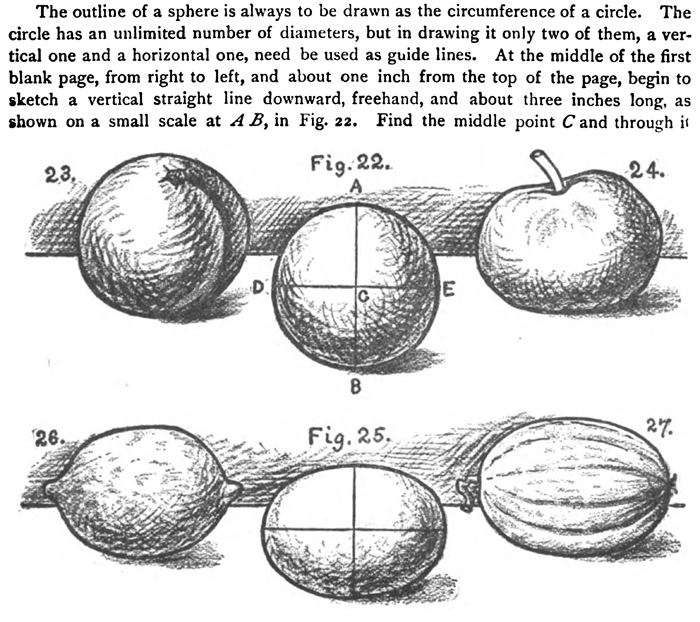
The outline of a sphere is always to be drawn as the circumference of a circle. The circle has an unlimited number of diameters, but in drawing it only two of them, a vertical one and a horizontal one, need be used as guide lines. At the middle of the first blank page, from right to left, and about one inch from the top of the page, begin to sketch a vertical straight line downward, freehand, and about three inches long, as shown on a small scale at A B, in Fig. 22. Find the middle point C and through is draw a horizontal line DE, equal to A B. Through the points A, B, D, and E sketch the circumference of a circle as shown in Fig. 22. Observe the general directions for all outline drawing as given in the Primary Freehand Manual, page 18, and in Advanced Freehand Book No. 5. Erase the guide lines and line in as usual.
NOTE. Both teachers and pupils are especially reminded that Figures 22, 23, 24, 25, and so on, are not to be copied. They are less than half as large as the student's drawings are intended to be, and they are inserted in the text only to guide him in the steps he is to take in drawing from the real object, which is before him.
OBJECTS SIMILAR TO THE SPHERE.
As a practical application of drawing the sphere, the pupils may now draw any objects similar to the sphere, as apples, peaches, apricots, cherries, grapes, etc. Each pupil may bring an object of this kind to be drawn at school as a regular lesson. He can place his object on his desk, as far away as possible, or on his neighbor's desk, not too far away ; or bet;:,;- still, on a support for drawing models' attached to his own desk, and make a drawing from it on the upper part of the first blank page of the drawing book, first on the left of the sphere, and then a drawing from another object on the right of the sphere. In making these drawings the circumference of a circle may be sketched very lightly at first, as a base; then make such changes in this outline as the apparent outline of the object requires ; lastly, line in as usual with a broad, soft, gray line. It will be well also to require pupils to draw similar objects in outline at home and bring the results to the teacher for inspection. Directions for arranging and drawing such objects in groups may be found on page 15 of Manual Training, No. 1.
LESSON II.
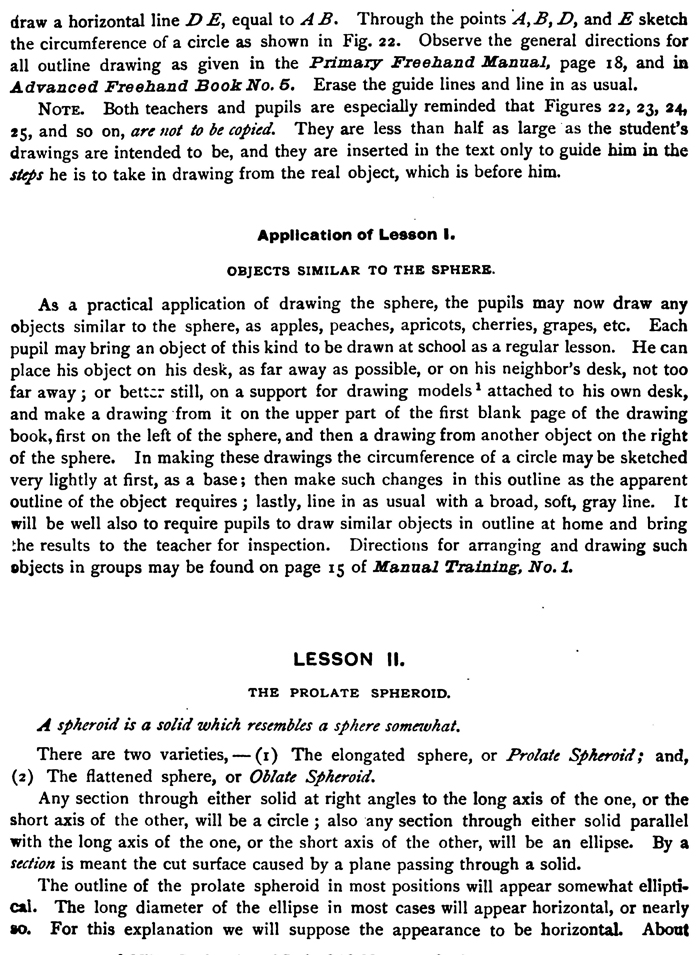
THE PROLATE SPHEROID.
A spheroid is a solid which resembles a sphere somewhat.
There are two varieties, — (I) The elongated sphere, or Prolate Spheroid; and, (2) The flattened sphere, or Oblate Spheroid.
Any section through either solid at right angles to the long axis of the one, or the short axis of the other, will be a circle ; also any section through either solid parallel with the long axis of the one, or the short axis of the other, will be an ellipse. By a section is meant the cut surface caused by a plane passing through a solid.
The outline of the prolate spheroid in most positions will appear somewhat elliptical. The long diameter of the ellipse in most cases will appear horizontal, or nearly so. For this explanation we will suppose the appearance to be horizontal. About
three inches from the bottom of the first blank page and equally distant from the left and the right ends of the page, begin to sketch a vertical straight line downward about two inches long, and ending about one inch from the bottom of the page. Now determine by pencil or string measurement (for an explanation of pencil and string measurement, see pages 6 and 7) the proportion between the apparent length and the apparent width of the prolate spheroid. Suppose for this explanation its apparent width to be two thirds its apparent length. Then through the middle of the vertical line sketch a horizontal straight line about three inches long, one half of it toward the left and the other half toward the right of the vertical line. Finally, sketch the outline through the extremities of the diameters thus drawn, and line it in as usual.
OBJECTS SIMILAR TO THE PROLATE SPHEROID.
As a practical application of drawing the prolate spheroid, the pupils may now draw any objects similar to it, as a lemon, a melon, a citron, a cucumber, a squash, a cantaloupe, etc. Let these objects be brought to school and treated as the apples, peaches, etc., in a previous lesson, by drawing on the lower part of the first blank page one of them on the left and another one on the right of the prolate spheroid previously drawn.
THE OBLATE SPHEROID.
The outline of the oblate spheroid in most positions will also appear somewhat elliptical, and the long diameter will appear horizontal in ordinary positions. About one inch from the top of the second blank page, and equally distant from the left and the right ends of the page, begin to sketch a vertical straight line downward about two inches long. Determine by pencil or string measurement the proportion between the apparent length and the apparent width of the oblate spheroid. Suppose as before its apparent width to be two thirds of its apparent length. Then through the middle of the vertical straight line sketch a horizontal straight line about three inches long, one half of it toward the left and the other half toward the right of the vertical line. Finally sketch the outline through the extremities of the diameters thus drawn and line it in as usual.
OBJECTS SIMILAR TO THE OBLATE SPHEROID.
After drawing the oblate spheroid as directed, the pupils are prepared to draw objects similar to it. as an onion, a turnip, a tomato, a pumpkin, etc As explained in previous lessons, draw on the upper part of the second blank page one of the objects on the left and another one on the right of the oblate spheroid previously drawn.
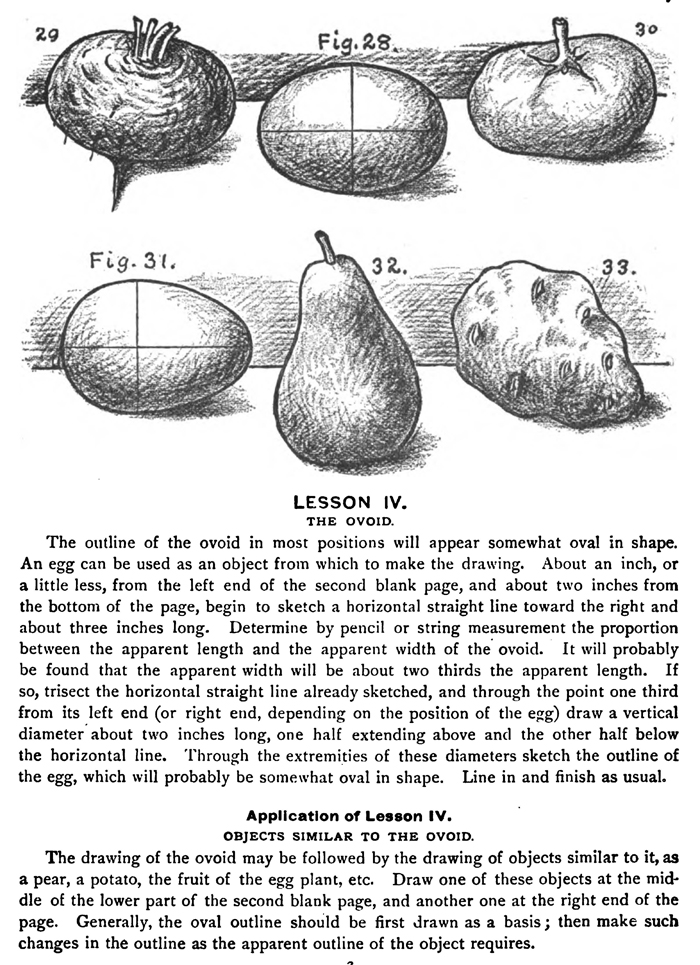
THE OVOID.
The outline of the ovoid in most positions will appear somewhat oval in shape. An egg can be used as an object from which to make the drawing. About an inch, or a little less, from the left end of the second blank page, and about two inches from the bottom of the page, begin to sketch a horizontal straight line toward the right and about three inches long. Determine by pencil or string measurement the proportion between the apparent length and the apparent width of the ovoid. It will probably be found that the apparent width will be about two thirds the apparent length. If so, trisect the horizontal straight line already sketched, and through the point one third from its left end (or right end, depending on the position of the egg) draw a vertical diameter about two inches long, one half extending above and the other half below the horizontal line. Through the extremities of these diameters sketch the outline of the egg, which will probably be somewhat oval in shape. Line in and finish as usual.
OBJECTS SIMILAR TO THE OVOID.
The drawing of the ovoid may be followed by the drawing of objects similar to it, as a pear, a potato, the fruit of the egg plant, etc. Draw one of these objects at the middle of the lower part of the second blank page, and another one at the right end of the page. Generally, the oval outline should be first drawn as a basis; then make such changes in the outline as the apparent outline of the object requires.
THE PLANE CIRCLE IN A HORIZONTAL POSITION.
The logical order we have laid down would indicate the right cylinder as the next solid to be drawn after the sphere and its variations. In drawing the cylinder, however, we are required to know how to draw the appearance of a plane circle ; hence, the plane circle is made the subject of this lesson.
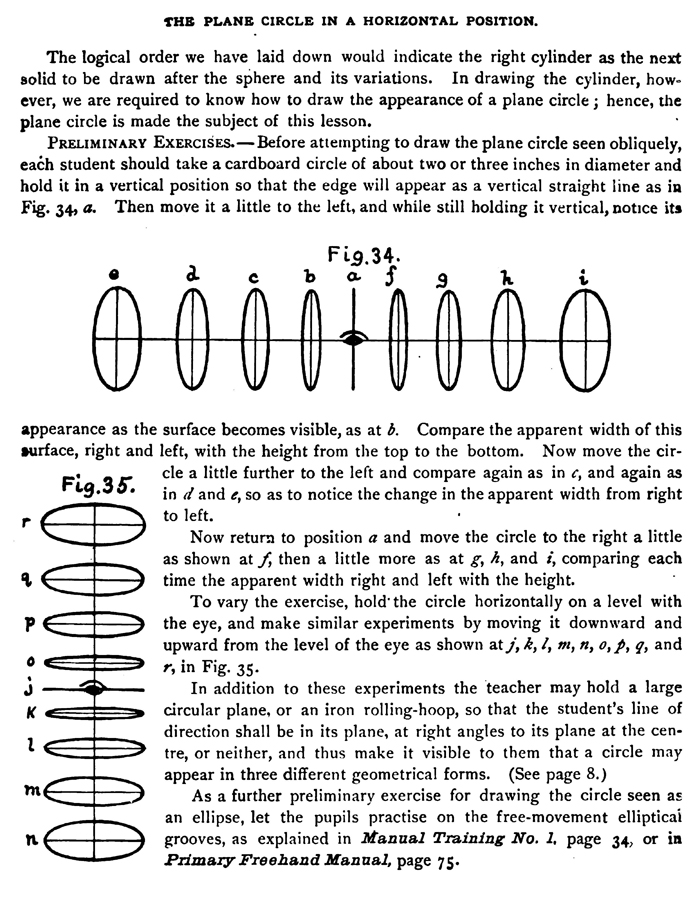
PRELIMINARY EXERCISES.
Before attempting to draw the plane circle seen obliquely, each student should take a cardboard circle of about two or three inches in diameter and hold it in a vertical position so that the edge will appear as a vertical straight line as in Fig. 34, a. Then move it a little to the left, and while still holding it vertical, notice its
appearance as the surface, right and surface becomes visible, as at b. Compare the apparent width of this left, with the height from the top to the bottom. Now move the circle a little further to the left and compare again as in c, and again as in d and e, so as to notice the change in the apparent width from right to left.
Now return to position a and move the circle to the right a little as shown at f, then a little more as at g, h, and i, comparing each time the apparent width right and left with the height.
To vary the exercise, hold' the circle horizontally on a level with the eye, and make similar experiments by moving it downward and upward from the level of the eye as shown at j, k,4 na, n, 0, p, g, and r, in Fig. 35.
In addition to these experiments the teacher may hold a large circular plane, or an iron rolling-hoop, so that the student's line of direction shall be in its plane, at right angles to its plane at the centre, or neither, and thus make it visible to them that a circle may appear in three different geometrical forms.
Drawing the Plane Circle In a Horizontal Position.
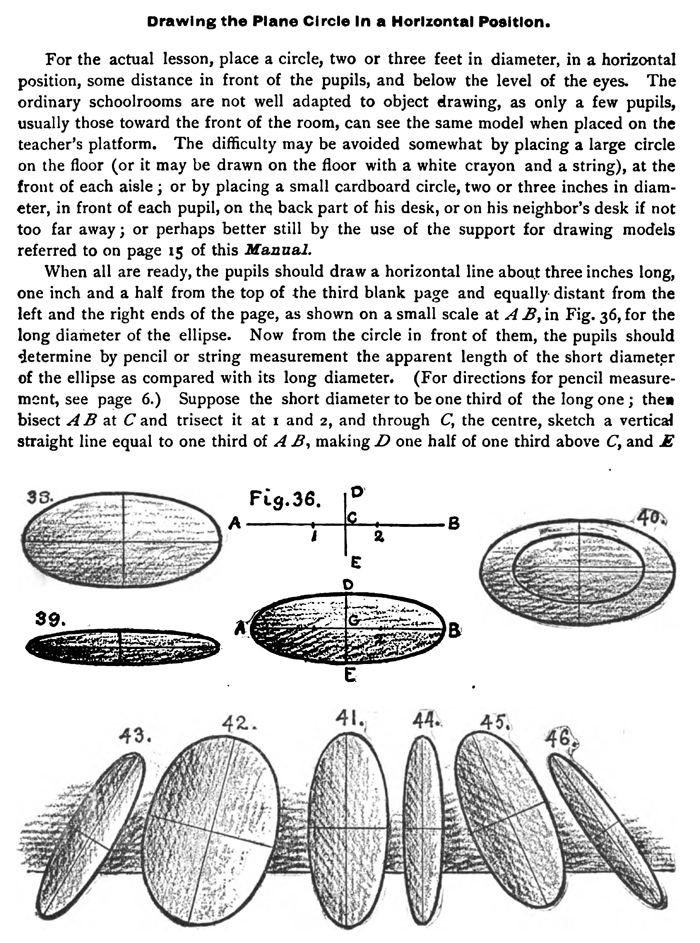
For the actual lesson, place a circle, two or three feet in diameter, in a horizontal position, some distance in front of the pupils, and below the level of the eyes. The ordinary schoolrooms are not well adapted to object drawing, as only a few pupils, usually those toward the front of the room, can see the same model when placed on the teacher's platform. The difficulty may be avoided somewhat by placing a large circle on the floor (or it may be drawn on the floor with a white crayon and a string), at the front of each aisle ; or by placing a small cardboard circle, two or three inches in diameter, in front of each pupil, on the back part of his desk, or on his neighbor's desk if not too far away ; or perhaps better still by the use of the support for drawing models..
When all are ready, the pupils should draw a horizontal line about three inches long, one inch and a half from the top of the third blank page and equally distant from the left and the right ends of the page, as shown on a small scale at A B, in Fig. 36, for the long diameter of the ellipse. Now from the circle in front of them, the pupils should determine by pencil or string measurement the apparent length of the short diameter of the ellipse as compared with its long diameter. (For directions for pencil measuremenT) Suppose the short diameter to be one third of the long one ; them bisect AB at C and trisect it at i and 2, and through C, the centre, sketch a vertical straight line equal to one third of A B, making .0 one half of one third above C, and E .
one half of one third below C. Through A, B, D, and E, sketch the ellipse, observing closely the appearance of the real circle in front.
The ellipse is a simple and beautiful curve ; but it is a very subtle one, constantly changing its degree of curvature, and therefore very difficult to draw correctly. The pupil should observe that there is not the least part of it that can form a part of a circle or a straight line, nor is there any part of it like an angle. To criticize the work as it progresses, examine it upside down and while holding it vertically and horizontally.
ERRORS TO BE AVOIDED.
Beginners are very apt to make ellipses too wide or thick in proportion to their length. It is difficult for them to
understand that circles seen obliquely appear very different from
their real or characteristic shape. Fig. 37 shows some errors frequently committed. No. a is too narrow or pointed at the
ends. An ellipse cannot be sharp at the ends until it approaches
a straight line. No. b is too broad and thick at the ends. An
CED ellipse always tapers gradually from the middle toward the ends. When No. c has the ends and the sides very different in shape.
When the appearance of the circle has been drawn once according to previous directions, it should if possible be placed nearer the student and drawn again, that he may notice how the apparent width of the ellipse increases, as shown in Fig. 38.
o Now place the circle farther away (it can be placed on a neighboring desk or support) and draw it again, as seen in Fig. 39.
Both of these drawings can be made at the upper part of the left end of the third blank
page.
CONCENTRIC CIRCLES.
Place or draw with instruments one circle inside of another having the same centre, and let the pupils draw them at the upper part of the right end of the third blank page. For the principles governing the drawing of concentric circles, see page to.
|


