
Home >Directory of Drawing Lessons > Drawing Objects & Things > Geometric Shapes > Cones > How to Draw Cones & Vases & Vessels
How to Draw Cones, Vases, and Vessels with the following 3-Dimensional Geometrical Shapes Drawing Lessons & Tutorials
|


|
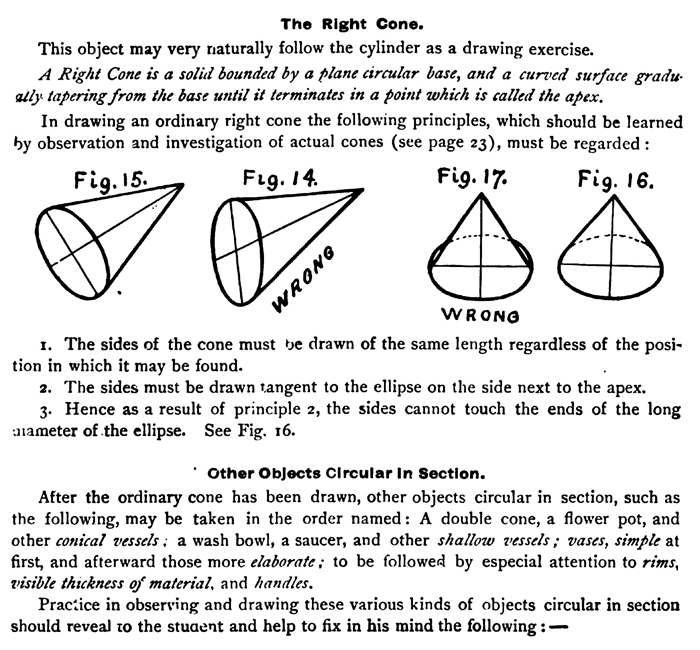
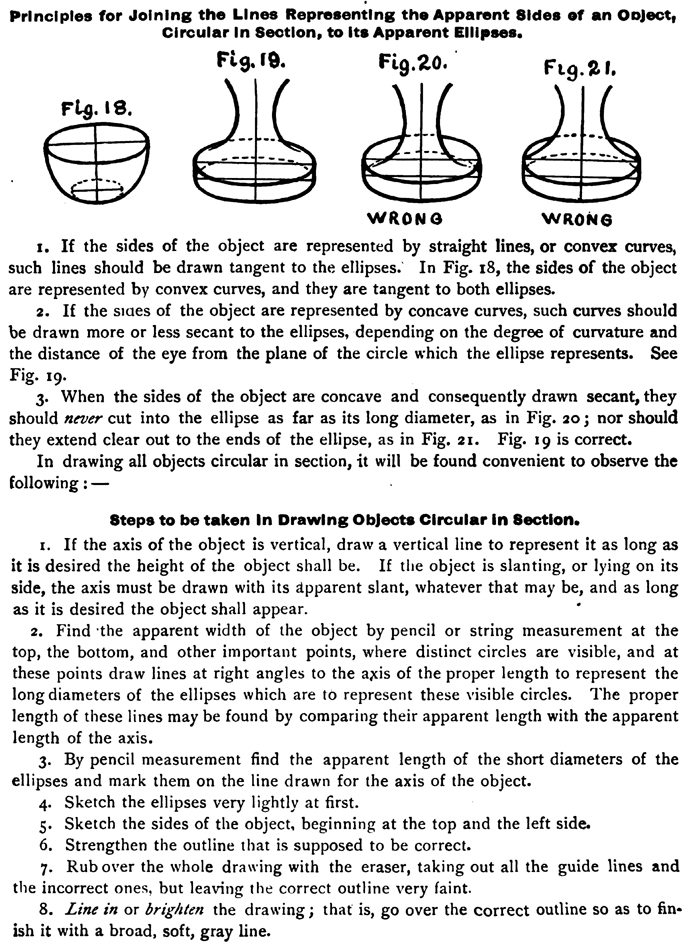
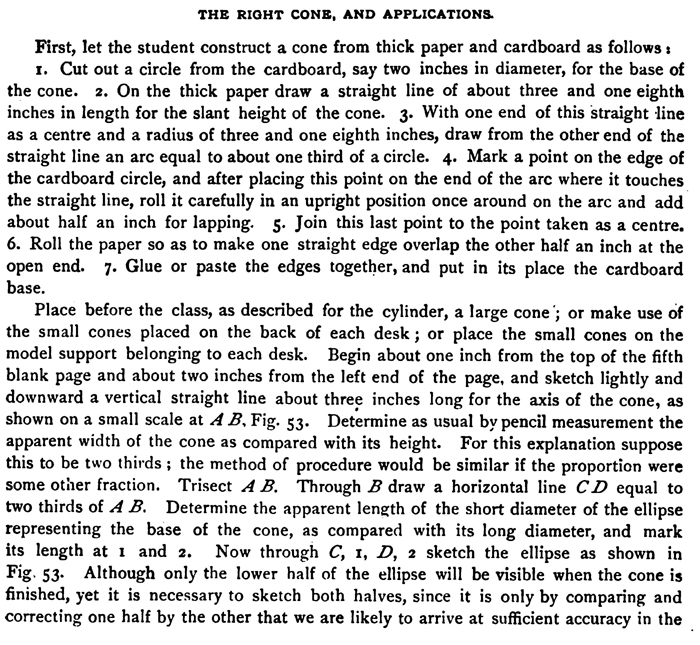
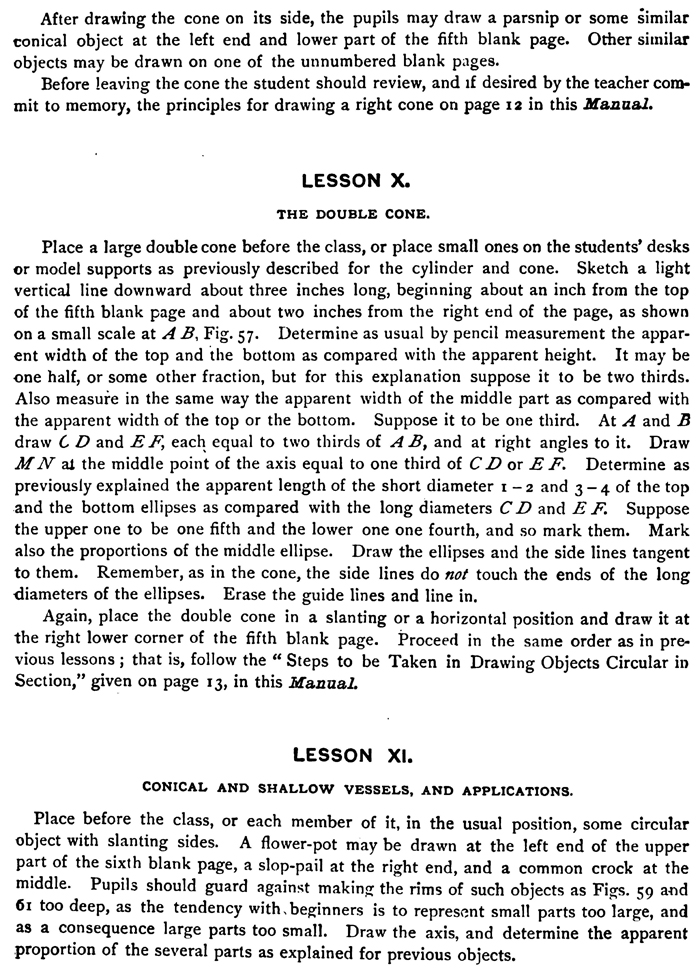
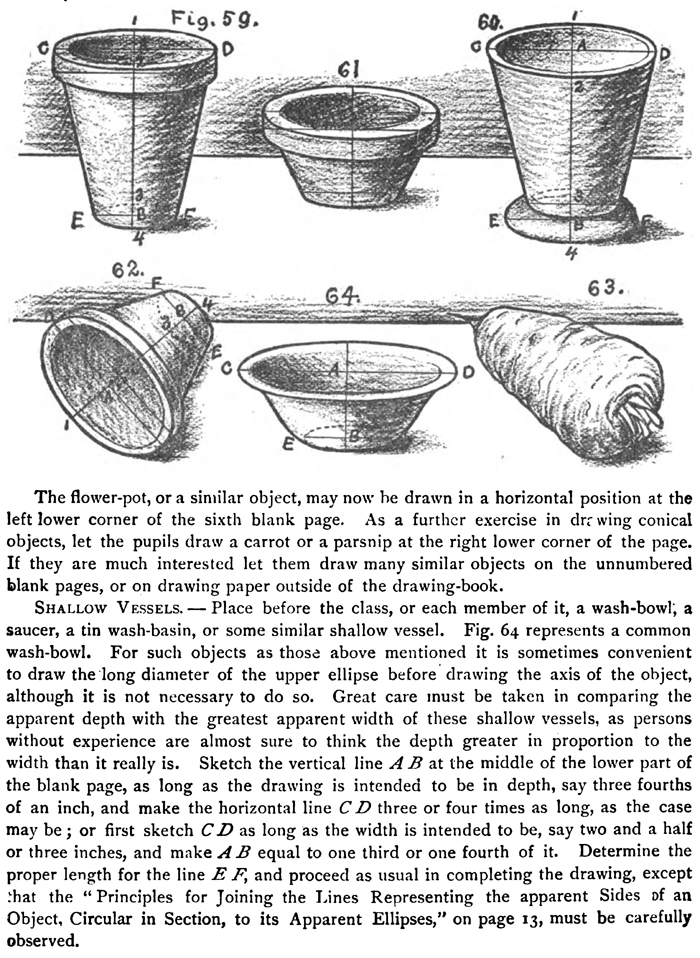
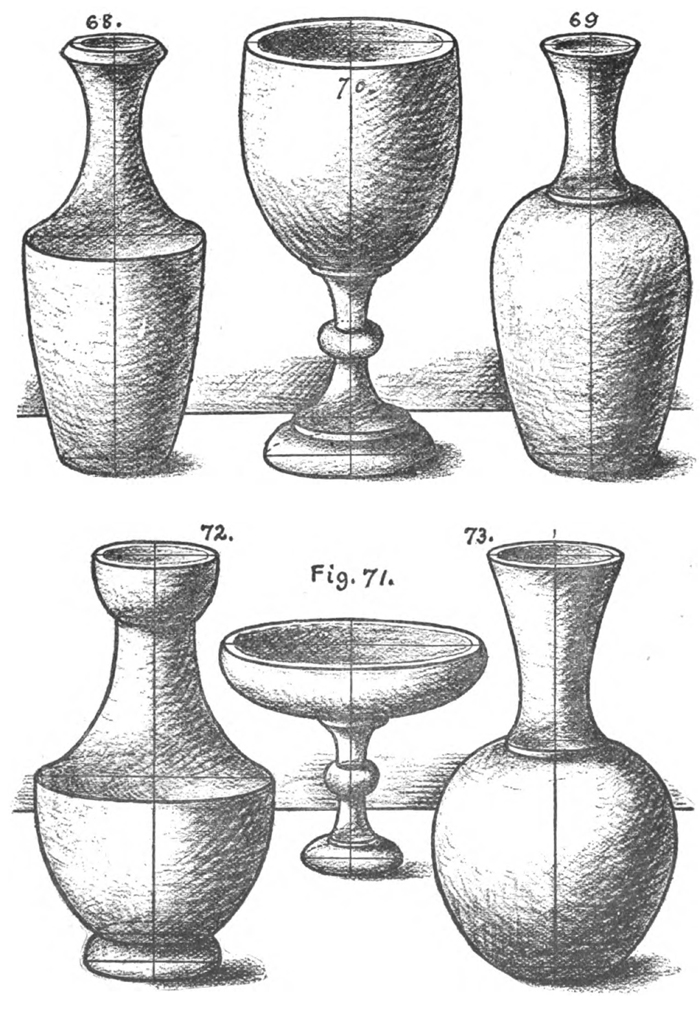
The above text is actually made up of images, so if you need to copy some of this text for an art assignment, please use the text below. Thank you. Drawing The Right Cone.This object may very naturally follow the cylinder as a drawing exercise. A Right Cone is a solid bounded by a plane circular base, and a curved surface gradually tapering from the base until it terminates in a point which is called the apex. In drawing an ordinary right cone the following principles, which should be learned by observation and investigation of actual cones, must be regarded : 1. The sides of the cone must be drawn of the same length regardless of the position in which it may be found. 2. The sides must be drawn tangent to the ellipse on the side next to the apex. 3. Hence as a result of principle 2, the sides cannot touch the ends of the long ammeter of the ellipse. See Fig. 16. Drawing Other Objects Circular In Section. After the ordinary cone has been drawn, other objects circular in section, such as the following, may be taken in the order named : A double cone, a flower pot, and other conical vessels; a wash bowl, a saucer, and other shallow vessels ; vases, simple at first, and afterward those more elaborate ; to be followe4 by especial attention to rims, visible thickness of material, and handles. Principles for Joining the Lines Representing the Apparent Sides of an Object, Circular In Section, to its Apparent Ellipses.1. If the sides of the object are represented by straight lines, or convex curves, such lines should be drawn tangent to the ellipses. In Fig. 18, the sides of the object are represented by convex curves, and they are tangent to both ellipses. 2. If the slues of the object are represented by concave curves, such curves should be drawn more or less secant to the ellipses, depending on the degree of curvature and the distance of the eye from the plane of the circle which the ellipse represents. See Fig. 19. 3. When the sides of the object are concave and consequently drawn secant, they should never cut into the ellipse as far as its long diameter, as in Fig. 20; nor should they extend clear out to the ends of the ellipse, as in Fig. 21. Fig. 19 is correct. In drawing all objects circular in section, it will be found convenient to observe the following :— Steps to be taken In Drawing Objects Circular In Section.1. If the axis of the object is vertical, draw a vertical line to represent it as long as it is desired the height of the object shall be. If the object is slanting, or lying on its side, the axis must be drawn with its apparent slant, whatever that may be, and as long as it is desired the object shall appear. 2. Find 'the apparent width of the object by pencil or string measurement at the top, the bottom, and other important points, where distinct circles are visible, and at these points draw lines at right angles to the axis of the proper length to represent the long diameters of the ellipses which are to represent these visible circles. The proper length of these lines may be found by comparing their apparent length with the apparent length of the axis. 3. By pencil measurement find the apparent length of the short diameters of the ellipses and mark them on the line drawn for the axis of the object. 4. Sketch the ellipses very lightly at first. 5. Sketch the sides of the object, beginning at the top and the left side. 6. Strengthen the outline that is supposed to be correct. 7. Rub over the whole drawing with the eraser, taking out all the guide lines and the incorrect ones, but leaving the correct outline very faint. 8. Line in or brighten the drawing; that is, go over the correct outline so as to finish it with a broad, soft, gray line. THE RIGHT CONE, AND APPLICATIONS.First, let the student construct a cone from thick paper and cardboard as follows 1. Cut out a circle from the cardboard, say two inches in diameter, for the base of the cone. 2. On the thick paper draw a straight line of about three and one eighth inches in length for the slant height of the cone. 3. With one end of this straight line as a center and a radius of three and one eighth inches, draw from the other end of the straight line an arc equal to about one third of a circle. 4. Mark a point on the edge of the cardboard circle, and after placing this point on the end of the arc where it touches the straight line, roll it carefully in an upright position once around on the arc and add about half an inch for lapping. 5. Join this last point to the point taken as a center 6. Roll the paper so as to make one straight edge overlap the other half an inch at the open end. 7. Glue or paste the edges together, and put in its place the cardboard base. Place before the class, as described for the cylinder, a large cone.; or make use of the small cones placed on the back of each desk; or place the small cones on the model support belonging to each desk. Begin about one inch from the top of the fifth blank page and about two inches from the left end of the page, and sketch lightly and downward a vertical straight line about three inches long for the axis of the cone, as shown on a small scale at A B, Fig. 53. Determine as usual by pencil measurement the apparent width of the cone as compared with its height. For this explanation suppose this to be two thirds ; the method of procedure would be similar if the proportion were some other fraction. Trisect A B. Through B draw a horizontal line CD equal to two thirds of A B. Determine the apparent length of the short diameter of the ellipse representing the base of the cone, as compared with its long diameter, and mark its length at 1 and 2. Now through C, 1, D, 2 sketch the ellipse as shown in Fig. 53. Although only the lower half of the ellipse will be visible when the cone is finished, yet it is necessary to sketch both halves, since it is only by comparing and correcting one half by the other that we are likely to arrive at sufficient accuracy in the part we wish to retain. Draw the sides of the cone so as to be tangent to the ellipse a little above the ends of the long diameter, or at a point on the ellipse between the ends of the long diameter and the vertex. On the model support of each pupil lay a small cone on its side; draw its appearance at the middle of the upper part of blank page 5. Remember that the axis of the cone is to be drawn first no matter what may be its apparent slant or length, also that the long diameter of the ellipse will be at right angles to the axis of the cone. Determine the apparent slant of the axis A B, and draw it as directed for finding the apparent slant of the axis of a cylinder when it appears to be slanting. Draw the long diameter of the ellipse CD, to represent the base of the cone, at right angles to the axis of the cone, A B. To determine the proper length of this long diameter compare the greatest apparent width of the cone with the apparent length of its axis. The short diameter of the ellipse r — 2 will coincide in apparent slant with the axis of the cone. Determine and mark its apparent length as directed in previous ellipses. Draw an ellipse through C, 1, D, 2, and the sides tangent to the ellipse. Another view of the cone, when lying on its side, may be drawn at the middle of the lower part of the fifth blank page. When students draw from a single large cone in a horizontal position their representations may be very different, but each one must draw it as he sees it, whether with a broad or a narrow ellipse, or with a vertical, a horizontal, or an oblique long diameter. DRAWING THE DOUBLE CONE.Place a large double cone before the class, or place small ones on the students' desks or model supports as previously described for the cylinder and cone. Sketch a light vertical line downward about three inches long, beginning about an inch from the top of the fifth blank page and about two inches from the right end of the page, as shown on a small scale at A B, Fig. 57. Determine as usual by pencil measurement the apparent width of the top and the bottom as compared with the apparent height. It may be one half, or some other fraction, but for this explanation suppose it to be two thirds. Also measure in the same way the apparent width of the middle part as compared with the apparent width of the top or the bottom. Suppose it to be one third. At A and B draw C D and E F, each equal to two thirds of A B, and at right angles to it. Draw MN at the middle point of the axis equal to one third of CD or EF. Determine as previously explained the apparent length of the short diameter 1 —2 and 3 — 4 of the top and the bottom ellipses as compared with the long diameters CD and EF. Suppose the upper one to be one fifth and the lower one one fourth, and so mark them. Mark also the proportions of the middle ellipse. Draw the ellipses and the side lines tangent to them. Remember, as in the cone, the side lines do not touch the ends of the long diameters of the ellipses. Erase the guide lines and line in. DRAWING CONICAL AND SHALLOW VESSELS, AND APPLICATIONS.Place before the class, or each member of it, in the usual position, some circular object with slanting sides. A flower-pot may be drawn at the left end of the upper part of the sixth blank page, a slop-pail at the right end, and a common crock at the middle. Pupils should guard against making the rims of such objects as Figs. 59 and 61 too deep, as the tendency with beginners is to represent small parts too large, and as a consequence large parts too small. Draw the axis, and determine the apparent proportion of the several parts as explained for previous objects. The flower-pot, or a similar object, may now he drawn in a horizontal position at the left lower corner of the sixth blank page. As a further exercise in drawing conical objects, let the pupils draw a carrot or a parsnip at the right lower corner of the page. If they are much interested let them draw many similar objects on the unnumbered blank pages, or on drawing paper outside of the drawing-book. DRAWING SHALLOW VESSELS.Place before the class, or each member of it, a wash-bowl; a saucer, a tin wash-basin, or some similar shallow vessel. Fig. 64 represents a common wash-bowl. For such objects as those above mentioned it is sometimes convenient to draw the long diameter of the upper ellipse before drawing the axis of the object, although it is not necessary to do so. Great care must be taken in comparing the apparent depth with the greatest apparent width of these shallow vessels, as persons without experience are almost sure to think the depth greater in proportion to the width than it really is. Sketch the vertical line AB at the middle of the lower part of the blank page, as long as the drawing is intended to be in depth, say three fourths of an inch, and make the horizontal line CD three or four times as long, as the case may be ; or first sketch CD as long as the width is intended to be, say two and a half or three inches, and make A B equal to one third or one fourth of it. Determine the proper length for the line E F, and proceed as usual in completing the drawing, except that the " Principles for Joining the Lines Representing the apparent Sides of an Object. SIMPLE VASES IN A VERTICAL POSITION. It will be noticed that all the objects thus far drawn, except the wash-bowl, have straight sides. After a fair degree of success' in representing objects with straight sides, such as have already been presented, a simple vase form, such as that represented by Fig. 65, may be placed before the class, to be followed by others, growing more complex in outline, or having a greater degree of subtlety in curvature, such as Figs. 66 and 67, and those on future pages. If the particular vases here presented are not available, others can be used ; and it is well to use others sometimes, even if these are in possession of the teacher. |


Privacy Policy ..... Contact Us