
Home >Directory of Drawing Lessons > Drawing Objects & Things > Geometric Shapes > Cylinders > How to Draw and Shade Cylinders
DRAWING & SHADING CYLINDERS : How to Draw Cylinders and Tubes in Various Oblique Positions
|


|
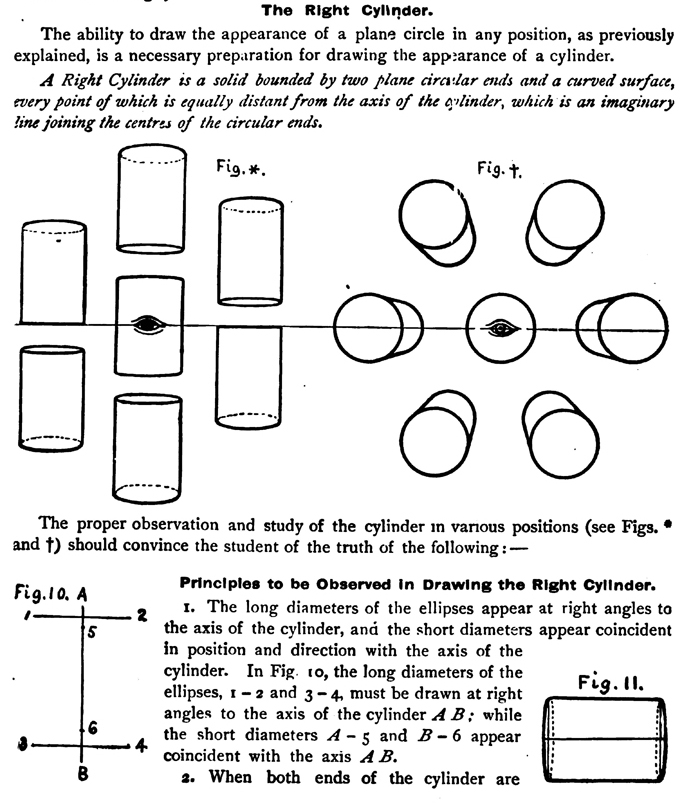
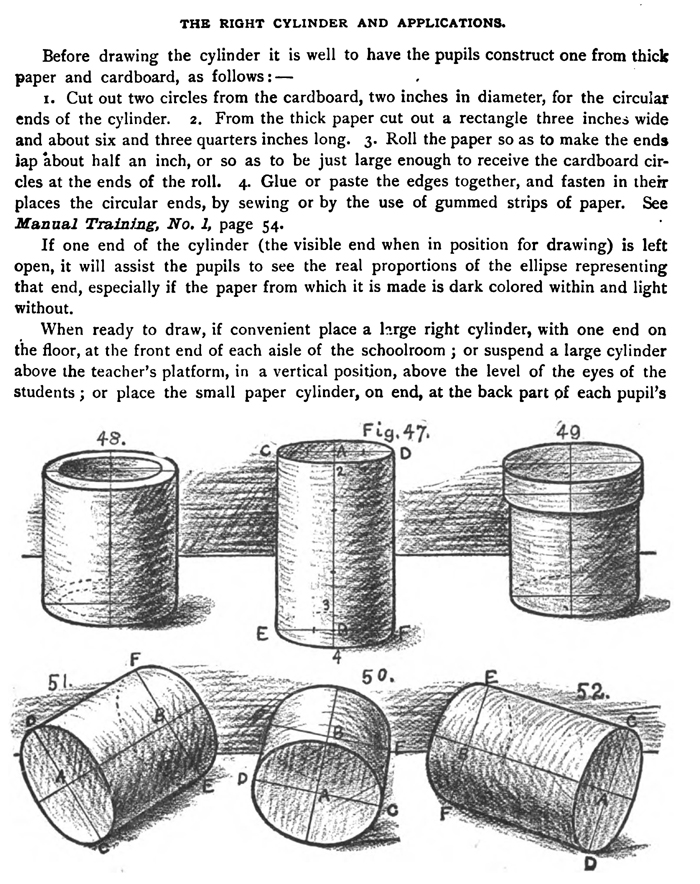
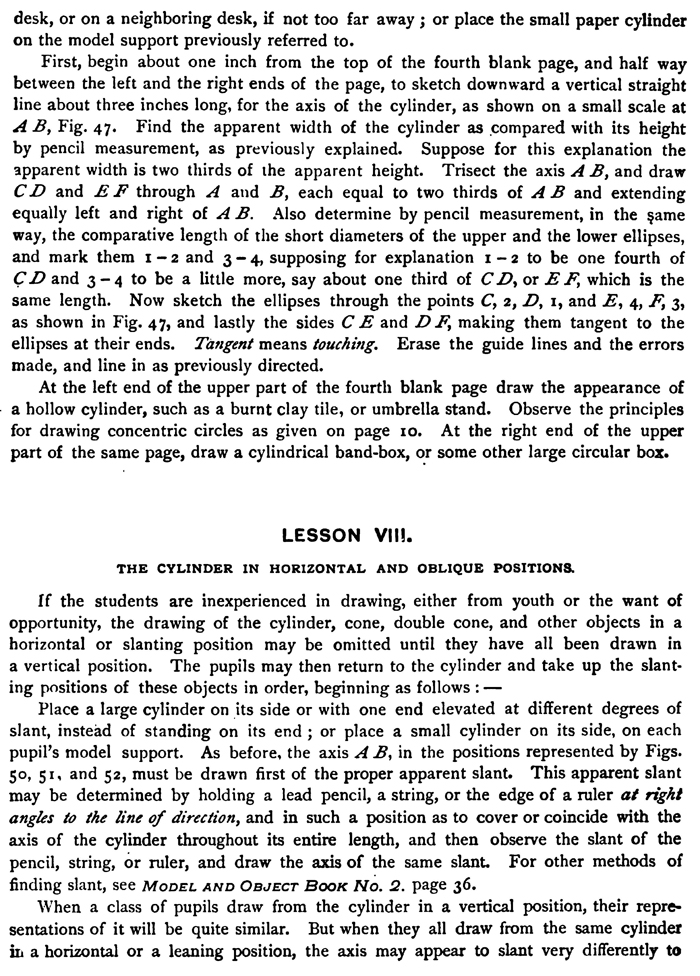
The above text is actually made up of images, so if you need to copy some of the text...you can find it below. Drawing The Right CylinderThe ability to draw the appearance of a plane circle in any position, as previously explained, is a necessary preparation for drawing the a A Right Cylinder is a solid bounded by two plane circular ends and a curved surface, every point of which is equally distant from the axis of the plunder, which is an imaginary line joining the centers of the circular ends. The proper observation and study of the cylinder in venous positions (see Figs. and t) should convince the student of the truth of the following:— Principles to be Observed In Drawing the Right Cylinder. 1.The long diameters of the ellipses appear at right angles to the axis of the cylinder, and the short diameters appear coincident in position and direction with the axis of the cylinder. In Fig 10, the long diameters of the ellipses, t - 2 and 3 - 4, must be drawn at right angles to the axis of the cylinder A B while the short diameters A - 5 and B - 6 appear coincident with the axis A B. 2. When both ends of the cylinder are equally distant from the eye, unless the cylinder is very snort, the surface of the circular ends will be invisible. See Fig. 11. 3. The visible end is always nearer the eye than the invisible end. 4. The ellipse representing the visible end is always longer and narrower in proportion to its size than the invisible end. 5. The ellipse representing the invisible end is always wider and shorter in proportion to its size than the visible end. Principles 3, 4, and 5 are illustrated by Fig. 12. 6. A cylinder in a vertical position must have its sides represented by lines parallel with each other, vertical, and tangent to the extreme ends of the ellipses ; but when in a horizontal position or in an inclined position, it may have its sides represented by lines converging toward the invisible end, as shown in Fig. 13. THE RIGHT CYLINDER AND APPLICATIONS.Before drawing the cylinder it is well to have the pupils construct one from thick paper and cardboard, as follows :— 1. Cut out two circles from the cardboard, two inches in diameter, for the circular ends of the cylinder. 2. From the thick paper cut out a rectangle three inches wide and about six and three quarters inches long. 3. Roll the paper so as to make the ends lap 'about half an inch, or so as to be just large enough to receive the cardboard circles at the ends of the roll. 4. Glue or paste the edges together, and fasten in their places the circular ends, by sewing or by the use of gummed strips of paper. If one end of the cylinder (the visible end when in position for drawing) is left open, it will assist the pupils to see the real proportions of the ellipse representing that end, especially if the paper from which it is made is dark colored within and light without. When ready to draw, if convenient place a large right cylinder, with one end on the floor, at the front end of each aisle of the schoolroom ; or suspend a large cylinder above the teacher's platform, in a vertical position, above the level of the eyes of the students ; or place the small paper cylinder, on end, at the back part of each pupil's desk, or on a neighboring desk, if not too far away ; or place the small paper cylinder on the model support previously referred to. First, begin about one inch from the top of the fourth blank page, and half way between the left and the right ends of the page, to sketch downward a vertical straight line about three inches long, for the axis of the cylinder, as shown on a small scale at B, Fig. 47. Find the apparent width of the cylinder as compared with its height by pencil measurement, as previously explained. Suppose for this explanation the apparent width is two thirds of the apparent height. Trisect the axis A B, and draw CD and EF through A and B, each equal to two thirds of AB and extending equally left and right of A B. Also determine by pencil measurement, in the same way, the comparative length of the short diameters of the upper and the lower ellipses, and mark them 1 - 2 and 3 – 4, supposing for explanation 1 –2 to be one fourth of CD and 3 –4 to be a little more, say about one third of CD, or E F, which is the same length. Now sketch the ellipses through the points C, 2, D, 1, and E, 4, F, 3, as shown in Fig. 47, and lastly the sides C E and D F, making them tangent to the ellipses at their ends. Tangent means touching. Erase the guide lines and the errors made, and line in as previously directed. At the left end of the upper part of the fourth blank page draw the appearance of a hollow cylinder, such as a burnt clay tile, or umbrella stand. Observe the principles for drawing concentric circles as given on page to. At the right end of the upper part of the same page, draw a cylindrical band-box, or some other large circular box. THE CYLINDER IN HORIZONTAL AND OBLIQUE POSITIONS.If the students are inexperienced in drawing, either from youth or the want of opportunity, the drawing of the cylinder, cone, double cone, and other objects in a horizontal or slanting position may be omitted until they have all been drawn in a vertical position. The pupils may then return to the cylinder and take up the slanting positions of these objects in order, beginning as follows :— Place a large cylinder on its side or with one end elevated at different degrees of slant, instead of standing on its end ; or place a small cylinder on its side, on each pupil's model support. As before, the axis A B, in the positions represented by Figs. 50, 51, and 52, must be drawn first of the proper apparent slant. This apparent slant may be determined by holding a lead pencil, a string, or the edge of a ruler at right angles to the line of direction, and in such a position as to cover or coincide with the axis of the cylinder throughout its entire length, and then observe the slant of the pencil, string, or ruler, and draw the axis of the same slant. When a class of pupils draw from the cylinder in a vertical position, their representations of it will be quite similar. But when they all draw from the same cylinder ill a horizontal or a leaning position, the axis may appear to slant very differently to different pupils, and it must be so represented. To some the ellipses may appear quite circular and to others quite narrow, yet each must represent what he sees. If small cylinders are used on the model supports, greater uniformity may be secured, if it is desired.
|
 ppearance of a cylinder.
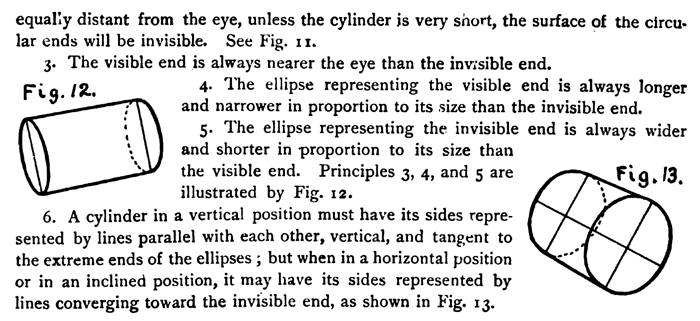

Privacy Policy ..... Contact Us