
Home >Directory of Drawing Lessons > Drawing Objects & Things > Geometric Shapes > Planes > How to Draw Rectangular Solids
DRAWING RECTANGULAR SOLIDS AND HEXAGONAL PLANES with the following Drawing Lesson
|


|
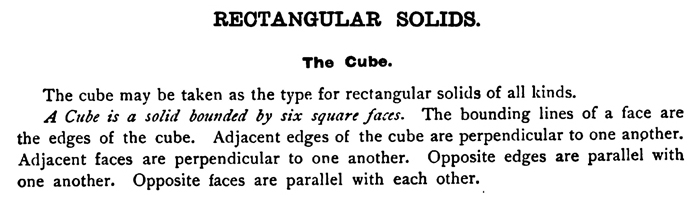
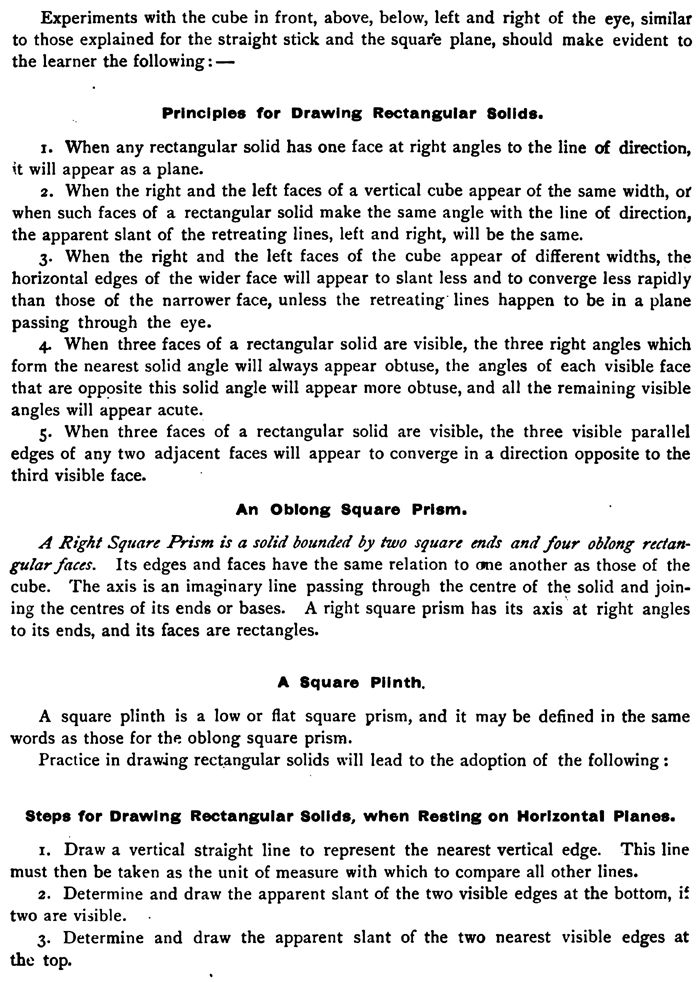
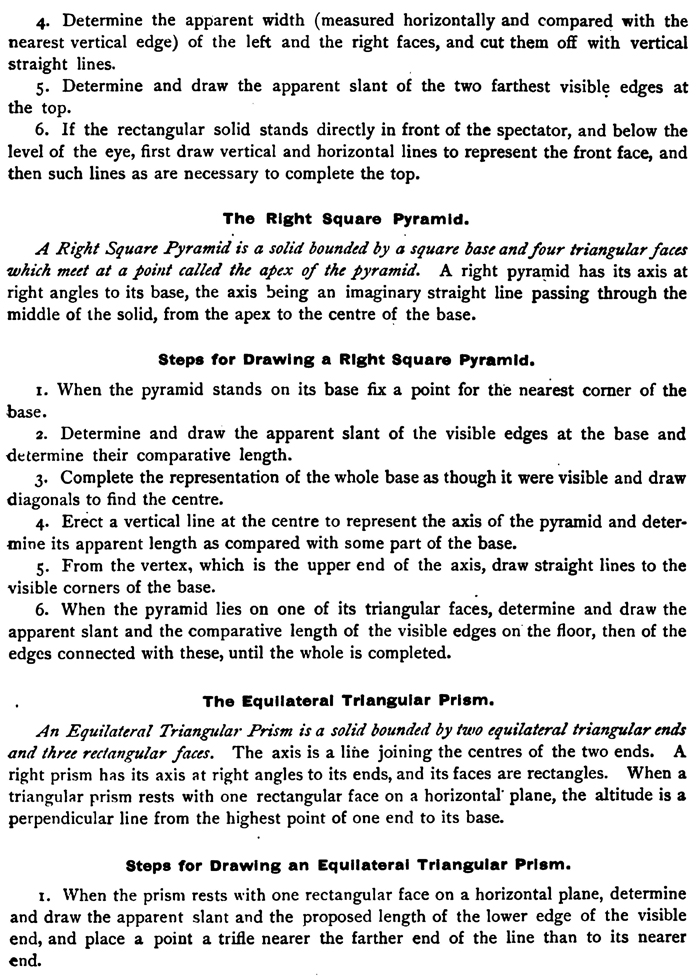
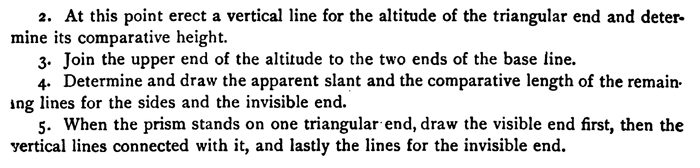
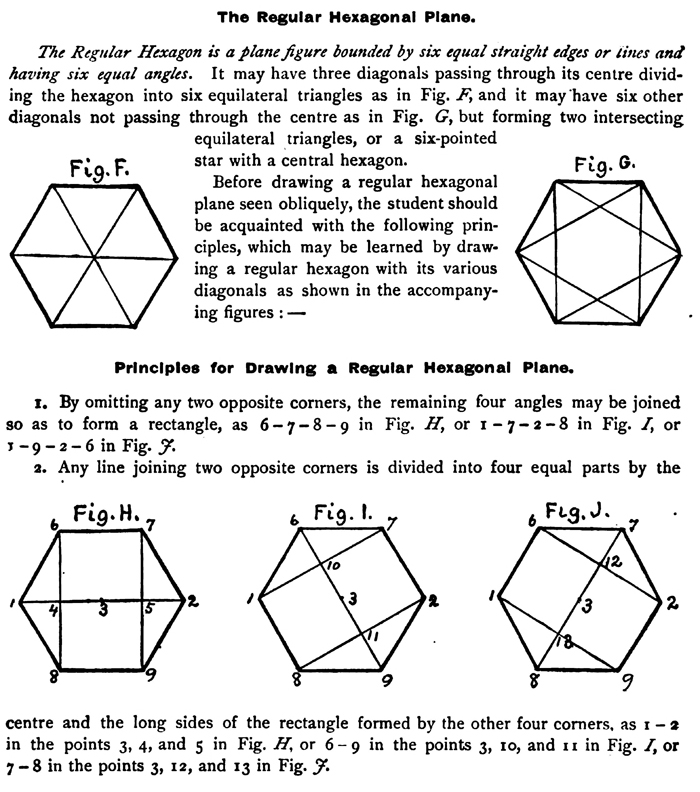
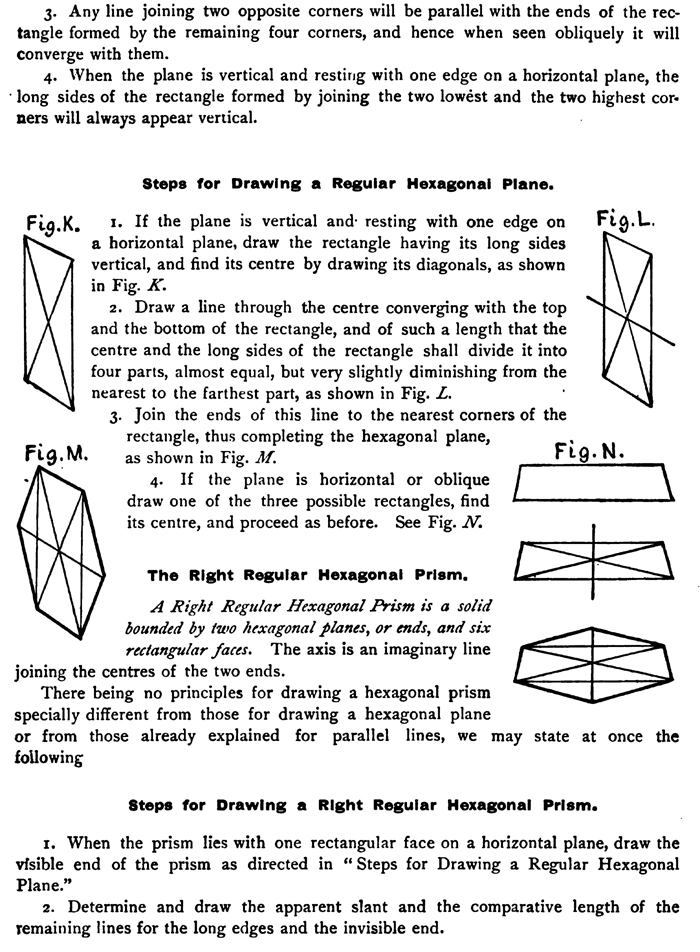
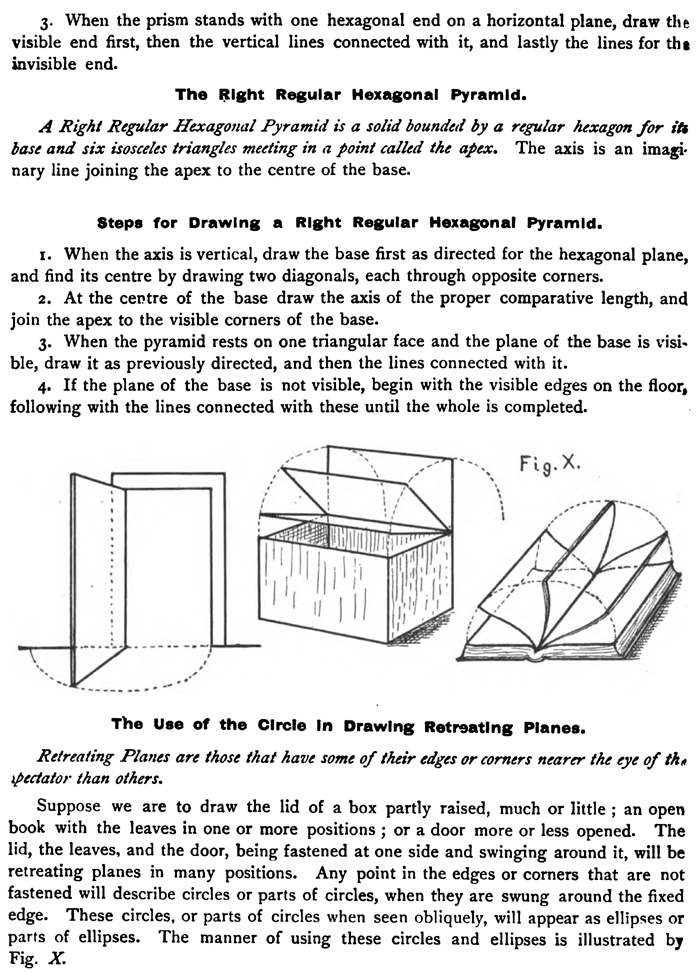
[The Text Above is Saves as Images, if you need to copy some text, it is below] DRAWING RECTANGULAR SOLIDS.Drawing CubesThe cube may be taken as the type for rectangular solids of all kinds. A Cube is a solid bounded by six square faces. The bounding lines of a face are the edges of the cube. Adjacent edges of the cube are perpendicular to one another. Adjacent faces are perpendicular to one another. Opposite edges are parallel with one another. Opposite faces are parallel with each other. Experiments with the cube in front, above, below, left and right of the eye, similar to those explained for the straight stick and the square plane, should make evident to the learner the following:— Principles for Drawing Rectangular Solids.1. When any rectangular solid has one face at right angles to the line of direction, it will appear as a plane. 2. When the right and the left faces of a vertical cube appear of the same width, or when such faces of a rectangular solid make the same angle with the line of direction, the apparent slant of the retreating lines, left and right, will be the same. 3. When the right and the left faces of the cube appear of different widths, the horizontal edges of the wider face will appear to slant less and to converge less rapidly than those of the narrower face, unless the retreating lines happen to be in a plane passing through the eye. 4. When three faces of a rectangular solid are visible, the three right angles which form the nearest solid angle will always appear obtuse, the angles of each visible face that are opposite this solid angle will appear more obtuse, and all the remaining visible angles will appear acute. 5. When three faces of a rectangular solid are visible, the three visible parallel edges of any two adjacent faces will appear to converge in a direction opposite to the third visible face. Drawing Oblong Square Prisms.A Right Square Prism is a solid bounded by two square ends and four oblong rectangular faces. Its edges and faces have the same relation to one another as those of the cube. The axis is an imaginary line passing through the center of the solid and joining the centers of its ends or bases. A right square prism has its axis at right angles to its ends, and its faces are rectangles. Drawing Square Plinths.A square plinth is a low or fiat square prism, and it may be defined in the same words as those for the oblong square prism. Practice in drawing rectangular solids will lead to the adoption of the following : Steps for Drawing Rectangular Solids, when Resting on Horizontal Planes.1. Draw a vertical straight line to represent the nearest vertical edge. This line must then be taken as the unit of measure with which to compare all other lines. 2. Determine and draw the apparent slant of the two visible edges at the bottom, two are visible. 3. Determine and draw the apparent slant of the two nearest visible edges at the top. 4. Determine the apparent width (measured horizontally and compared with the nearest vertical edge) of the left and the right faces, and cut them off with vertical straight lines. 5. Determine and draw the apparent slant of the two farthest visible edges at the top. 6. If the rectangular solid stands directly in front of the spectator, and below the level of the eye, first draw vertical and horizontal lines to represent the front face, and then such lines as are necessary to complete the top. Drawing Right Square Pyramids.A Right Square Pyramid is a solid bounded by a square base and four triangular faces which meet at a point called the apex of the pyramid. A right pyramid has its axis at right angles to its base, the axis being an imaginary straight line passing through the middle of the solid, from the apex to the center of the base. Steps for Drawing a Right Square Pyramid.1. When the pyramid stands on its base fix a point for the nearest corner of the base. 2. Determine and draw the apparent slant of the visible edges at the base and determine their comparative length. 3. Complete the representation of the whole base as though it were visible and draw diagonals to find the center 4. Erect a vertical line at the center to represent the axis of the pyramid and determine its apparent length as compared with some part of the base. 5. From the vertex, which is the upper end of the axis, draw straight lines to the visible corners of the base. 6. When the pyramid lies on one of its triangular faces, determine and draw the apparent slant and the comparative length of the visible edges on the floor, then of the edges connected with these, until the whole is completed. Drawing Equilateral Triangular Prisms.An Equilateral Triangular Prism is a solid bounded by two equilateral triangular ends and three rectangular faces. The axis is a line joining the centers of the two ends. A right prism has its axis at right angles to its ends, and its faces are rectangles. When a triangular prism rests with one rectangular face on a horizontal' plane, the altitude is a perpendicular line from the highest point of one end to its base. Steps for Drawing an Equilateral Triangular Prism.1. When the prism rests with one rectangular face on a horizontal plane, determine and draw the apparent slant and the proposed length of the lower edge of the visible end, and place a point a trifle nearer the farther end of the line than to its nearer end. 2. At this point erect a vertical line for the altitude of the triangular end and determine its comparative height. 3. Join the upper end of the altitude to the two ends of the base line. 4. Determine and draw the apparent slant and the comparative length of the remaining lines for the sides and the invisible end. 5. When the prism stands on one triangular end, draw the visible end first, then the vertical lines connected with it, and lastly the lines for the invisible end. The Regular Hexagonal Plane.The Regular Hexagon is a plane figure bounded by six equal straight edges or lines and having six equal angles. It may have three diagonals passing through its center dividing the hexagon into six equilateral triangles as in Fig. F, and it may have six other diagonals not passing through the center as in Fig. G, but forming two intersecting equilateral triangles, or a six-pointed star with a central hexagon. Before drawing a regular hexagonal plane seen obliquely, the student should be acquainted with the following principles, which may be learned by drawing a regular hexagon with its various diagonals as shown in the accompanying figures :— Principles for Drawing a Regular Hexagonal Plane. 1. By omitting any two opposite corners, the remaining four angles may be joined so as to form a rectangle, as 6 - 7 - 8 - 9 in Fig. H, or 1 - 7 - 2 - 8 in Fig. I, or 2. Any line joining two opposite corners is divided into four equal parts by the center and the long sides of the rectangle formed by the other four corners, as 1 - 2 in the points 3, 4, and 5 in Fig. H, or 6 - 9 in the points 3, to, and 11 in Fig. I, or 7 - 8 in the points 3, 12, and 13 in Fig. y. 3. Any line joining two opposite corners will be parallel with the ends of the rectangle formed by the remaining four corners, and hence when seen obliquely it will converge with them. 4. When the plane is vertical and resting with one edge on a horizontal plane, the • long sides of the rectangle formed by joining the two lowest and the two highest corners will always appear vertical. Steps for Drawing a Regular Hexagonal Plane.1. If the plane is vertical and resting with one edge on a horizontal plane, draw the rectangle having its long sides vertical, and find its center by drawing its diagonals, as shown in Fig. K. 2. Draw a line through the center converging with the top and the bottom of the rectangle, and of such a length that the center and the long sides of the rectangle shall divide it into four parts, almost equal, but very slightly diminishing from the nearest to the farthest part, as shown in Fig. L. 3. Join the ends of this line to the nearest corners of the rectangle, thus completing the hexagonal plane, as shown in Fig. Al 4. If the plane is horizontal or oblique draw one of the three possible rectangles, find its center, and proceed as before. See Fig. N. The Right Regular Hexagonal Prism.A Right Regular Hexagonal Prism is a solid bounded by two hexagonal planes, or ends, and six rectangular faces. The axis is an imaginary line joining the centers of the two ends. There being no principles for drawing a hexagonal prism specially different from those for drawing a hexagonal plane or from those already explained for parallel lines, we may state at once the following Steps for Drawing a Right Regular Hexagonal Prism.1. When the prism lies with one rectangular face on a horizontal plane, draw the visible end of the prism as directed in " Steps for Drawing a Regular Hexagonal Plane." 2. Determine and draw the apparent slant and the comparative length of the remaining lines for the long edges and the invisible end. 3. When the prism stands with one hexagonal end on a horizontal plane, draw the visible end first, then the vertical lines connected with it, and lastly the lines for the invisible end. Drawing Right Regular Hexagonal Pyramids.A Right Regular Hexagonal Pyramid is a solid bounded by a regular hexagon for its base and six isosceles triangles meeting in a point called the apex. The axis is an imaginary line joining the apex to the center of the base. Steps for Drawing a Right Regular Hexagonal Pyramid.1. When the axis is vertical, draw the base first as directed for the hexagonal plane, and find its center by drawing two diagonals, each through opposite corners. 2. At the center of the base draw the axis of the proper comparative length, and join the apex to the visible corners of the base. 3. When the pyramid rests on one triangular face and the plane of the base is visible, draw it as previously directed, and then the lines connected with it. 4. If the plane of the base is not visible, begin with the visible edges on the floor, following with the lines connected with these until the whole is completed. The Use of the Circle In Drawing Retreating Planes.Retreating Planes are those that have some of their edges or corners nearer the eye of the spectator than others. Suppose we are to draw the lid of a box partly raised, much or little ; an open book with the leaves in one or more positions; or a door more or less opened. The lid, the leaves, and the door, being fastened at one side and swinging around it, will be retreating planes in many positions. Any point in the edges or corners that are not fastened will describe circles or parts of circles, when they are swung around the fixed edge. These circles, or parts of circles when seen obliquely, will appear as ellipses or parts of ellipses. The manner of using these circles and ellipses is illustrated by Fig. X. |
Privacy Policy ..... Contact Us