
Home >Directory of Drawing Lessons > Drawing Objects & Things > Geometric Shapes > Planes > How to Draw Square and Rectangular Planes
DRAWING SQUARE PLANES in Various Positions with the following Drawing Lesson
|


|
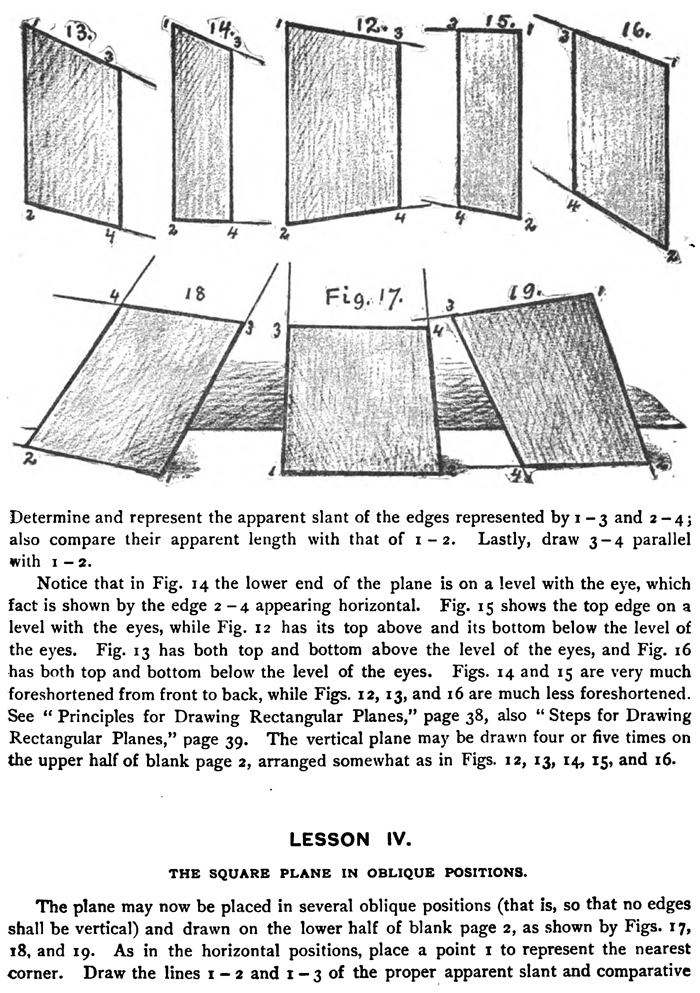
[The Text Above is Saves as Images, if you need to copy some text, it is below] THE STRAIGHT STICK OR EDGE.The blank pages numbered from 1 to 12 are to be used in drawing the regular exercises of this book. Besides these there are four blank pages not numbered, which are to be used for examinations, free movement exercises, or home work, as the teacher may direct. For the first practical lesson place a straight slender stick or iron rod before the class. It may be placed on the teacher's platform, or leaned against the wall or the desk, or placed anywhere in full view of the class. If it is not convenient to obtain a stick, draw straight lines on the platform in different positions with white crayon. The lesson is to draw or represent by a line of convenient length, say two or three inches long, the apparent slant of the stick or edge, in many different positions. The drawings for this lesson should be made un the upper half of blank page 1, arranged somewhat as in Figs. 1, 2, 3, 4, 5, 6, 7, and 8. THE SQUARE PLANE IN A HORIZONTAL POSITION.When pupils can represent a rod, stick, or line in any position, a square plane may be drawn. Place a square plane, two or more feet in size, on a horizontal plane, as the teacher's platform, below the level of the eyes of the pupils. This plane may be cut from stiff pasteboard or sheet-metal; or a square may be marked on the teacher's platform with white crayon; or a small square may be placed on the back part of each desk or on a neighboring desk. When all are ready to draw, place a point I for the nearest corner of, the plane, as in Figs. 10 and 11. This plane may be drawn first at the left end and again at the right end of the lower half of blank page 1. Now ascertain as previously shown, and draw, the apparent slant of the edge represented by 1 - 2, and then by 1 - 3. If 1 - 2 is assumed (which may be about two and one half inches long), compare the apparent length of 1 - 3 with the apparent length of 1 - 2 in the object by means of pencil or string measurement. Lastly draw 2 -4 converging with 1 - 3, and 3-4 converging with 1- 2. The lines 1 - 2, 1 - 3, 2 - 4, and 3 - 4 may be sketched, at first, considerably longer than it is intended they shall be, because it is easier to determine the convergence of long lines than of short ones. If two corners, as 1 and 2 in Fig. 9, are the same distance from the eye, draw first a horizontal line 1 - 2 at the middle of the lower half of the first blank page for the front edge of the plane. Now ascertain and draw the apparent slant of the edges represented by I - 3 and 2 - 4, and compare their apparent length with that of 1 - 2. Notice that they must converge upward. Lastly, draw 3 - 4 parallel with 1- 2. THE SQUARE PLANE IN A VERTICAL POSITION.The same plane may now be placed before the class in a vertical position above the level of the pupils' eyes, at their level, with one of the upright edges turned away from the pupils a little, then more, and much more, as illustrated by Figs. 12, 13, 14, 15, and 16. In all these positions, the plane being vertical, two of its edges, the right and the left, must appear vertical, and they must be so drawn. Hence, draw a vertical line 1 - 2, about three inches long, to represent the nearer vertical edge of the plane. This line will be the unit of measure for all the other lines. Determine and represent the apparent slant of the edges represented by x —3 and 2 —4; also compare their apparent length with that of 1 — 2. Lastly, draw 3-4 parallel with 1 — 2. Notice that in Fig. 14 the lower end of the plane is on a level with the eye, which fact is shown by the edge 2 -4 appearing horizontal. Fig. 15 shows the top edge on a level with the eyes, while Fig. 12 has its top above and its bottom below the level of the eyes. Fig. 13 has both top and bottom above the level of the eyes, and Fig. 16 has both top and bottom below the level of the eyes. Figs. 14 and 15 are very much foreshortened from front to back, while Figs. 12, 13, and 16 are much less foreshortened. The vertical plane may be drawn four or five times on the upper half of blank page 2, arranged somewhat as in Figs. 12, 13, 14, 15, and 16. THE SQUARE PLANE IN OBLIQUE POSITIONS.The plane may now be placed in several oblique positions (that is, so that no edges shall be vertical) and drawn on the lower half of blank page 2, as shown by Figs. 17, 18, and 19. As in the horizontal positions, place a point 1 to represent the nearest corner. Draw the lines 1 — 2 and x —3 of the proper apparent slant and comparative length. Draw 3 - 4 and 2 - 4 of their proper apparent slant, and their intersection 4 will be the fourth corner. In Fig. 18 the top of the plane leans from the spectator and toward the right; in Fig. 17 the top is leaning backward, or from the spectator ; in Fig. 19 the top is leaning forward and toward the left.
|


Privacy Policy ..... Contact Us