
Home >Directory of Drawing Lessons > Drawing Objects & Things > Geometric Shapes > Prisms > How to Draw Equilateral Triangular Prisms
DRAWING EQUILATERAL TRIANGULAR PRISMS : Learn all about how to draw a prism, with triangular sides and making foldable paper nets for this geometric shape
|


|
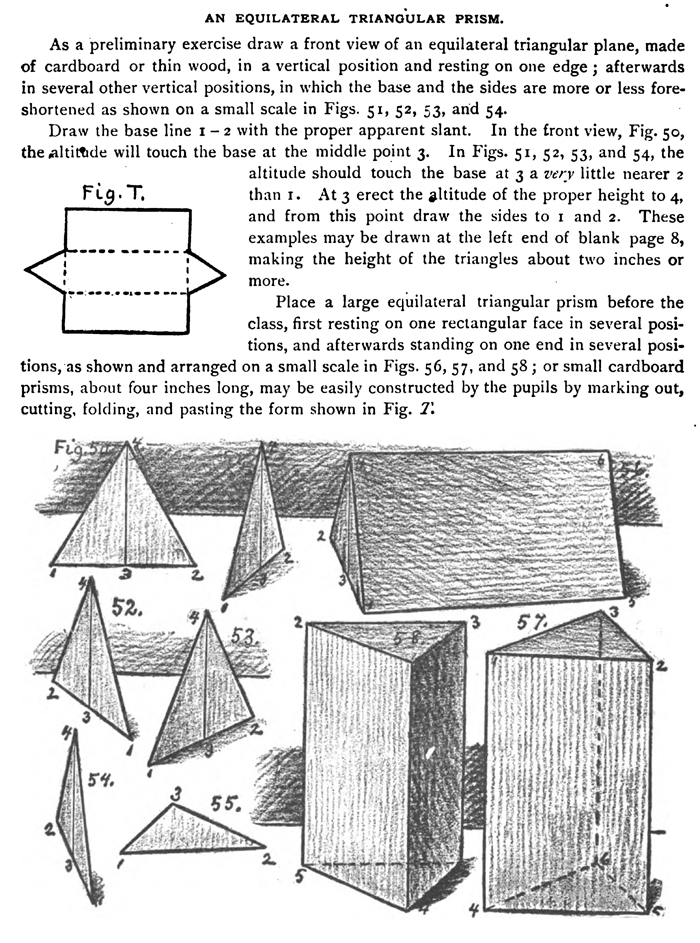
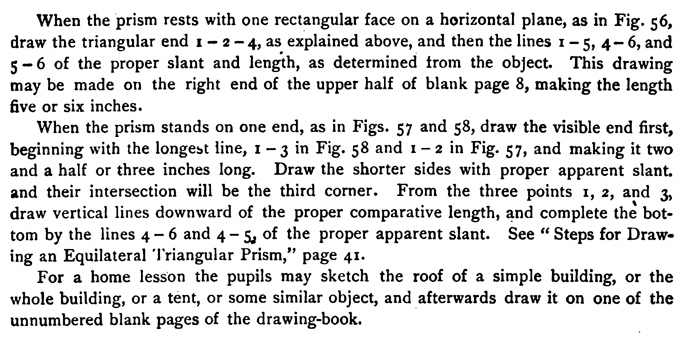
[The Text Above is Saves as Images, if you need to copy some text, it is below] AN EQUILATERAL TRIANGULAR PRISM.As a preliminary exercise draw a front view of an equilateral triangular plane, made of cardboard or thin wood, in a vertical position and resting on one edge ; afterwards in several other vertical positions, in which the base and the sides are more or less foreshortened as shown on a small scale in Figs. 51, 52, 53, and 54. Draw the base line 1— 2 with the proper apparent slant. In the front view, Fig. 50, the altitude will touch the base at the middle point 3. In Figs. 51, 52, 53, and 54, the altitude should touch the base at 3 a very little nearer 2 than 1. At 3 erect the altitude of the proper height to 4, and from this point draw the sides to 1 and 2. These examples may be drawn at the left end of blank page 8, making the height of the triangles about two inches or more. Place a large equilateral triangular prism before the class, first resting on one rectangular face in several positions, and afterwards standing on one end in several positions, as shown and arranged on a small scale in Figs. 56, 57, and 58 ; or small cardboard prisms, about four inches long, may be easily constructed by the pupils by marking out, cutting, folding, and pasting the form shown in Fig. 2. When the prism rests with one rectangular face on a horizontal plane, as in Fig. 56, draw the triangular end 1- 2 -4, as explained above, and then the lines 1 -5, 4- 6, and 5 - 6 of the proper slant and length, as determined from the object. This drawing may be made on the right end of the upper half of blank page 8, making the length five or six inches. When the prism stands on one end, as in Figs. 57 and 58, draw the visible end first, beginning with the longest line, 1 - 3 in Fig. 58 and 1- 2 in Fig. 57, and making it two and a half or three inches long. Draw the shorter sides with proper apparent slant. and their intersection will be the third corner. From the three points 1, 2, and 3, draw vertical lines downward of the proper comparative length, and complete the bottom by the lines 4 - 6 and 4 - 5, of the proper apparent slant. For a home lesson the pupils may sketch the roof of a simple building, or the whole building, or a tent, or some similar object, and afterwards draw it on a piece of paper.
|
Privacy Policy ..... Contact Us