
Home >Directory of Drawing Lessons > Drawing Objects & Things > Geometric Shapes > Helpful Geometry for Artists
DRAWING GEOMETRIC SHAPES AND FORMS with the Following Helpful Geometry Knowledge for Artists
|


|
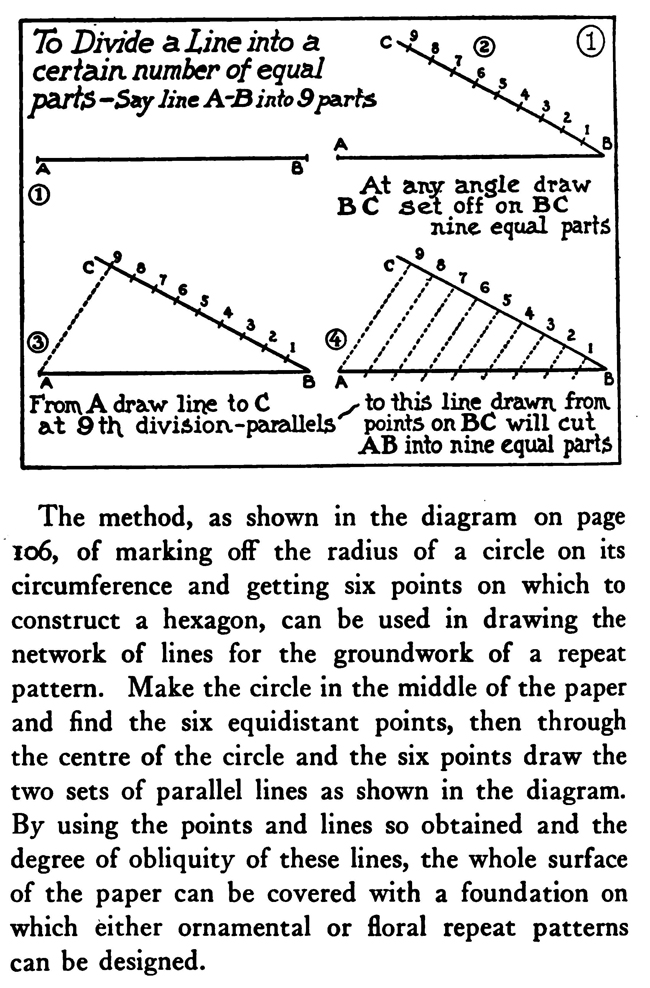
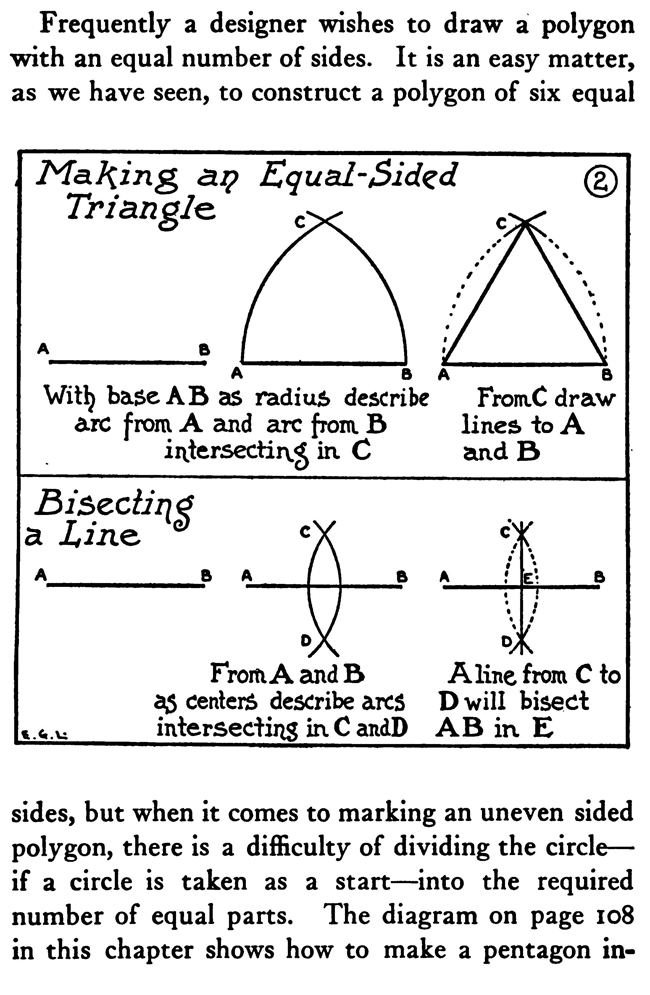
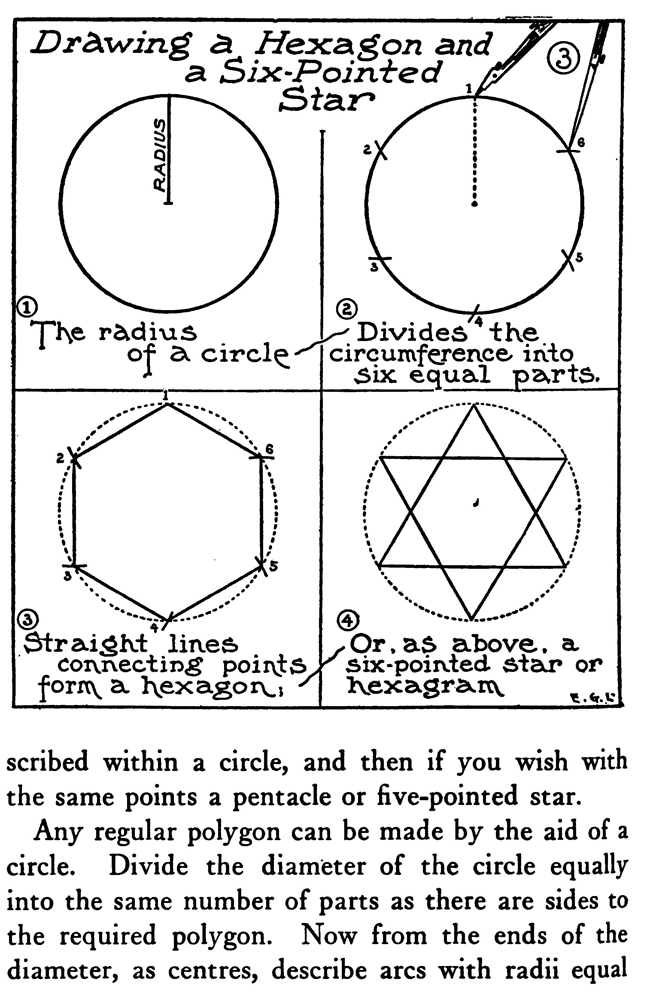
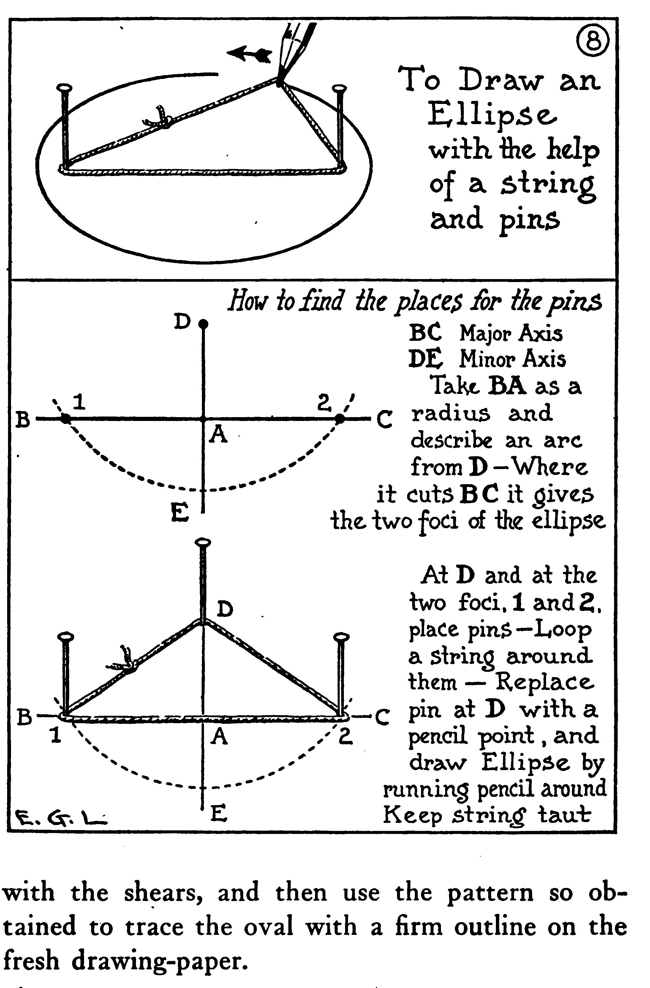
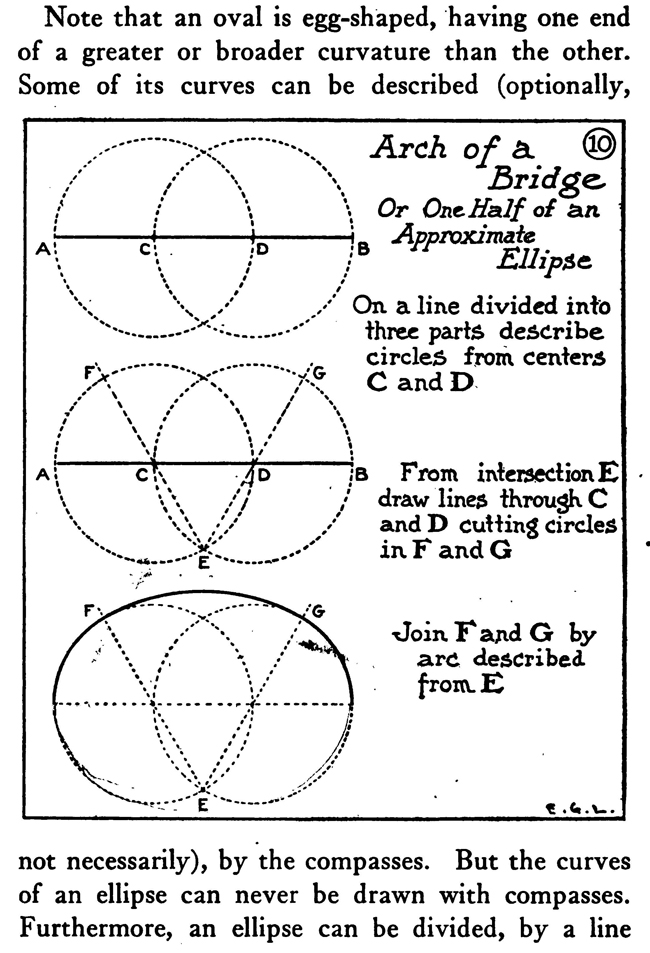
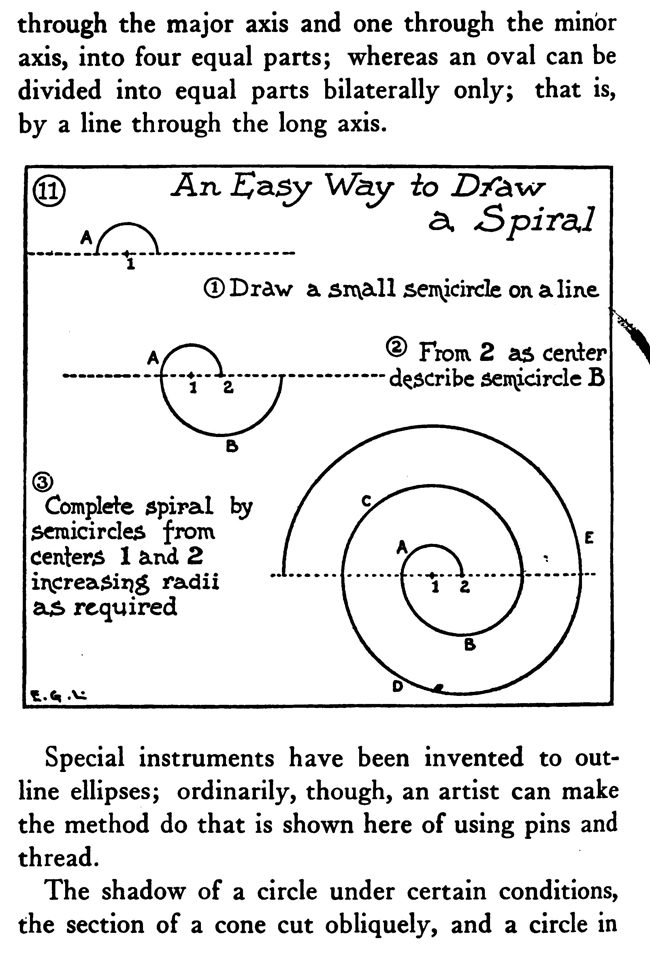
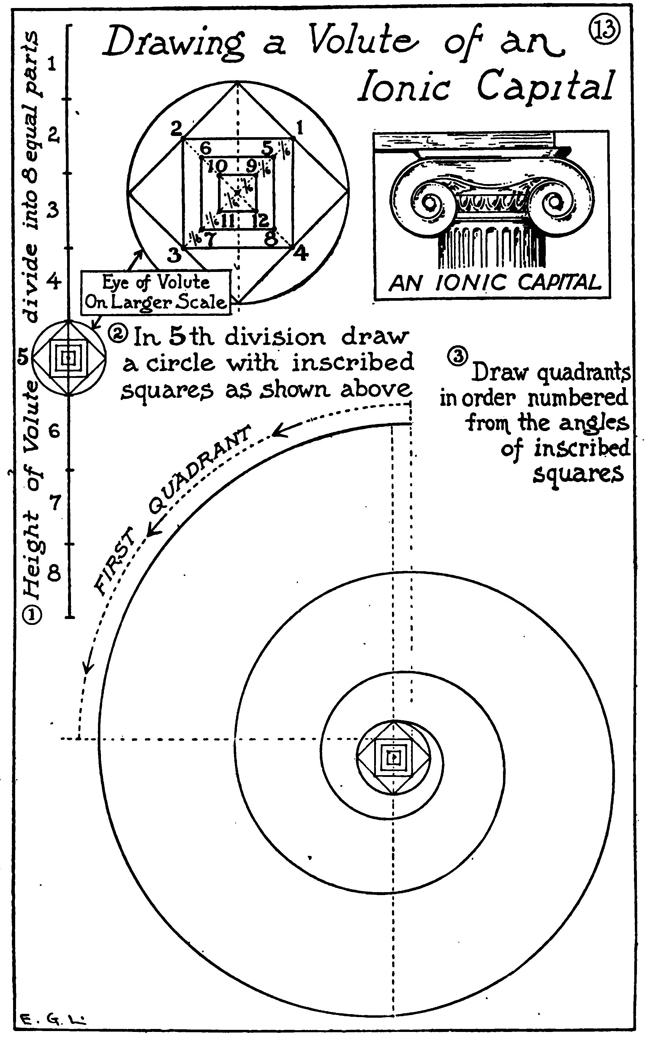
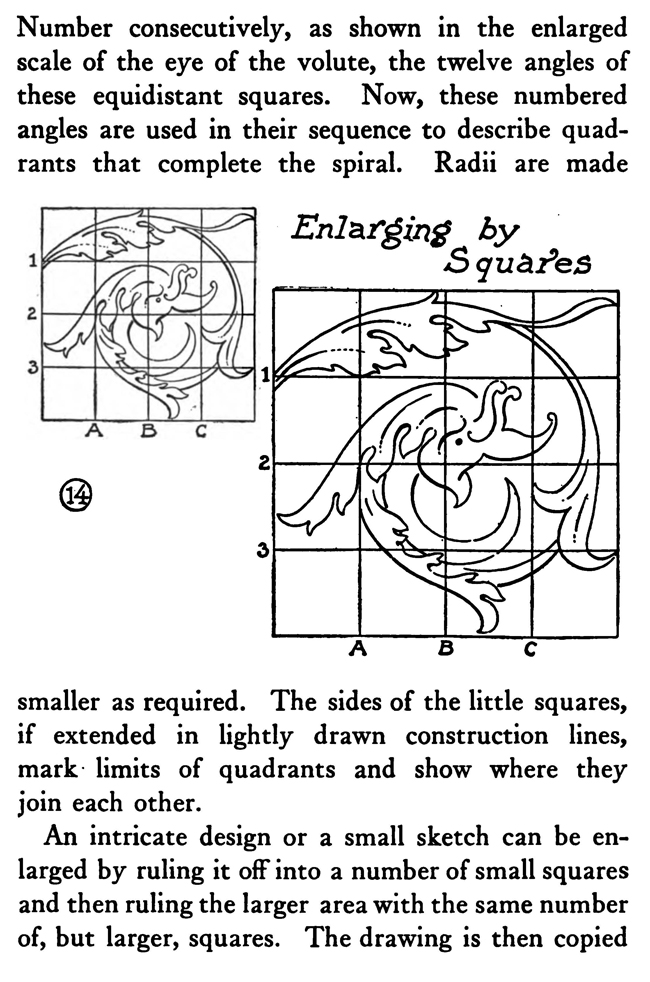
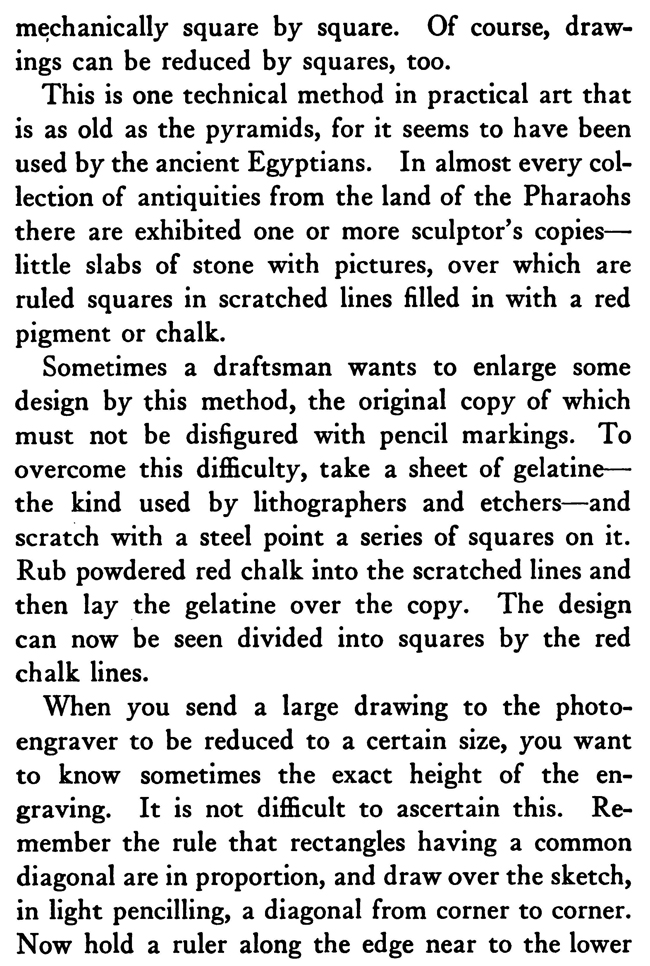
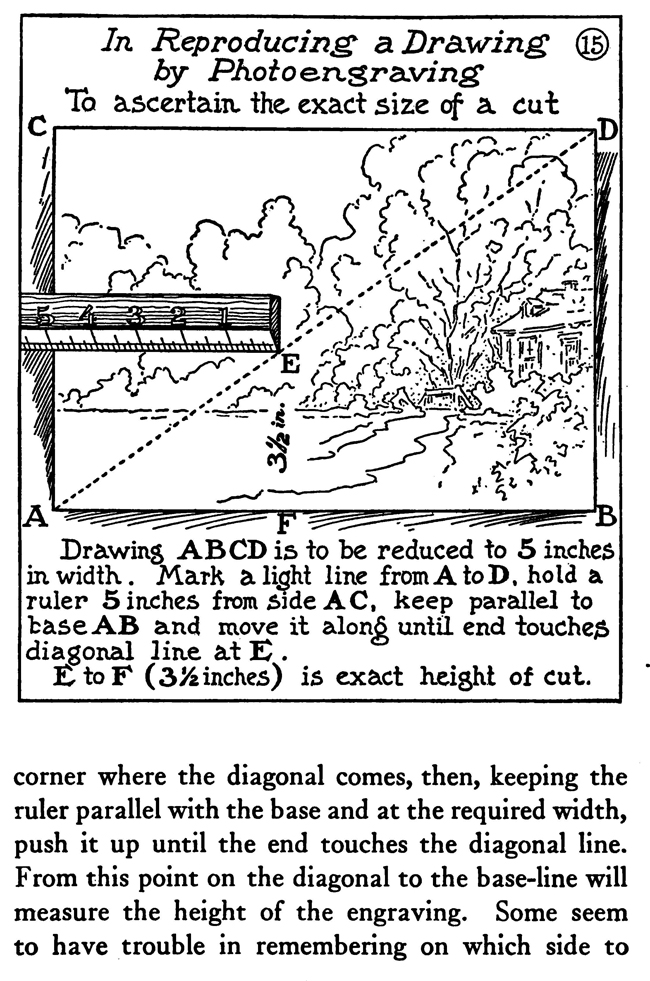
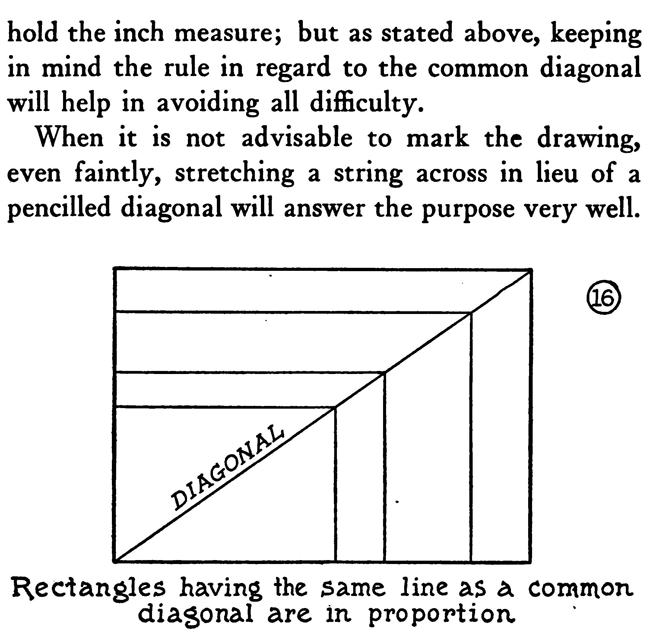
The above text is actually made up of images...to copy any text, you can find it below. HELPFUL GEOMETRY FOR ARTISTSArtists, illustrators, and designers rarely need to be skilled in mechanical drawing nor to have any special scholarship as geometricians. A knowledge of a few simple problems in plane geometry, however, can often be advantageously turned to account in certain classes of their work. The sure methods of geometry are much better than guesswork in the construction of regular plane figures, ellipses, etc., to say nothing of saving both time and labor. Take, for instance, the dividing of a line into a certain number of parts. The first diagram of this chapter shows how to do this. You will need a straight-edge and a triangle. A scale marked off into centimetres and millimetres is also available, as it is very easy to calculate the divisions with it. You can also use a T-square with a shifting head adjusted so as to run the parallel oblique lines. It is necessary that the edge of the drawing-board be absolutely straight in drawing parallel lines with the T-square. The method, as shown in the diagram, of marking off the radius of a circle on its circumference and getting six points on which to construct a hexagon, can be used in drawing the network of lines for the groundwork of a repeat pattern. Make the circle in the middle of the paper and find the six equidistant points, then through the centre of the circle and the six points draw the two sets of parallel lines as shown in the diagram. By using the points and lines so obtained and the degree of obliquity of these lines, the whole surface of the paper can be covered with a foundation on which either ornamental or floral repeat patterns can be designed. Frequently a designer wishes to draw a polygon with an equal number of sides. It is an easy matter, as we have seen, to construct a polygon of six equal as centers describe arcs D will bisect intersecting in C anaD AB in. E sides, but when it comes to marking an uneven sided polygon, there is a difficulty of dividing the circle—if a circle is taken as a start—into the required number of equal parts. The diagram on page 1o8 in this chapter shows how to make a pentagon inscribed within a circle, and then if you wish with the same points a pentacle or five-pointed star. Any regular polygon can be made by the aid of a circle. Divide the diameter of the circle equally into the same number of parts as there are sides to the required polygon. Now from the ends of the diameter, as centres, describe arcs with radii equal to the diameter, and intersecting at a point outside of the circle. Then from this point, where the two arcs intersect, draw a line through the second of the divisions on the diameter to and intersecting the circumference of the circle. Here from this point to the nearest end of the diameter, you now have one side of the required polygon. This is the most practical method of dividing circles or inscribing within them regular polygons when the required number of sides is an odd number like 7, 9, or i 1. It is important to remember that it is always the second division on the diameter through which the line from the point outside the circle is drawn. When designers have need of oval or elliptical forms or parts of such forms, they will find the way through the major axis and one through the minor axis, into four equal parts; whereas an oval can be divided into equal parts bilaterally only; that is, by a line through the long axis. Special instruments have been invented to outline ellipses; ordinarily, though, an artist can make the method do that is shown here of using pins and thread. The shadow of a circle under certain conditions, the section of a cone cut obliquely, and a circle in perspective are elliptical in form. Artists can make the difficult work of drawing wheels in perspective easier by roughly sketching out the size wanted and then constructing an ellipse of that size on another piece of paper, which when cut out can be used to trace a firm and certain outline of the perspectively viewed wheel. On account of the facility of construction and because fine lines can be made with the pen compasses, a method is illustrated of making an approximate ellipse with instruments. A way is also shown of drawing a curve resembling the arch of a bridge. Often in ornamental or industrial work the designer has need, not only of an accurate, but of a. firmly lined scroll or spiral. Two diagrams in this chapter make it plain how to construct two such forms mechanically with the compasses. The next engraving explains the making of a much more graceful spiral ornament : namely, the Ionic volute. To draw this curve proceed in this manner: A line which represents the height of the intended volute is divided into eight equal parts. In the fifth division, counting down, describe a circle. This will be the eye of the volute. Inscribe within it. a square resting on one corner. Draw its diameters and divide each into six equal parts; on the points so obtained construct three squares. smaller as required. The sides of the little squares, if extended in lightly drawn construction lines, mark limits of quadrants and show where they join each other. An intricate design or a small sketch can be enlarged by ruling it off into a number of small squares and then ruling the larger area with the same number of, but larger, squares. The drawing is then copied mechanically square by square. Of course, drawings can be reduced by squares, too. This is one technical method in practical art that is as old as the pyramids, for it seems to have been used by the ancient Egyptians. In almost every collection of antiquities from the land of the Pharaohs there are exhibited one or more sculptor's copies—little slabs of stone with pictures, over which are ruled squares in scratched lines filled in with a red pigment or chalk. Sometimes a draftsman wants to enlarge some design by this method, the original copy of which must not be disfigured with pencil markings. To overcome this difficulty, take a sheet of gelatine—the kind used by lithographers and etchers—and scratch with a steel point a series of squares on it. Rub powdered red chalk into the scratched lines and then lay the gelatine over the copy. The design can now be seen divided into squares by the red chalk lines. When you send a large drawing to the photoengraver to be reduced to a certain size, you want to know sometimes the exact height of the engraving. It is not difficult to ascertain this. Remember the rule that rectangles having a common diagonal are in proportion, and draw over the sketch, in light pencilling, a diagonal from corner to corner. Now hold a ruler along the edge near to the lower Drawing ABCD is to be reduced to 5 inches in width . Mark a light line from A to D, hold a ruler 5 inches from side AC, keep parallel to base AB and move it along until end -touche diagonal line at E corner where the diagonal comes, then, keeping the ruler parallel with the base and at the required width, push it up until the end touches the diagonal line. From this point on the diagonal to the base-line will measure the height of the engraving. Some seem to have trouble in remembering on which side to hold the inch measure; but as stated above, keeping in mind the rule in regard to the common diagonal will help in avoiding all difficulty. When it is not advisable to mark the drawing, even faintly, stretching a string across in lieu of a pencilled diagonal will answer the purpose very well. |


Privacy Policy .... Contact Us