Do you want to learn how to roughly sketch / draw a coffee pot and cream pitcher as seen in the picture below? This is an easy step by step drawing lesson for kids, teens, and adults alike. Everyone should be able to follow this simple sketching / drawing tutorial with a little bit of time and work. Good luck. You Might Also Be Interested in Learning How to Draw Tea Pots From Front and Side Angle.
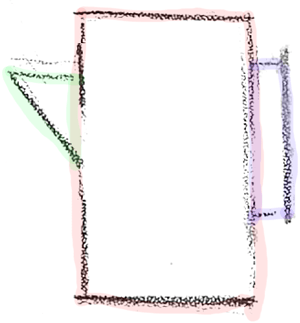
Start drawing the coffee pot by drawing a tall rectangle (highlighted in pink), a triangle (highlighted in green) up towards the top left side of the rectangle, and draw another rectangle on the right side (highlighted in purple).
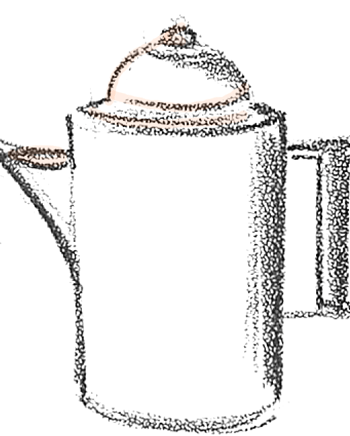
Now draw a curve at the bottom and top of the rectangle (highlighted in purple), as pictured above. Draw a smaller rectangle for the handle (highlighted in green) at the right of the purple-highlighted rectangle that you drew in step #1. Also draw part of the coffee pot’s lid (highlighted in light orange (sort of looks like a bendy letter ‘y’).
Finish off the coffee pot by drawing the rest of the lid and by drawing an oval at the top of the triangle spout. Try to shade the pot as seen above.
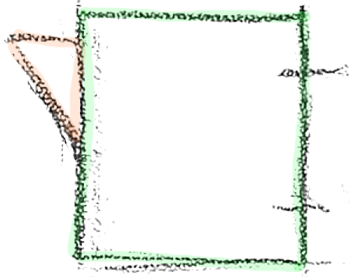
Firstly, to draw the cream pitcher, draw a rectangle (highlighted in green) with a triangle shape (highlighted in light orange) on the top left side of the rectangle. Also draw lines where you will place the handle.
Draw an oval (highlighted in orange) at the top of the rectangle, a curved line like a letter ‘u’ (highlighted in purple) at the bottom of the rectangle.
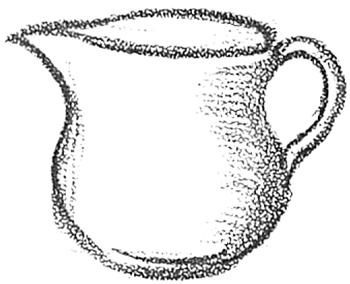
Draw the handle (highlighted in pink) by drawing a backwards bubble letter ‘c’. Also draw a sideways letter ‘v’ on top of the triangle that you drew in step #4.
Now finish up the coffee cream pitcher as seen in the picture above. Try to shade it as seen in the picture above.
This is what the picture should look like when you are finished. All sketches and drawings are different, so even if your drawing doesn’t look exactly like the one above, doesn’t mean that your drawing isn’t good. You might want to try putting out items from your kitchen and try to draw them with the techniques that we taught you from this tutorial. Good luck.
Technorati Tags: draw coffee pot, drawing coffee pot, how to draw coffee pot, draw pitcher, drawing pitcher, how to draw pitcher, how to draw, drawing lessons, drawing for kids, how to sketch, sketching
Today I'll show you how to draw Rick from the Rick and Morty cartoon tv…
Today I'll show you how to draw Morty from the Rick and Morty cartoon tv…
Today I'll show you how to draw the spunky little rabbit, Kuromi, from My Melody…
Today I'll show you how to draw this cute "bean duck" that I found on…
Today I'll show you how to draw Sosuke and Ponyo in a bubble (chibi /kawaii…
Today I'll show you how to draw a Boo from Super Mario Bros in Kawaii…
View Comments
WWWWWWWWWWWWWWWWWWOOOOOOOOOOOOOOOWWWWWWWWWWWWW