Learn how to shade and add graduated shading to a 3-dimensional prism. This is a tutorial from an old book from 1900 so that is why it isn’t in my normal step by step tutorial style.
The shading of pentagonal, hexagonal, and other prisms presents no difficulty to one able to show the light and shade of a cube. In this case, the hexagonal prism stands under the same conditions as the cube in the last lesson. As we saw there, the faces receiving the most direct rays will be the brightest, the other increasing in depth of tone as they turn from the light. (See on “ Shades ” in the last chapter.)
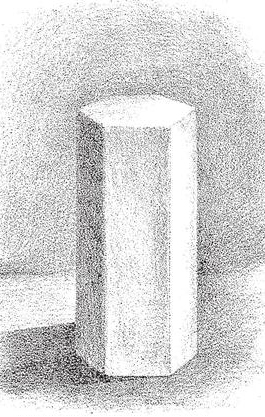
First sketch out a prism (you can find prism drawing tutorials here…this tutorial is about shading, not drawing prisms) Shade the shadow, background, and ground-plane.
Put on, with an even tint throughout, the tones of the two dark perpendicular faces, judging carefully their general depth of shade in relation to the cast-shadow and the background.
Add Gradations from the upper right-hand corner of each face. Contrast will cause the whole right edge of each face to appear slightly darker. The lightest perpendicular face (that nearest the light) shows similar gradations to the others, but in a lighter key. Compare its general tone with that of the upper hexagonal end—which has likewise a gradation from back to front.
Darken the cast-shadow, clearly defining part of its nearest edge. The darkening of the background round the upper hexagonal end and along the lightest perpendicular face will help to relieve them from the background. It is to be noted that the darkest portion of the perpendicular faces is not on the extreme left edge, neither is the lightest portion on the extreme right.
Place the prism as in the picture above. The light shines from above. Necessarily, the faces turning away from the direct light increase in depth of tone. In this case, however, the reflection from the ground-plane is very clearly marked on the lowest face, because that side is turned at an angle to receive it. So strong may this reflection be that the whole lowest face may be lighter in tone than the one above. The effects of aerial perspective will be seen in altering slightly the tones on the further end of the prism. In this drawing we have shown an outline throughout. This is a useful method for rapid shading, but is to be discarded in all finished work, where outlines should be shown as in Nature—by the meeting of two tones of unequal depth.
Shade evenly the cast-shadow, background, and ground-plane ; the low- est shaded face, though brightened by reflection, is still in shadow, and must there- fore be shown much darker than the top face; for reflected light in shades never appears so bright as the half tone. Lay on the shades of the two lower faces.
A gradation on the middle shaded rectangular face works from right to left. Contrast with the bright upper face and with the hexagonal end causes the edges to be slightly dark. As the face recedes, the effect of aerial perspective will be seen in making the whole of a more even tone. The face beneath should be darkened a trifle along its lowest edge, where it catches little reflection.
A gradation on the hexagonal end from right to left should now be added. Contrast with the darker shaded faces causes the left edge to appear light. The top rectangular face should be gradated from the further edges to the front, where the effects of contrast are seen. The end of this face removed from the spectator receives a slight tone to show the effects of aerial perspective.
Gradate the cast-shadow.
Technorati Tags: 3d prisms, 3 dimensional prisms, shading, shadows, graudations, shading prisms
Today I'll show you how to draw Rick from the Rick and Morty cartoon tv…
Today I'll show you how to draw Morty from the Rick and Morty cartoon tv…
Today I'll show you how to draw the spunky little rabbit, Kuromi, from My Melody…
Today I'll show you how to draw this cute "bean duck" that I found on…
Today I'll show you how to draw Sosuke and Ponyo in a bubble (chibi /kawaii…
Today I'll show you how to draw a Boo from Super Mario Bros in Kawaii…
View Comments
Cool and so helpful! Can you please refer the 1900's book? Who drew these sketches??
Fotini