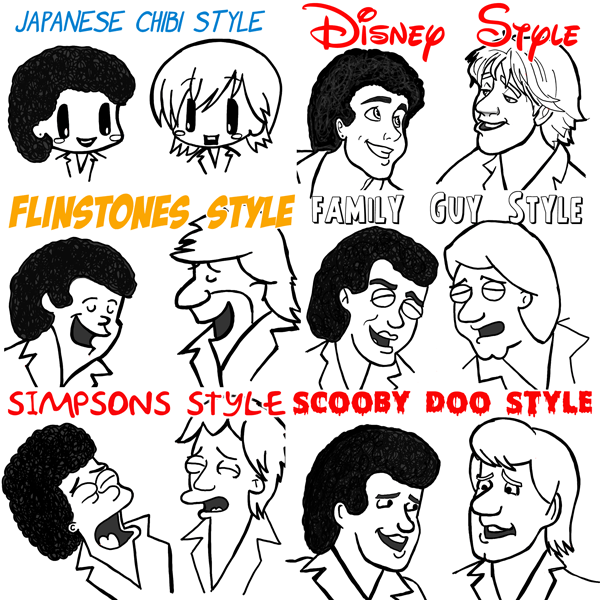
So I am trying something different today. I usually show you how to draw specific characters, but today I am going to show you how to draw anybody that you want in various different cartoon styles. So I’m going to use a picture of my favorite band, Air Supply, and I am going to illustrate them in 6 different styles. You can watch me do this and hopefully you will then be able to pick up a photo of your favorite band or tv show and create cartoon versions of them too. I also include a small guide for each style, so you can then make your own drawings as well.
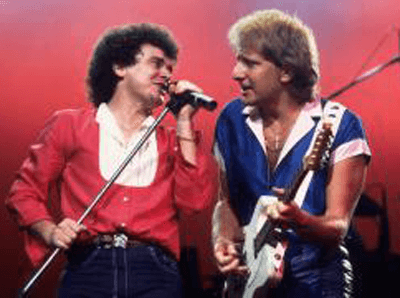
Here is a photo of Air Supply from way back in the 1980s. So their clothes and hair are outdated, but back then this is what cool looked like. They just reached their 40 year anniversary, so I’m doing this tutorial as a tribute to my favorite band.
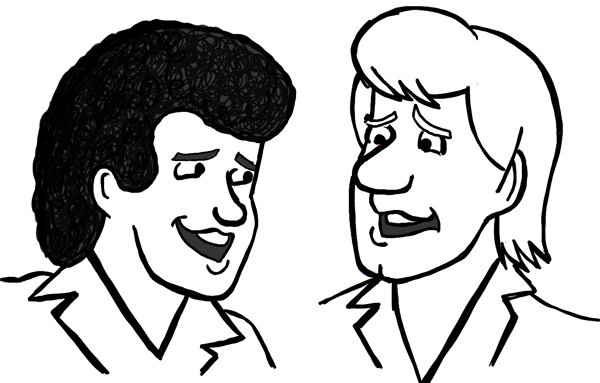
After choosing your source image, you will need to look at each of your characters and pinpoint what their most distinguishable features are. This is important if you are going to make the cartoon characters look like the actual people you are trying to create. So lets look at Russell and Graham.
– Russell has curly hair.
– Russell has a very cute, small nose.
– Russell’s face is a little boyish, which gives him a cute appearance.
– He has a feminine jawbone, which doesn’t mean he has a feminine appearance…his jawbone is just less defined than Graham’s.
– He is a bit shorter than Graham.
– Graham has straight, blonde hair.
– He has a slightly larger than normal nose.
– His eyebrows curve upwards when he sings, which most people have when they grimace.
– The area below his nose is a straight line. Most people’s have a more curved outwards appearance.
– He has a nice sturdy jaw.
Now…we will start drawing Russell and Graham in different cartoon-ish and illustrative styles
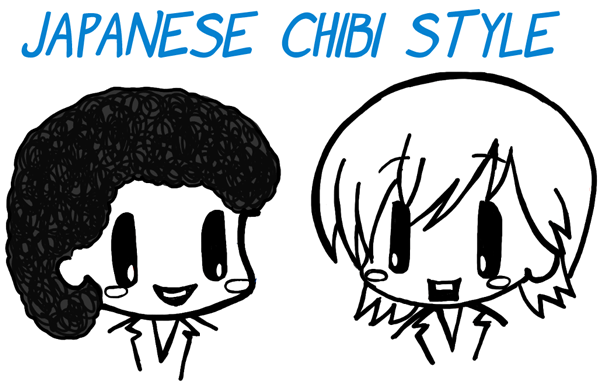
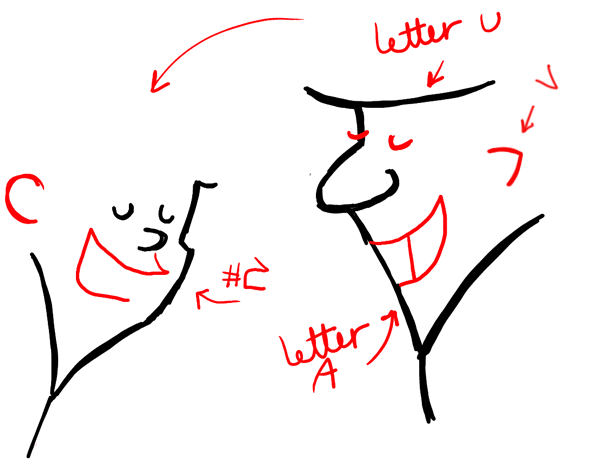
This style is a cute chibi style…a cutesy-babyish Manga style.
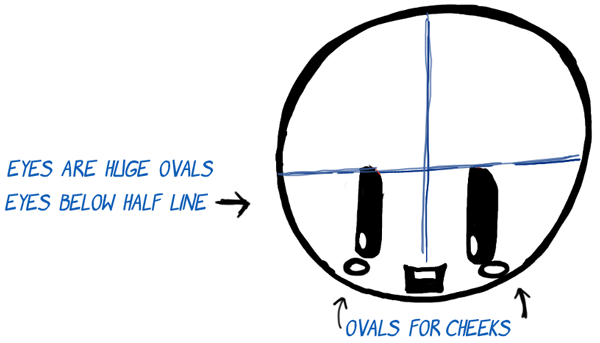
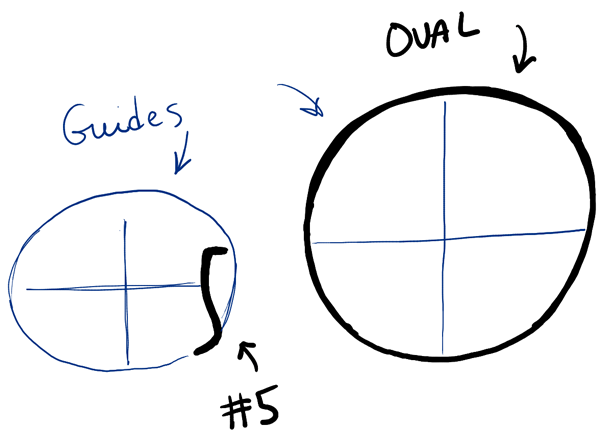
– You start off the head by drawing a circle. Then you draw guidelines thru the center.
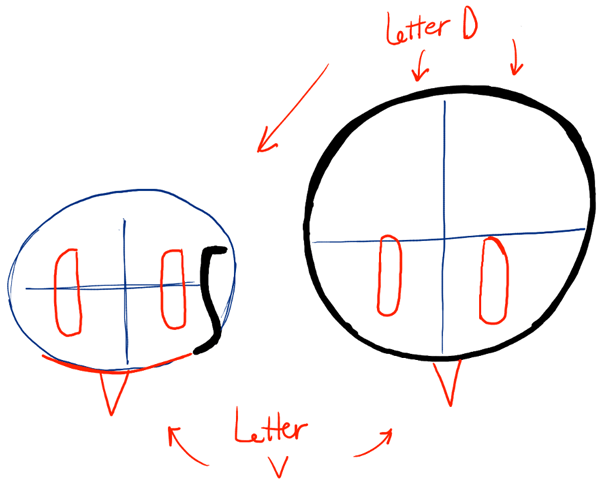
– They eyes almost take up the whole bottom half of the circle. The eyes are capital letter ‘D’ shapes that are so rounded that they look like ovals.
– The cheeks are ovals as well.
– The mouth can be many different shapes…usually just a curved line, but since my characters are singing, they are open mouthed.
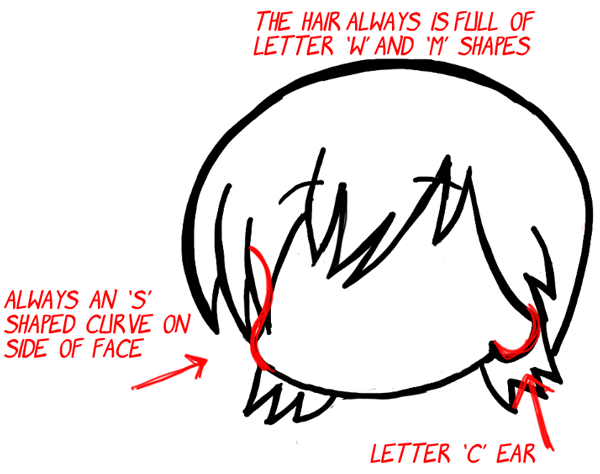
– So as you can see the hair is drawn with a lot of zig-zags. This is the classic Chibi style. We can draw this type of hair for Graham, but not for Russell, as he has very curly hair.
– The side of the face is always a letter ‘S’ shape.
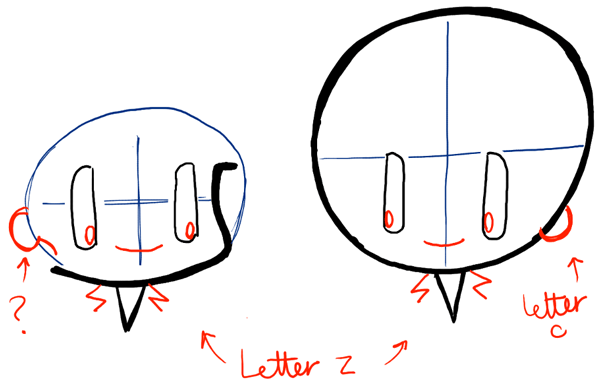
– And the ear is a letter ‘C’ shape.
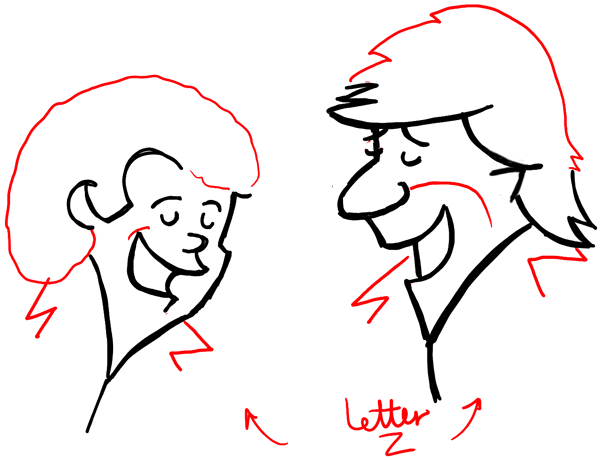
These are the basics for drawing Chibis. Now lets show you how I drew Russell and Graham.
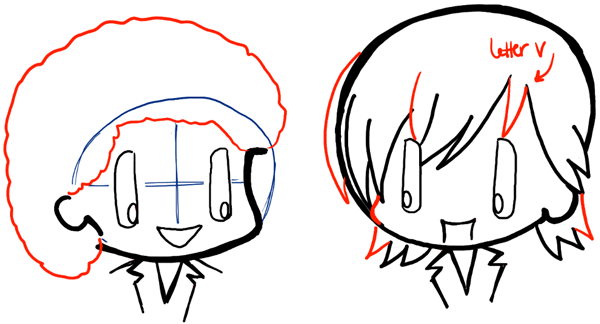
– Draw 2 ovals and the guides.
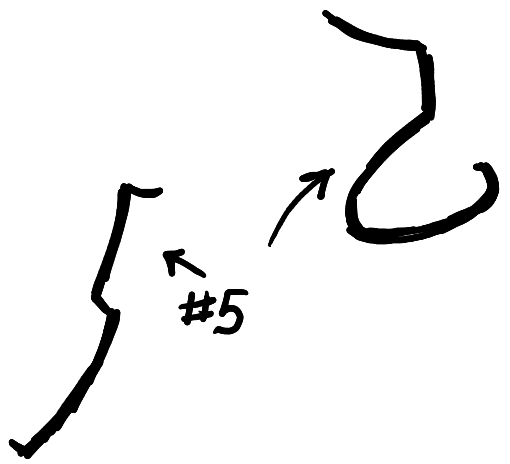
– Draw a #5 / Letter ‘S’-like shape on the side of the left oval.
– Draw the eyes.
– Draw letter ‘V’ shapes at the bottom of each character.
– Draw oval in each eye.
– Draw the ears.
– Draw a smile on each face.
– Draw letter ‘z’ shape for the collars.
– Continue drawing the mouths.
– Draw letter ‘W’ shapes for character #2’s hair.
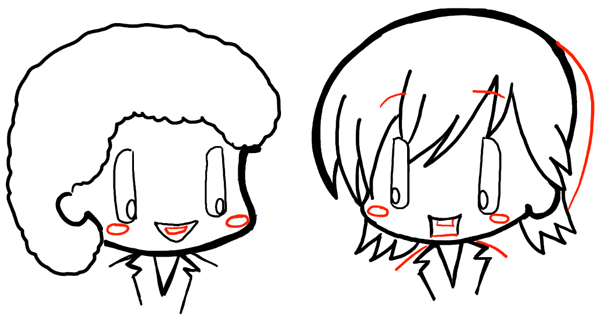
– Continue drawing the shirts.
– Continue with the hair.
– Draw the side of character #2’s face.
– Draw ovals for cheeks.
– Finish up the mouths and teeth.
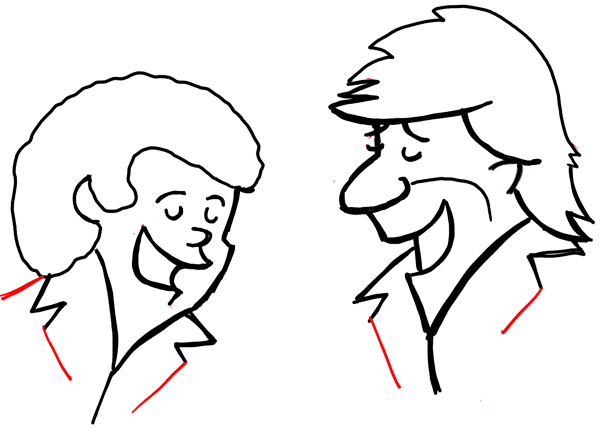
– Finish up the hair and shirt for character #2. Give him curved eye brows.
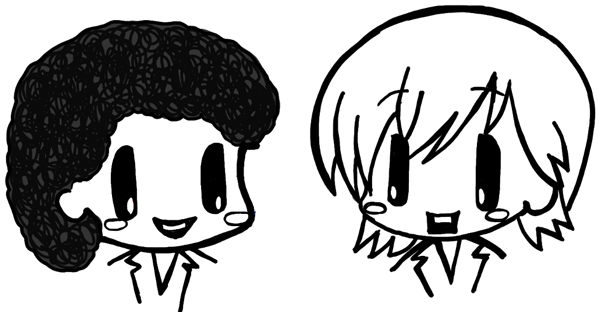
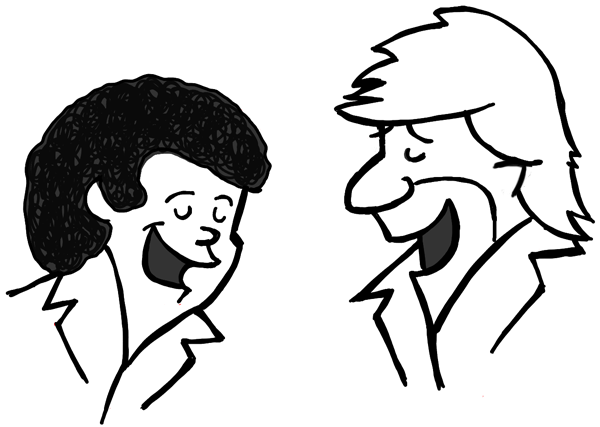
And then you darken the lines and color in the black areas. You can color it in, I didn’t because it would take too many steps to show you.
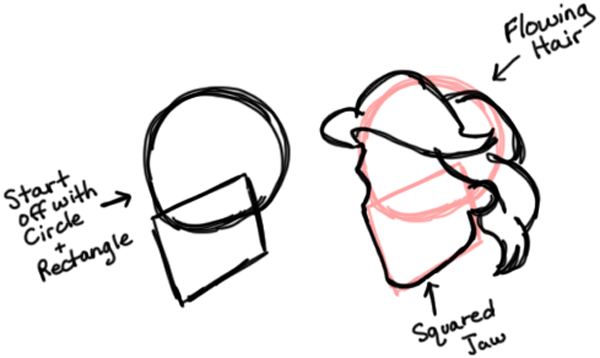
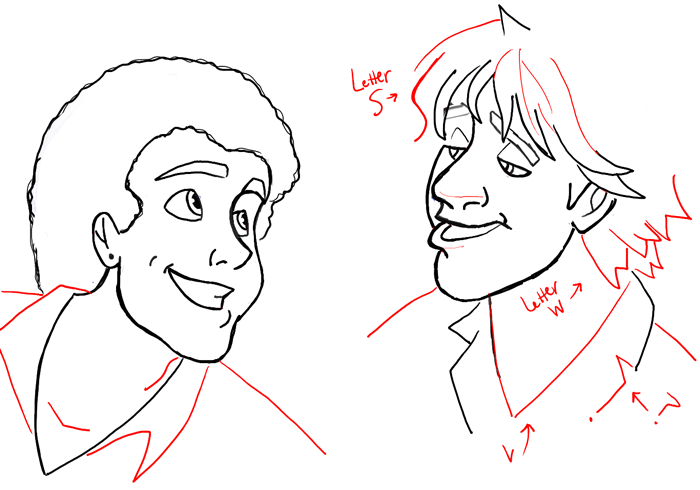
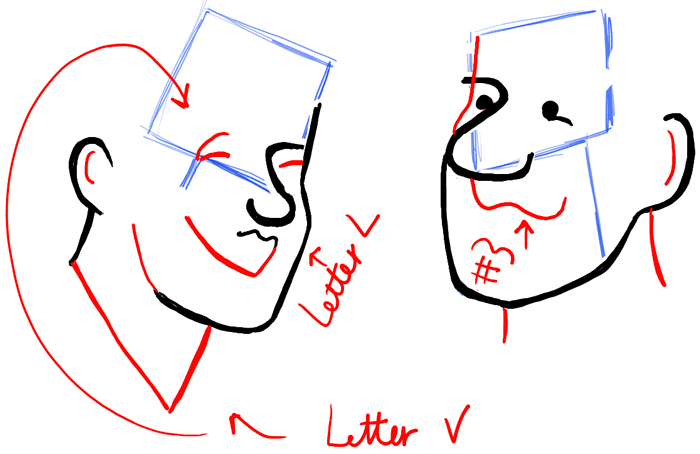
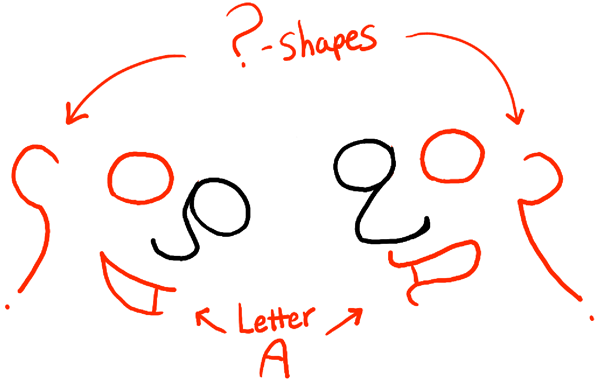
Okay, now we are going to discuss how to draw males / men in Disney Style. These characters are in 3/4 view. So lets discuss how to draw a Disney man in 3/4 view.
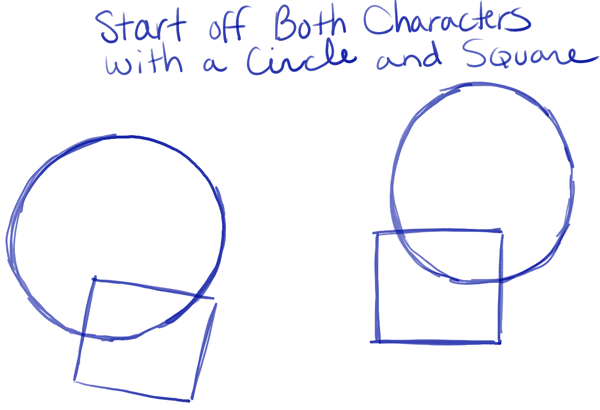
We start off drawing Disney characters, who are in the 3/4 view, with a circle and a rectangle. This will help us get the correct proportions on the face. It also helps us draw the square jaw that the Disney men tend to have. Almost all Disney men have flowing, beautiful, perfect hair.
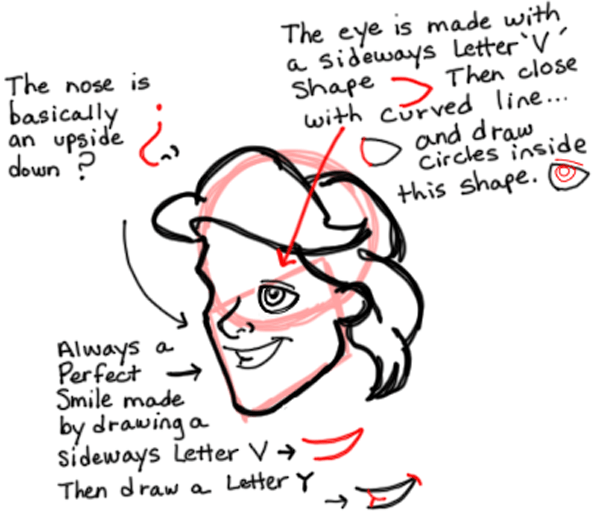
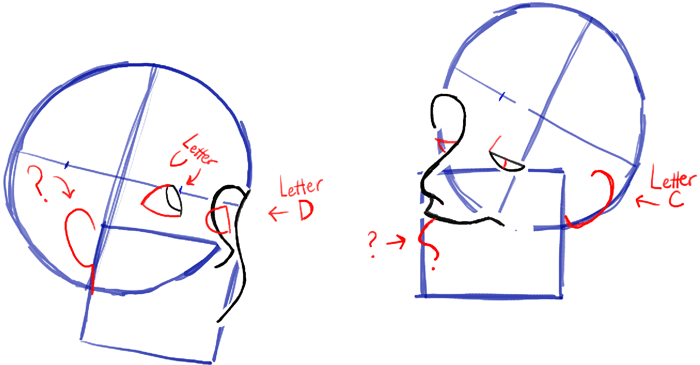
Above, I illustrate how to draw the “typical” Disney style mouth. It is simple if you follow my steps. The nose, also is simple, it is just an upside down ‘?’-shape. The eyes are a bit more difficult, but if you follow my illustrated steps, you will be able to do it.
– Start off both characters with circles and squares.
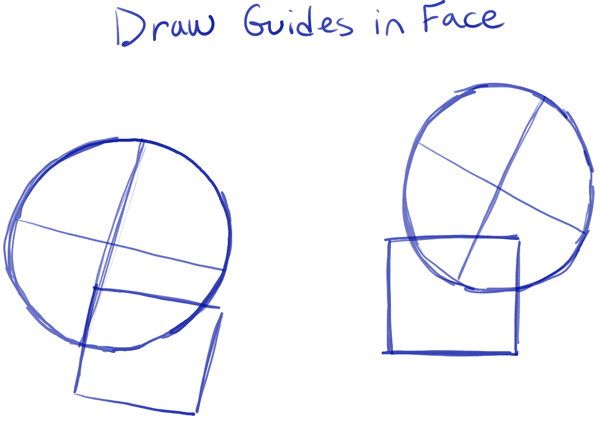
– Draw guides in the faces.
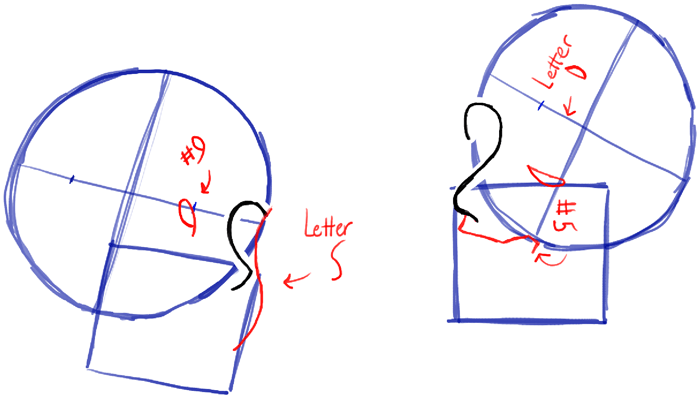
– Draw letter ‘S’ shapes, using the guides to help you place them correctly.
– Character #1: Draw a #9 shape and a letter ‘S’ curved shape.
– Character #2: Draw a sideways #5 shape at the mouth area. Draw a sideways letter ‘D’ shape at the eye area.
– Character #1: Draw eyes and ear.
– Character #2: Draw a ? shape under the mouth. Continue drawing the eyes. Draw the ear.
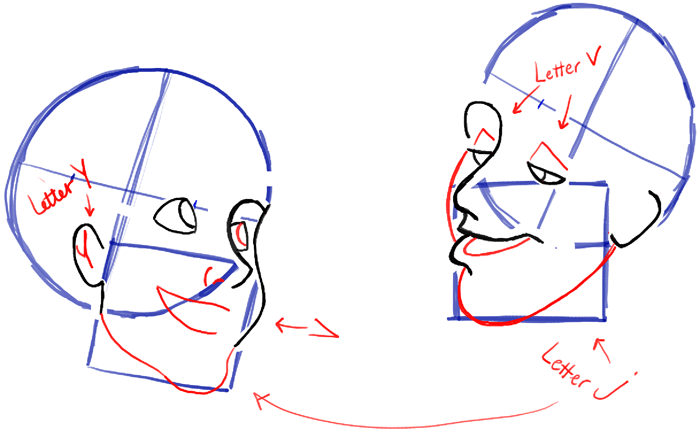
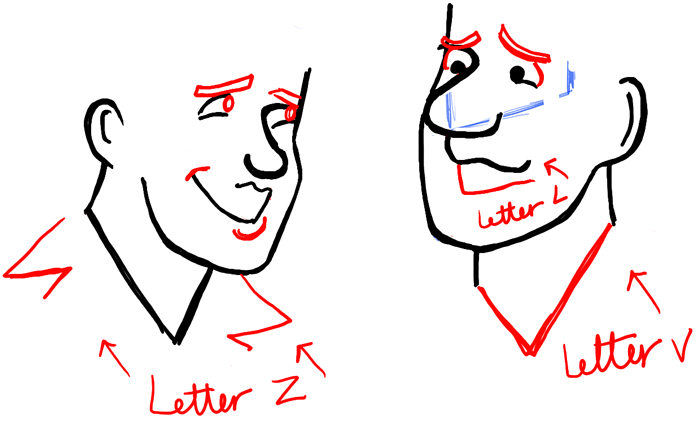
– Character #1: Draw his jaw. His jaw isn’t as square as a typical Disney character. Draw the mouth. Continue drawing ear, nose and eye.
– Character #2: Draw his chin and continue drawing his mouth. Draw area above his eyes. Draw his cheek.
– Character #1: Draw eyebrows and finish up eyes. Draw earring. Finish up mouth. Draw neck line.
– Character #2: Draw eye brows. Finish up mouth, ear, and nose. Start his neckline too.
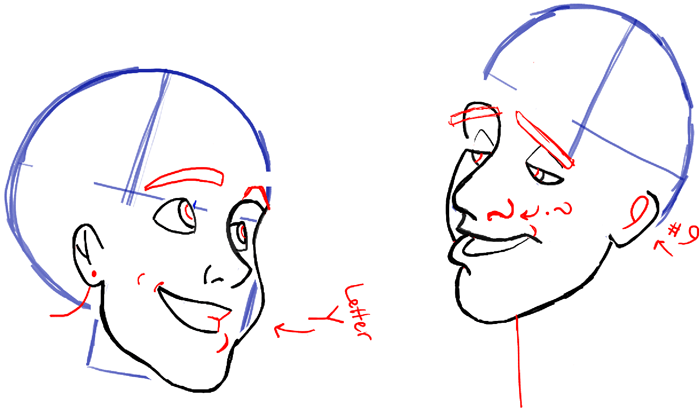
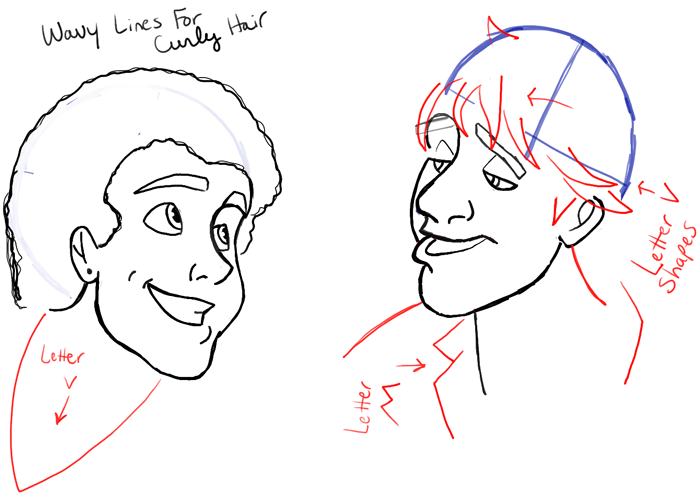
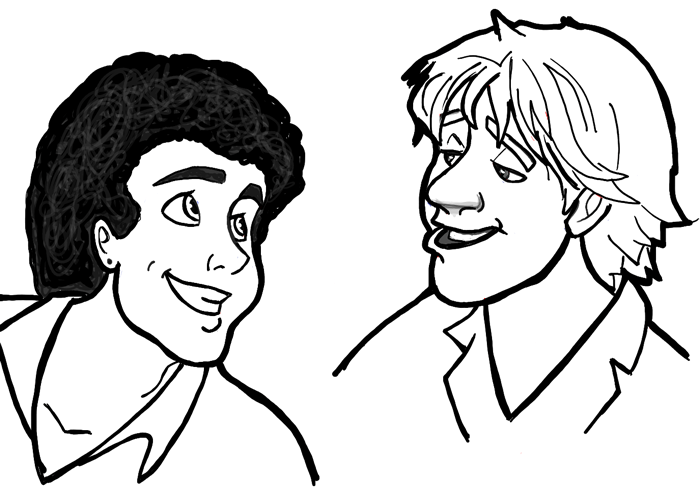
– Character #1: Draw wavy lines for his hair. Draw neckline. Erase guidelines.
– Character #2: Start drawing his shirt and draw his back neckline. Start drawing his hair. His hair isn’t the typical, perfect hair, because he has rock start hair.
– Character #1: Draw the shirt in.
– Character #2: Continue drawing in his shirt. Continue drawing his hair. Add some more details to nose and bottom lip.
– See how I erased the guidelines and thickened the lines. I also colored in the black areas. You can color them in if you like.
Now, lets take a look at drawing Flinstones-style characters. Men and boys in the Flinstones vary in shapes and styles, I have noticed. The boys and more feminine-looking men tend to have less of a jaw, and rounder ears. So keep that in mind when you are drawing your Flinstones-style characters. Here is the gist of drawing Flinstones-style cartoons:
Follow the above guide to draw Flinstones-style characters. Now we will start drawing Russell and Graham from Air Supply as Flinstones Characters.
– Start off drawing both characters with #5-like shapes.
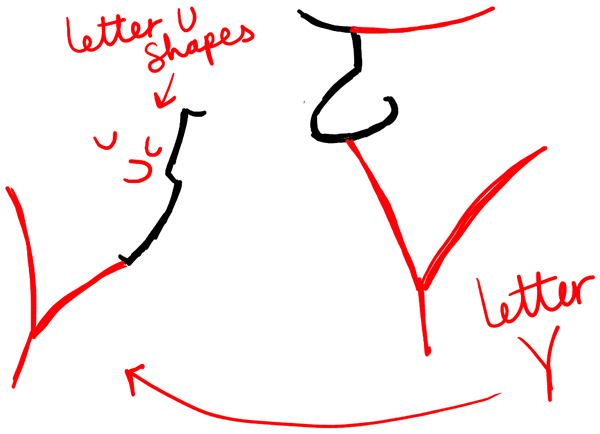
– Draw a letter ‘Y’-like shape at the bottom of both characters.
– Character #1: Draw letter ‘U’ shapes for eyes and nose.
– Character #2: Draw a curved line on the forehead.
– Character #1: Draw a #2-shaped mouth. Draw a letter ‘c’ shaped ear…some characters have ‘c’ shaped ears, mostly boys, but some men too.
– Character #2: Draw a sideways letter ‘A’ shape for the mouth. Draw letter ‘u’ shaped eyes and a letter ‘v’ shaped ear.
– Character #1: Draw a #5-shape on top of the ear. Draw a backwards ? shape on the mouth. Draw some curved lines.
– Character #2: Draw eyebrows and start drawing the hair.
– Start drawing the clothes and continue drawing the hair.
– Finish drawing the shirts.
– Now darken/thicken the lines up and fill in black areas. You may also color them in if you like.
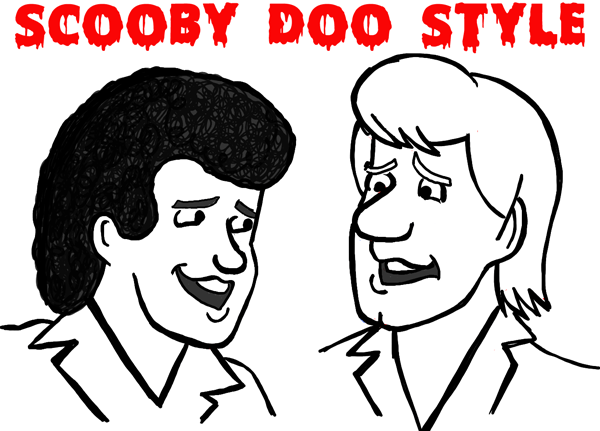
Now lets draw Russell and Graham in a Scooby Doo character style. Scooby Doo was remade a few times (I believe), but I am talking about the original Scooby Doo style. The faces of the men will be in 3/4 view. Scooby Doo has a unique look to it, so it shouldn’t be too hard to give you a few pointers when drawing men or boys in Scooby Doo cartoon style.
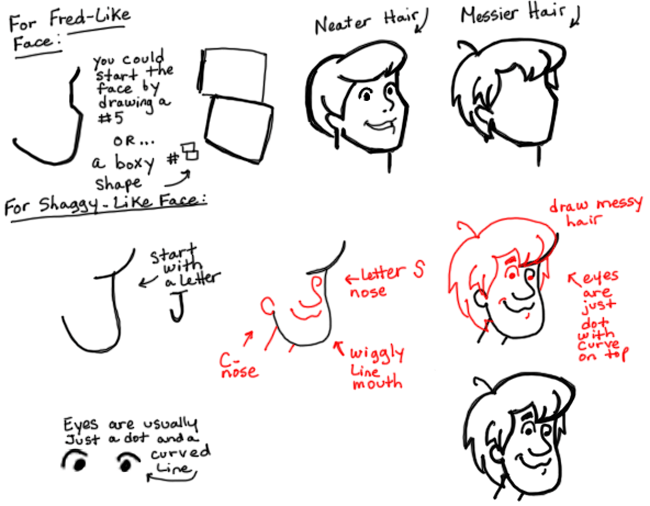
Take a look at the tips for drawing in Scooby Doo style. Basically there are 2 jaw types that are predominantly used…the strong jaw type which Fred has and the softer jaw of Shaggy. You draw Shaggy’s face by drawing a letter ‘J’. You draw Fred’s face by drawing a #5-like shape. Fred’s hair is neat and Shaggy’s is messy. You draw the both types of hair by drawing a sideways #3-like shape on top of the face. However, with the messy hair type, you draw a bunch of letter ‘W’ like shapes for the wisps of hair.
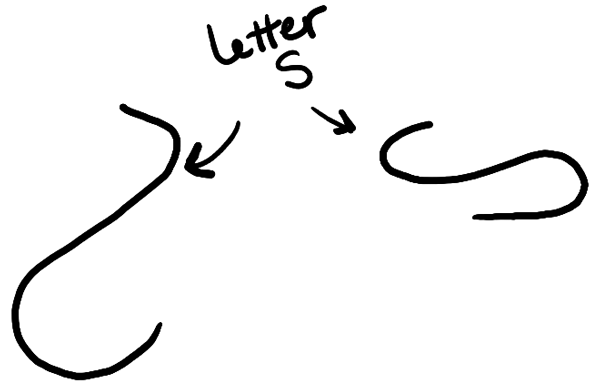
The eyes are easy to draw…just a circle with a curved line on top of it. The noses are very simplified too. Basically they look like a letter ‘S’ shape.
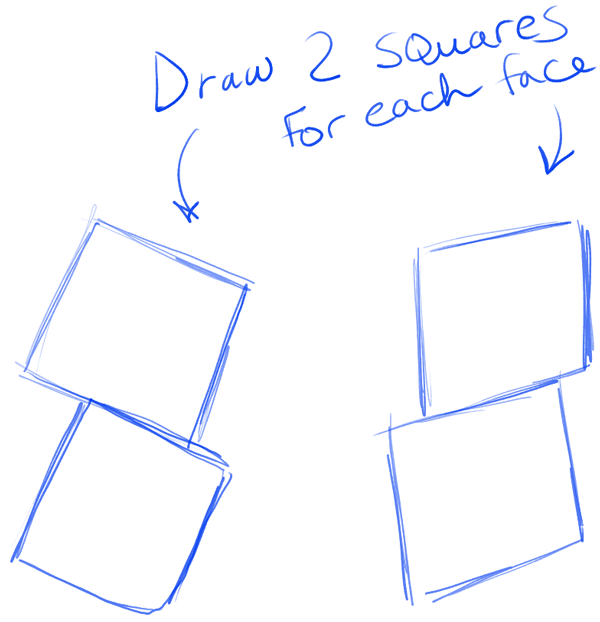
– To keep their faces proportional, lets draw guidelines…by drawing 2 boxes for each face.
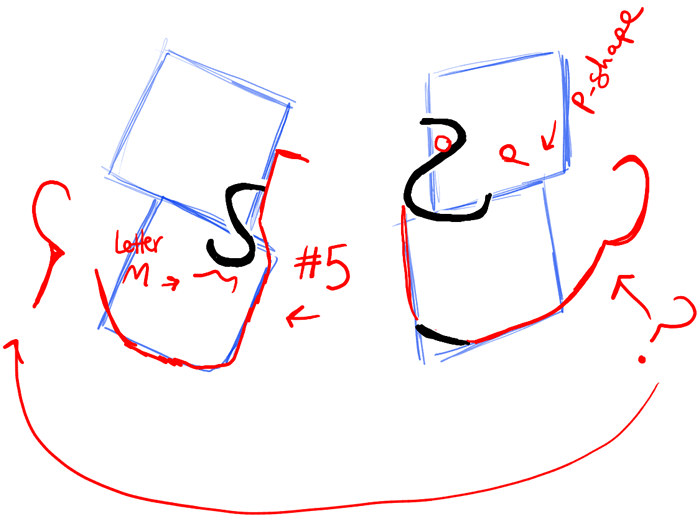
– Draw a letter ‘S’ shape, using the boxes to help you place it correctly. On the 2nd face, draw the bottom of the chin.
– Character #1: Draw a ?-like shape for the ear and neck. Draw a letter ‘m’ shaped mouth. Draw a #5 shape for the right side of the face.
– Character #2: Draw ?-like shape for the side of the face and ear. Draw the eyes.
– Character #1: Draw a letter ‘V’ shape for the neckline. Draw a letter ‘L’ shape for the bottom of the mouth. Draw the mouth and the inner ear.
– Character #2: Draw the neck. Draw a #3 shape for the mouth. Draw the inner ear and the side of his forehead.
– Character #1: Draw letter ‘Z’ shapes for the lapels. Draw curved lines around the mouth. Draw circles in the eyes. Draw curved lines for eye brows.
– Character #2: Draw curved lines for eye brows. Draw letter ‘V’ shaped neckline. Draw letter ‘L’ shape for the bottom of the mouth. Draw curved line around the eyes.
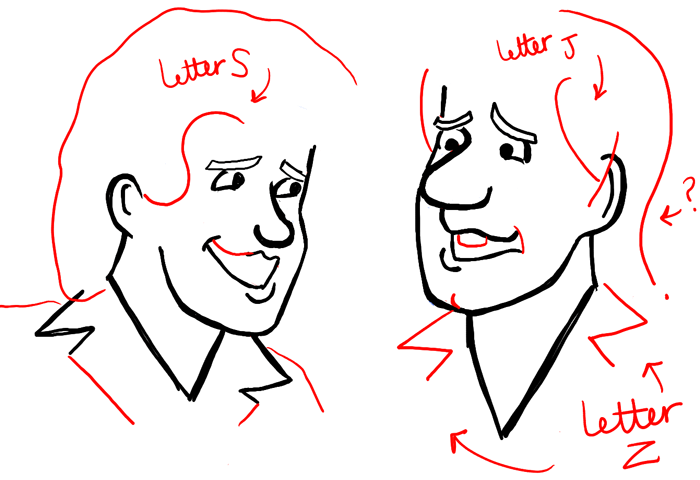
– Character #1: Start drawing the hair. Draw the rest of the mouth and the shirt.
– Character #2: Start drawing the hair. Draw letter ‘Z’ shapes for the lapels. Draw ‘?’ and letter ‘J’ shape for the hair. Draw curved lines on the face and a rectangle for the teeth.
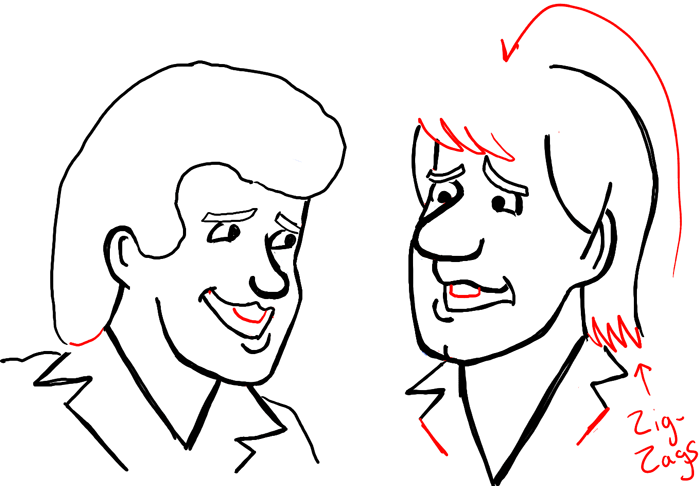
– Draw the rest of the hair, shirt, and mouth.
– Darken and thicken lines. Fill in black areas. You can colorize this picture if you like.
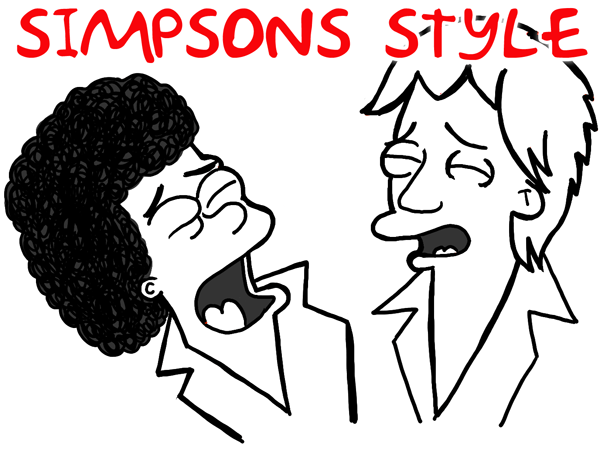
The Simpsons is one of the most iconic cartoons ever so I have to add them to our list of illustrative styles. You can’t really mess up a Simpsons cartoon, as long as you add circle eyes and a Simpsons-style mouth, everyone will know that you are drawing a Simpsons character. Lets take a look at how to draw in Simpsons-style now.
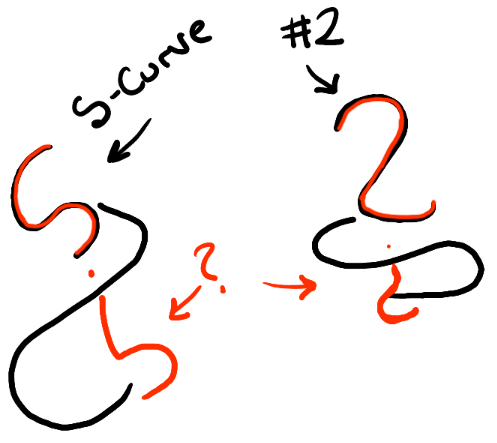
Take a look at the guide above. Like I said above, all the eyes are circular. If the eyes are closed, you just erase part of the top and part of the bottom of the circle…but it is still circular. If the eye lid is partly closed just draw an eye lid over the circle eye. For the mouths…closed mouths look like a sideways letter ‘J’. Open mouths are made by drawing a backwards letter ‘S’ shape. Hair widely differs, but it is always simplified, as seen above. Now lets draw Russell and Graham as Simpsons characters.
– Draw a letter ‘S’ shape for each face.
– Character #1 : Draw a letter ‘S’ shape and an upside down ?-shape.
– Character #2 : Draw a #2-like shape and an upside down ?-shape
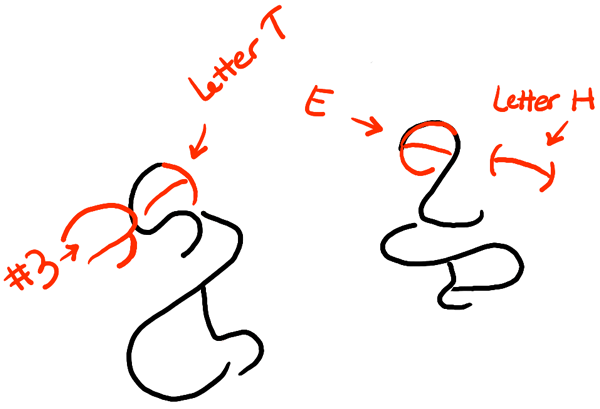
– Character #1 : Draw a #3-shape for the left eye. Draw a sideways letter ‘T’-like shape.
– Character #2 : Draw a circle-ish letter ‘E’ shape for the left eye. Draw a circle-ish letter ‘H’ shape for the right eye.
– Character #1 : Draw a ?-like shape for the ear and neck. Draw one also in the mouth and on the forehead.
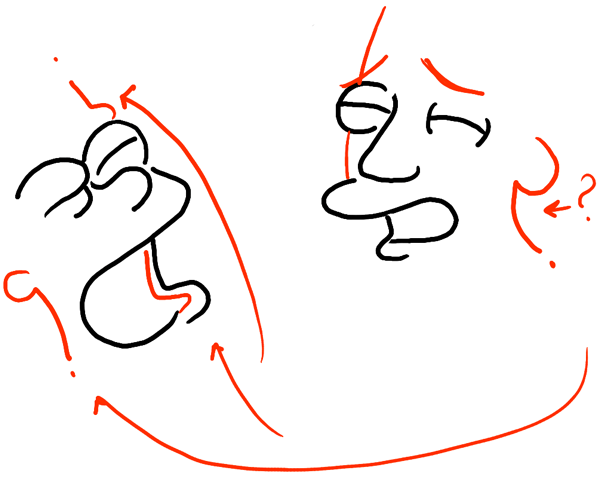
– Character #2 : Draw a ?-like shape for the ear and neck. Draw eye brows and the side of the face.
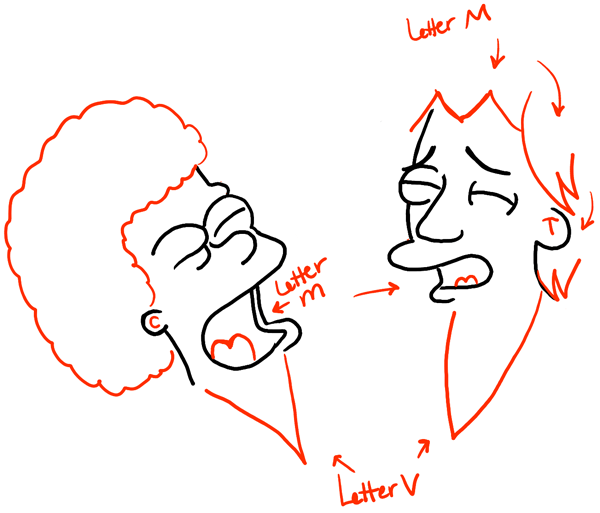
– Character #1 : Draw curly hair. Draw a sideways #3-like shape in the mouth. Draw a letter ‘V’ shaped neckline. Draw a letter ‘C’ shape in the ear.
– Character #2 : Draw a letter ‘V’ shaped neckline. Draw a sideways #3-like shape in the mouth. Draw a letter ‘T’ shape in the ear. Draw ‘M’ shapes in the hair.
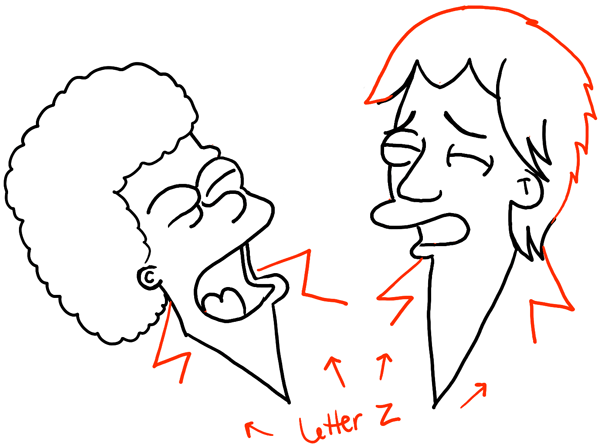
– Add finishing details.
– Just darken up the lines and fill in the black areas. You can color in your pictures if you choose too.
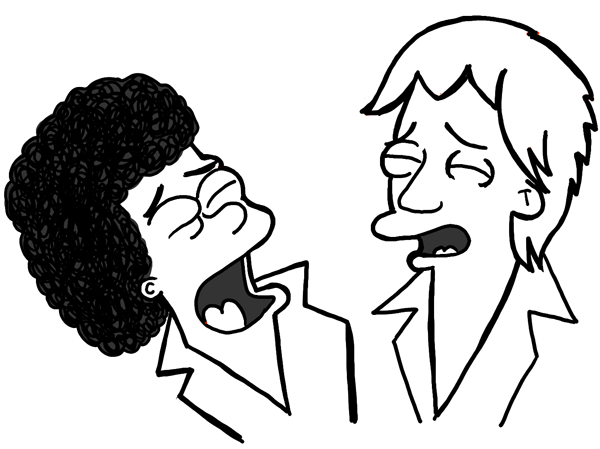
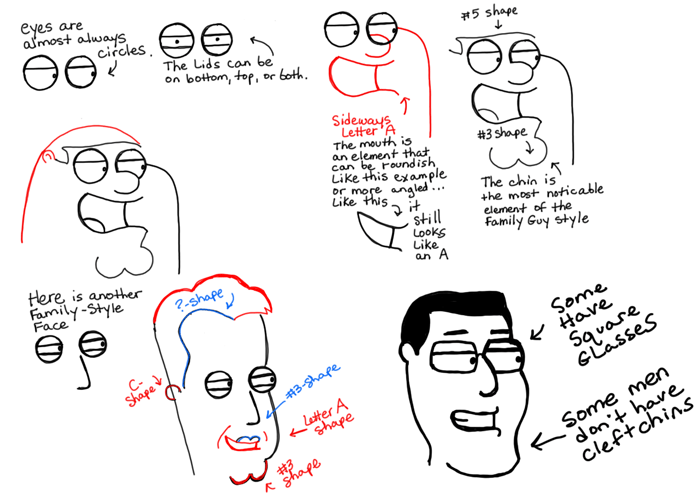
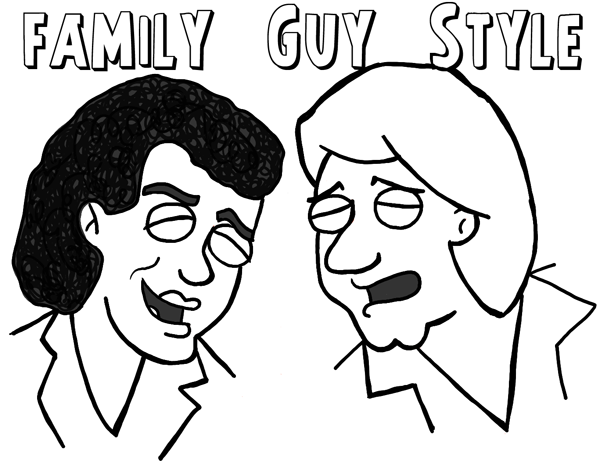
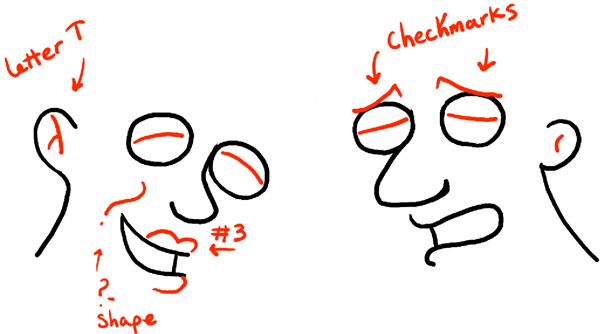
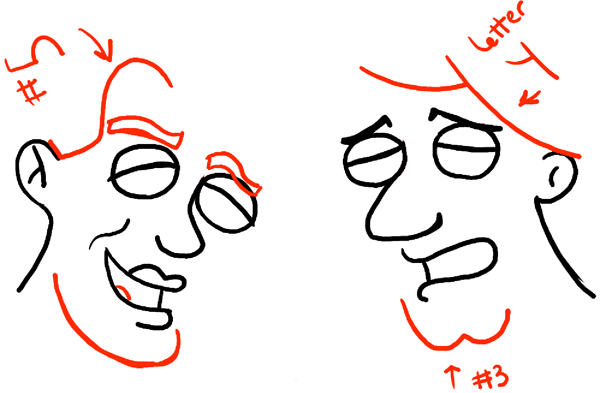
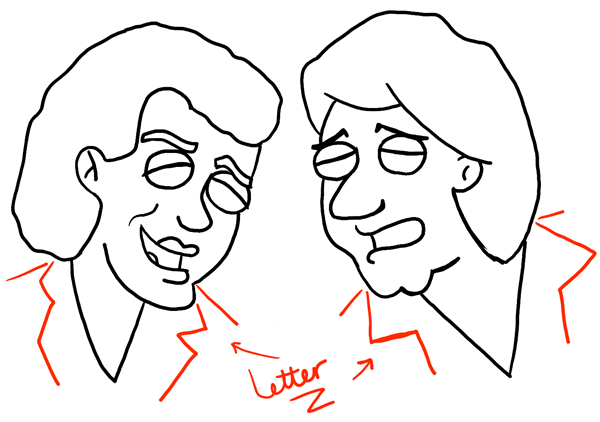
Now for the last style that we are going to go over today. We are now going to learn how to draw in Family Guy style. Family Guy has been on for a long time so this style should be recognizable. Lets find out how to draw in Family Guy cartoon style now.
Take a look at the guide above. Just like with The Simpsons, the eyes are usually circular. When someone has glasses on, sometimes the eyes are rectangle-ish, but thats an exception. When the The eye lids are lines within the circles. The lines can be on the top of the circle, at the bottom of the circle, or both. The mouths are usually sideways letter ‘A’ shapes. And the chins sometimes have clefts, but sometimes there is no cleft. If the person is heavy or fat, the chin is inside the face instead of at the outside of the face. Now lets learn how to draw Russell and Graham in Family Guy Style.
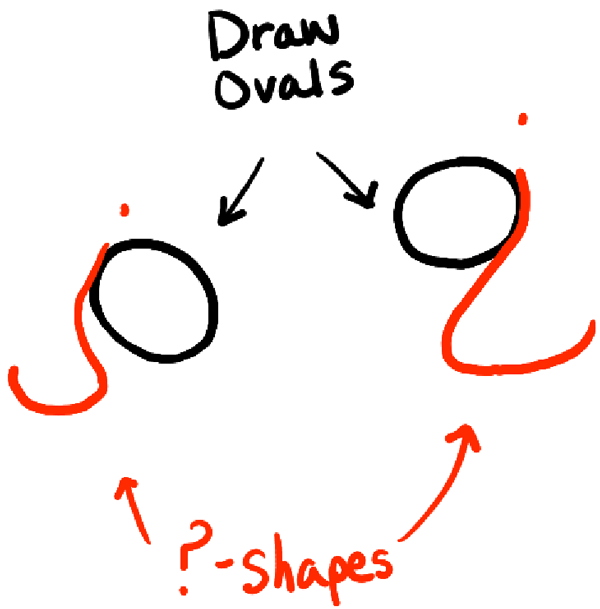
– Start off the characters with ovals and ?-like shapes.
– Now draw sideways letter ‘A’ shapes for the mouths.
– Draw an oval for the other eye.
– Draw ?-like shape for the ear and neck of each character.
– Character #1 : Draw a letter ‘T’ in his ear. Draw curved lines in the eyes. Draw a sideways #3-shape for the upper lip and a curved line for the lower lip.
– Character #2 : Draw curved lines in his eyes and ear. Draw check mark shapes for the eye brows.
– Character #1 : Draw the eyebrows and chin. Draw a #5-like shape for the hair line.
– Character #2 : Draw sideways #3-like shape for the chin. Start drawing the hair.
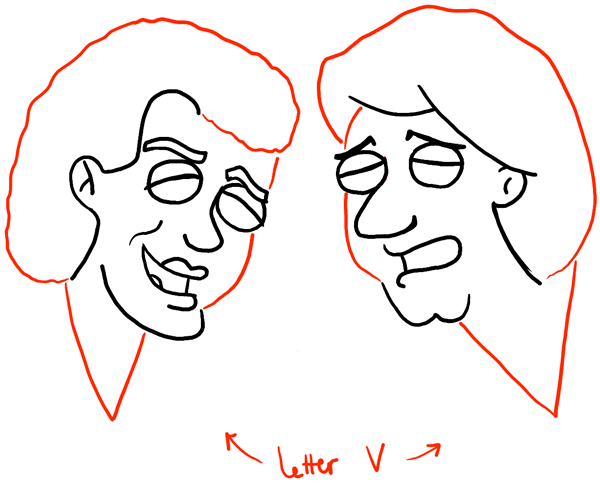
– Draw the hair, faces, and necklines.
– Draw the shirts.
– Now just darken and thicken the lines. Also fill in the blackened areas. You can color your picture in if you like.
So Now its your turn. Get pictures out of your favorite people and try to draw them in all different cartoon or illustrative styles. You now know the basics of drawing all different types of cartoons. Have Fun! I’d love to see your finished pictures!!!
Technorati Tags: air supply, russell hitchcock, graham russell, draw family guy, draw the simpsons, draw chibi, draw scooby doo, draw the flinstones, draw disney, drawing in different styles, illustrative styles, cartoon styles, caricatures, how to draw air supply
Today I'll show you how to draw Rick from the Rick and Morty cartoon tv…
Today I'll show you how to draw Morty from the Rick and Morty cartoon tv…
Today I'll show you how to draw the spunky little rabbit, Kuromi, from My Melody…
Today I'll show you how to draw this cute "bean duck" that I found on…
Today I'll show you how to draw Sosuke and Ponyo in a bubble (chibi /kawaii…
Today I'll show you how to draw a Boo from Super Mario Bros in Kawaii…
View Comments
This is so cool!! i will use it every-time i draw (i think that will be 200times in one day):D....
This is so cool!! i will use it every-time i draw (i think that will be 200times in one day):D
Excellent post!!! I'm a teacher of English at a secondary school in Argentina. I'm going to use it for my comic-strip project.
Thanks a lot!! :D
That is so cool!!!
Thank you
I need how to draw afamely