Today I will show you how to draw a few doors in two 2 point perspective – one is closed, one is opened all the way and one door is either opening or closing. Either way, I have made this tutorial as simple as possible to follow. If you use a ruler and these perspective drawing techniques, you will be able to make these 3-dimensional doors. Happy Drawing!
If you want a more detailed guide to perspective, we have a few of them here.
You Might Also Like Our Other Perspective Drawing Tutorials
(Step 1) Draw two horizontal lines at the bottom of the page (these are the floor and the base board of the wall).
(Step 2) Draw the door shapes (rectangles).
(Step 3) Draw the inner rectangle. Notice that we erased part of the base board (the part that was within the 3 rectangles didn’t need to be there any more).
(Step 4) Lightly draw a line thru the center of the doors…this is the horizon line. Draw a point on the left and on the right (you can’t see it on our picture but there is a dot to the right of the picture). These are our two vanishing points.
Also draw a rectangle on the first door (this is all you can see of the door becaues it is open straight towards us).
(Step 5) Now we are going to draw door #2’s open door. Draw a line from the Vanishing Point (VP) and draw it to the top left corner of the inner door rectangle. Then draw a line from the VP to the bottom left corner of the inner door rectangle as well.
(Step 6) Draw a vertical line connecting the 2 lines you just drew together to form a door. Notice that I erased the parts of the lines from step #5 that were outside the range of the door.
(Step 7) Now draw a line from the top and bottom corner of the door (the one we just drew) to the 2nd Vanishing Point that is off to the right (the one that we can’t see on my paper, but you drew it on yours).
(Step 8) Draw 2 vertical lines.
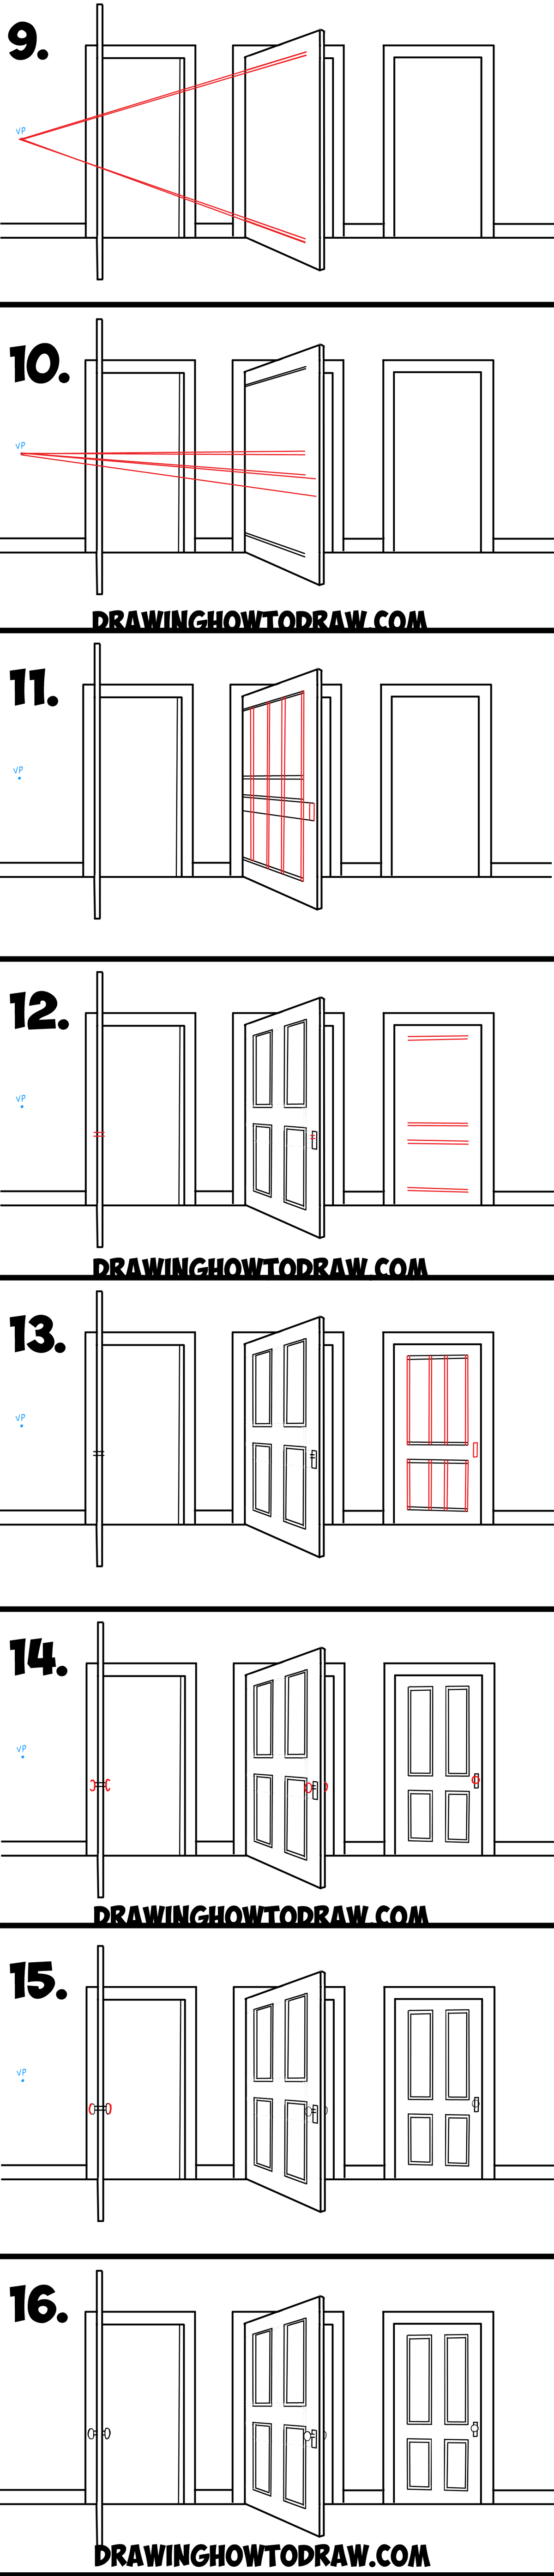
(Step 9 & 10) Now we are going to draw the rectangle patterns that are on the door. Draw some lines on door #2 from the left vanishing point.
(Step 11) Draw vertical lines for the rectangle patterns on the door, as well as the door knob rectangle.
(Step 12) Draw horizontal lines on door #1, #2, and #3. We are drawing the rectangle patterns on door #3 (they are supposed to be straight it looks like mine are a bit slanted – sorry). Notice that we aren’t drawing the lines on door #3 to the vanishing point…this is because they are parallel to the ground, unlike door #2’s lines which were angled.
(Step 13) Draw vertical lines on door #3.
(Step 14) Draw door handles – on door #1, they are letter ‘C’ shaped…on door #2 one is an oval and the other is a backwards letter ‘C’ shape…on door #3, draw a circle door handle.
(Step 15) Add curved lines to the first door handle.
(Step 16) Erase lines that we no longer need …now you are done!
If you want a more detailed guide to perspective, we have a few of them here.
You Might Also Like Our Other Perspective Drawing Tutorials
Technorati Tags: two point perspective, 2 point perspective, perspective, perspective drawing, doors, open door, closed door, opening door, opened door, closing door, how to draw doors
Today I'll show you how to draw Rick from the Rick and Morty cartoon tv…
Today I'll show you how to draw Morty from the Rick and Morty cartoon tv…
Today I'll show you how to draw the spunky little rabbit, Kuromi, from My Melody…
Today I'll show you how to draw this cute "bean duck" that I found on…
Today I'll show you how to draw Sosuke and Ponyo in a bubble (chibi /kawaii…
Today I'll show you how to draw a Boo from Super Mario Bros in Kawaii…
View Comments
great job this tutor help me a lot. thanks.
Hi this was most helpful
Hi
Bruce did this
Hi
Thanks for the help
This was very helpful