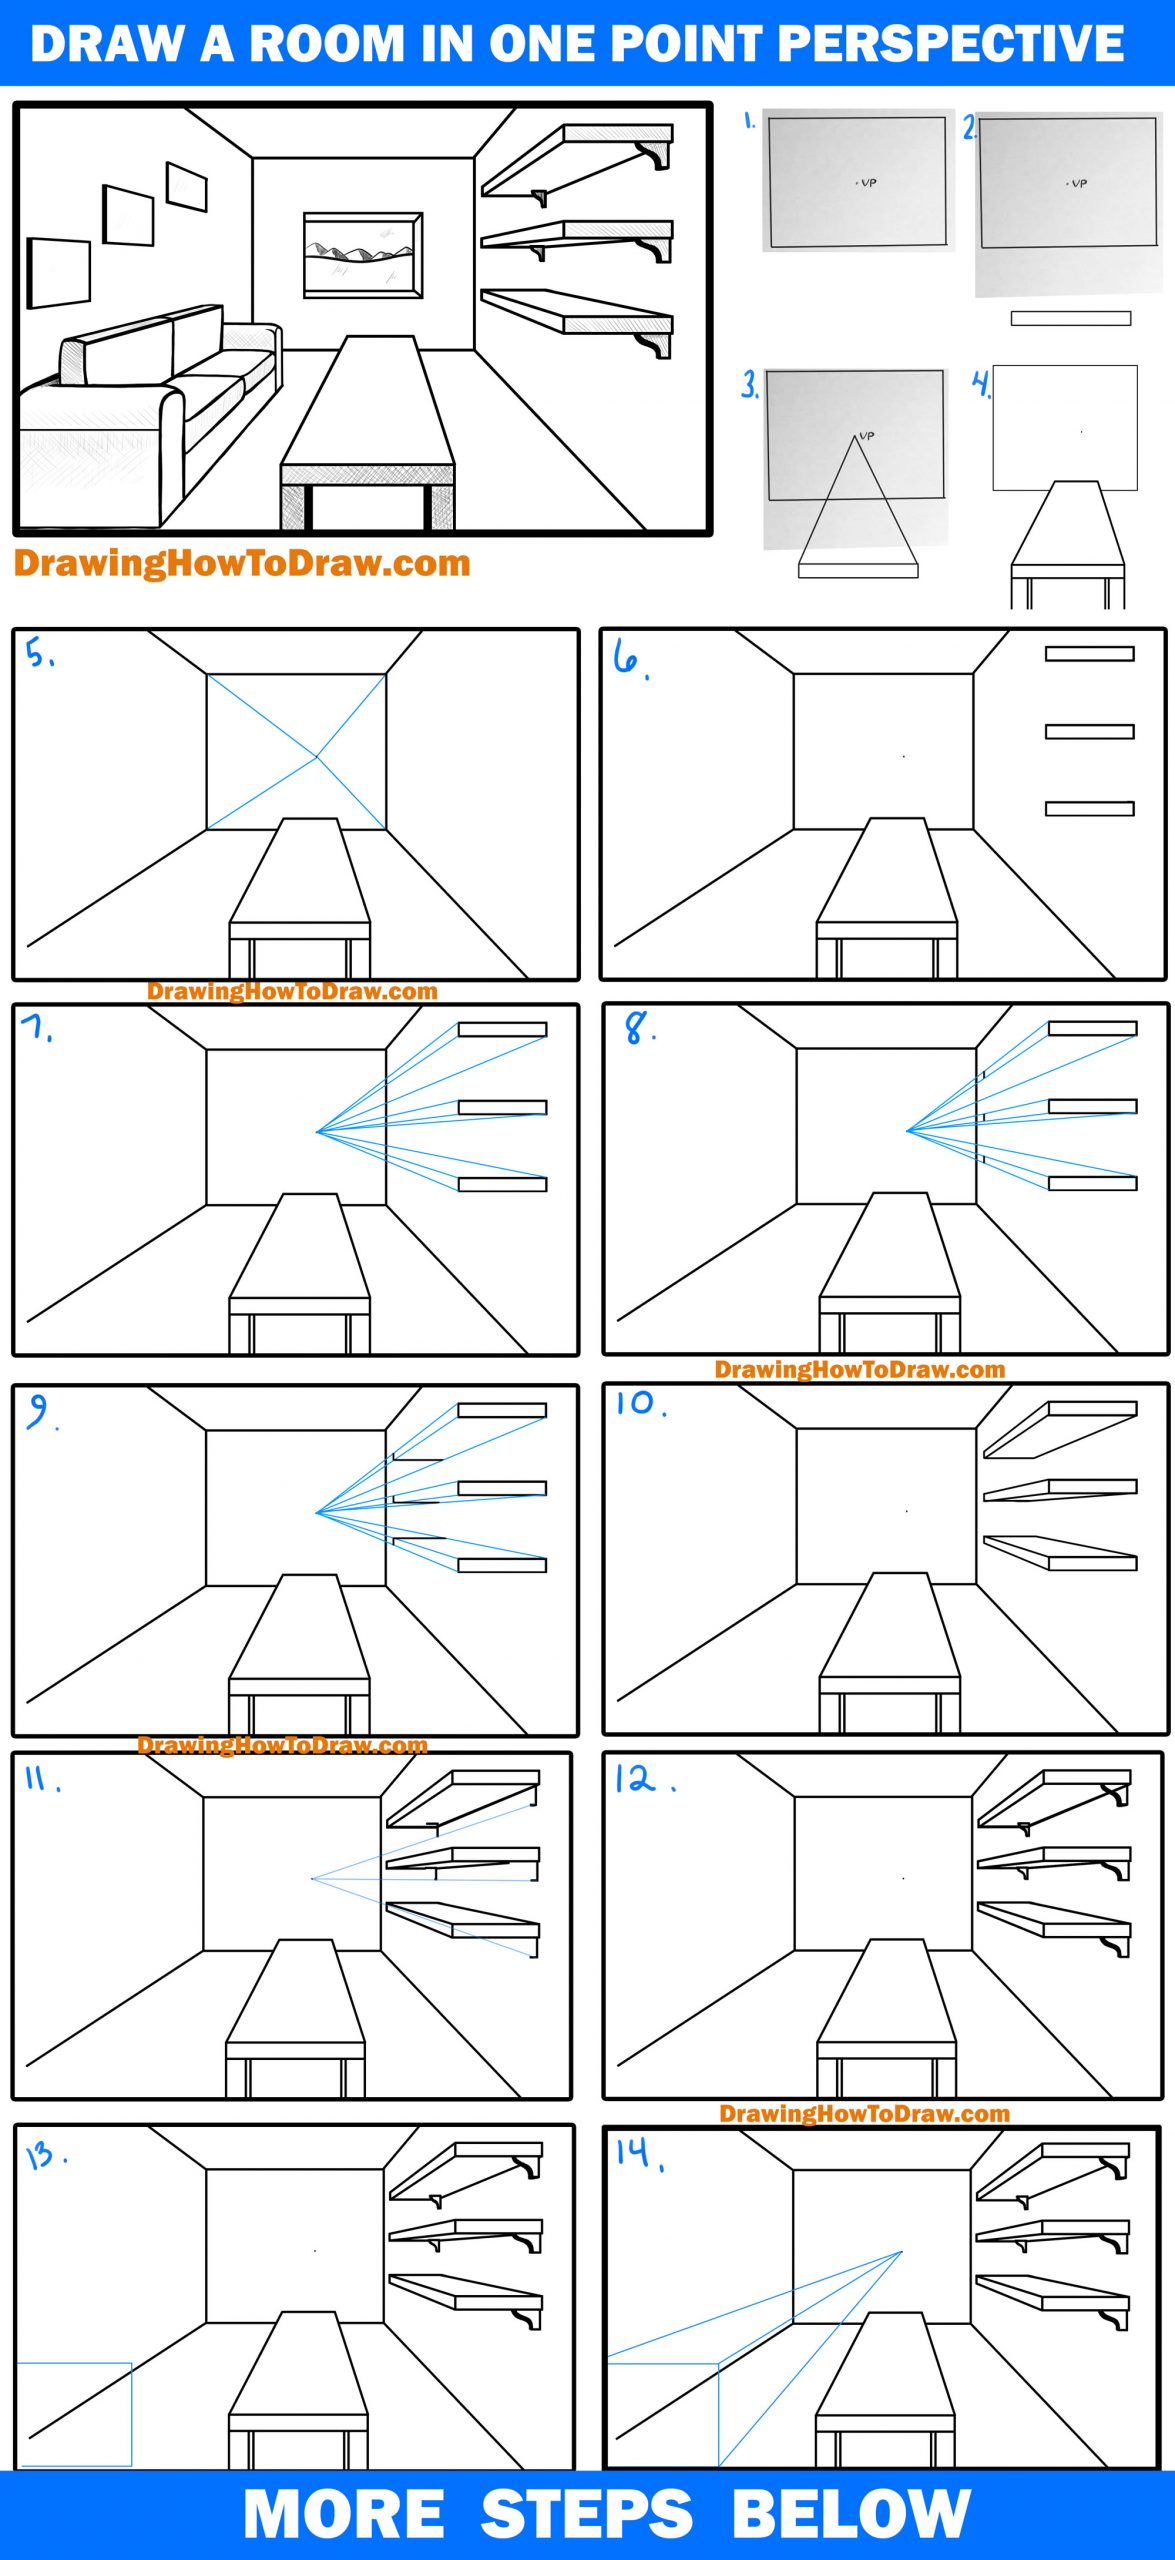
Today I will show you how to draw a living room in one point perspective. This drawing has picture frames, a window, shelves, a couch, and a table. 1 point perspective (also called parallel perspective) is used by interior designers because it is the easiest way to draw an interior room quickly. I think it is a great skill to have. Enjoy the lesson below.
(Step 1) Draw a rectangle somewhere on your paper. This will be the back wall. Look at the finished drawing if you want to see how large I made mine.
Draw a dot somewhere inside that rectangle. This will be the vanishing point.
The vanishing point is the point at which something that has been growing smaller or increasingly faint disappears altogether. For example, when you are looking down the street and it looks like the houses are disappearing at a single point. This would be the vanishing point.
(Step 2) Draw a much smaller rectangle. This will be the front of the table.
(Step 3) Get a ruler and draw a line from both of the top corners of this rectangle out towards the vanishing point.
(Step 4) Now draw the legs of the table. Make sure if one leg is an inch long, so is the other leg. Draw a line on the inside of each leg to show depth.
(Step 5) Now let’s draw the ceiling, floor, and 2 sidewalls. Do this by taking a ruler and drawing a line from the vanishing point through each corner of the rectangle from step #1. Draw them out until you get to the edge of the table.
Then erase the parts of the guidelines that are inside that back wall (the rectangle from step #1). We don’t need those lines anymore.
(Step 6) Draw 3 rectangles as I have. These are the fronts of the shelves. Make sure that they are equally spaced apart.
(Step 7) Now draw lines to the vanishing point, as I have. Notice which corners of the shelving I drew lines out from.
(Step 8) Draw a vertical line in 3 places to denote where the end of the shelving will be.
(Step 9) Now draw a horizontal line on each shelf. On the highest and middle shelves, the line is on the bottom of the shelf. On the bottom shelf, the horizontal line is on the top of the shelf. It changes depending on whether the shape is above or below the horizon line.
(Step 10) Darken the lines that are part of the shelf and erase the rest of these guidelines.
(Step 11) Draw a backward “L” shape for each of the front shelf brackets. Make sure each is the same size as the others.
Then lightly take a pencil and draw a line from the bottom of each bracket out to the vanishing point.
You do this so you know where the farther out brackets need to be drawn.
(Step 12) Then Draw a backward “S” like shape on each bracket to form the shape of the bracket. Darken to the right of each bracket (a bit) to show depth.
Notice that the bottom shelf doesn’t have a bracket. This isn’t by accident, but because we can’t see that one because it’s hidden by the shelf.
(Step 13) Now we will start the sofa. The sofa is a tough one to draw, so we are going to start with guidelines.
Start off by drawing a rectangle from the nearest part of the couch.
(Step 14) Take a ruler and draw lines out to the vanishing point.
(Step 15) Now draw some vertical and horizontal lines.
(Step 16) Draw some lines out to the vanishing point.
(FYI) You don’t actually have to draw it all the way to the point. The main part is having the ruler lined up on the vanishing point, then just finish the line where it needs to end.
(Step 17) Draw a horizontal and vertical line in the shape of an “L” at the far corner of the couch.
(Step 18) Erase the part of the wall that is covered by the couch. Also, erase any guidelines that need to be erased.
(Step 19) Draw 2 horizontal lines for the farthest away arm.
(Step 20) Erase the part of the wall that the sofa is covering.
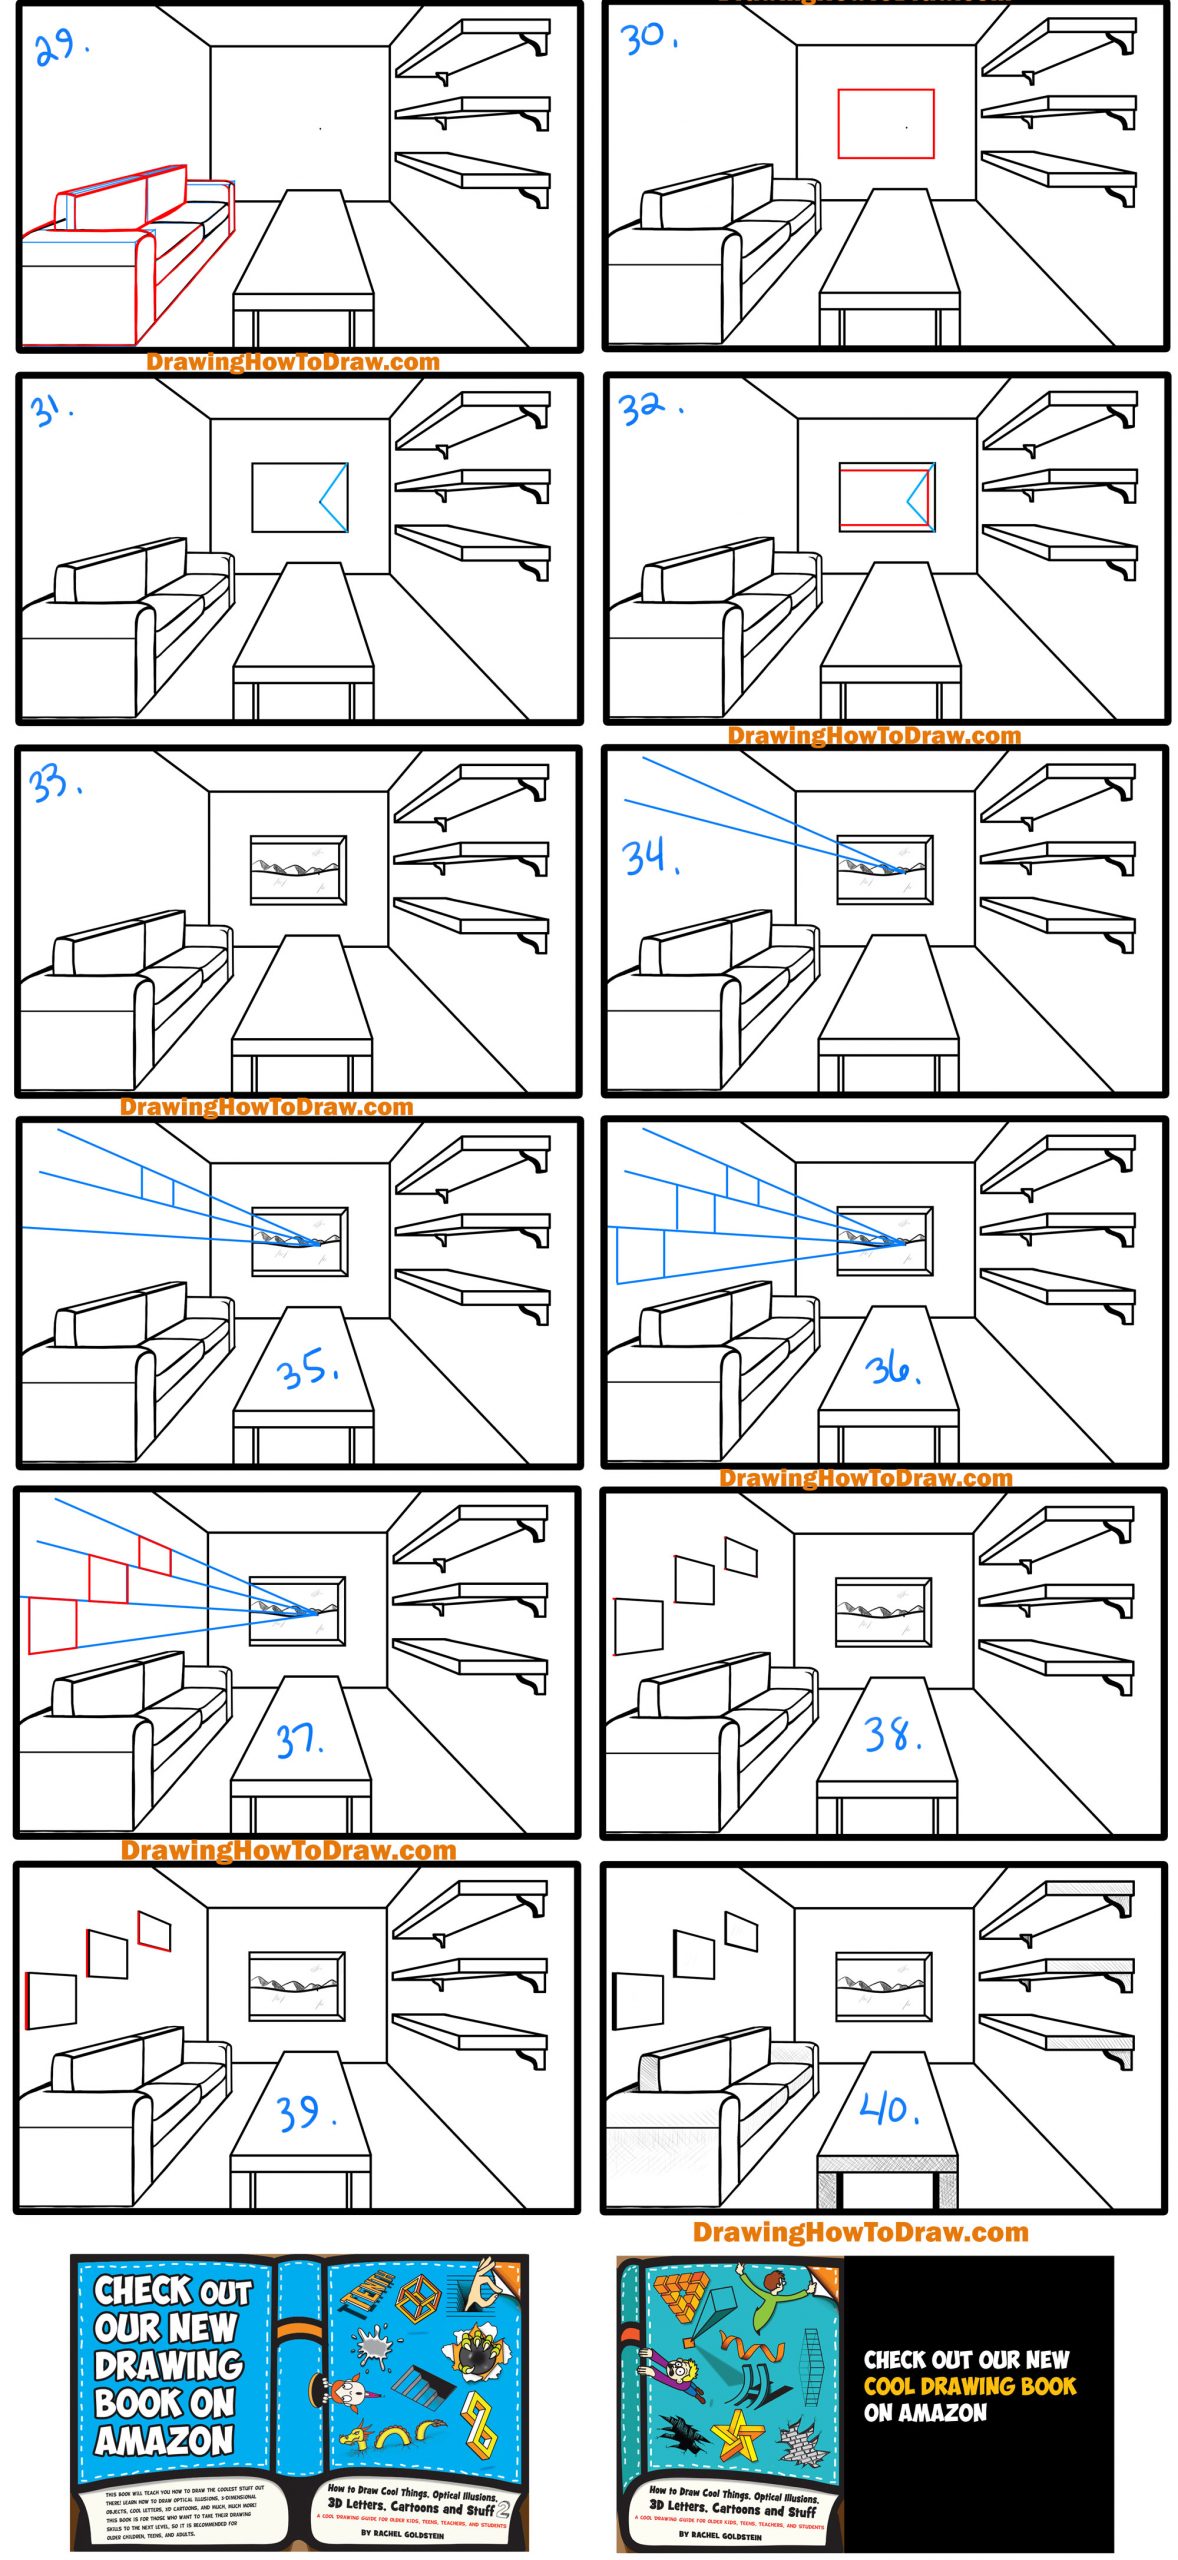
(Step 21) Draw lines out to the vanishing point.
(Step 22) Draw an “X” shape on the front of the couch cushions. This is for finding the center of the cushions.
(Step 23) Now that you found the center, draw 2 vertical lines and a horizontal line for the centers of the cushions.
(Step 24) Draw 2 vertical lines for the side of the top cushion.
(Step 25) Draw the last guideline out to the vanishing point.
(Step 26) Erase un-needed guidelines.
(Steps 27-29) Draw the real lines of the couch.
(Step 30) Draw a rectangle for the window.
(Step 31) Draw a line from the top right and bottom right corners of the rectangle. Really, I was supposed to draw a line all the corners to the vanishing point, but made a mistake, because where the window is located you should be able to see all the inner walls of the window.
(Step 32) Here I drew 3 lines to form an almost-rectangle. You can do all 4 lines to form a rectangle if you want, because like I said before, I made a mistake.
(Step 33) If you want to, draw scenery out of the window. If you can, draw the horizon line on the vanishing point. So for example, my hill is on the vanishing point.
(Step 34) Let’s start the picture frames. Draw lines out to the vanishing point (don’t actually draw over your window, just line it up with the vanishing point).
(Step 35) Draw 2 vertical lines for the first frame.
(Step 36) Draw more lines out to the vanishing point. Draw 2 more vertical lines for each frame. As you go further to the left, each frame should be slightly wider than the previous one.
(Step 37) You can now draw the frames for real.
(Step 38) Erase guidelines and draw horizontal lines on the frames to give them depth.
(Step 39) Draw a vertical line on all 3 frames to give them depth. Draw the bottom, horizontal line on the farthest frame because you can see the bottom of it (because it’s higher up).
(Step 40) If you want, add some shading to give it texture. I only did it on some stuff, obviously, in real life it would be way more shaded.
Technorati Tags: one point perspective, 1 point perspective, perspective drawing, interior, room, living room, couch, shelves, shelf, picture frames, window, table, couch, sofa
Today I'll show you how to draw Rick from the Rick and Morty cartoon tv…
Today I'll show you how to draw Morty from the Rick and Morty cartoon tv…
Today I'll show you how to draw the spunky little rabbit, Kuromi, from My Melody…
Today I'll show you how to draw this cute "bean duck" that I found on…
Today I'll show you how to draw Sosuke and Ponyo in a bubble (chibi /kawaii…
Today I'll show you how to draw a Boo from Super Mario Bros in Kawaii…
View Comments
Very good and very educational.
I always wanted to draw but I can tell u this is the best place so far for learning to draw so thank you for putting this up