Today I will show you how to draw a beautiful young black woman’s face. She has a gorgeous smile, large glasses, and a stylish afro. I will guide you through the process of drawing her, giving you almost 40 steps to follow. Find the step by step drawing lesson below. Good luck and have fun! Happy Drawing!
(1) Graphite pencils are optional but preferred. I got this cheaper set of graphite pencils and I actually like them a lot.
(2) Eraser. I usually use types of erasers. I use (a) A white drawing eraser and (2) Kneaded eraser
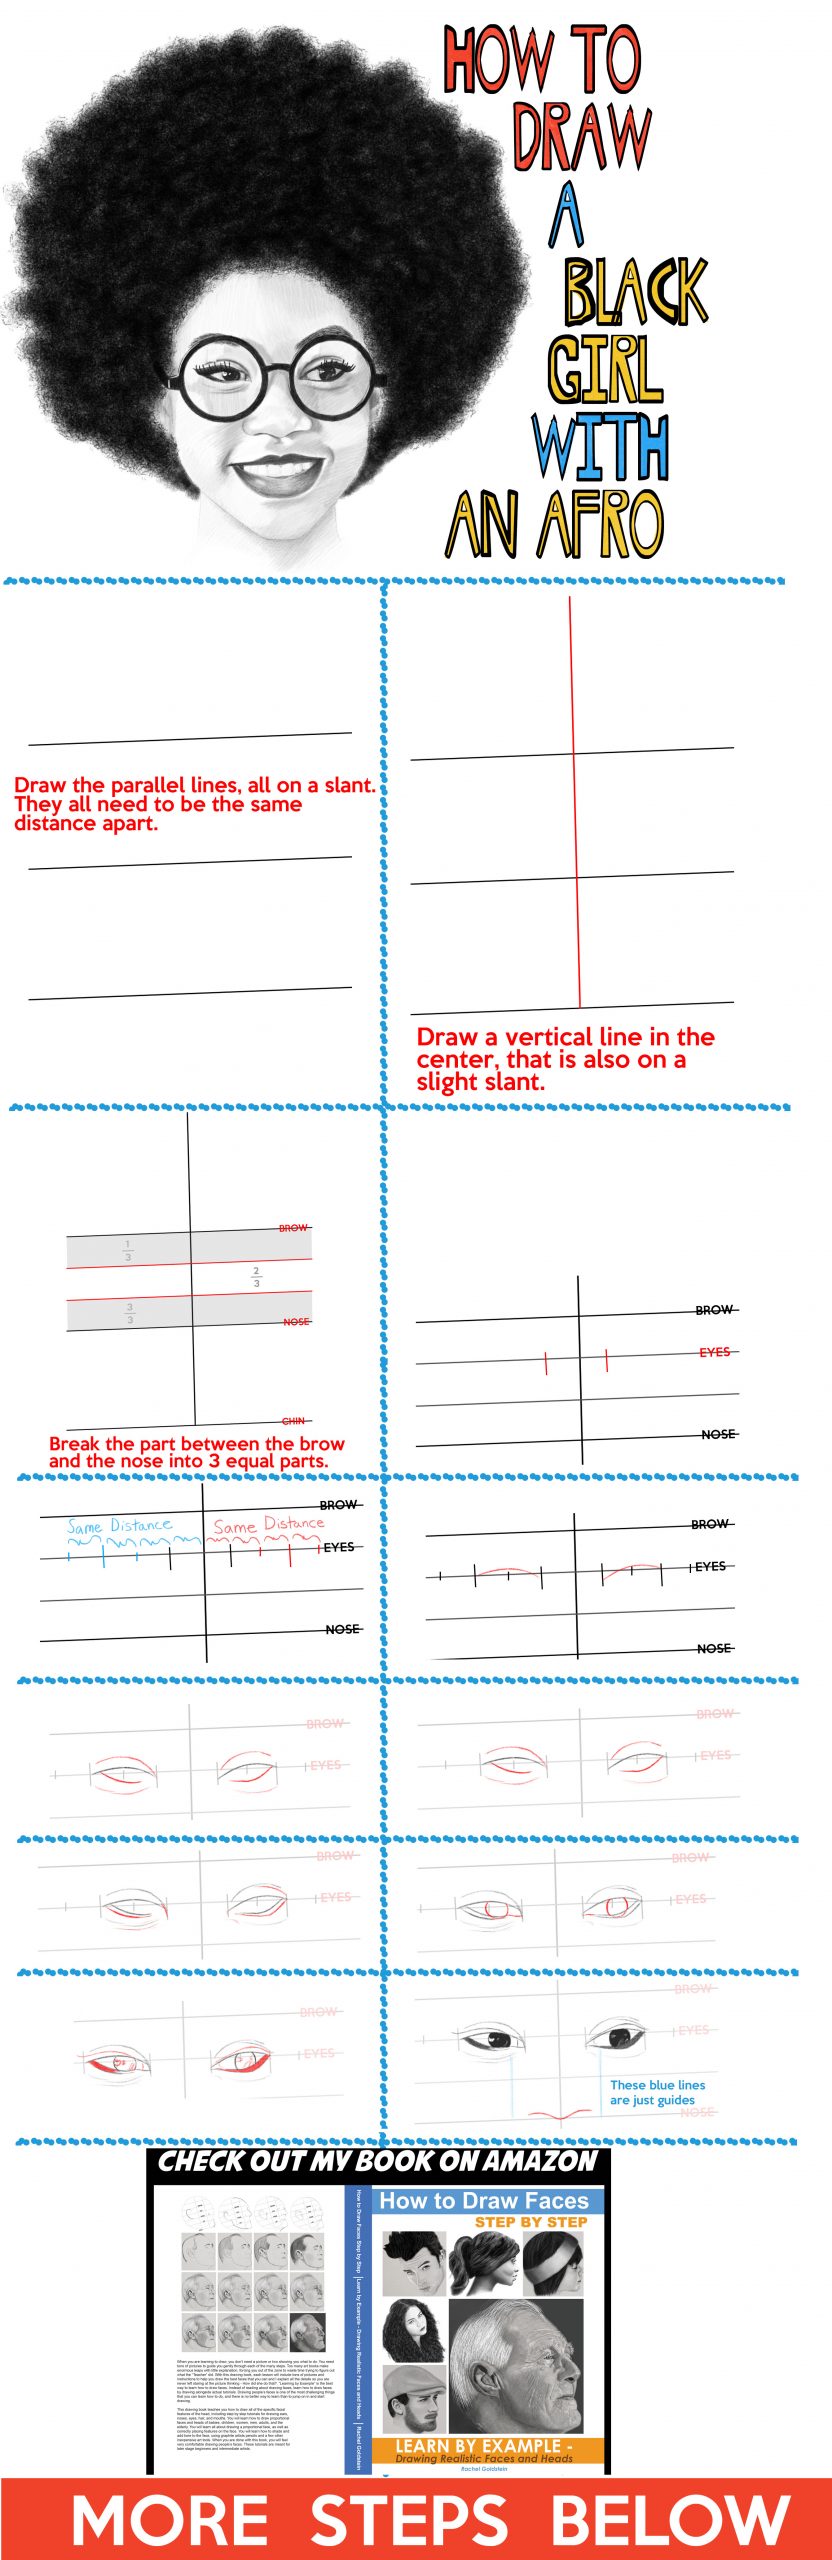
(STEP 01) Let’s start drawing guidelines. Draw them lightly as they will be erased later on. Draw the parallel lines, all on a slant. They all need to be the same distance apart.
(STEP 02) Draw a vertical line in the center, that is also on a slight slant.
(STEP 03) Lightly lable the brow, nose, and chin line to reference later. Break the part between the brow and the nose into 3 equal parts.
(STEP 04) Label the eye line. Draw 2 notches. Draw the notch on the left side further away from the center line than the notch on the right. The right side of the face is going to be a bit smaller since the face is turned slightly away from the viewer.
(STEP 05) Make 3 more notches on the right side, the same distance apart as the distance between the center line and the first notch. Make 3 more notches on the left side, the same distance apart as the distance between the center line and the first notch.
(STEP 06) Use the guidelines and notches to help you place the eyes. Start off the eyes by drawing a curved line for each eye.
(STEP 07) Draw curved lines for her lower eyes, her upper eyelids, and the lines below her eyes.
(STEP 08) Add some more details to her eyes.
(STEP 09) Draw a sideways “?” shape on the left eye, and a curved line on the right one. Draw a partial circle for each of the pupils. Erase the part of the circle that is outside of the eye.
(STEP 10) She has a lot of eye makeup on, including a lot of eye liner. Draw a sideways “S”-like curve on each eyelid. Blacken in the lower, inner eyelid, this is makeup as well. Draw a few highlights in the eyes. She obviously has pupils, but her eyes are so dark, they cannot be seen.
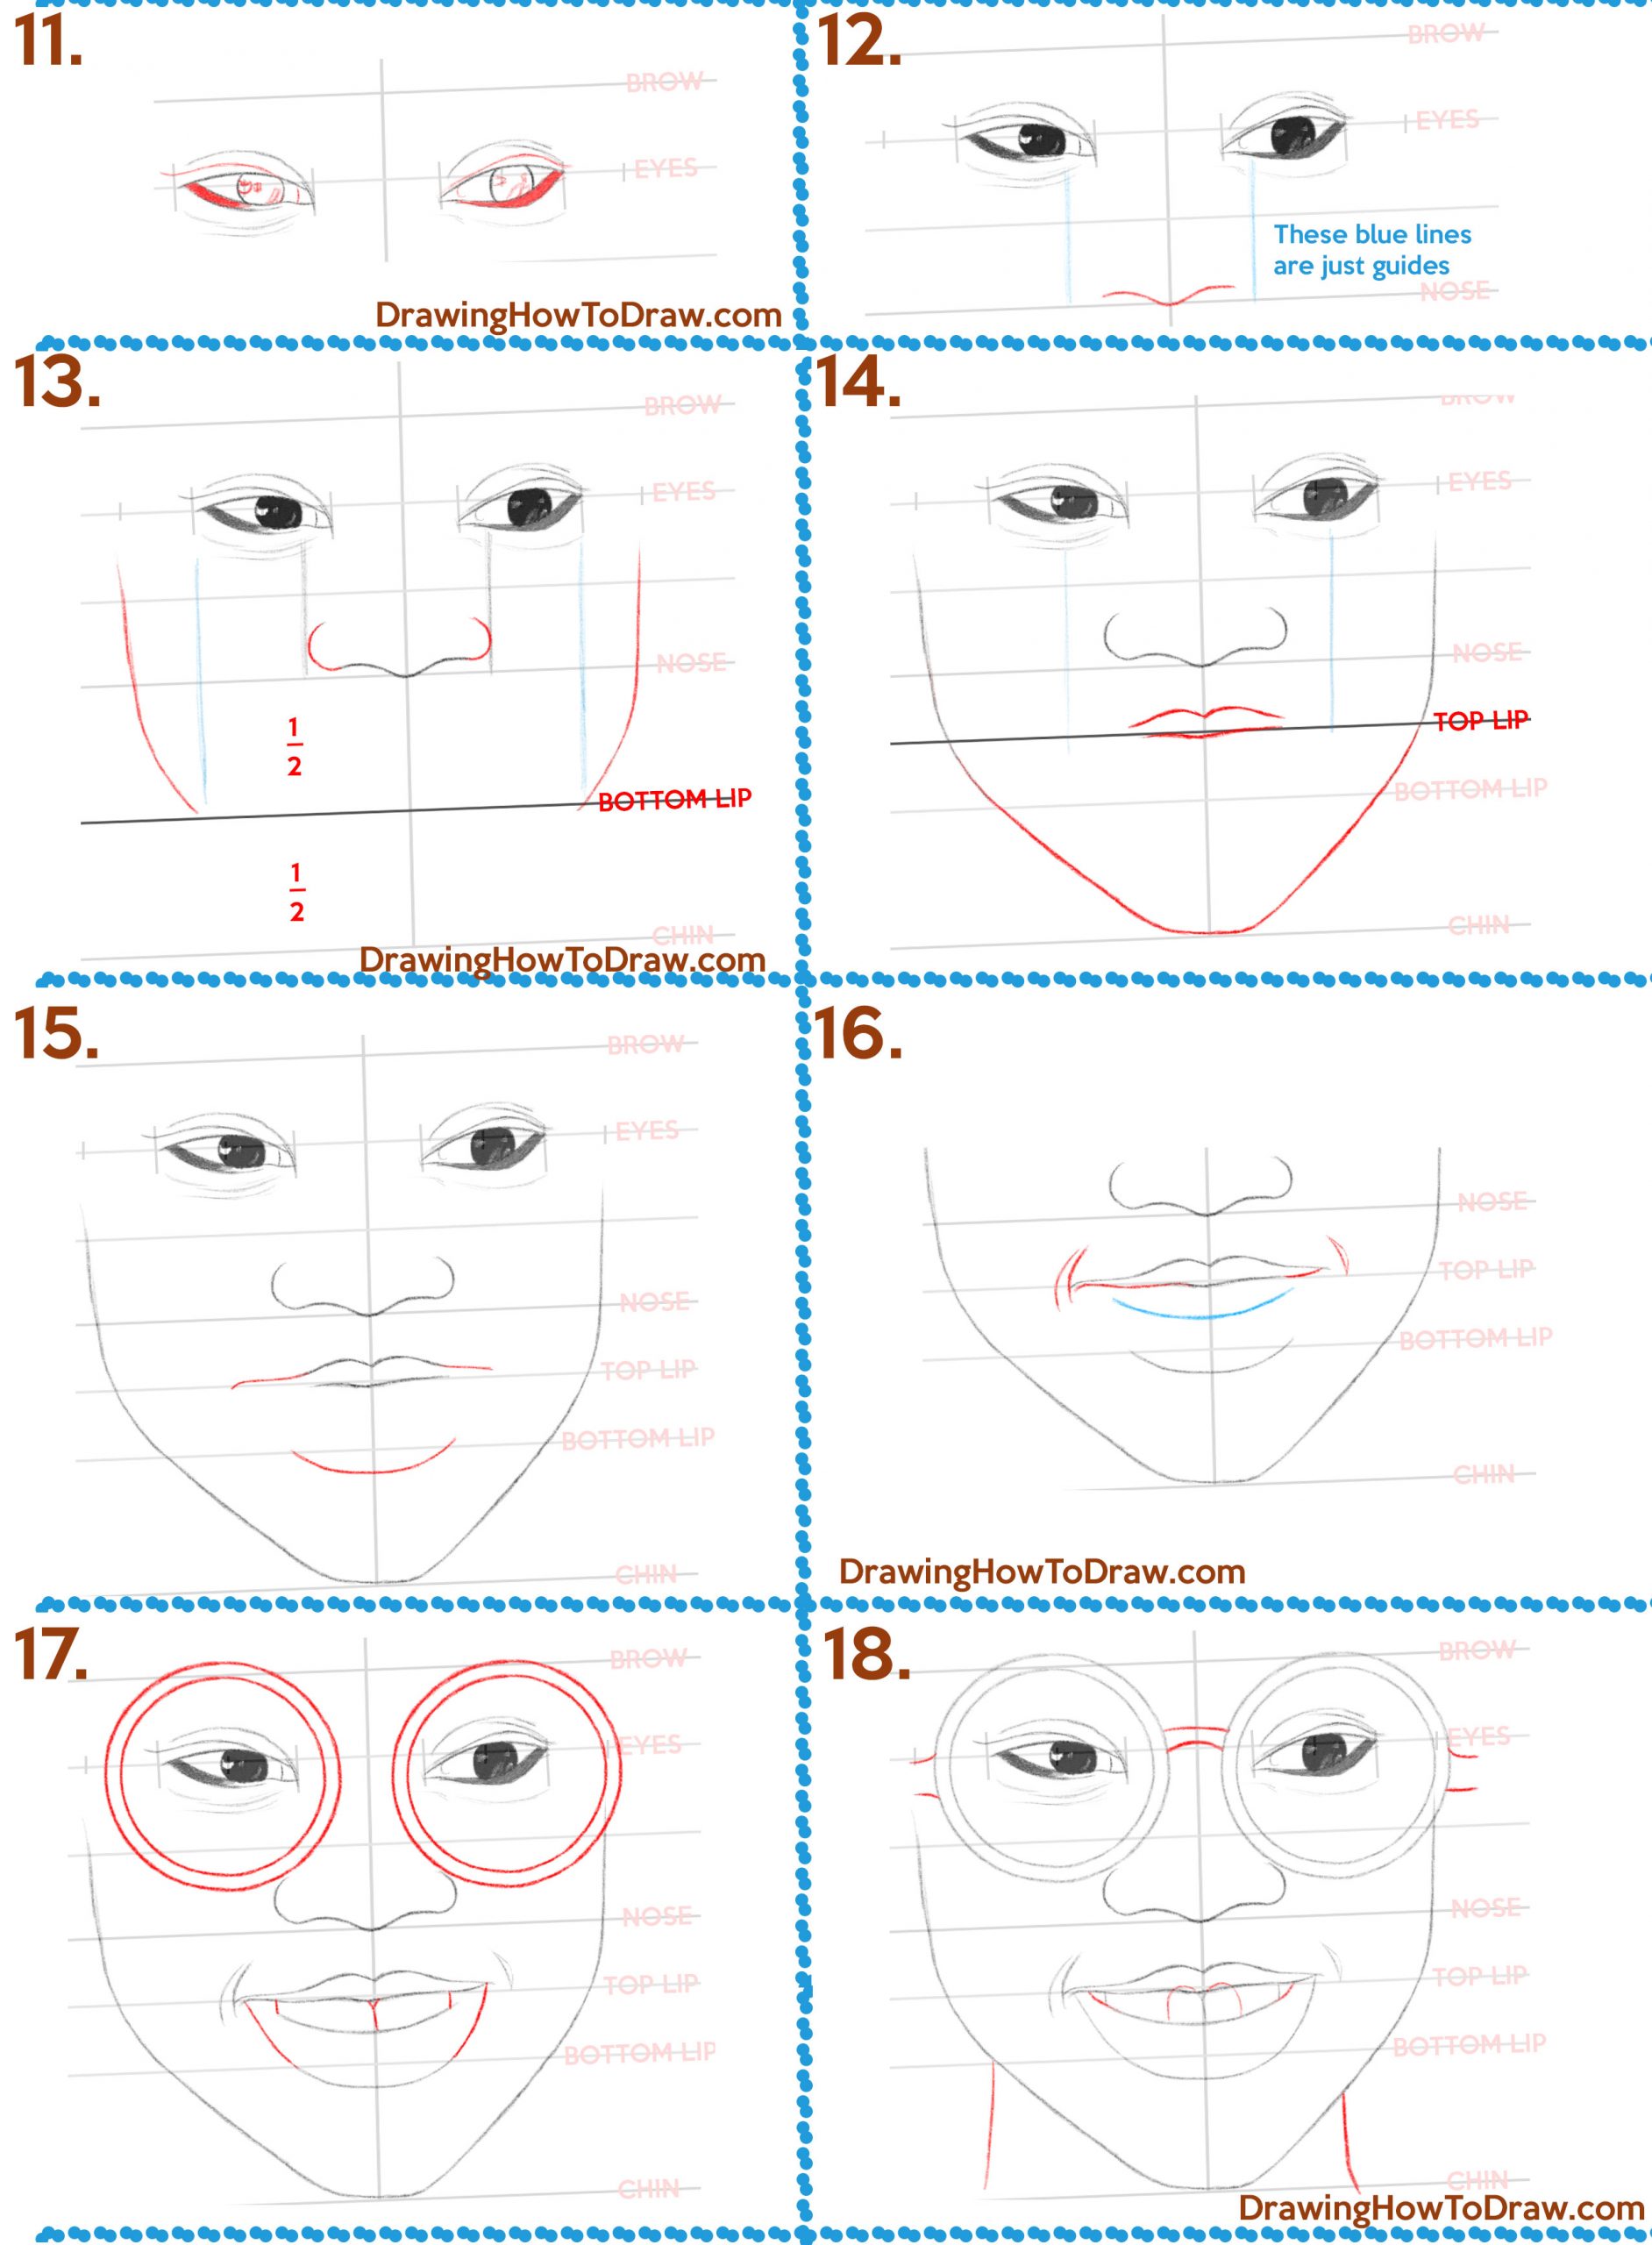
(STEP 11) Lightly draw guidelines down from the right side of the left pupil. Draw a line for the inner eye on the right eye.
(STEP 12) Lightly draw a guidelines down from the right side of the left iris. Lighlty draw a line down from the right side of the right eye’s inner eye. Draw the start of her nose between these 2 lines, on the nose line.
(STEP 13) Lightly draw a guideline through the center between the “nose line” and the “chin line”. Lightly draw a line down from the outside of both eyes. Where these 2 points meet is where you will draw the sides of the face to. Draw the sides of the face, starting on the outside eye notch, and curving down until it meets this point. Also draw the sides of the nose, which both look like a “C” shape.
(STEP 14) Lightly draw a guideline through the center between the “nose line” and the “top lip line”. Now let’s start drawing the lips. The top of the top lip is like a flattened “m” shape. Draw a wavy line for the lower part of the top lip. Draw the chin.
(STEP 15) Use the guidelines to help you place the bottom lip, which is a curved line. Draw a sideways “?”-like shape on the left side of her upper lip. Draw a line on the right side.
(STEP 16) Draw curved lines on the left of her mouth and a “D” shape on the right side of her mouth for her cheeks. Draw a wavy line and a curved line on the bottom of her top lip. Lightly draw a curved line as a guide for her teeth.
(STEP 17) Connect the bottom lip with the top lip. Draw a line on both side of her teeth. Draw a “Y”-like shape in the center of her teeth. Draw 2 circles for each lens of her eyeglasses. You can use a compass, or find some lids to trace.
(STEP 18) Draw her throat with 2 curved lines. Draw the arms and the bridge of the glasses with curved lines. Draw parts of the bottom lip. Turn the center teeth into an “m” shape.
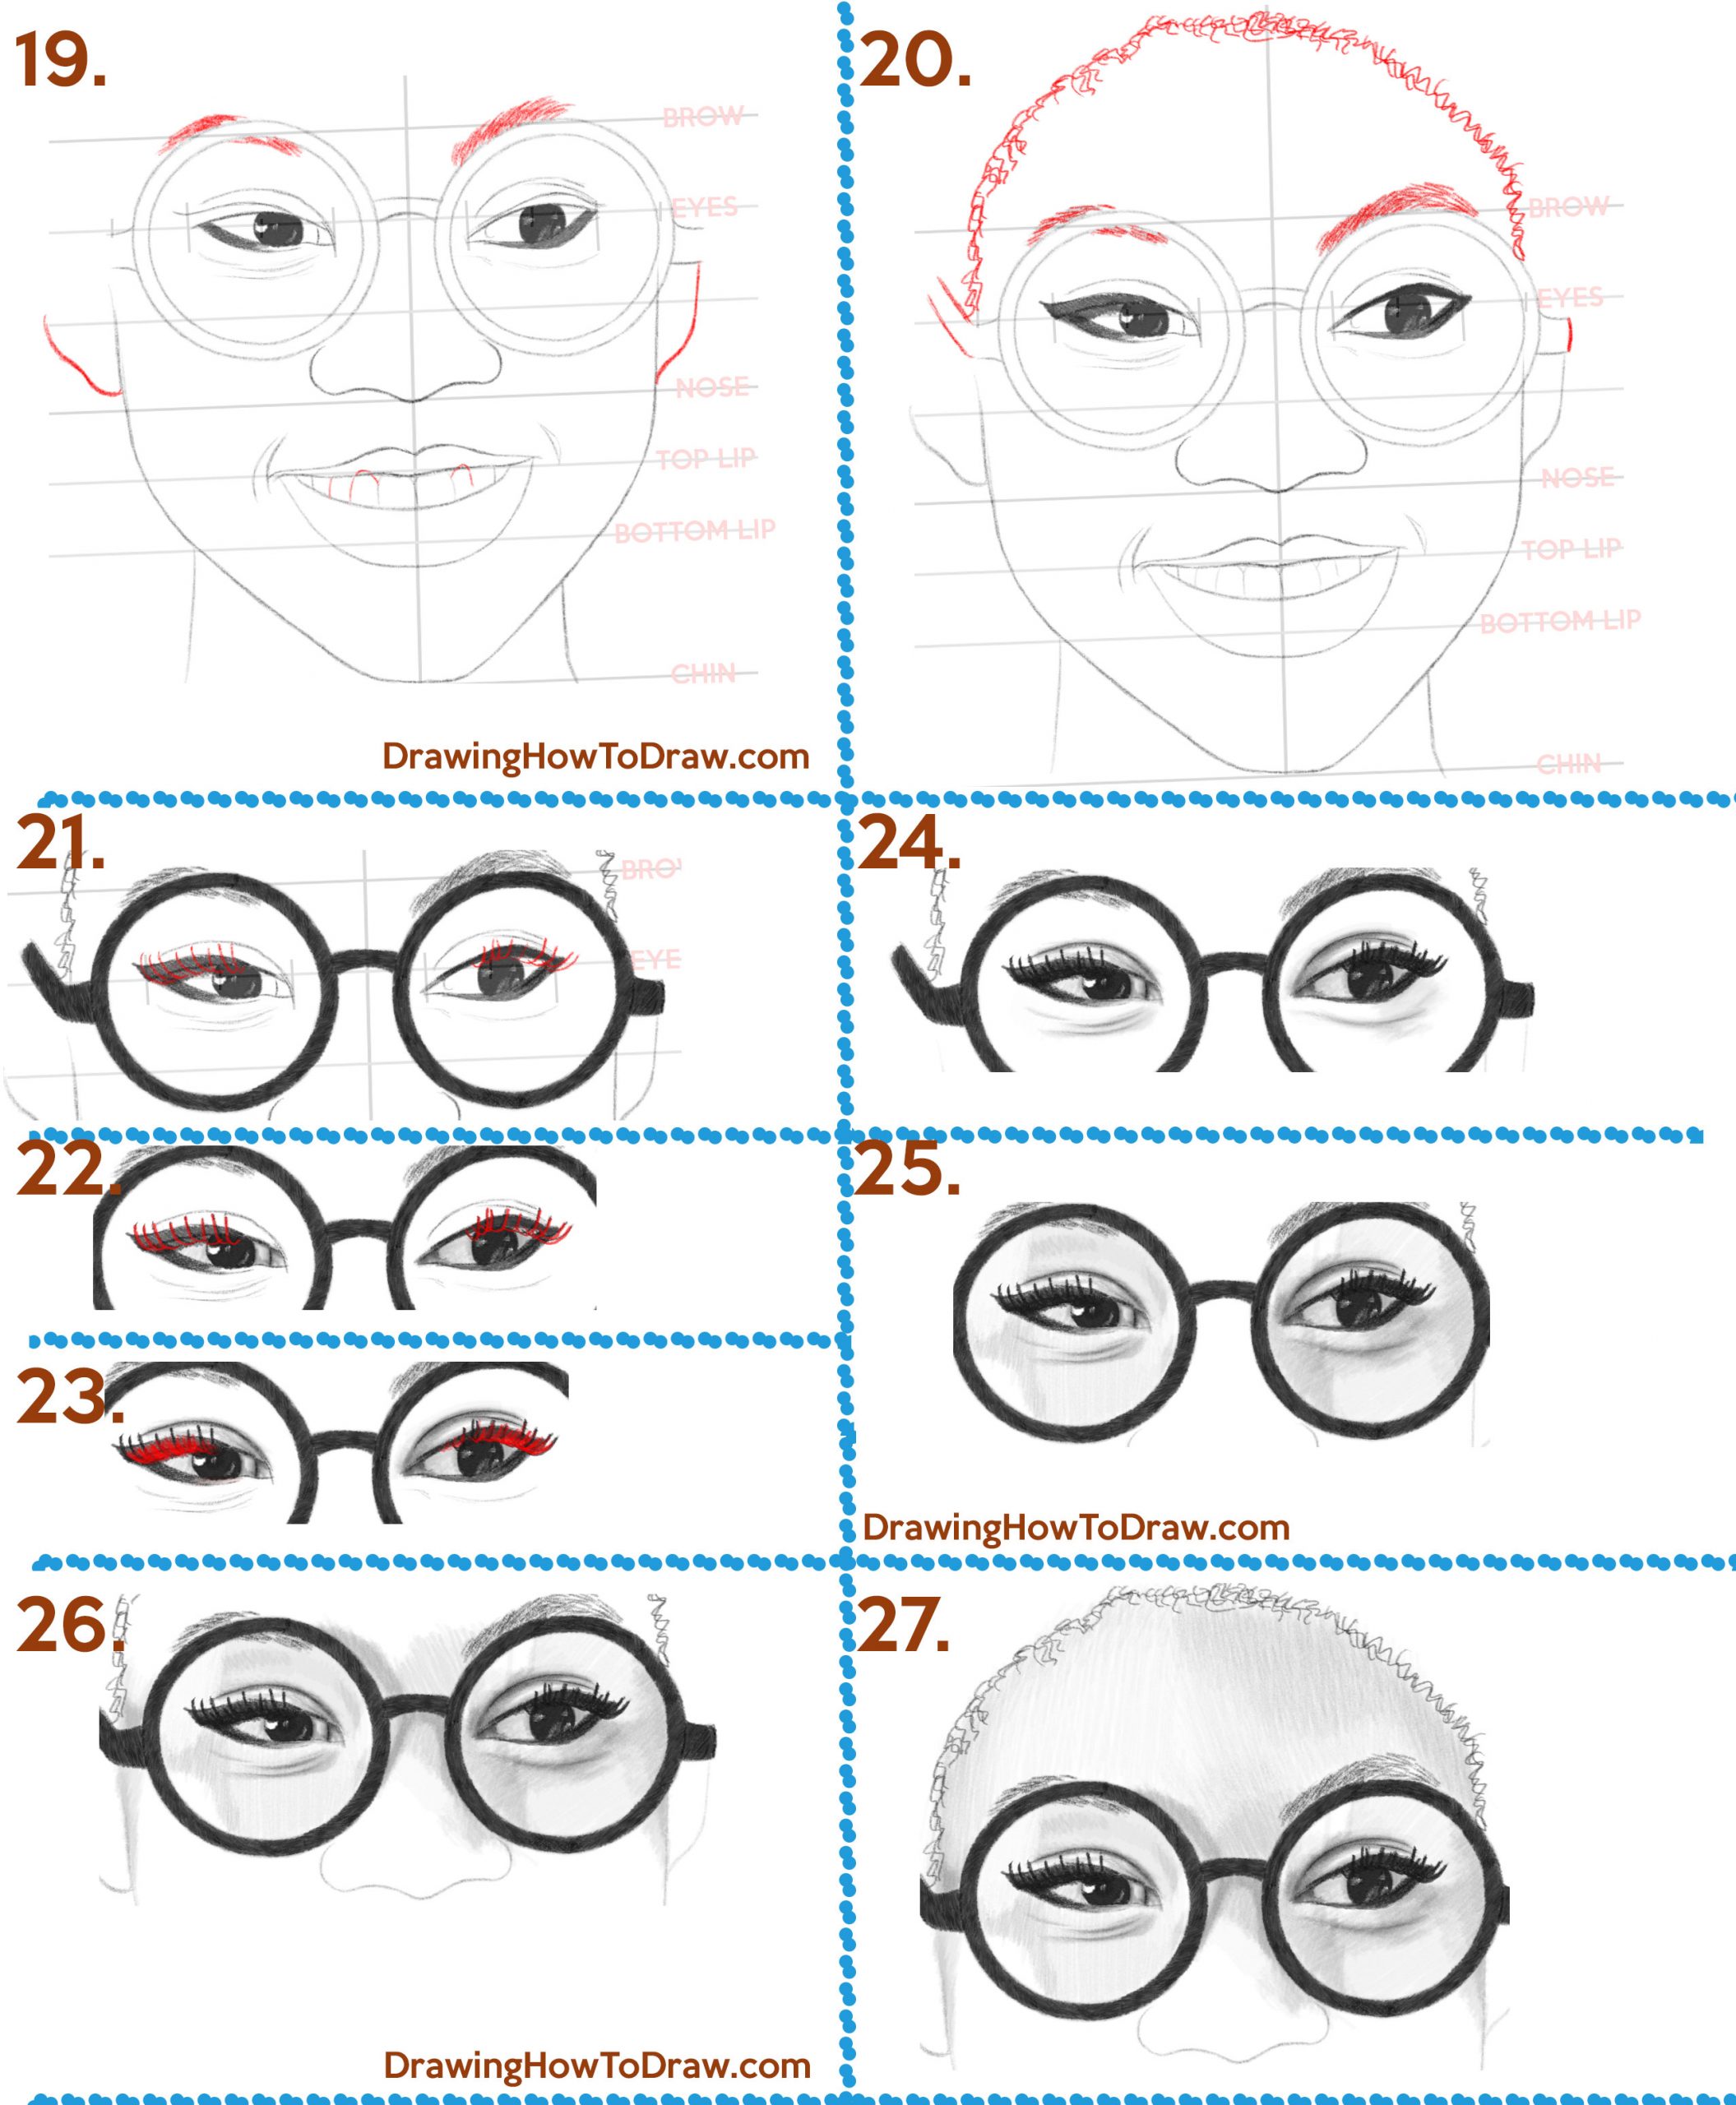
(STEP 19) Draw upside down “J” shapes for 2 of her teeth. Draw a curved line for the other one. The part above the lip can be erased. Draw the ears. The left ear looks like a flattened #3 shape and the one on the right looks slightly like a “J” shape. Draw tiny hairs for her eyebrows.
(STEP 20) Draw squiglly lines for her bangs. Draw 2 lines on the left arm of her glasses and a curved line on the right side of her glasses. Draw more lines on her eyebrows. Darken some the makeup on her eyes.
(STEP 21) Draw Eyelashes. They start off as “C” shapes on the outer part of the eye, and as they move towards the inner eye, they turn into “J”-like shapes, some of them overlapping. Also fill in the glasses.
(STEP 22) Thicken up each eyelash. Start shading the inner eyes and whites of the eyes.
(STEP 23) Add a bunch of “J” shapes below the larger lashes. This will bulk them up. Add shading to the eyelids. They should be darkest at the crease and gradually fade out to nothing.
(STEP 24) Add shading beneath her eyes.
(STEP 25) Shade inside her glasses’ lenses.
(STEP 26) Shade around her glasses now.
(STEP 27) Shade her forehead.
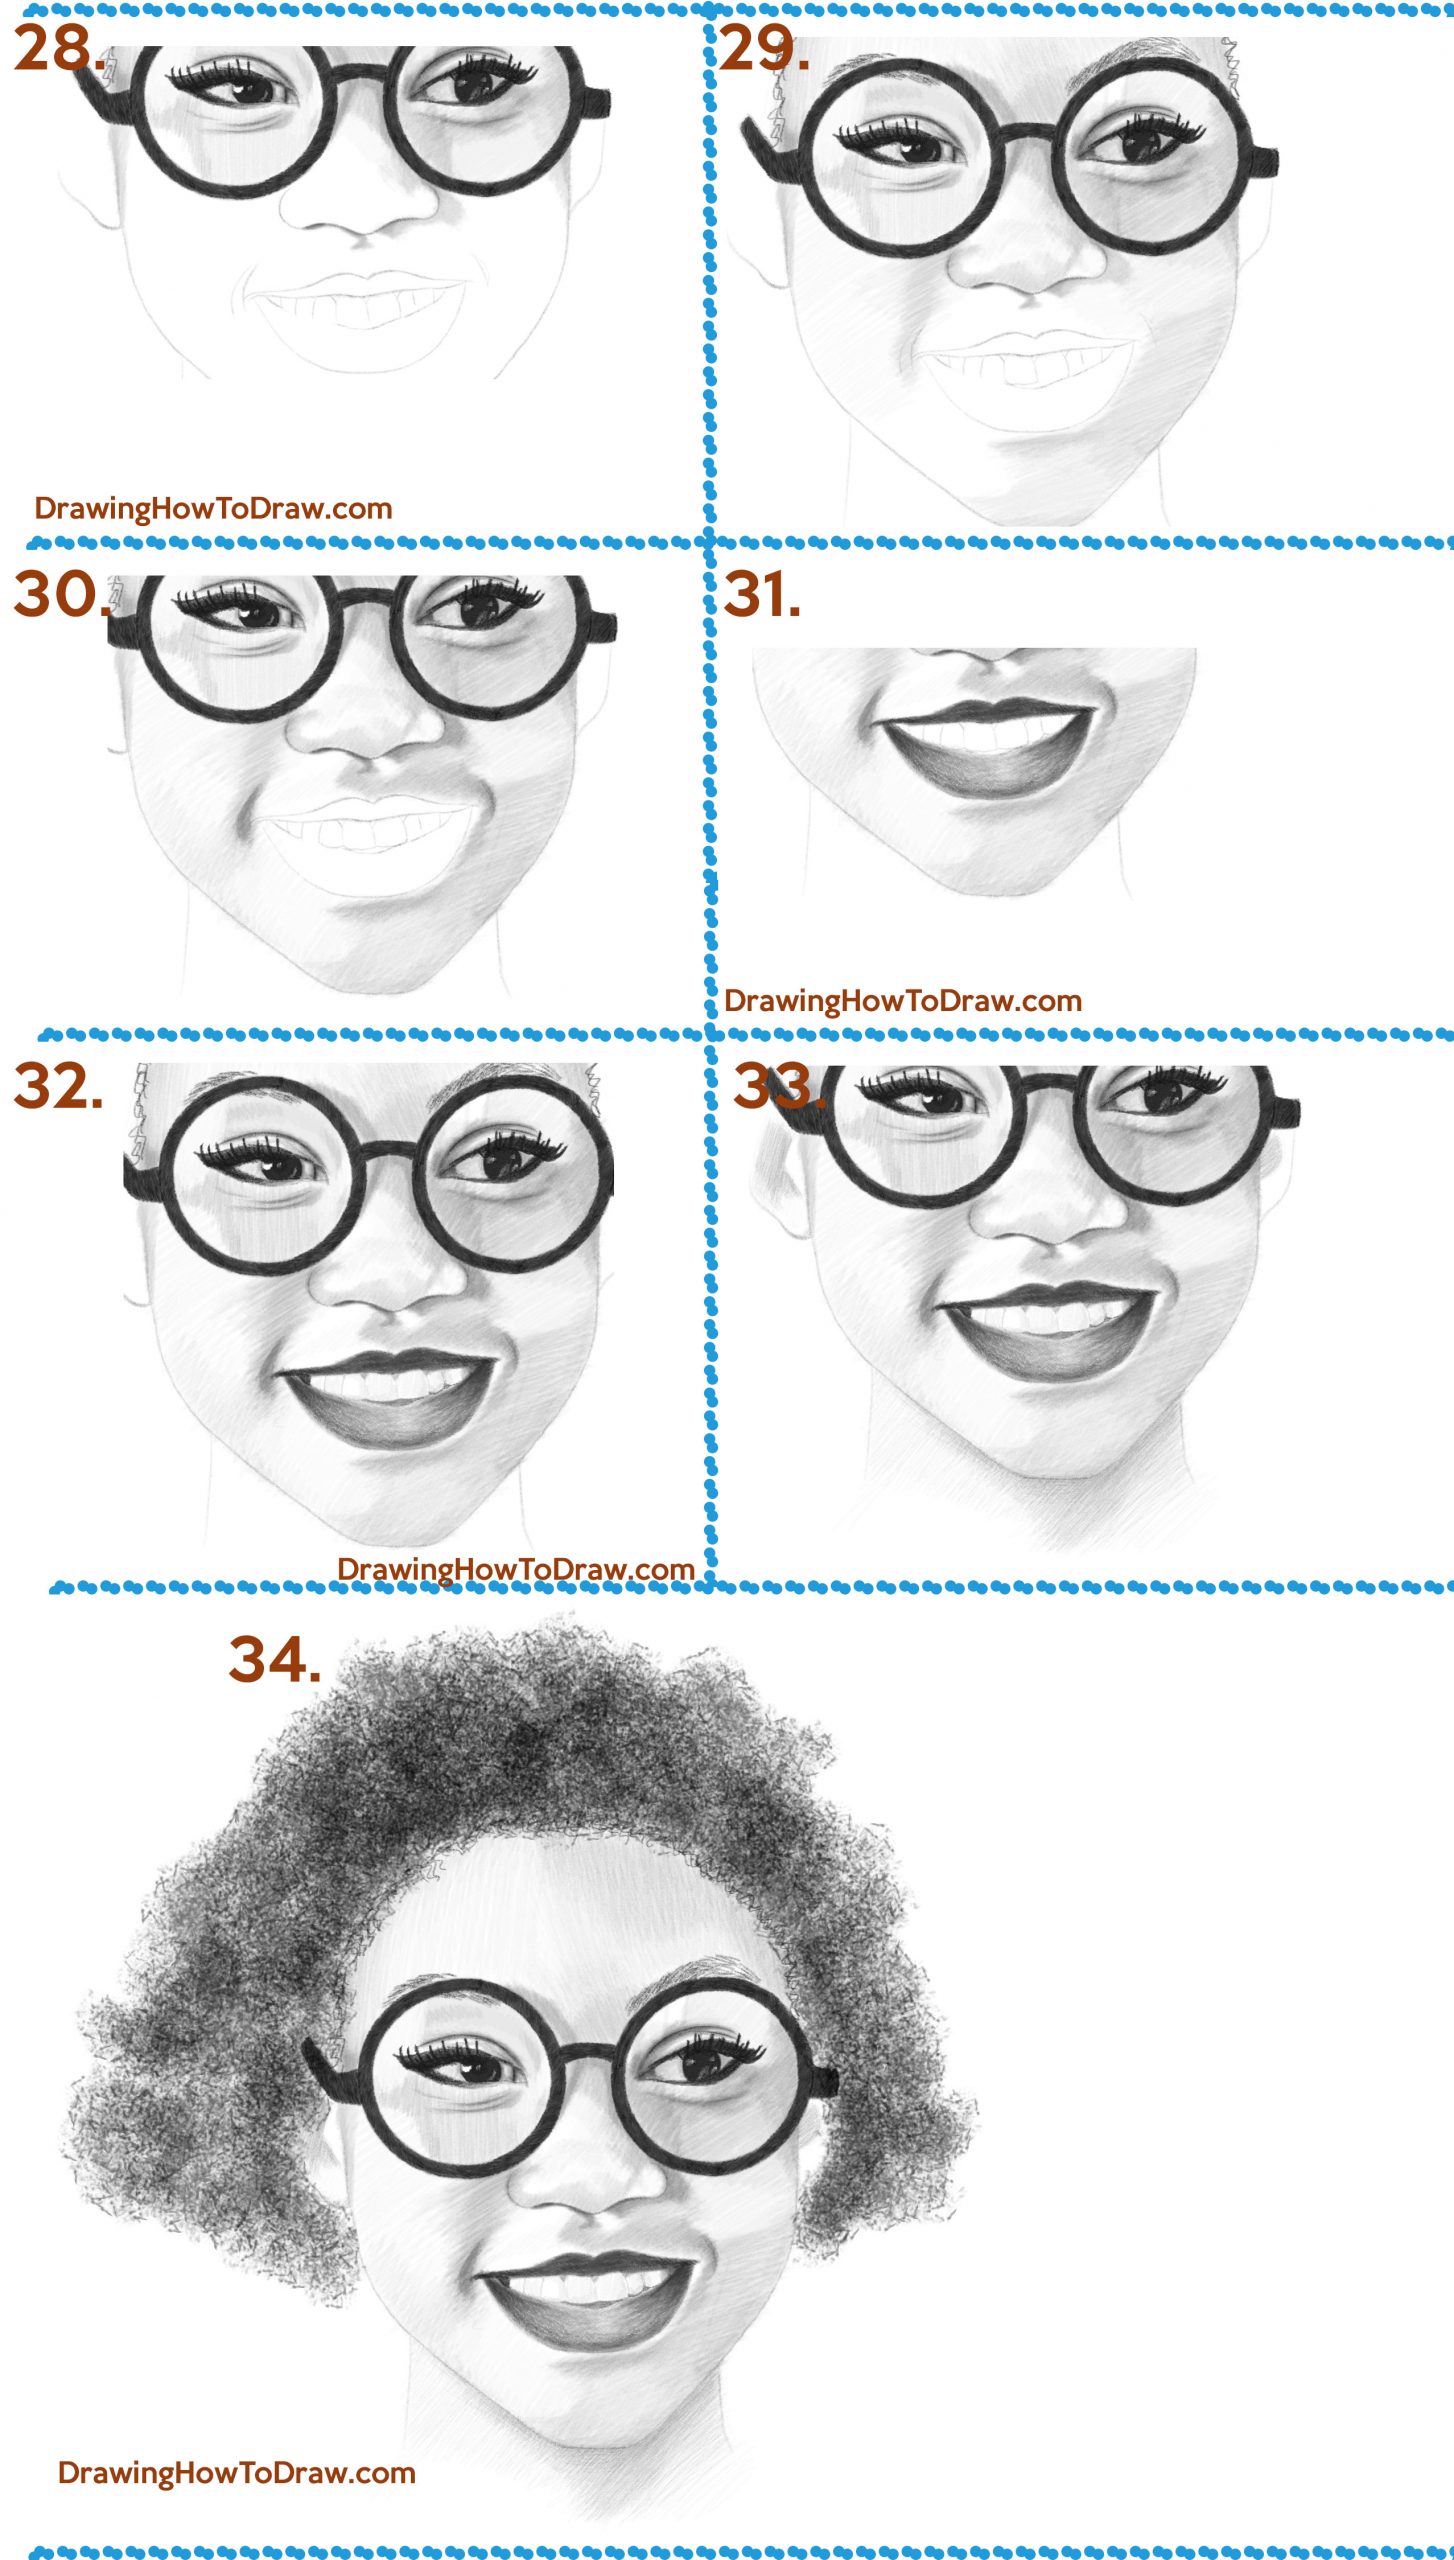
(STEP 28) Start shading the nose. Also, draw part of her bottom lip.
(STEP 29) Draw the bottom of one of her front teeth. Start shading the bottom of her face, her nose and a bit under her right eye.
(STEP 30) There are some pretty dark shadows on her lower face. The creases around her mouth, get pretty dark. And the right side of her face and of her nose get pretty dark as well.
(STEP 31) Draw some lines on her teeth. Her lips are pretty dark. Make the top lip darker. The bottom lip is only as dark as the top lip on the sides and on the bottom.
(STEP 32) Draw a bit more shading in her lenses. Also add shading for the gums and under her top teeth. Add some light tint to the teeth. Add a small shadow on teh right side of some of her teeth.
(STEP 33) Start shading her ears and throat.
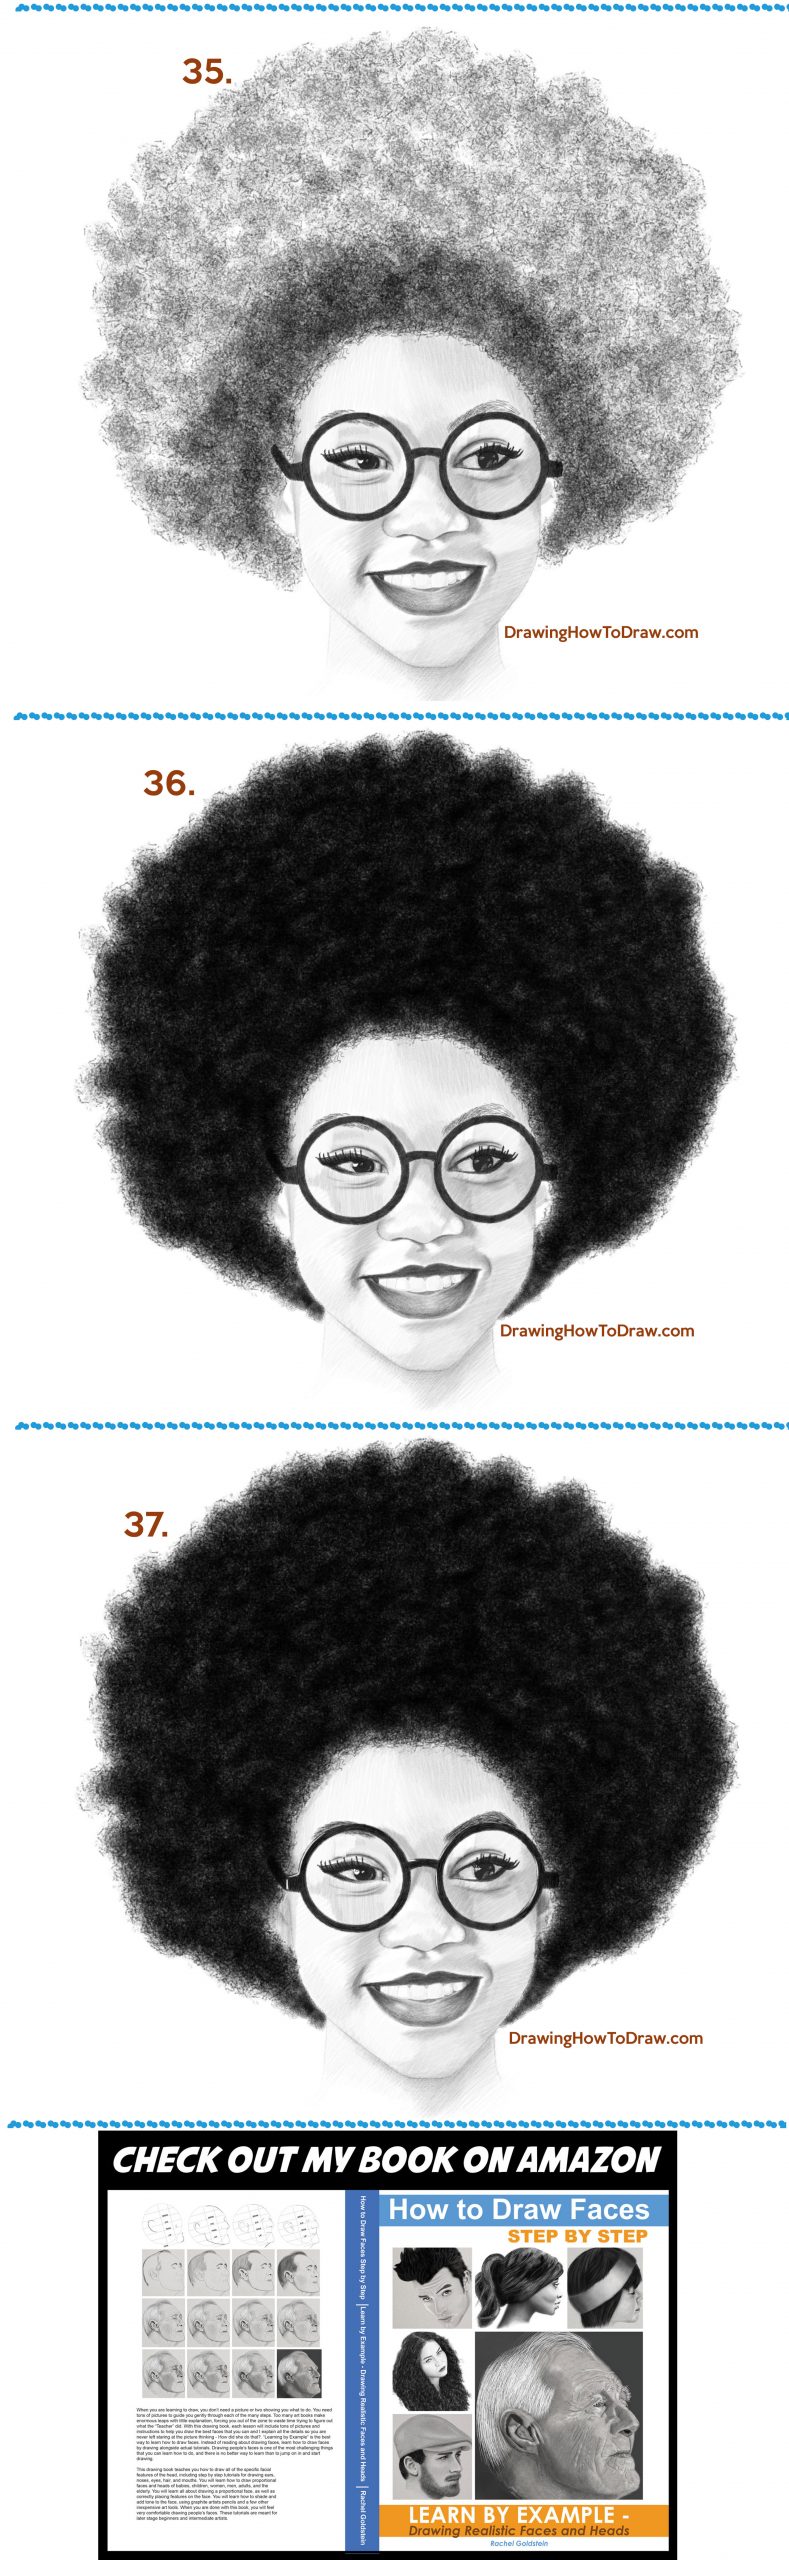
(STEPS 34- 36) Draw squiggly curly lines in different directions and angles. Just keep adding curls until sufficiently dark.
(STEP 37) Either use an eraser to erase out highlights or you use a white paint marker/ white gel pen. to draw in highlights. I recommend a Tombow Mono eraser pen for highlights, but if you don’t have one, you can either mold a kneaded eraser into a point or just try to get in there with a normal pencil eraser. Also, darken her eye brows and add shading to her ears.
Technorati Tags: drawing faces, how to draw faces, black woman, black girl, african american woman, african american girl, afro, afroes, glasses, woman, girl
Today I'll show you how to draw Rick from the Rick and Morty cartoon tv…
Today I'll show you how to draw Morty from the Rick and Morty cartoon tv…
Today I'll show you how to draw the spunky little rabbit, Kuromi, from My Melody…
Today I'll show you how to draw this cute "bean duck" that I found on…
Today I'll show you how to draw Sosuke and Ponyo in a bubble (chibi /kawaii…
Today I'll show you how to draw a Boo from Super Mario Bros in Kawaii…