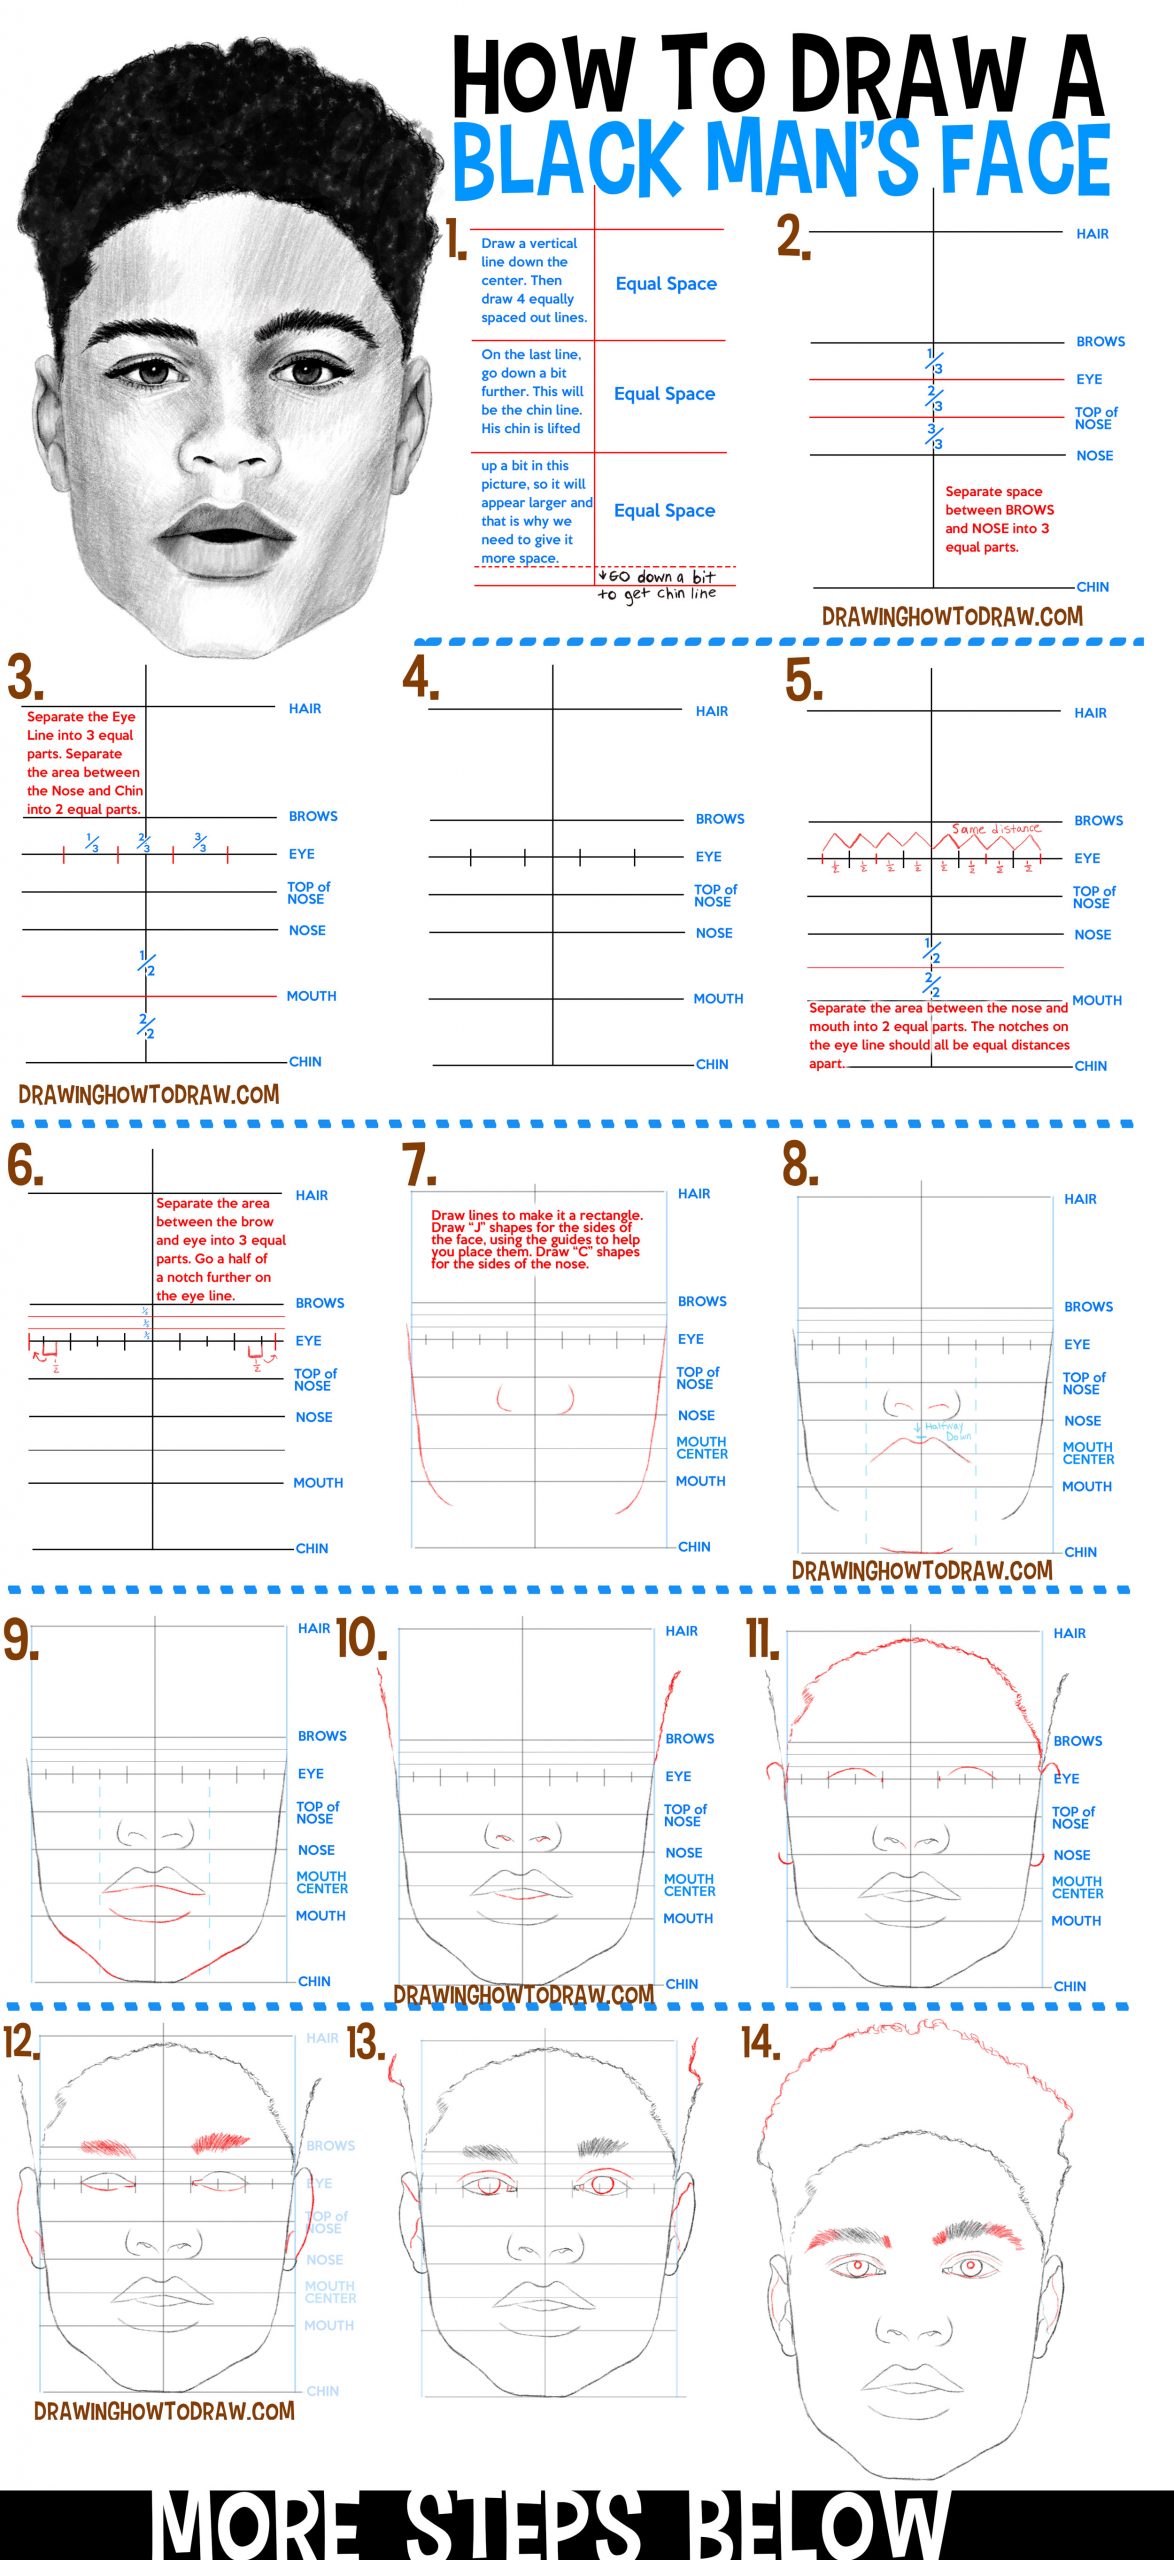
Today I will show you how to draw a handsome young black man’s face from the front view. I will guide you through the steps of drawing this man’s face. Find the step by step drawing lesson below. Good luck and have fun! Happy Drawing!
(STEP 01) Draw a vertical line down the center. Then draw 4 equally spaced out lines. On the last line, go down a bit further. This will
be the chin line. His chin is lifted up a bit in this picture, so it will appear larger and that is why we need to give it more space.
(STEP 02) Separate space between BROWS and NOSE into 3 equal parts.
(STEP 03) Separate the Eye Line into 3 equal parts. Separate the area between the Nose and Chin into 2 equal parts.
(STEP 04) Separate the area between the nose and mouth into 2 equal parts. The notches on the eye line should all be equal distances apart.
(STEP 05) Separate the area between the brow and eye into 3 equal parts. Go a half of a notch further on the eye line.
(STEP 06) Draw lines to make it a rectangle. Draw “J” shapes for the sides of the face, using the guides to help you place them. Draw “C” shapes for the sides of the nose.
(STEP 07) Draw sideways “J” shaped nostrils. Draw guidelines down from the 2nd notch on each eye line. Draw the mouth in
between those 2 lines. Go halfway down from the “nose” to the “mouth center” and draw an “m” like shape for the top of the mouth. Draw a curved line for the chin.
(STEP 08) Draw more of his mouth. Finish drawing his chin.
(STEP 09) Draw the sides of his hair. Draw sideways “S” shaped nostrils. Draw a curved line on his mouth.
(STEP 10) Use the guidelines to help you place the top of
each eye. Draw “J” like shapes for the top and bottom of each ear. Draw lines for the bangs. Draw 2 curved lines in the nose.
(STEP 11) Start drawing lines for eyebrow hairs. Draw a sideways “J” shape for his inner eyes. Draw a curved line for his lower eye. Draw a curved line and an upside-down “J” shape on his ears.
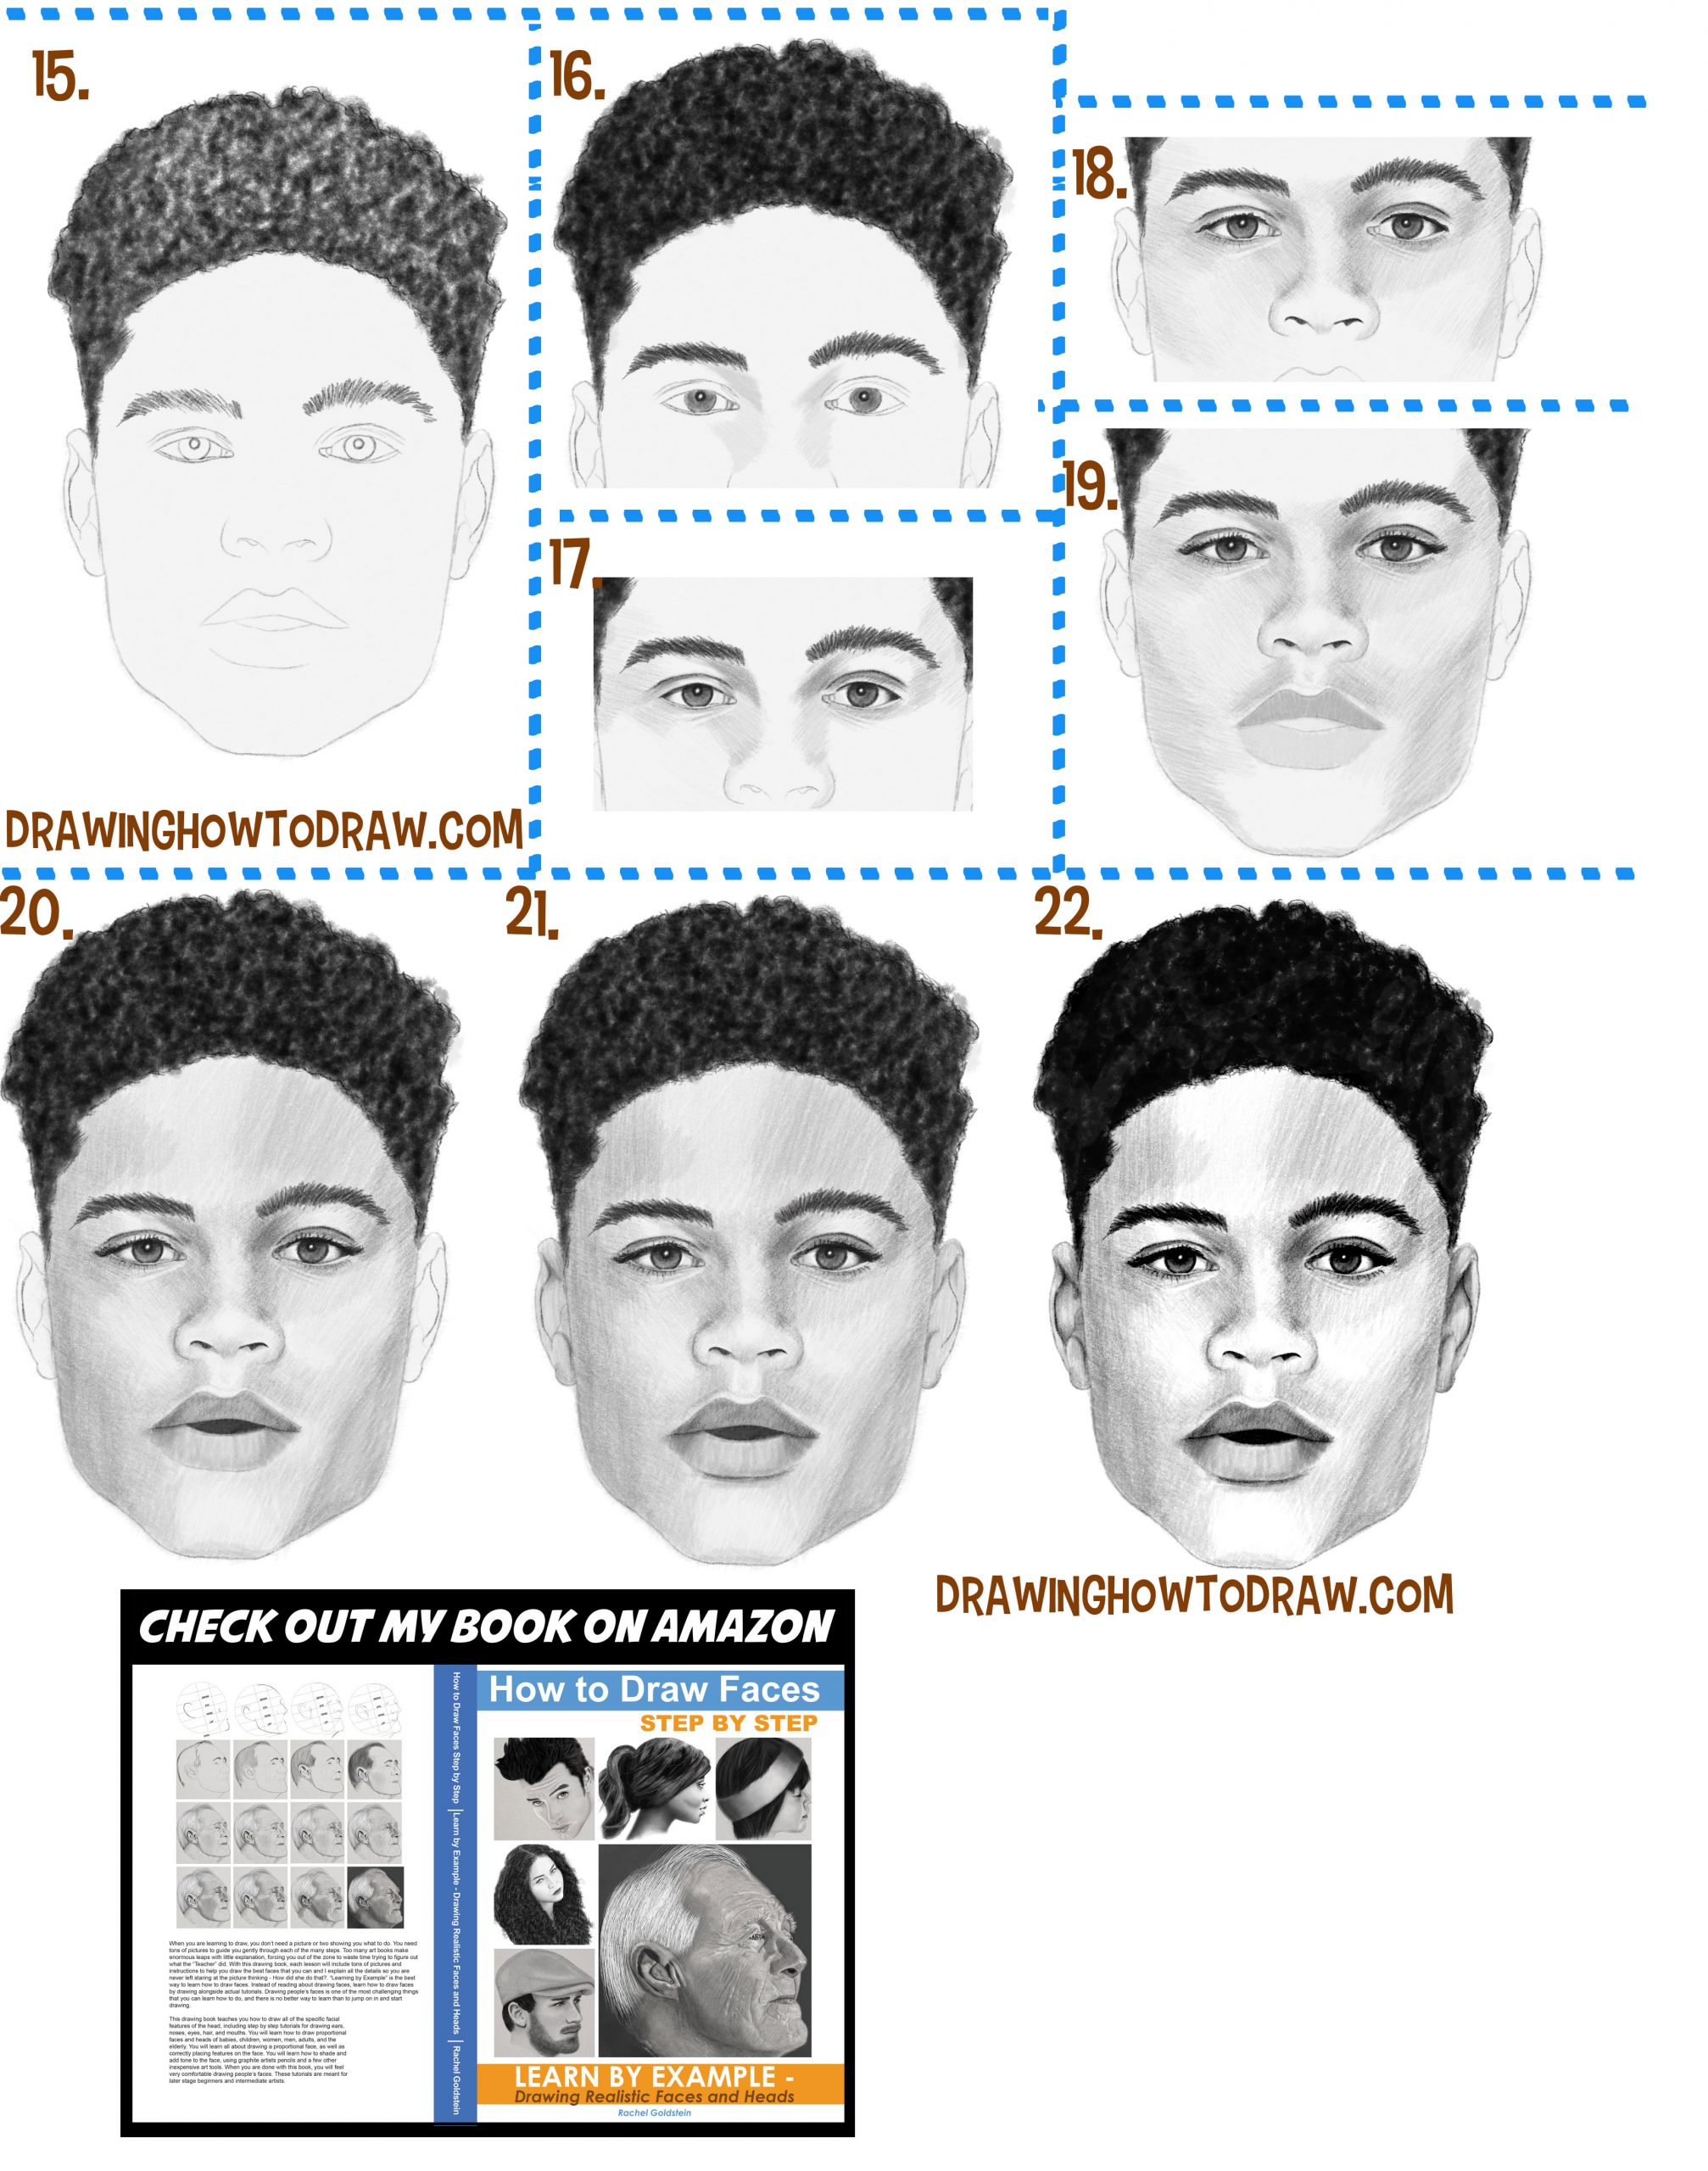
(STEP 12) Add some lines to his ears. Draw a curved line above each eye for the lids. Draw 2 lines to each of the inner eyes. Draw a partial circle in each eye for the irises. Ad a bit to his hair.
(STEP 13) Add more curved lines for eyebrow hairs. Add to the ears. Draw an inner eyelid line on the lower lid. Draw circles for the pupils. Draw some curved lines on the upper
eyelids. Add the top of his hair.
(STEP 13b) You can erase the guidelines if you want to.
(STEP 14) Lighten the outline of the face, with an eraser. Lightly shade the face so there is a light tint. Draw curly
squiggly lines for curls. Blacken some areas for shadows.
(STEP 15) Add more curls. Darken in shapes that are shadows to make it look more 3-dimensional. Add more lines to the eyebrows. Add tint to the irises. Darken in part of each pupil. Add shadows to sides of the nose.
(STEP 16) Darken the outer area of the iris. Darken the pupils. Darken the upper eyelid line. Shade the upper eyelids. Shade the corner on the whites of the eyes. Shade around the eyes and a bit on the nose.
(STEP 17) Draw dark wavy lines around the upper lid, for parts of the eyelashes. Draw curved lines for the lower lashes. Shade in the nostrils with a dark tint. Shade around the nose and eyes and on cheeks.
(STEP 18) Add shading to the sides of the face, the chin, and the part above the lip. Add tint to the lips, making sure to make the upper lip darker. Add some lighter tones to the nose so that the shadows all blend into each other more gradually.
(STEP 19) Work on the shadows of the face. Darken in the inside of his mouth. Add some light lines on the lips.
(STEP 20) Darken the shadows on his lips. Darken and thicken the lashes a bit. Work on the shading of the face a bit more. Add tint to the ears and a bit of shading.
(STEP 21) Continue shading, especially the lips and ears.
(STEP 22) Use a tissue to blend in the shadows a bit. Then darken some of the shadows to show more contrast.
Technorati Tags: drawing faces, how to draw faces, black man, black young man, african american man, african american teen, boy, man, front view
Today I'll show you how to draw Rick from the Rick and Morty cartoon tv…
Today I'll show you how to draw Morty from the Rick and Morty cartoon tv…
Today I'll show you how to draw the spunky little rabbit, Kuromi, from My Melody…
Today I'll show you how to draw this cute "bean duck" that I found on…
Today I'll show you how to draw Sosuke and Ponyo in a bubble (chibi /kawaii…
Today I'll show you how to draw a Boo from Super Mario Bros in Kawaii…