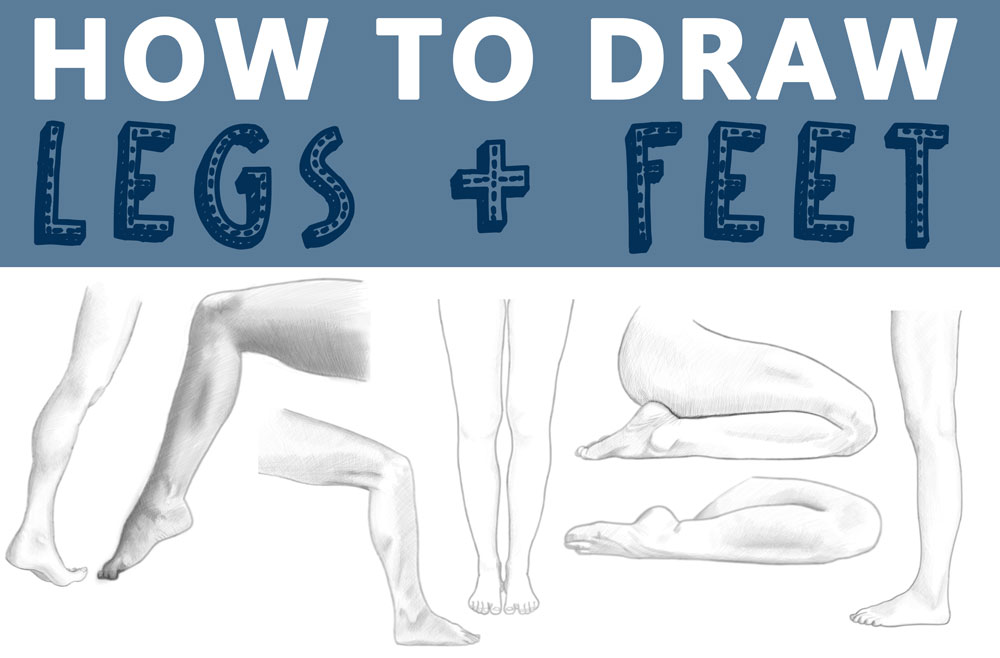
Today I will show you how to draw legs and feet in a realistic or illustrative style. There are 7 legs/feet tutorials listed below on this page. Happy Drawing!
Legs and feet are pretty hard to draw. I think feet are even harder to draw than hands. That is why it is a good idea to start off drawing the legs/feet with guidelines. Find the tutorials below.
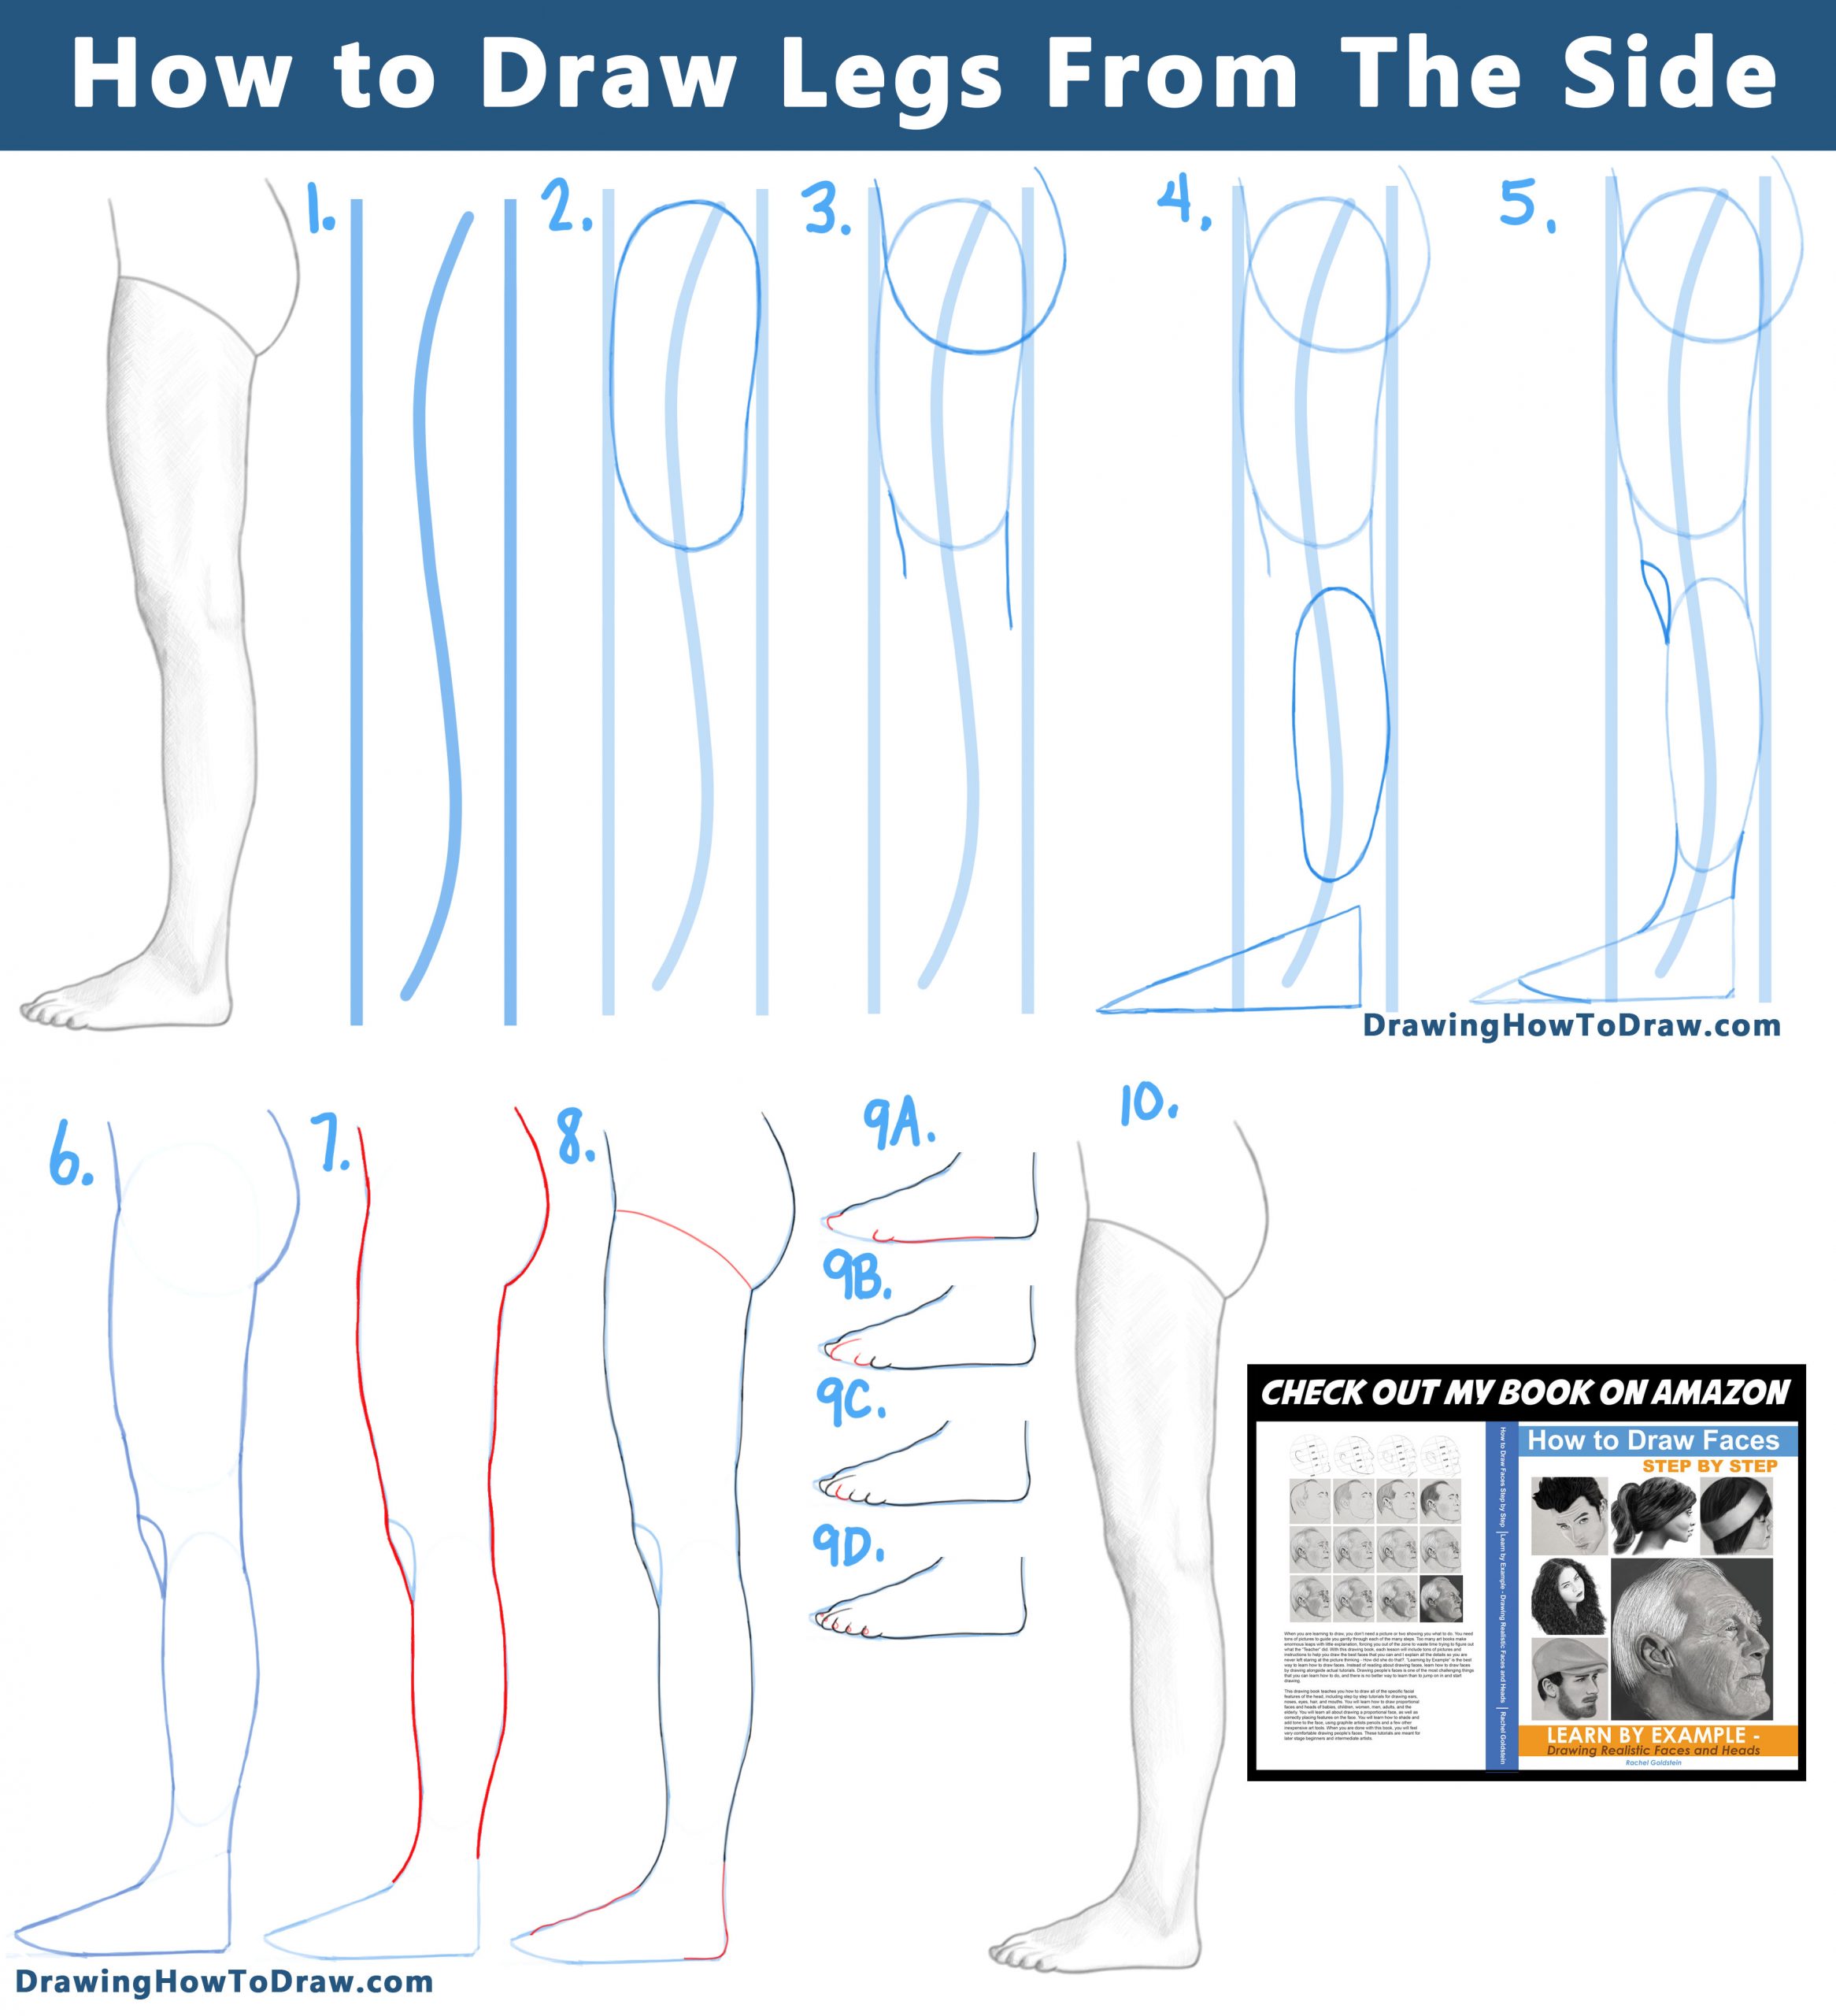
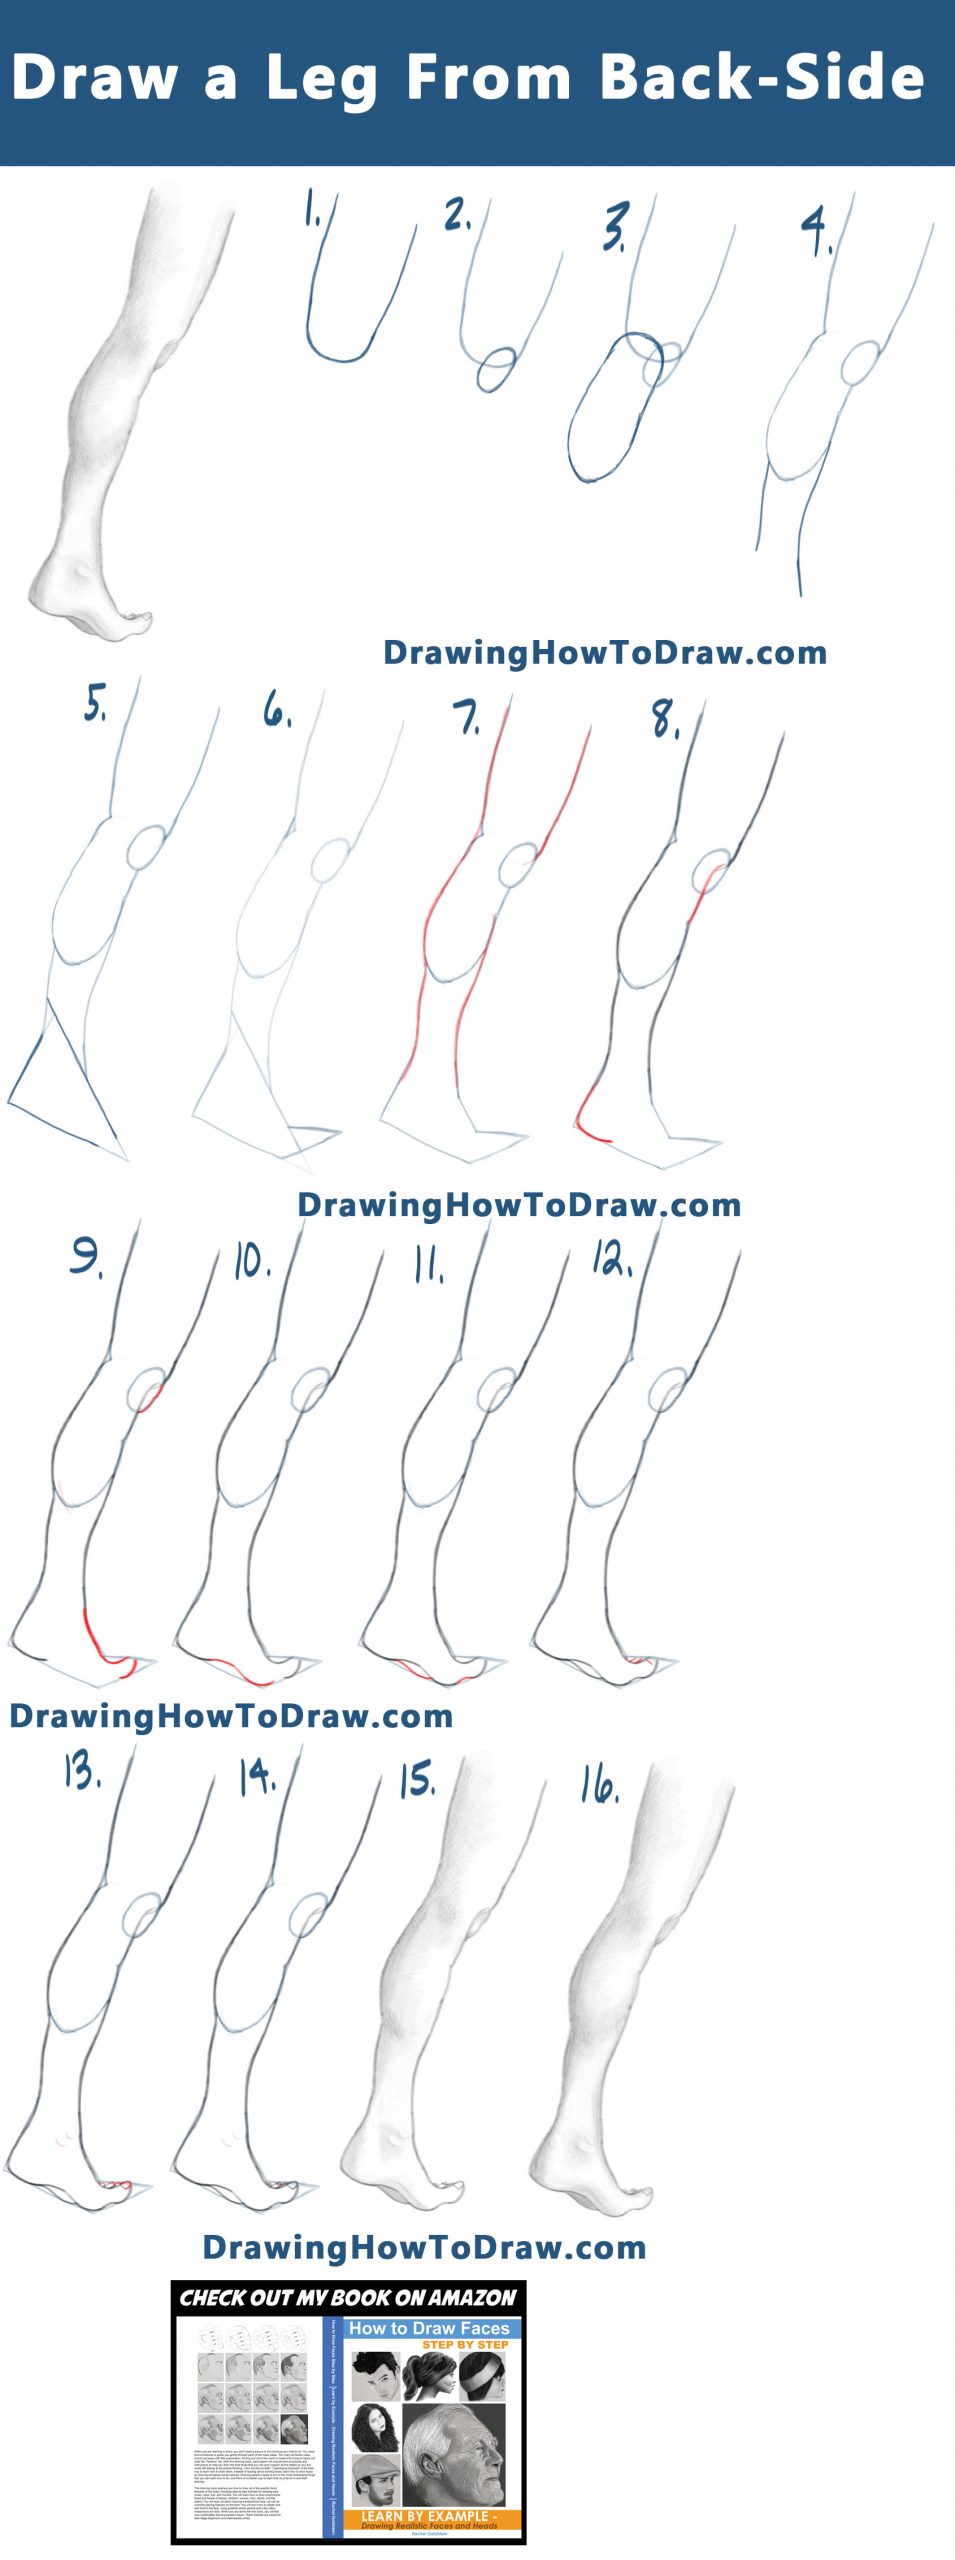
(STEP 01) Lightly start of the leg with guidelines. Draw them very lightly. The leg from the side is very much in an “S” shaped curve. So lightly draw 2 vertical lines. Within those 2 lines, draw a flattened “S” shaped curve.
(STEPS 02 – 05) Lightly draw the basic shapes that make up the leg. Draw these lightly as they are guidelines.
(STEP 06) Erase the inner guidelines.
(STEP 07) You can draw darker lines for part of the outline.
(STEP 08) The top of the foot has a wavy line to it. The reason being all the veins and little bones at the top of the foot. Draw the curved lines at the back of the foot, it sort of looks like a “J” shape.
(STEP 09A) Draw a wavy line at the bottom of the foot. Draw a sideways “C” shape for the toe on the right. Draw an upside-down “?” shape for the toe on the left.
(STEP 09B) Draw a “J” shape for the toe on the left. Draw another sideways “C” shape for the toe on the right.
(STEP 09C) Draw another sideways “C” shaped toe.
(STEP 09D) Draw ovals or half ovals for the nails.
(STEP 10) Add shading, mostly on the front of the leg and the top of the foot. Also, shade around a “V” shape where the foot and leg meet. Also, shade an “L”-like shape behind the knee.
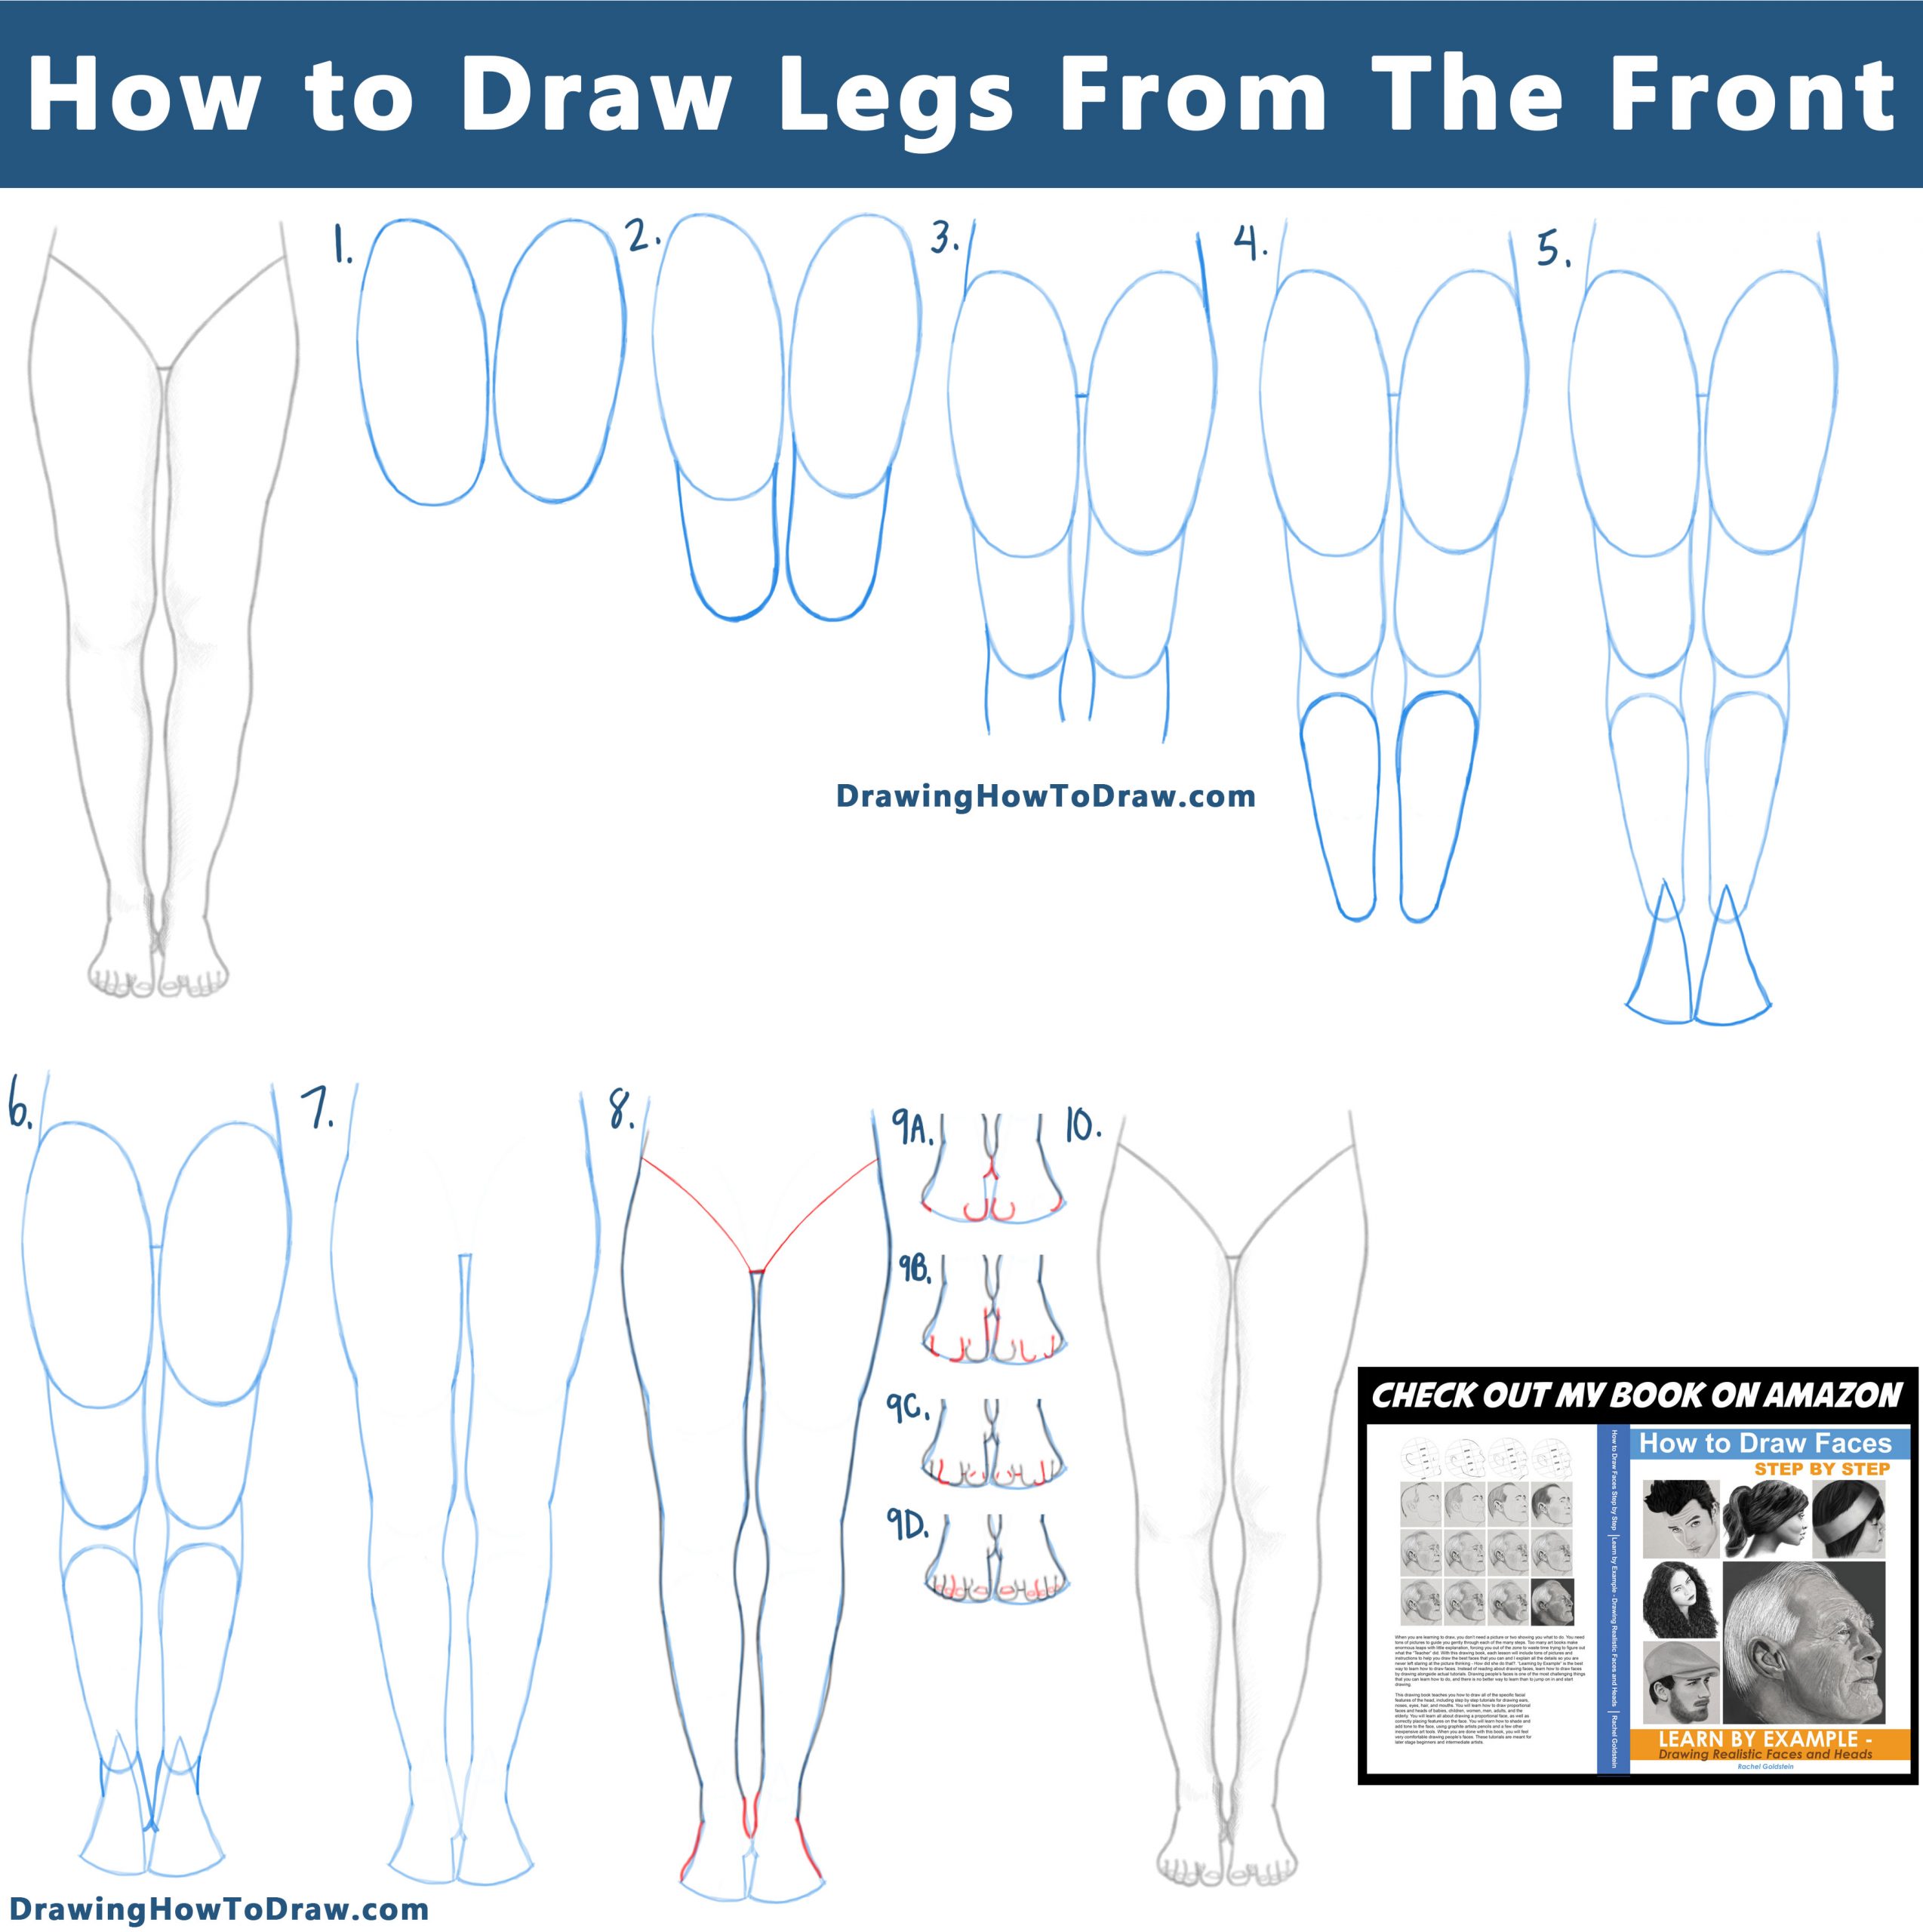
(STEPS 01 – 06) Lightly draw the basic shapes that make up the leg. Draw these lightly as they are guidelines.
(STEP 07) Erase the inner guidelines. Darken most of this outer outline, except for the feet.
(STEP 08) Draw the lines for her underwear. Draw “S”-curves for her ankles. Draw wavy lines on the outside of each foot.
(STEP 09A) Draw a curved line on both ankles. Draw a curved line on the outer toes. Draw a “U” shape for each of the big toes.
(STEP 09B) Draw a line on the inner feet. Draw a line on each of the big (thumb) toes. Draw 2 “J” shapes (for toes) on each of the feet.
(STEP 09C) Draw a “J” shape on each foot (for toes), draw some lines as well.
(STEP 09D) Draw a wavy line in each of the feet. Draw the nails, most of them are oval-like. The second toe’s nail can be formed like the big toe’s nail, which is 2 outward lines, and then connect with 2 curved lines.
(STEP 10) Add shading, mostly on the inner legs. Also, shade around the oval that is the knee.
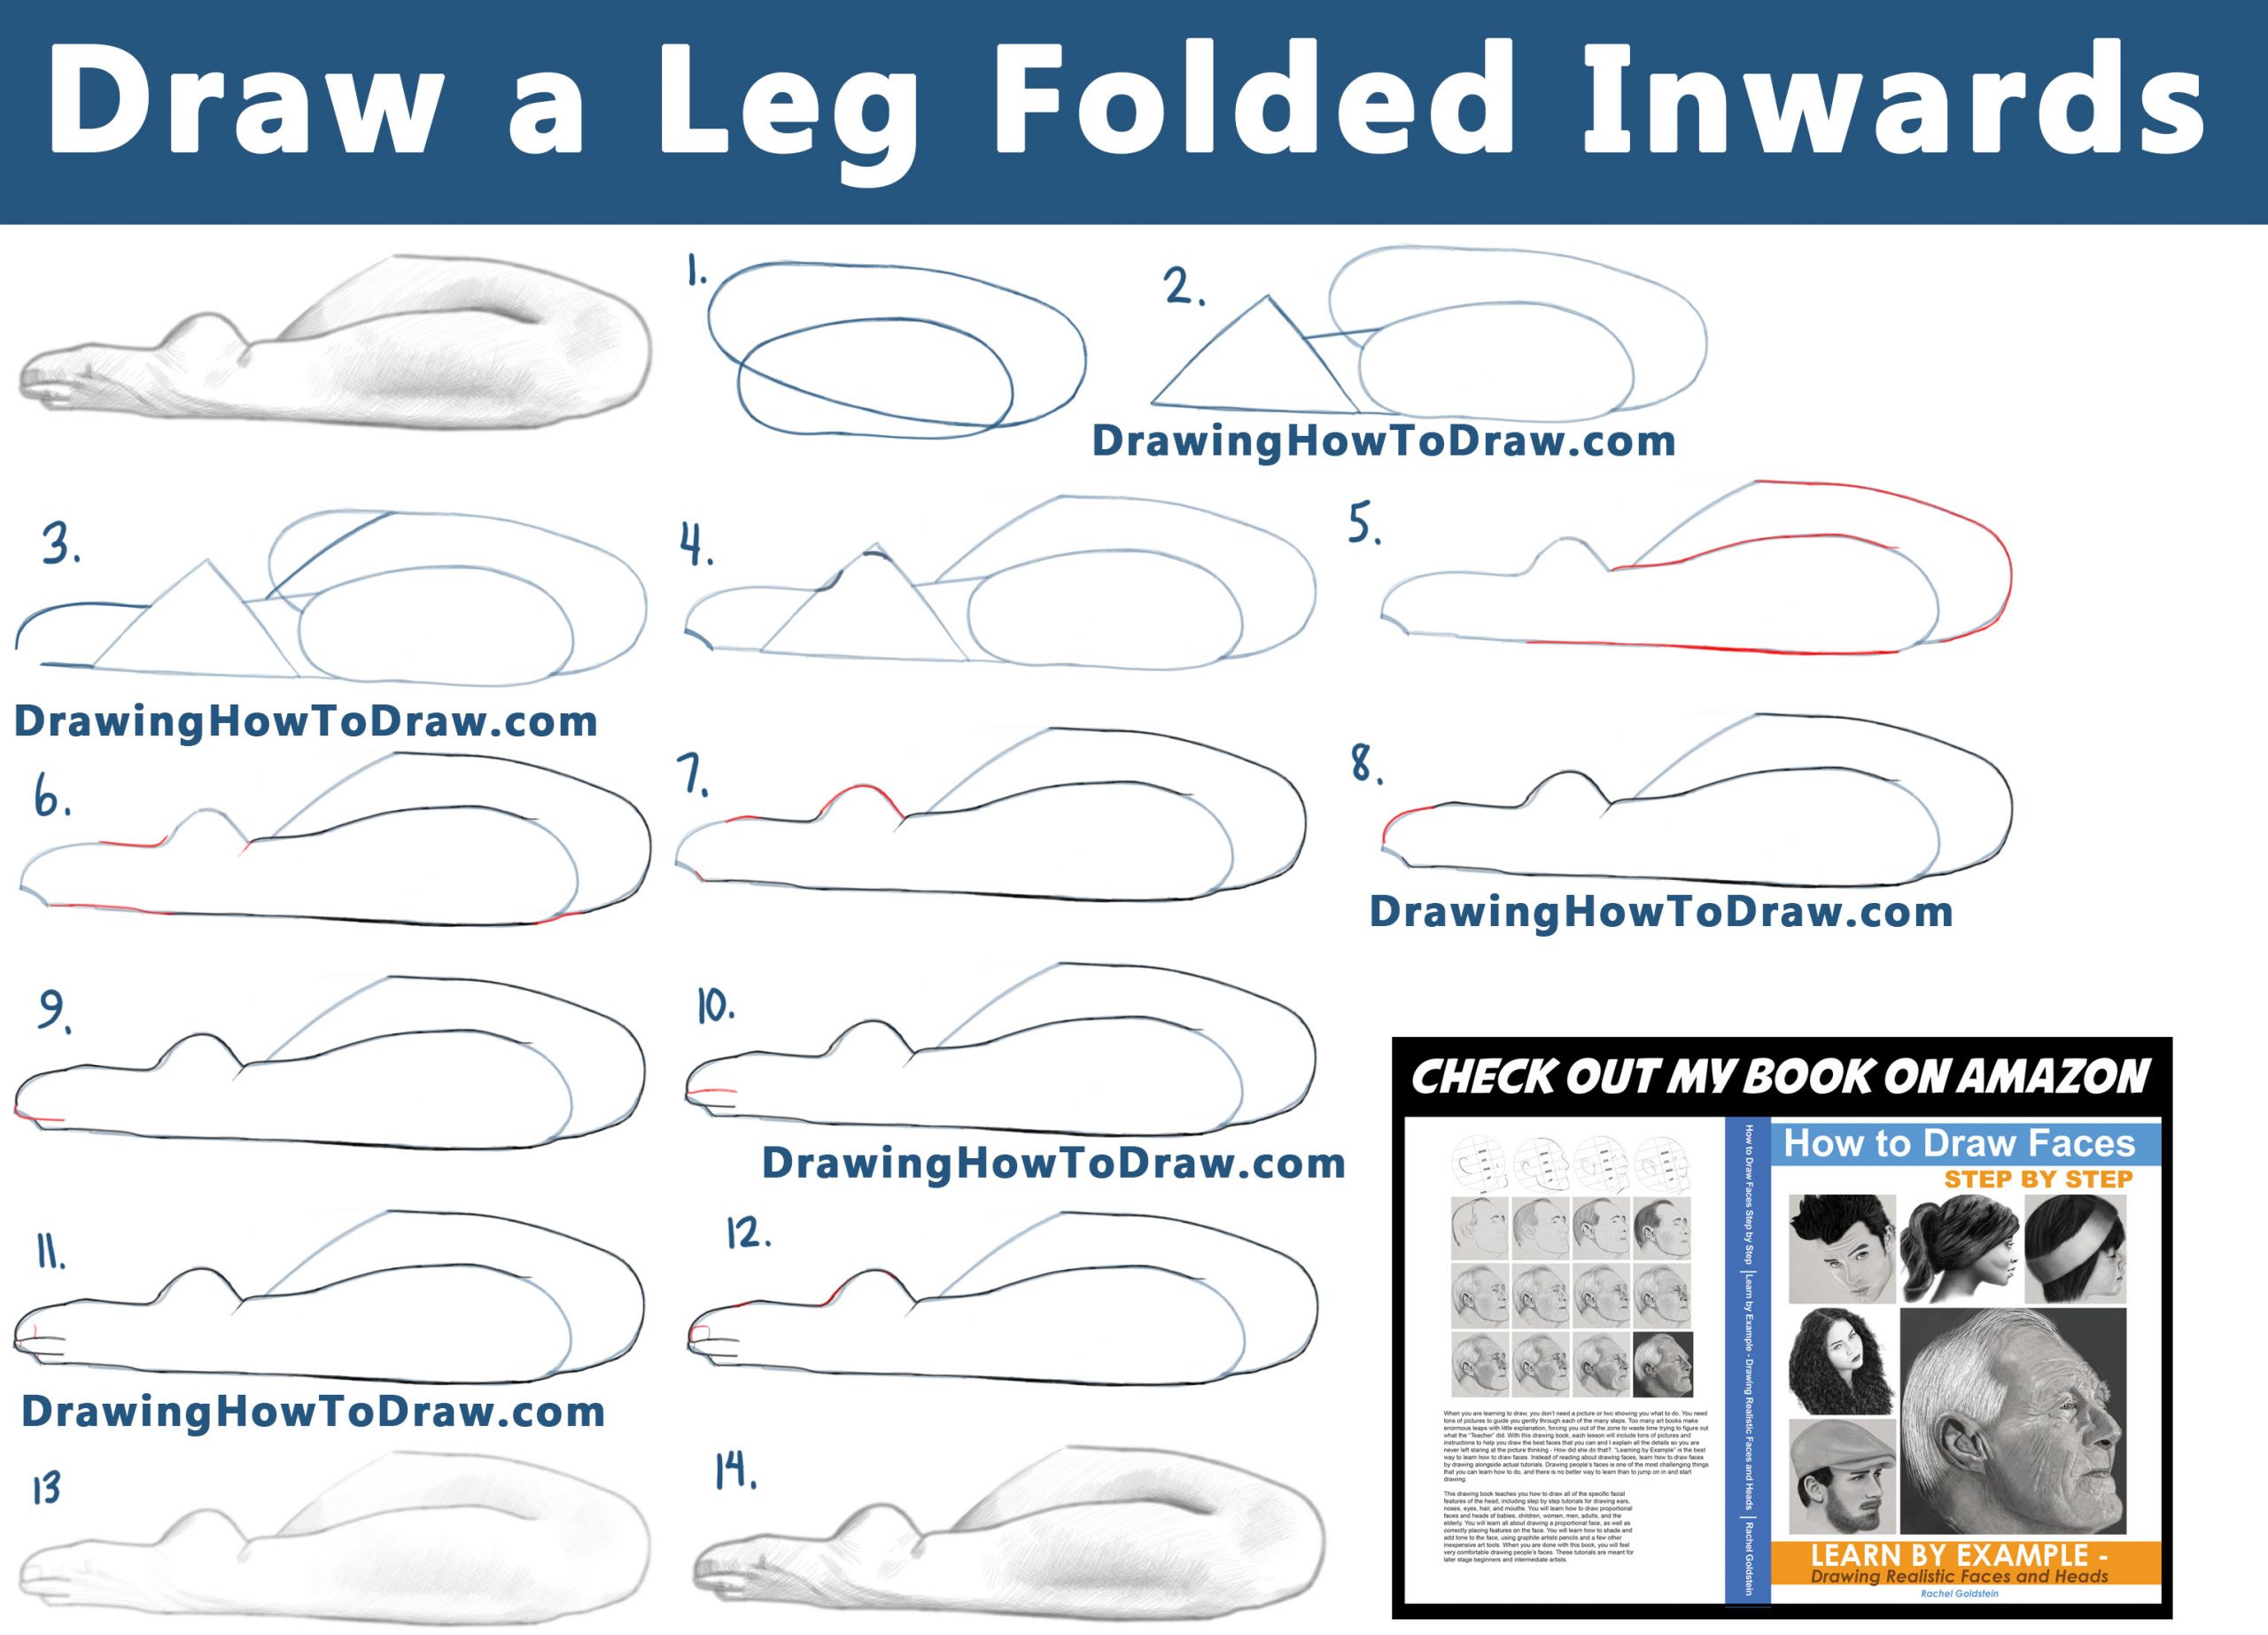
(STEPS 01 – 03) Lightly draw the basic shapes that make up the leg. Draw these lightly as they are guidelines.
(STEP 04) Darken these lines.
(STEP 05) Draw some of the upper thigh and part of the butt. Draw a line inside the foot. Draw an “S” like curve on the front of the foot.
(STEP 06) Draw a “C” shape for one of the toes. Draw a “J”-like shape for the back of the foot.
(STEP 07) Draw a “C” shape for the back toe. Draw a curved line on the foot. Draw a bunch of lines on the back of the foot.
(STEP 08) Draw a “J” shape on each foot (for toes), draw some lines as well.
(STEP 09) Draw another “C” shape for one of the toes. Also, draw a curved line for one of the back toes.
(STEP 10) Draw a sideways #3 shape.
(STEP 11) Erase guidelines and then shade in the leg.
(STEPS 01 – 05) Lightly draw the basic shapes that make up the leg. Draw these lightly as they are guidelines.
(STEP 06) Darken these lines.
(STEP 07) Draw an “S”-like curve on the top of the foot. Draw a “J”-like shape on the back of the foot.
(STEP 08) Draw a wavy line on the bottom of the foot. Draw a curved line on the top of the foot.
(STEP 09) Draw a curved line for the first toe on the left. Draw a curved line on the bottom of the foot.
(STEP 10) Draw a “J” shape for the right toe. Draw a line under the toe on the left.
(STEP 11) Draw a backward “J” shape for one of the toes. Draw the lines for nails.
(STEP 12) Draw a curved line for one of the toes. Finish up the nails.
(STEP 13) Start shading the leg. Most of the shadows are on the front of the leg and foot, but also on the bottom of the thigh as well. Make sure to make also get the shading around the muscle on the side of the leg and around the knee.
(STEP 14) Darken the shadows from the previous step and also add lighter shading around it.
(STEPS 01 – 03) Lightly draw the basic shapes that make up the leg. Draw these lightly as they are guidelines.
(STEP 04) Darken these lines.
(STEP 05) Draw a wavy line on the top of the foot. Draw a line that turns into a curved line (sort of like a “J”) for the first toe.
(STEP 06) Draw a “J” shape for the 2nd toe. Draw a curved line on the right side of the foot.
(STEP 07A) Draw another “J” shape for the next toe. Draw a curved line on the big toe (on the right).
(STEP 07B) Draw another “J” shape for the next toe.
(STEP 07C) Draw another “J” shape for the next toe.
(STEP 07D) Draw the nails. On the little toe, it just looks like a curved line. On the other toes, there is a combo of straight lines with curved lines.
(STEP 8) Start shading the leg. Most of the shadows are on the bottom of the thigh, top of the thigh, and the front of the leg. Also, get the “#2” shaped shadow at the ankle and the shadows below the knee and on the calf.
(STEP 9) Darken the shadows from the previous step and also add lighter shading around it.
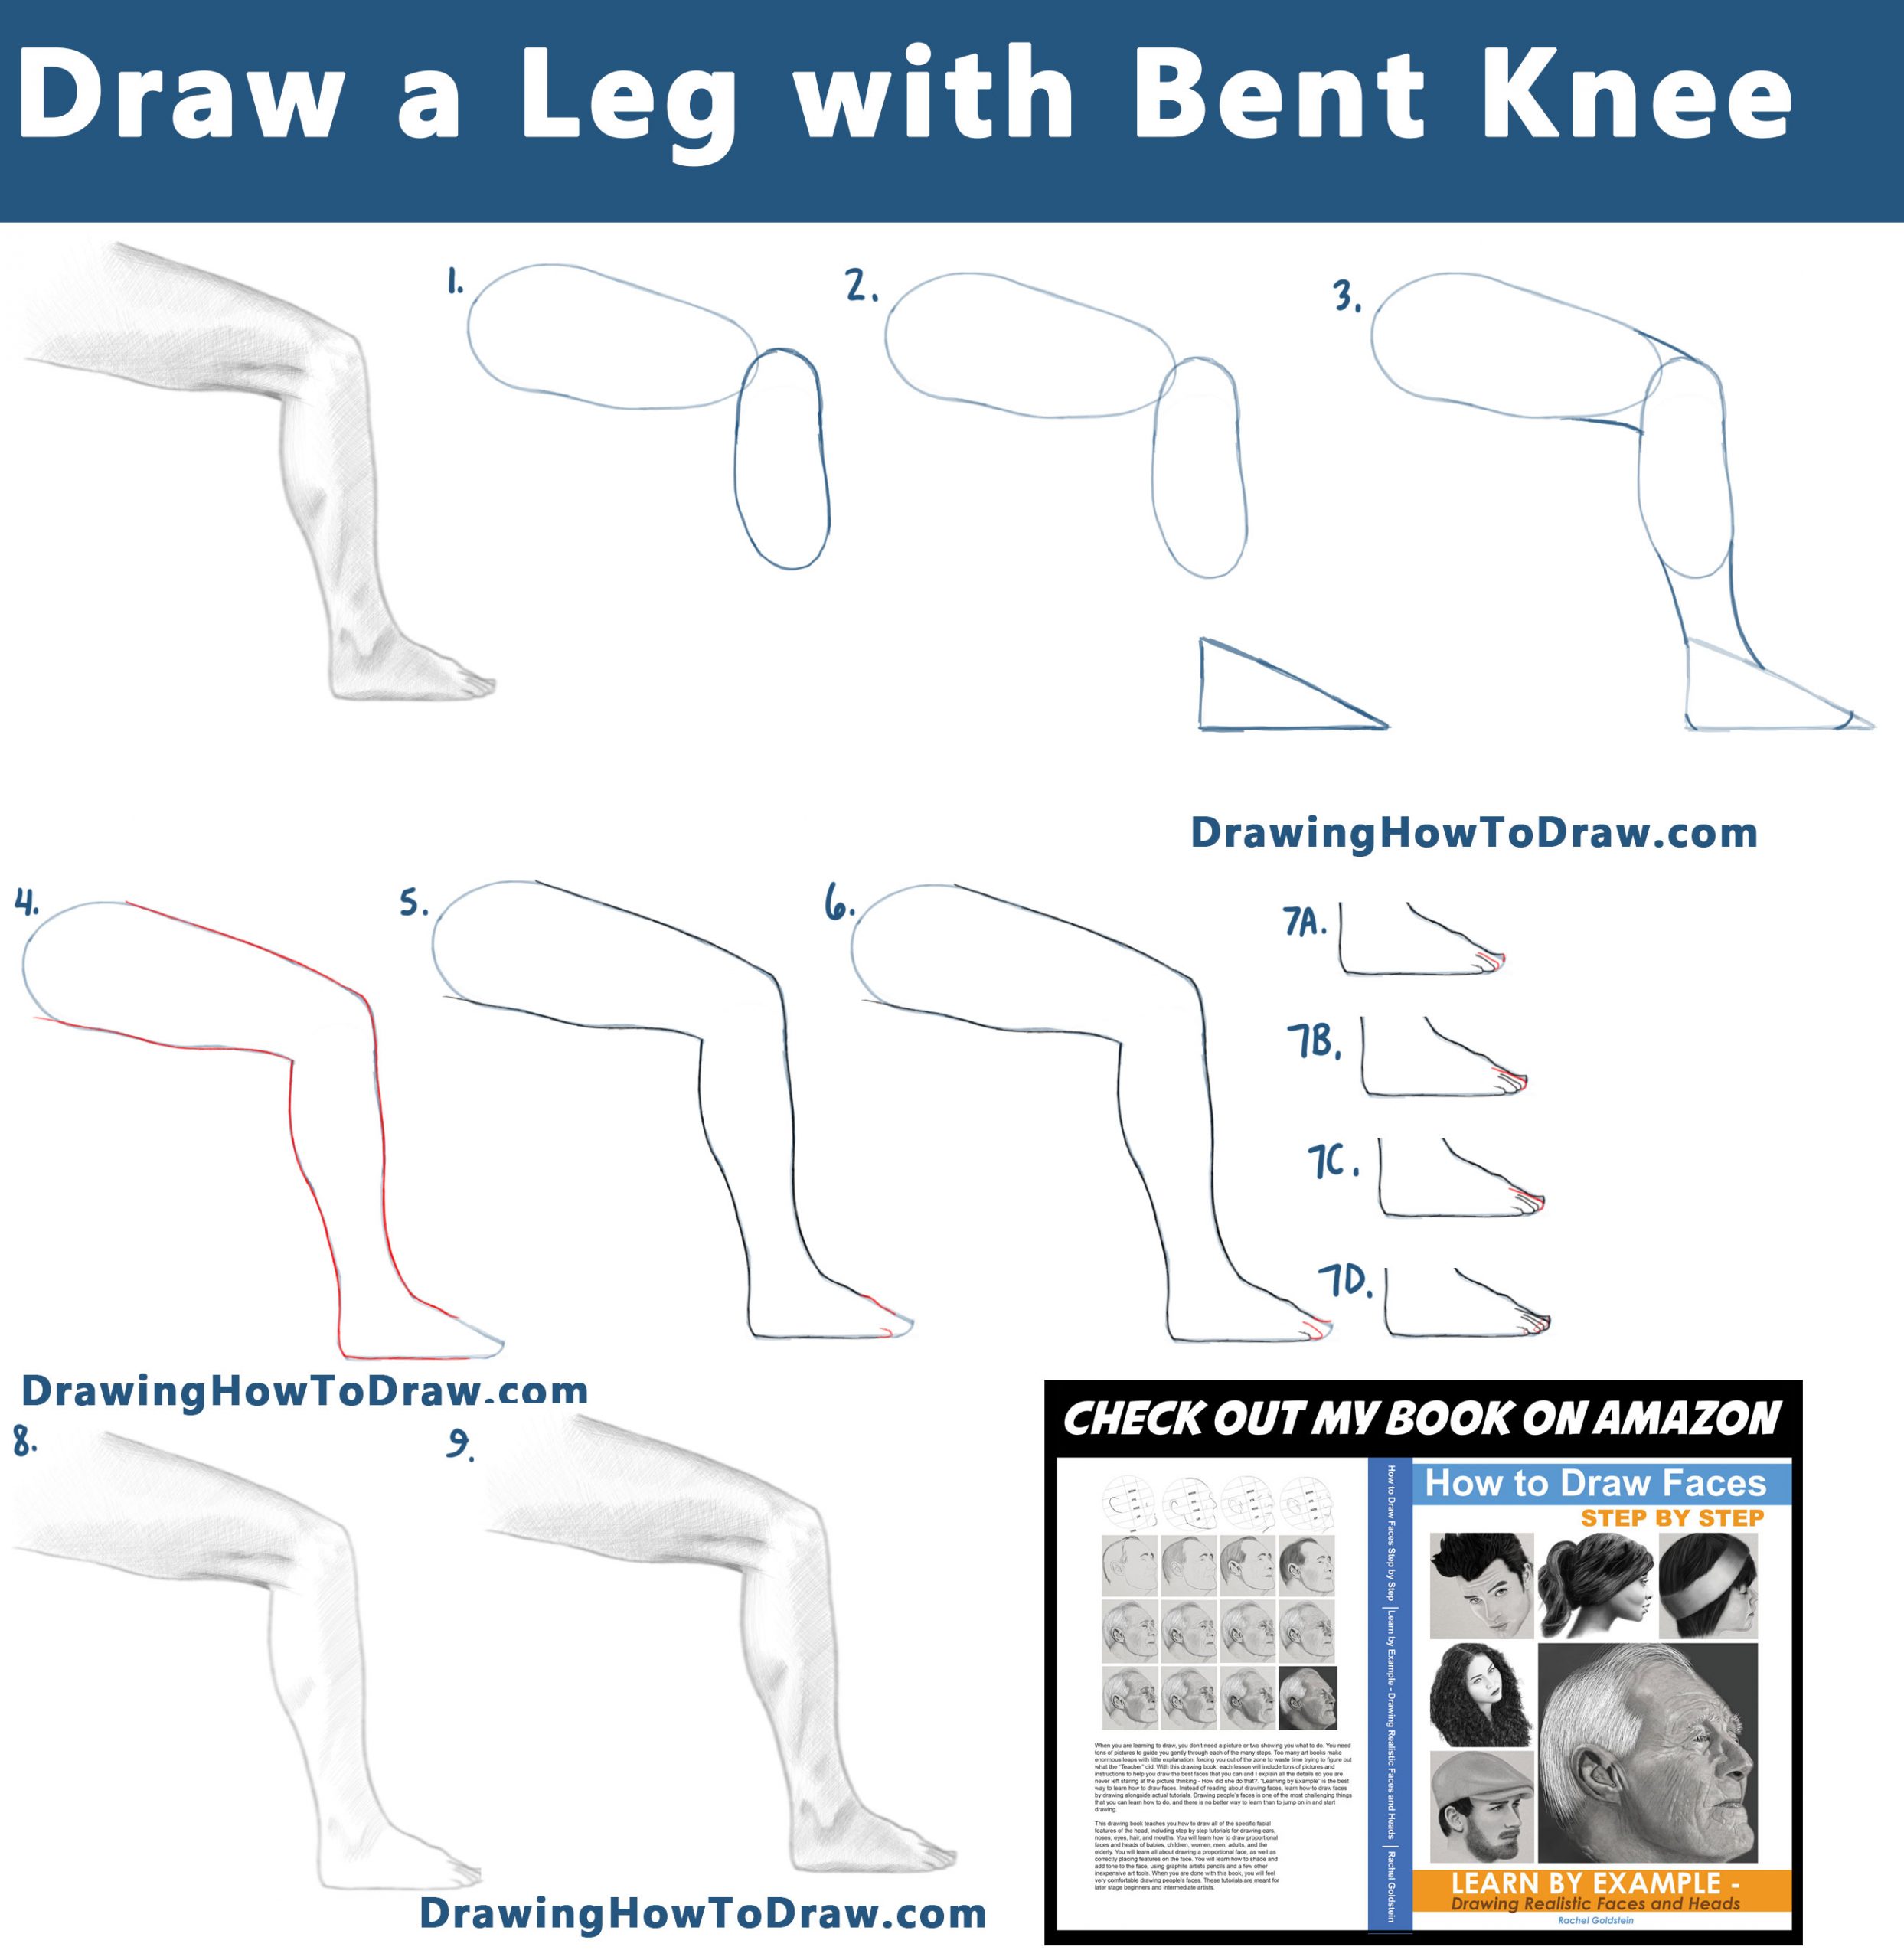
(STEPS 01 – 04) Lightly draw the basic shapes that make up the leg. Draw these lightly as they are guidelines.
(STEP 05) Darken these lines.
(STEP 06) Start adding to the leg.
(STEP 07) Draw 2 curved lines on the foot.
(STEP 08) Draw another curved line.
(STEP 09) Draw a “J” shape for the first toe.
(STEP 010) Draw a curved line for the toe.
(STEP 11) Draw curved lines for the toenails.
(STEP 12) Draw a curved and straight line on the toenail.
(STEP 13) Start shading the leg.
(STEP 14) Darken the shadows from the previous step and also add lighter shading around it.
(STEPS 01 – 06) Lightly draw the basic shapes that make up the leg. Draw these lightly as they are guidelines.
(STEP 07) Darken these lines.
(STEP 08) Draw an upside-down “J” shape on the knee. Draw a “J”-like shape on the back of the foot.
(STEP 09) Draw a”?”-like shape on the front of the foot. Draw a curved line on the knee.
(STEP 10) Draw an “S”-like curve on the bottom of the foot.
(STEP 11) Draw an “S”-like curve on the bottom of the foot. Draw a curved line at the back of the big toe.
(STEP 12) Draw lines for the toes. Draw a curved line on the big toe.
(STEP 13) Lightly draw 2 curved lines on the ankle. Draw curved lines for the ends of the nails on the toes.
(STEP 14) Draw lines for the bottoms of the nails.
(STEP 15) Start shading the leg. Add shading mostly to the back of the foot and calf, but also on the knee, and the bottom of the foot.
(STEP 16) Darken the shadows from the previous step and also add lighter shading around it.
Today I'll show you how to draw Rick from the Rick and Morty cartoon tv…
Today I'll show you how to draw Morty from the Rick and Morty cartoon tv…
Today I'll show you how to draw the spunky little rabbit, Kuromi, from My Melody…
Today I'll show you how to draw this cute "bean duck" that I found on…
Today I'll show you how to draw Sosuke and Ponyo in a bubble (chibi /kawaii…
Today I'll show you how to draw a Boo from Super Mario Bros in Kawaii…
View Comments
Hi, the legs and fingers drawing were very good and I followed all, thank you for helping us to be able to draw. kind regards Mitra