Hippos are a popular animal to cartoon as cute animals. However, did you know that in nature they are very dangerous, violent animals. Either way, I thought that it would be fun to draw cartoon hippos today so I have put together a simple step by step tutorial for kids of all ages, teens, and adults. Build up the hippo’s form with simple shapes, letters, and numbers. Enjoy the hippopotamus cartooning lesson.
Here is another Hippo Cartooning Tutorial
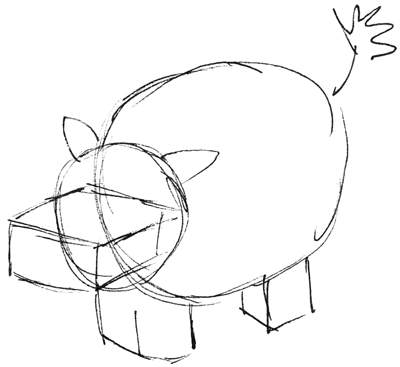
Firstly, draw the basic shapes that make up the hippo’s form…such as an oval body, an oval face…etc.
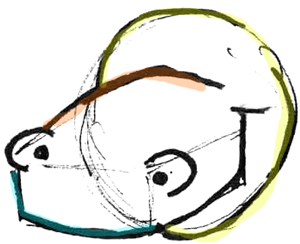
Now we are looking at a closeup of the hippo’s face. The lines that you see in color are the lines that are being added in this step, the other lines were added in the previous step. Draw a ‘J’ lie shape (highlighted in red) for the hippo’s smile. Draw the nostrils of the hippo by drawing a ‘c’ with an oval within it (on the left), and draw a backwards ‘c’ with an oval in it on the right. Draw a curved line (highlighted in green) at the top of the hippo’s snout.
Re-outline with a firmer stroke the circle surrounding the hippo’s face. At the front of the hippo’s snout, draw a letter ‘L’ like shape (highlighted in blue). At the left of the snout, draw an upside down letter ‘L’ shape (highlighted in red).
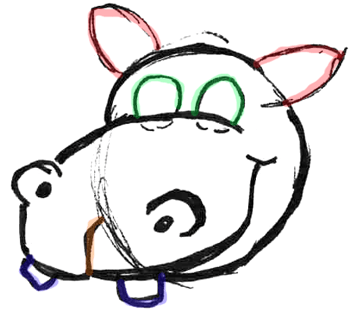
Draw the line that is in the middle of the hippo’s snout. Draw the 2 teeth (rectangle shapes highlighted in purple). Draw 2 ovals (highlighted in green) for the hippo’s eyes. Also draw an ear on either side of the hippo’s face (highlighted in pink).
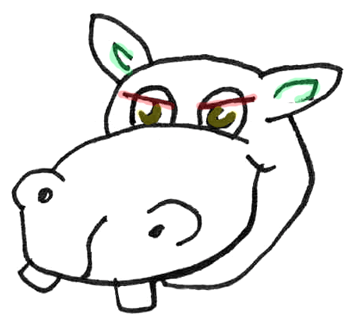
Now draw a sideways letter ‘v’ in each ear (highlighted in green). Draw a bubble letter ‘c’ in each of the hippo’s eyes for irises / pupils. Also draw an eye lid for each eye (highlighted in pink).
Now draw a question mark and backwards question mark like shape for each of the legs that is closer to you. Also draw an ‘L’ shape (highlighted in orange) for each of the back legs.Also draw a sideways ‘v’ like shape for the hippo’s tail.
For finishing touches, draw the curved bottoms of each foot and then draw ‘m’ like shapes for the hippo’s nails. Also draw a zig-zaggy tail ending.
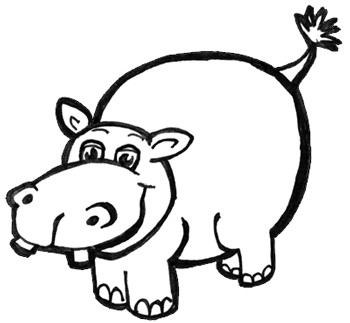
Now just erase lines that you don’t need and outline the ‘correct’ lines with a black pen or marker. Making thick, interesting lines instead of the thin pencil lines makes quite a difference in the end result, doesn’t it? If you are having problems figuring out which lines to erase, then reference my drawing (above) for help. Now you will have an amazing cartoon drawing of a cartoon whimsical hippo to show off to your friends.
Here is another Hippo Cartooning Tutorial
Technorati Tags: draw hippos, how to draw hippos, drawing hippos, draw cartoon hippos, drawing cartoon hippos, hippos, hippopotamus, cartoon hippos, comic hippos, how to draw, drawing lessons, drawing tutorials, drawing for kids, cartooning, draw cartoons, draw comics
Today I'll show you how to draw Rick from the Rick and Morty cartoon tv…
Today I'll show you how to draw Morty from the Rick and Morty cartoon tv…
Today I'll show you how to draw the spunky little rabbit, Kuromi, from My Melody…
Today I'll show you how to draw this cute "bean duck" that I found on…
Today I'll show you how to draw Sosuke and Ponyo in a bubble (chibi /kawaii…
Today I'll show you how to draw a Boo from Super Mario Bros in Kawaii…
View Comments
Mine didn't work :'(
my hippo turned out fantastic and i love it=)