Learn how to draw, shade, and highlight drapery and clothing folds. There are many forms that make up a fold and many different types of folds to learn how to draw. The following tutorial is a great guide to folds…so book mark this page and come back to it when you need it. From George Bridgman’s 1952 book Complete Guide to Drawing fro Life.
Clothing is drapery arranged around a body that is beneath it. To express the multitudinous forms it takes, one should learn to express in a direct way the different characters of folds, for each one plays its individual part as distinctly as actors play their different characters upon the stage.
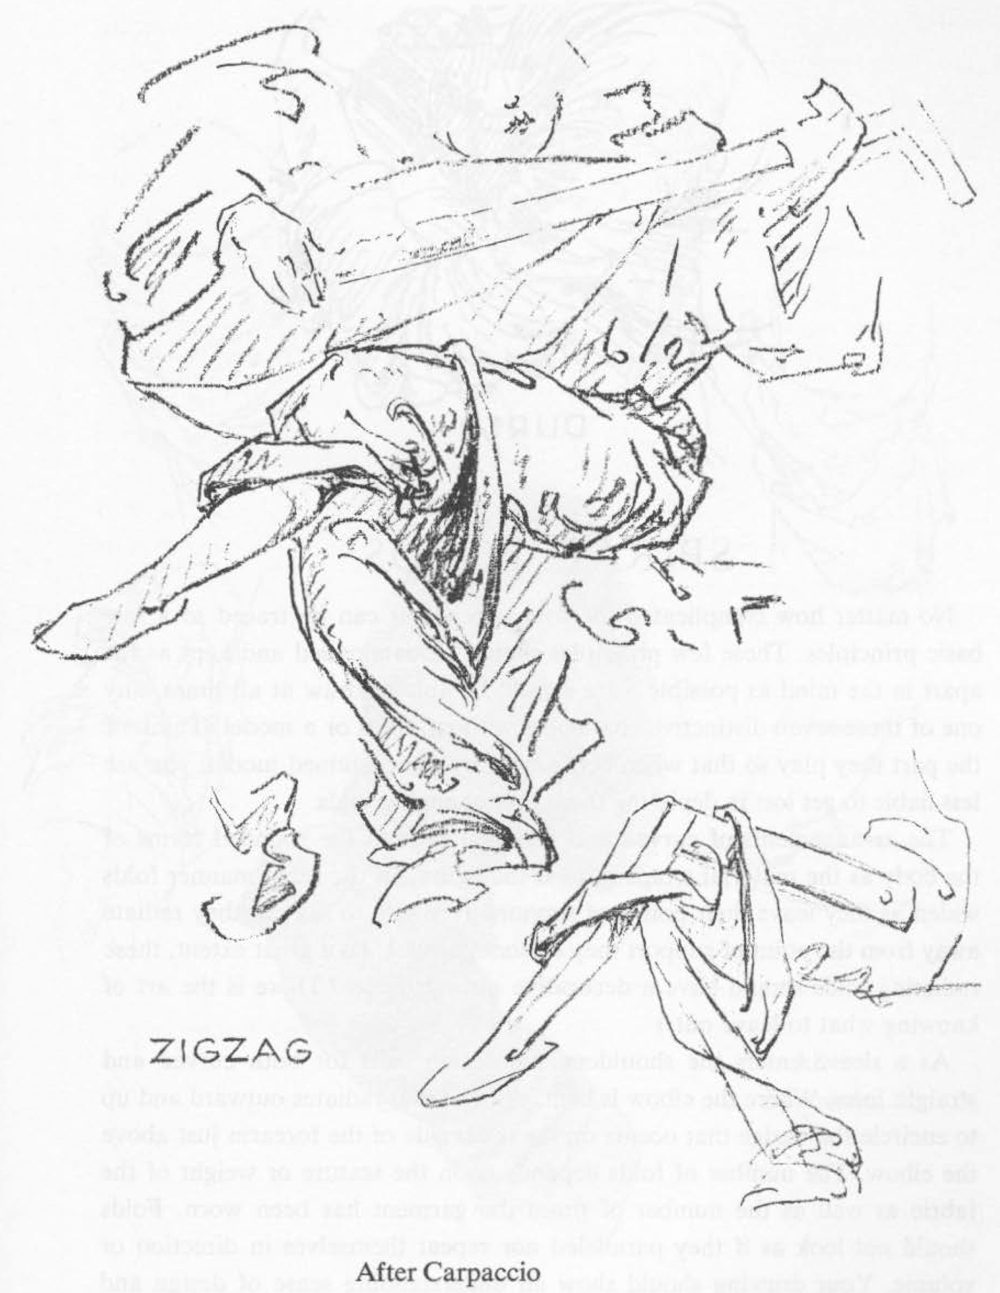
Folds are not all the same…they all vary in different ways. There are those which pass around and radiate from the points of support, clasping the figure and thereby reducing the receding surface to a minimum; or they may zigzag in an irregular manner from side to side. There are folds which are straight, festooned and V-shaped; folds which fall, cross or pass around the figure. There are materials which have concave and convex. forms as well as cord-like edges. All folds have laws unto themselves. Some folds run into their opponents and die away while there are others which terminate abruptly. Each individual fold has its own manner, its temperament and almost its religion. Each pursues its function so that each must be studied apart as a fixed law, a thing entirely apart, without connection, yet held throughout by the unforeseen laws of rhythm.
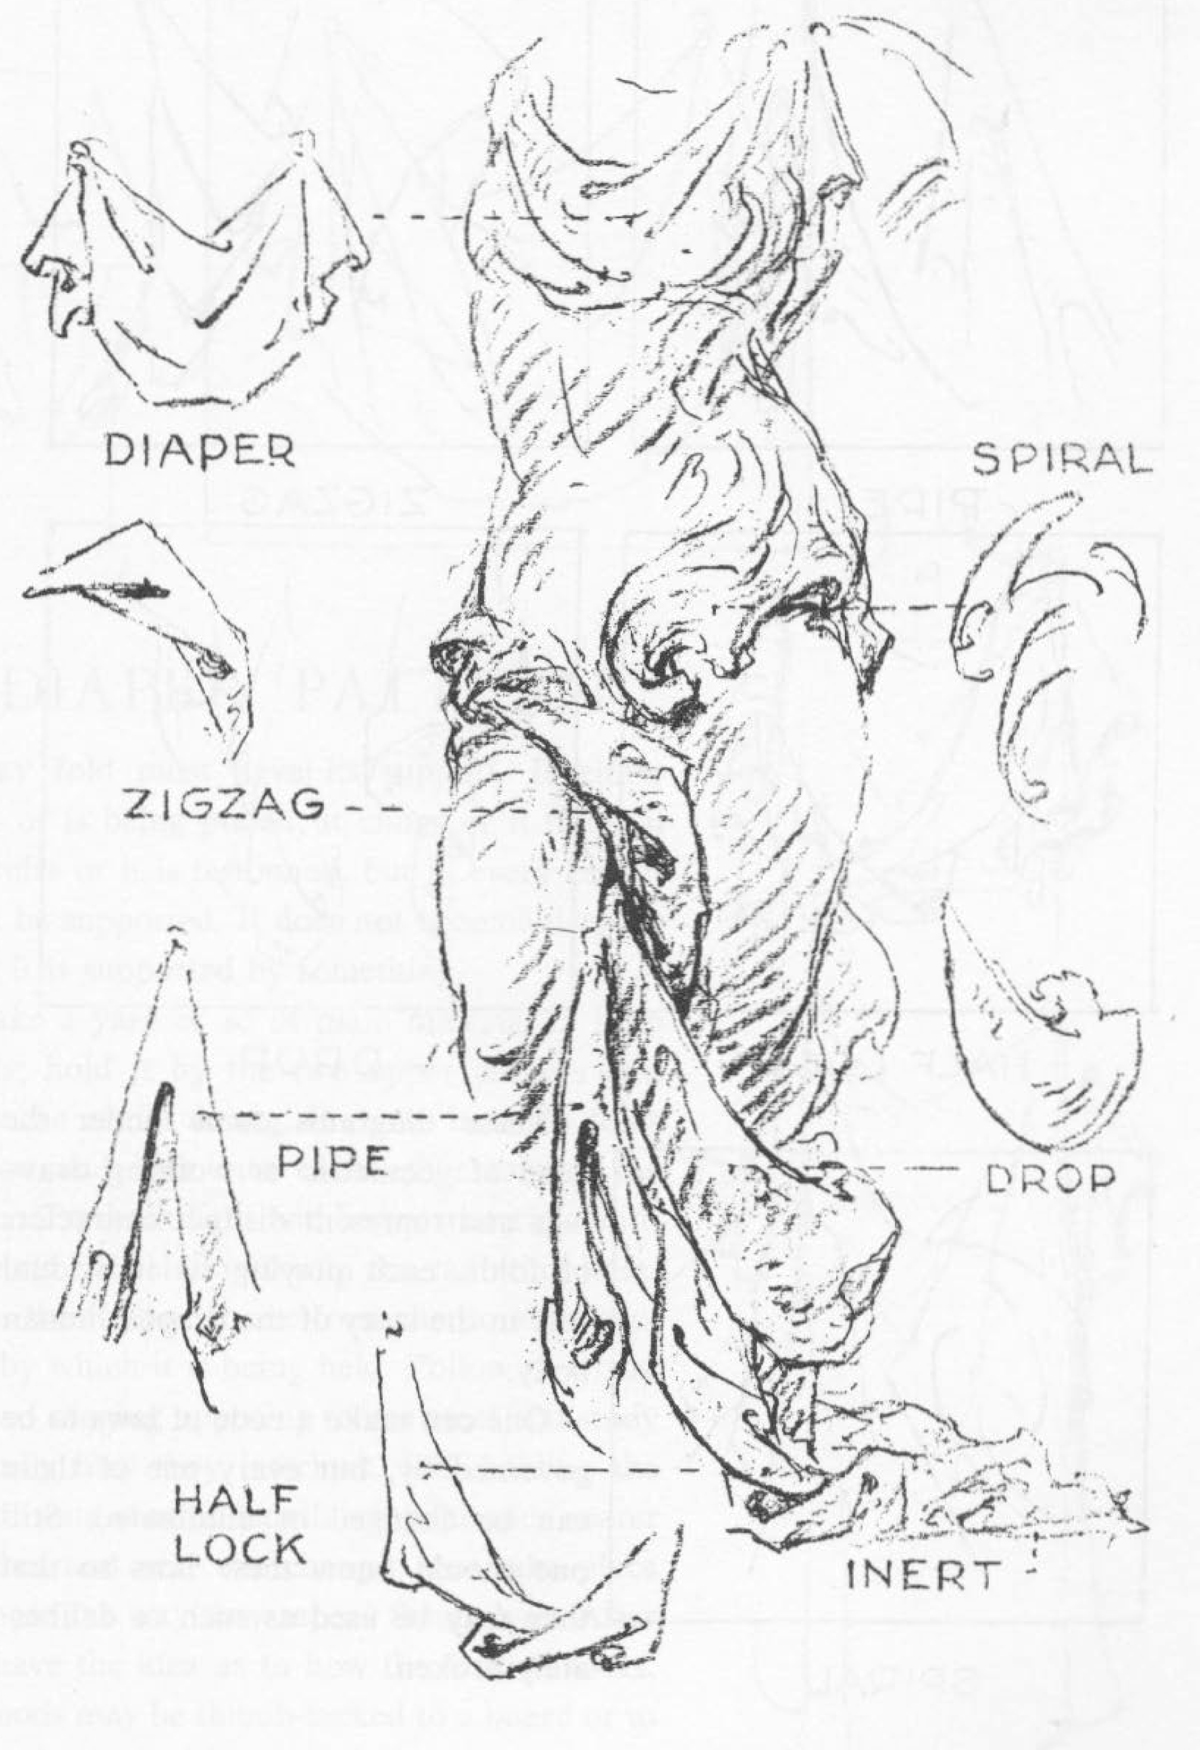
As you would study the surface of an arm and forearm, or a thigh and a leg, and their connection at the elbow or at the knee joints, these folds must come together, linked as they pass around or into one another. To do so, a name indicating a function must be given to each:
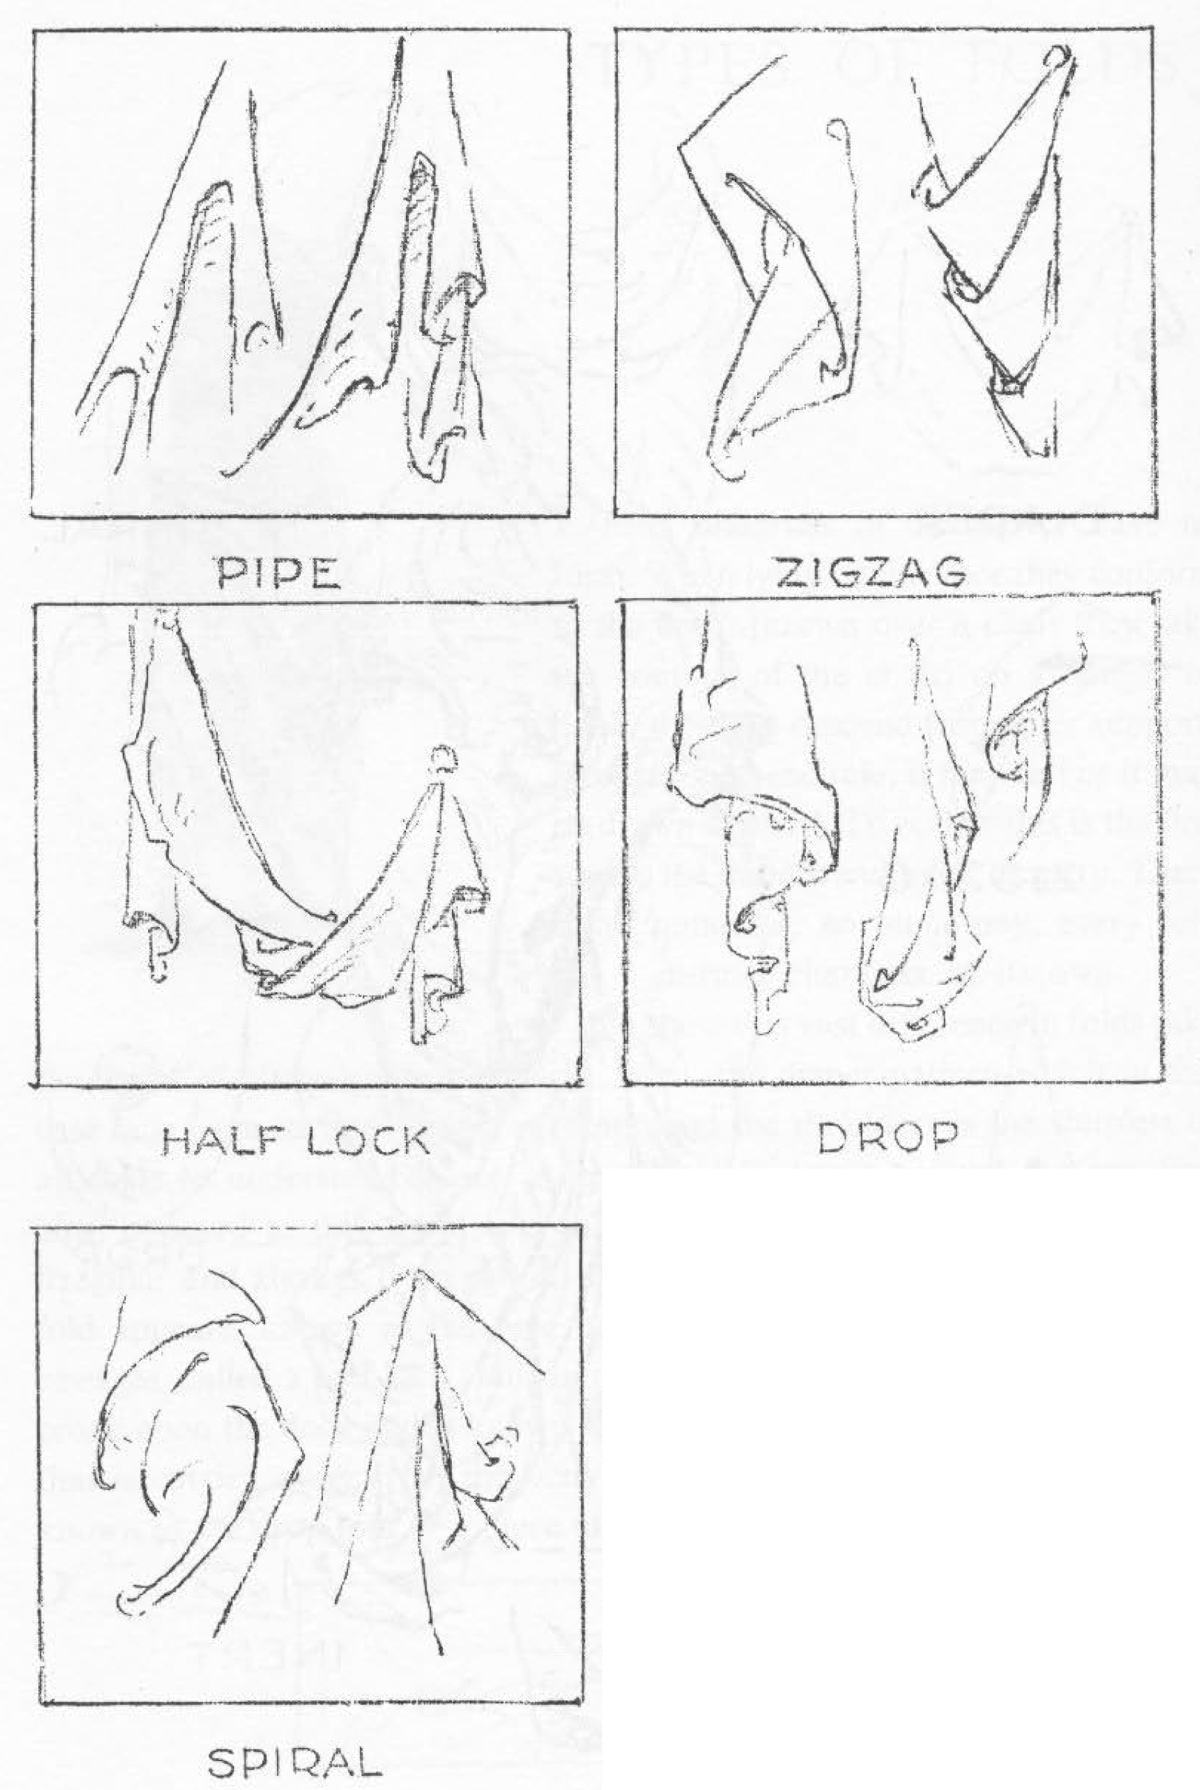
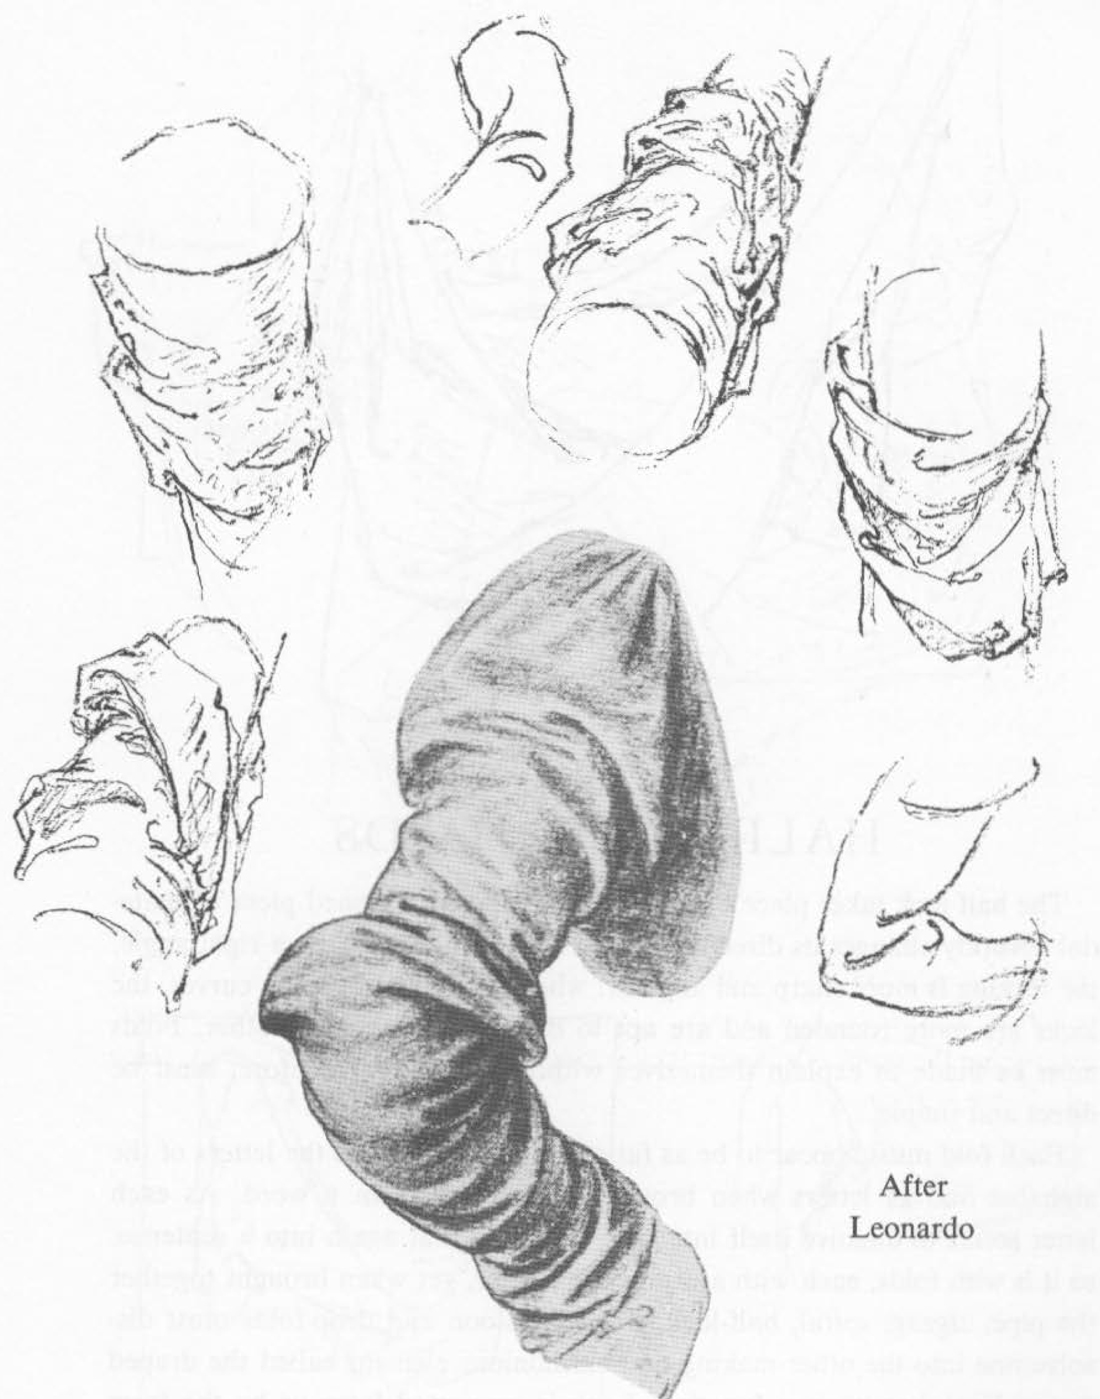
1 Pipe or Cord
2 Zigzag
3 Spiral
4 Half-lock
5 Diaper Pattern
6 Drop or Flying
7 Inert
Dress materials in themselves have no form. When lying on the floor they conform to the floor; thrown over a chair they take the contour of the chair; on a hanger or hook, the folds descend from their support. Drapery may encircle, it may fall or it may be drawn upward. To realize this is the first step to the understanding of drapery. There is no sameness, no monotony; every fold has a distinct character of its own.
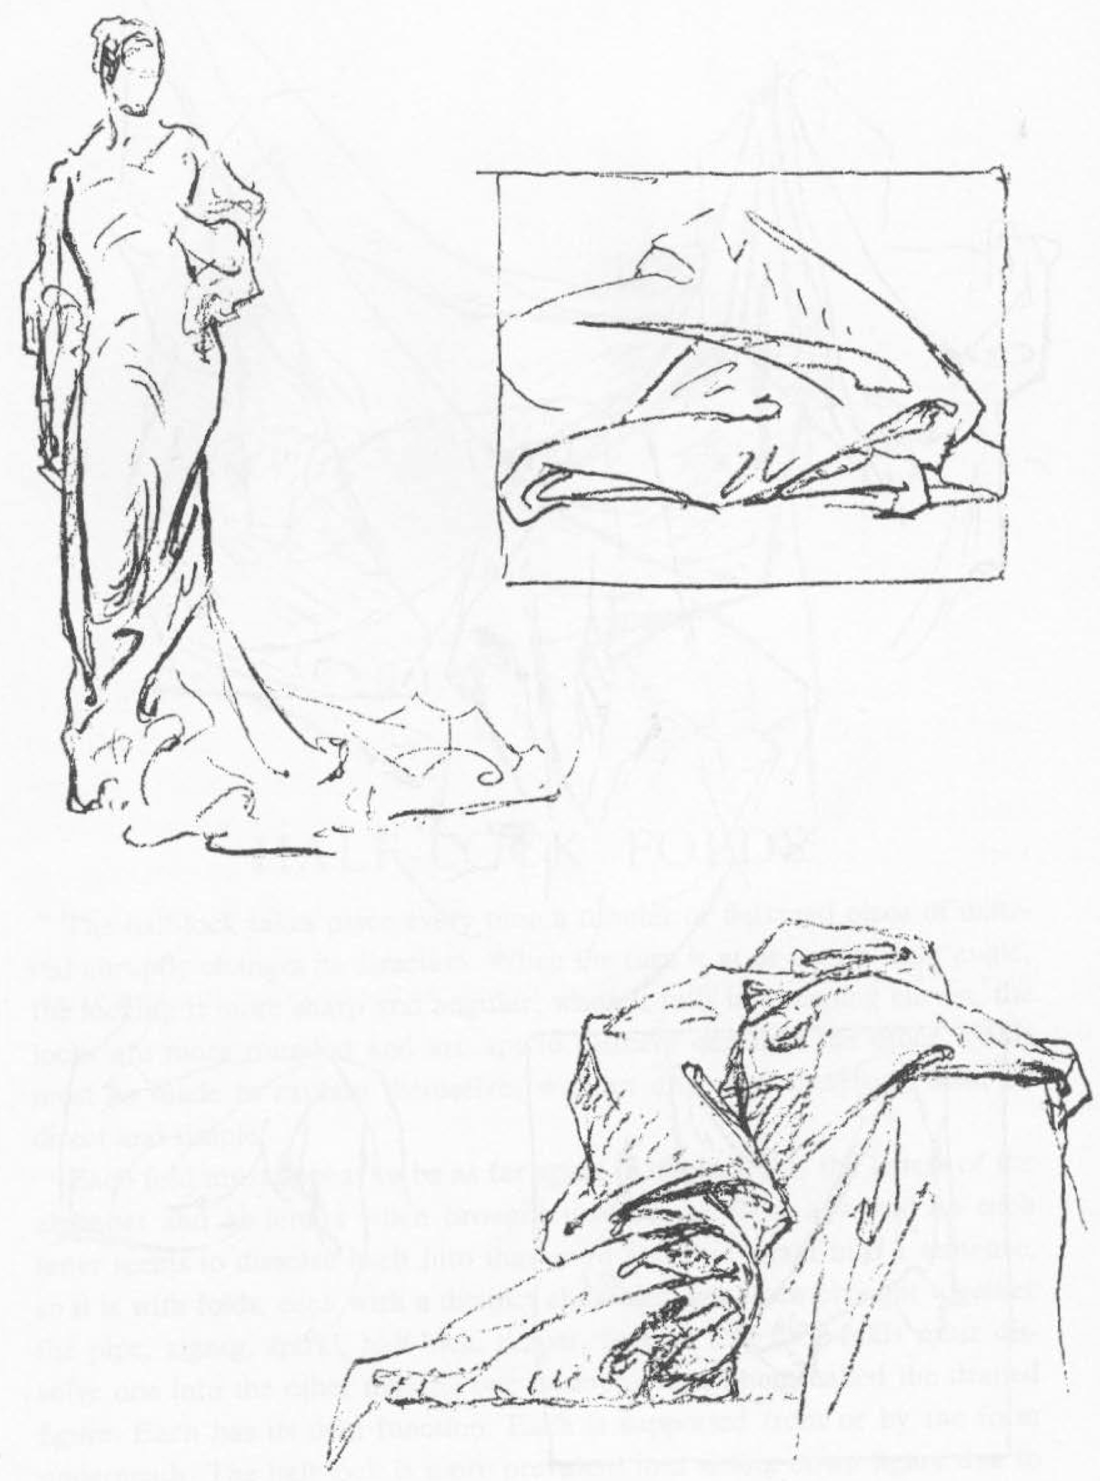
To show this vast difference in folds take the figure of Victory as an example. First, the diaper pattern which in this case falls from its fixed points of support at the shoulders is the simplest of all folds to understand. Next, a spiral fold is drawn around the receding hips; opposed to this spiral is a fold of a totally different character. It is irregular and zigzags from side to side. Below this another distinct type of fold appears, known as the pipe or cord fold. Beneath this another type emerges, called a half-lock. This in turn shares its form with that which lies prone upon the floor and is known by the name, inert. There is also the fold that is carried away from the body by its movement or by the air and is known as the drop fold or a piece of flying drapery .
These diagrams come under the head of geometric or working drawings and represent distinct characters of folds, each playing its individual role in the story of the draped human body. One can make a code of laws to be governed by, but every one of these can be changed or eliminated. Still one should know these laws so that – they may be used as such or deliberately broken.
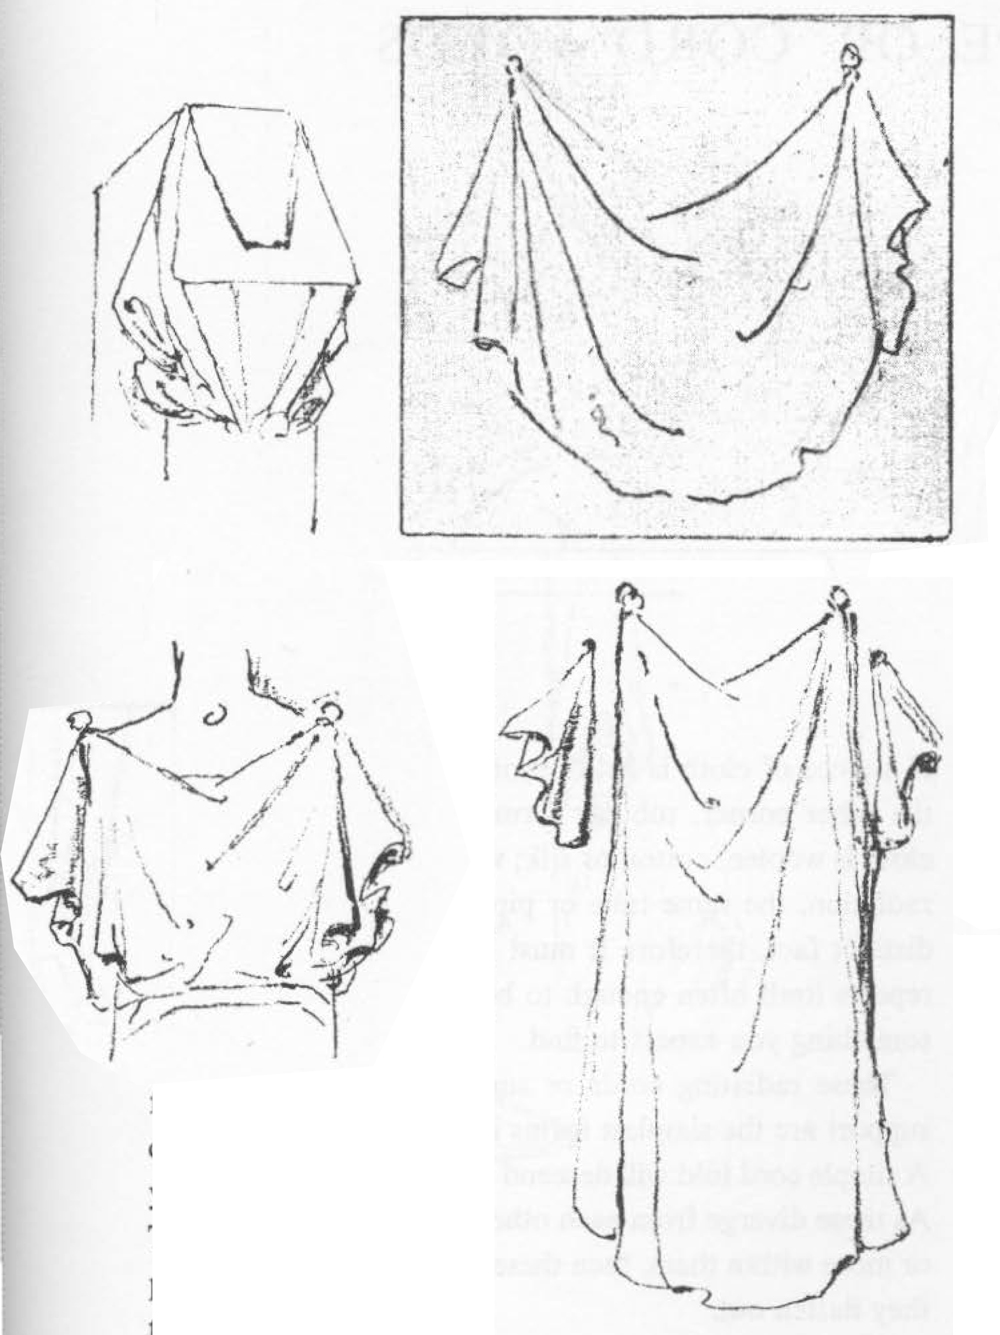
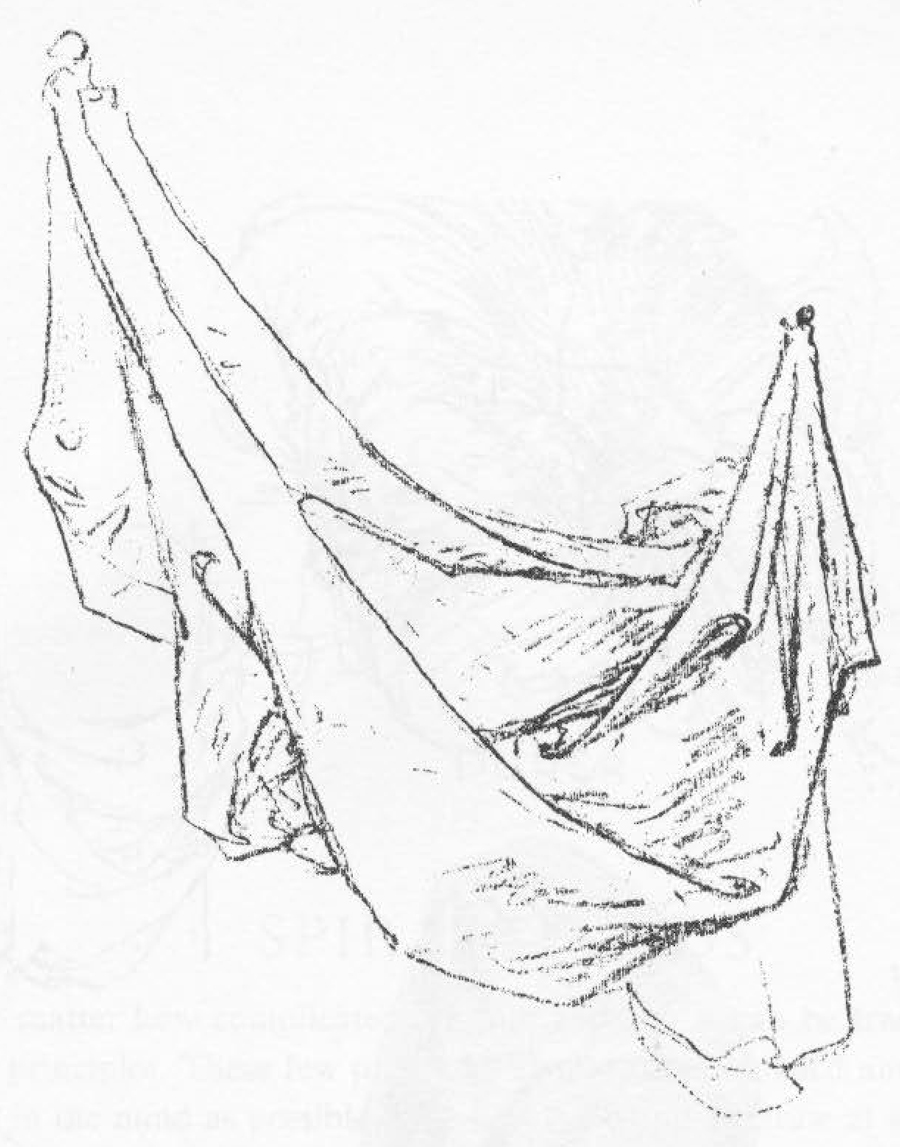
Every fold must have its support. It either pulls or is being pulled; it clings or it folds; it encircles or it is festooned, but in every case it must be supported. It does not ecome drapery until it is supported by something. Take a yard or so of plain material in both hands; hold it by the two upper corners and , allow the center to sag. It shows how the folds festoon and lock into each other toward the center. Try both light and heavy materials until you note the relationship in the radiating lines. Trace the fold or crease from the point of support by which it is being held. Follow to where the two sagging opposing forces meet and study carefully how they interlock. Still holding the
two corners at arms’ length bring the ends nearer together and note the changes that take place and note the way they repeat themselves. After you have the idea as to how the festoon locks, the goods may be thumb-tacked to a board or to the wall or placed on a lay figure.
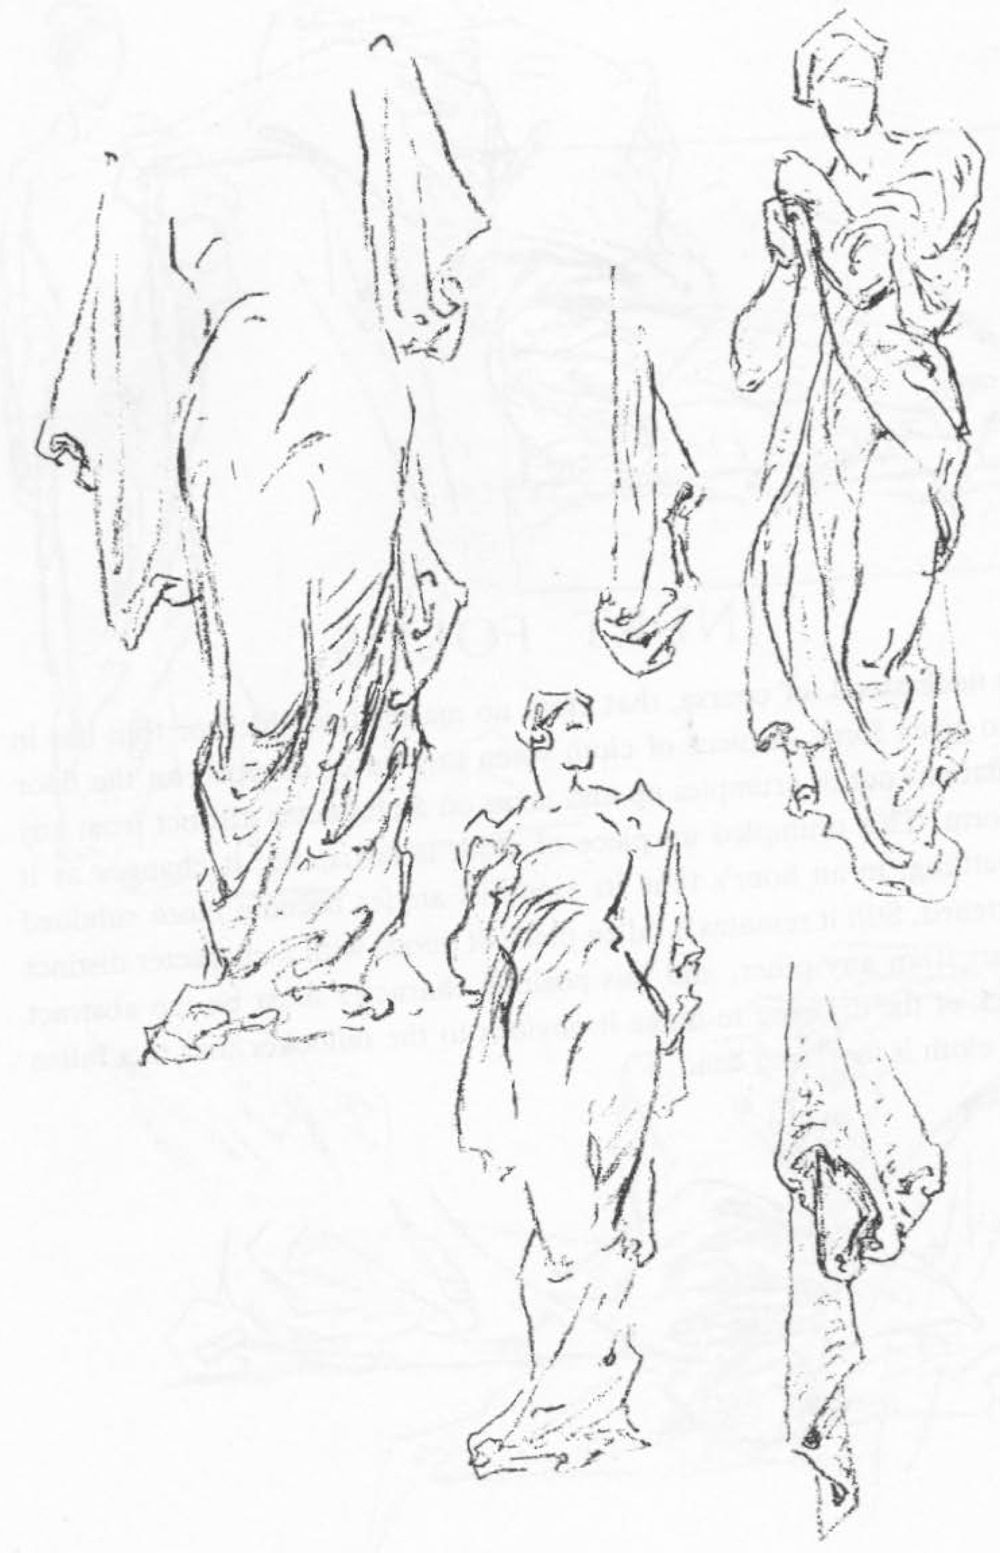
If a piece of cloth is held up or nailed by one corner and then pulled from the other corner, tubular forms radiate from its fixed point. Whether the cloth is woolen, cotton or silk; whether it is thick, thin, old or new, the same radiation, the same tube or pipe-like forms are always prevalent. This is a distinct fact, therefore it must be recognized as a law; it is something that repeats itself often enough to be recognized as such, something to look for, something you expect to find.
These radiating cords or summits as they descend from their points of support are the simplest forms in drapery and are the first to be understood. A simple cord fold will descend and then divide into two or three other cords. As these diverge from each other, the original cords may make room for two or more within them, then these may again divide, making two or more until they flatten out.
A tubular fold of cloth may be bent. As it bends the outer portion becomes rigid, and underneath it becomes more slack. The excess cloth on the inner side buckles into a more or less definite pattern which must be figured out and remembered. The twisting of this fold when bent gives an entirely new design, one which might be called a zigzag pattern.
Here the pull is uneven in character. It is quick and jerky. To demonstrate
this, take six single sheets of newspaper, roll them into a two-inch cylinder,
bend the roll in the middle, now grasp the roll near each side of the bend
and give it a sharp twist from side to side. Note the pattern and the design.
You can reason out why these bendings and twistings so consistently repeat themselves. Try it out on a piece of stiff cloth and you will find a familiar resemblance. It is this repetition that must be stored away in your mind so that you may check your knowledge with what you see on the model. Remember at all times that each fold has a character apart from every other fold. Remember that you will have a preference as to folds, that some folds will appeal to you more than others, making your drawings different from other drawings. Remember that the things you know and leave out are the things that give the power and simplicity to your drawings.
Students gain much by making a number of drawings to tell the story of an interlocking zigzag fold. Do not copy the drawings on these pages, start with a straight or curved line and try to lock the ends with other lines that will account for bringing together the two opposing forces.
o matter how complicated the fold appears, it can be traced to a few basic principles. These few principles should be cataloged and kept as far apart in the mind as possible. One should be able to draw at all times, any one of these seven distinctive characters without notes or a model. Think of the part they play so that when confronted by the costumed model, you are less liable to get lost in depicting these ever changing folds.
The arrangements of curved and diagonal lines fit the rounded forms of the body as the material wraps around the figure. In the same manner folds widen as they leave their points of support. It is safe to say: as they radiate away from the point of support they seldom parallel. To a great extent, these radiating folds should have a decorative arrangement. (There is the art of knowing what to leave out.)
As a sleeve enters the shoulders, the design calls for both curved and straight lines. Where the elbow is bent, the material radiates outward and up to encircle the wedge that occurs on the outer side of the forearm just above the elbow. The number of folds depends upon the texture or weight of the fabric as well as the number of times the garment has been worn. Folds should not look as if they paralleled nor repeat themselves in direction or volume. Your drawing should show an understanding sense of design and pattern.
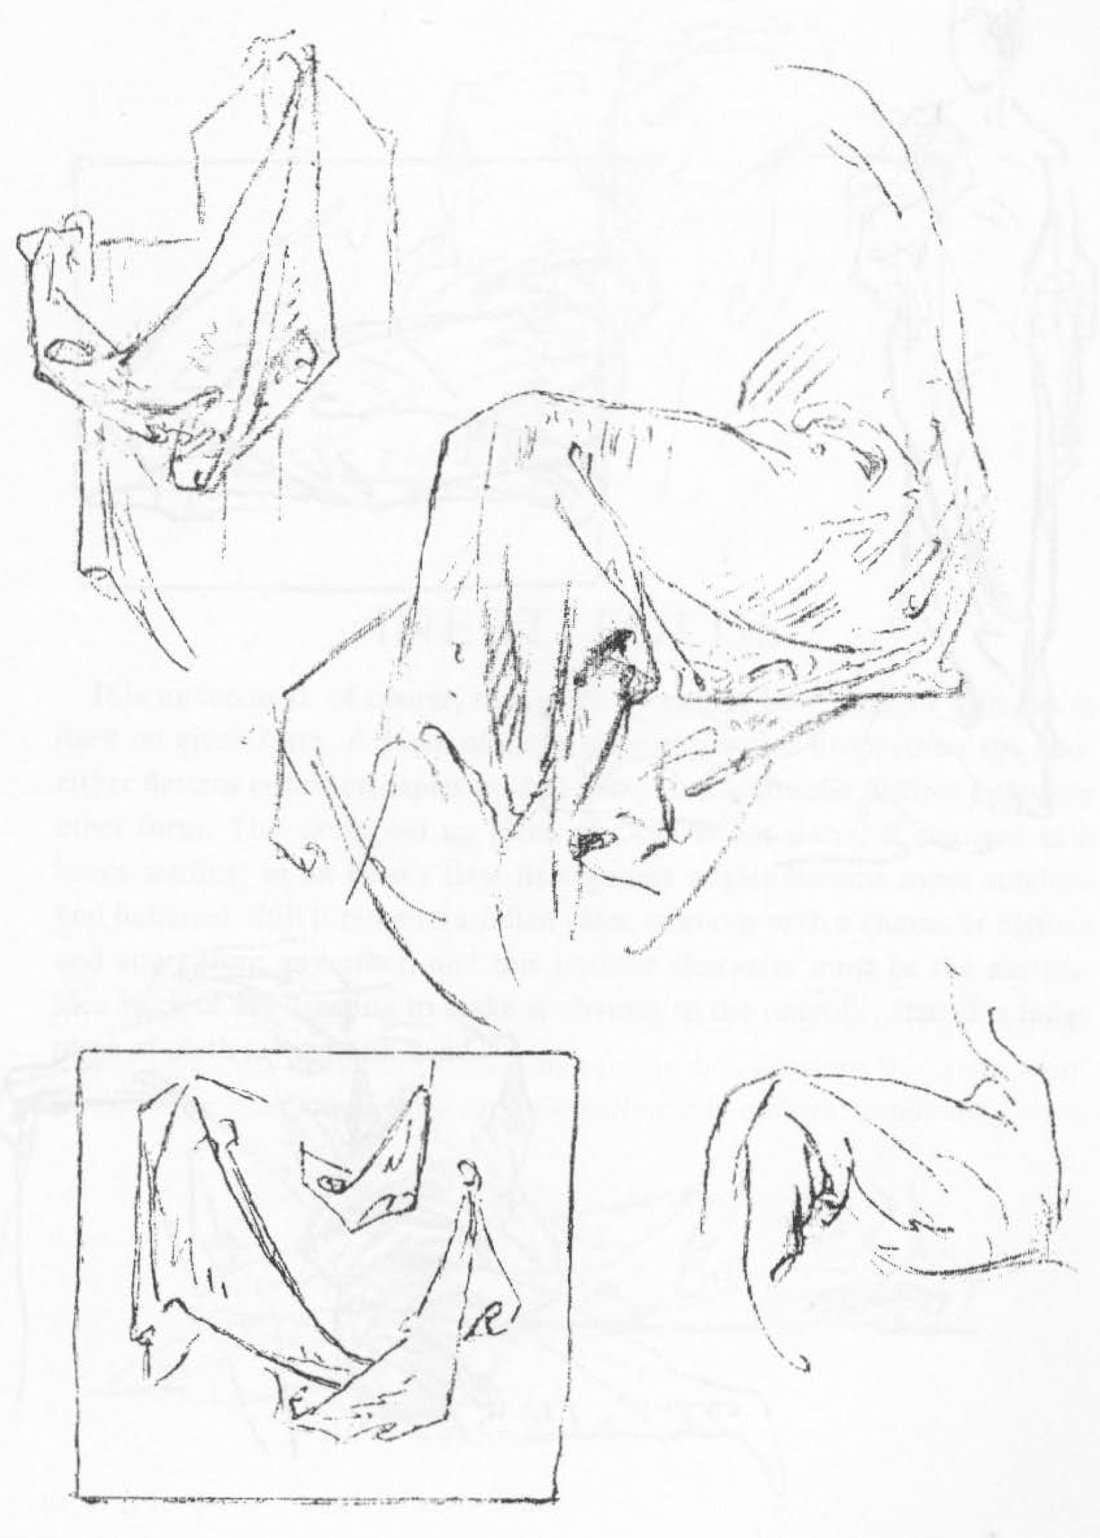
The half-lock takes place every time a tubular or flattened piece of material abruptly changes its direction. When the turn is at or near a right angle, the locking is more sharp and angular; when it falls in sweeping curves, the locks are more rounded and are apt to dissolve one into the other. Folds must be made to explain themselves without difficulty, therefore, must be direct and simple.
Each fold must appear to be as far apart in character as the letters of the alphabet and as letters when brought together to form a word. As each letter seems to dissolve itself into that word and that again into a sentence, so it is with folds, each with a distinct character, yet when brought together the pipe, zigzag, spiral, half-lock, diaper, festoon and drop-folds must dissolve one into the other making one harmonious element called the draped figure. Each has its own function. Each is supported from or by the form underneath. The half-lock is more prevalent in a sitting down figure due to the greater number of angles causing a greater change in the direction of planes.
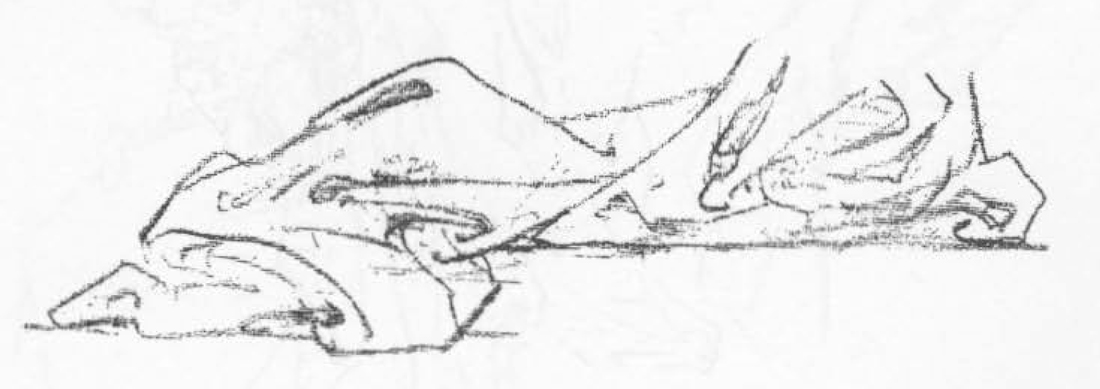
It is understood, of course, that cloth no matter how thick or thin has in itself no given form. A piece of cloth when thrown or dropped on the floor either flattens out or crumples up and takes on a character distinct from any other form. This crumpled up piece of cloth is not static; it changes as it keeps settling; in an hour’s time its vigorous angles become more subdued and flattened. Still it remains a fallen piece of goods with a character distinct and apart from any other, and this positive character must be the abstract idea back of the drawing to make it obvious to the onlooker that this fallen piece of cloth is inert and dead.
As this particular class of fold leaves its support, being free, it takes a swinging rhythmical motion down the whole length of the material to its salvage. When these folds hang straight they add dignity to the figure but when the outline is curved such as in movement and the lower borders are suspended in space, they usually twist, turn or take a spiral form at their inner or outer edges. The drop fold is a distinct opposite to any other character of fold. No other fold must encroach upon its territory. It is used chiefly in figures that run, dance and perform other decorative movements. Its outline sways in weaving curves when the figure is in motion and with dignity when in repose. Whether in movement or static, all folds follow the laws of gravity when away from a fixed point. Only the details of these laws vary. A great deal depends upon the materials used when they are cut straight across or warp-wise. They then behave differently in detail.
Technorati Tags: drawing folds, draw folds, drawing clothing, drawing clothes, drawing drapery, folds, drapery, guide to folds
Today I'll show you how to draw Rick from the Rick and Morty cartoon tv…
Today I'll show you how to draw Morty from the Rick and Morty cartoon tv…
Today I'll show you how to draw the spunky little rabbit, Kuromi, from My Melody…
Today I'll show you how to draw this cute "bean duck" that I found on…
Today I'll show you how to draw Sosuke and Ponyo in a bubble (chibi /kawaii…
Today I'll show you how to draw a Boo from Super Mario Bros in Kawaii…
View Comments
these are great, thank you so much. clothing is so difficult to wrap your head around ahah
Wow this is REALLY good & helpful! Thx!
Would you mind if I use some of this images on handouts in my high school class? I would give your website credit for the images.
No problem at all