If you have never drawn a portrait of a human face, then this is a good starting point. I found this segment from a great drawing book by Charles Oliver, called “Anatomy and Perspective”. If you like this article, you can buy it on Amazon.
Learn How to Draw Portraits and Drawing People’s Faces and Heads
Step 1
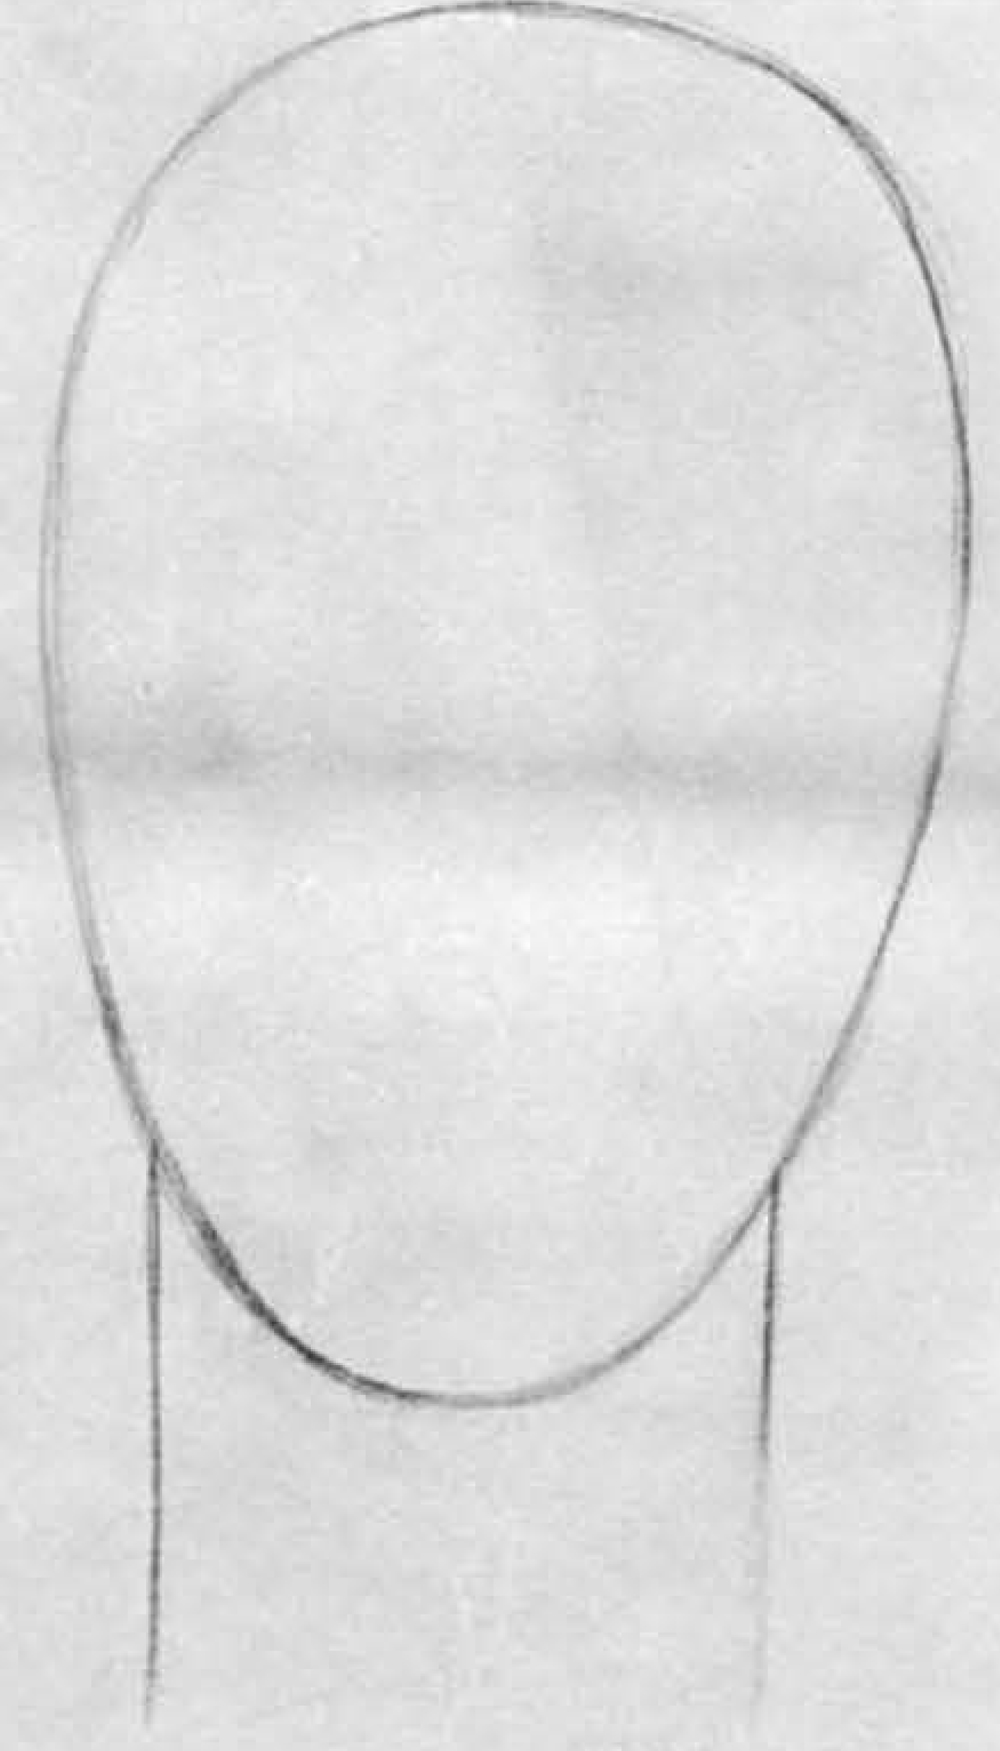
Draw the head out as an oval.
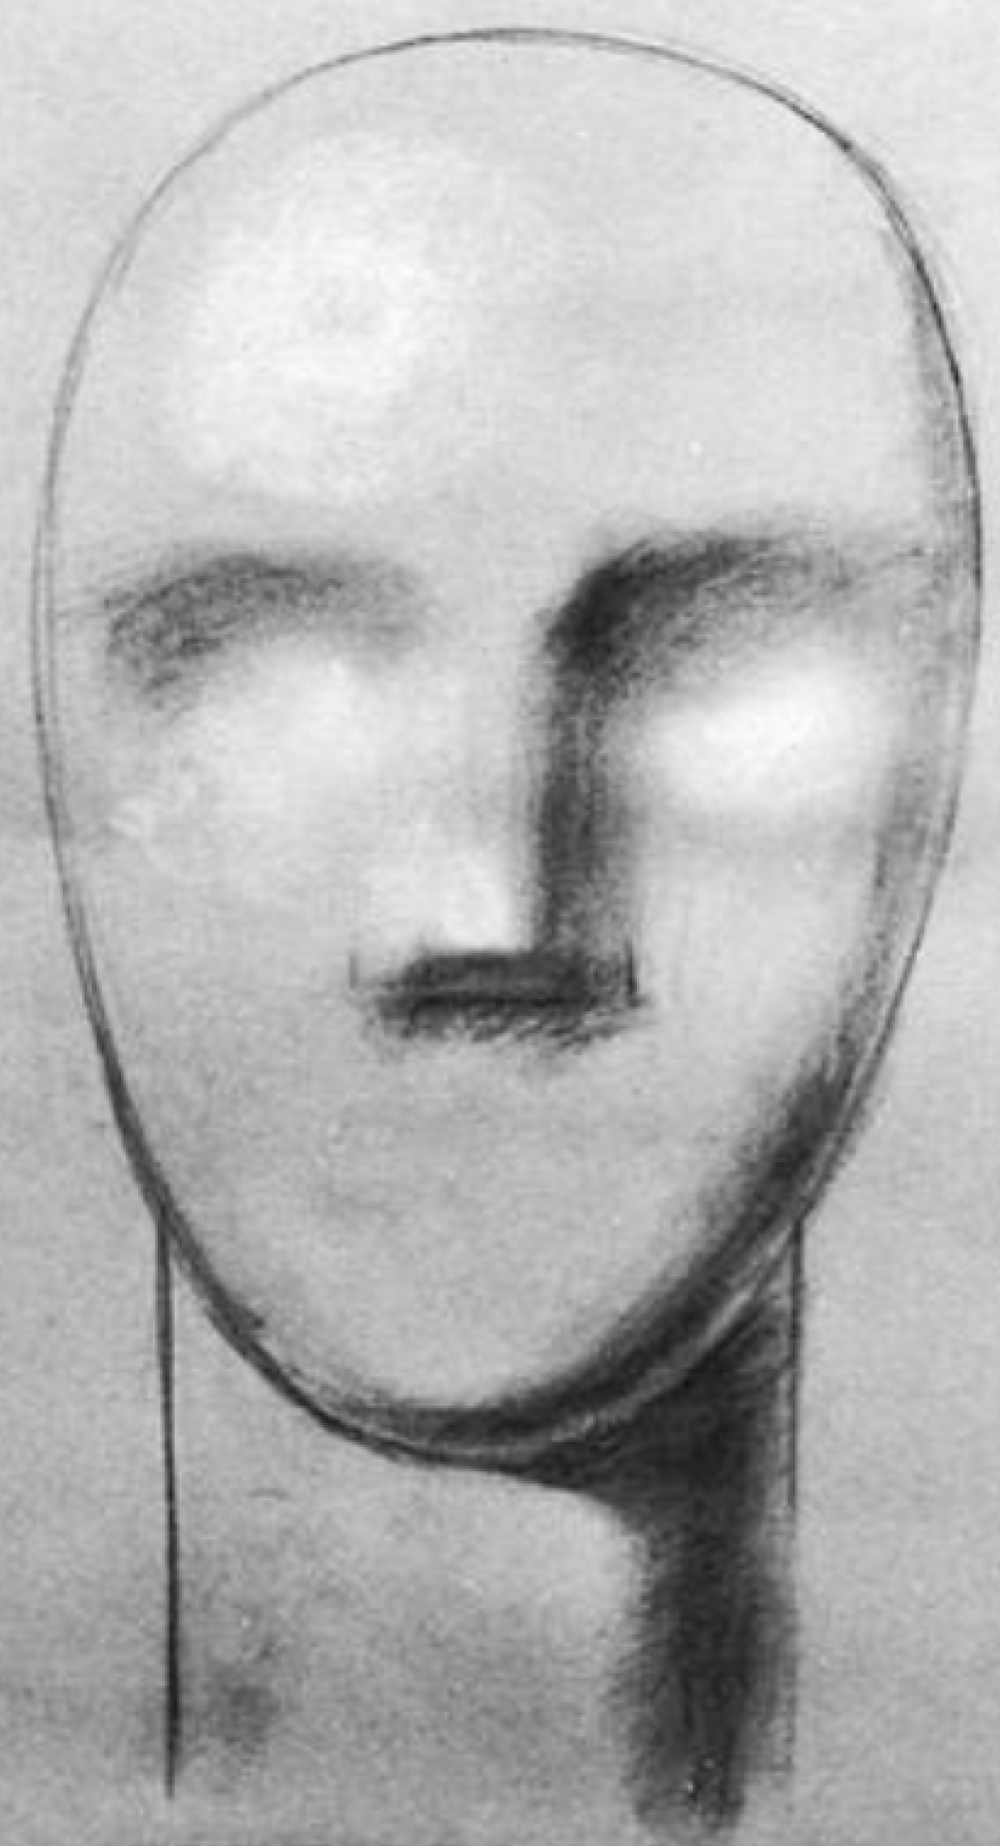
Step 2

In this second drawing, the oval shape that you drew has been taken even further to create an actual form that is starting to look like a face. This form has been created by creating a light to shine on the oval from the upper left…by shading on the right and under sections. The oval has been drawn upon a cylindrical neck. The oval then casts its own shadow upon the cylinder.
[ad#draw]
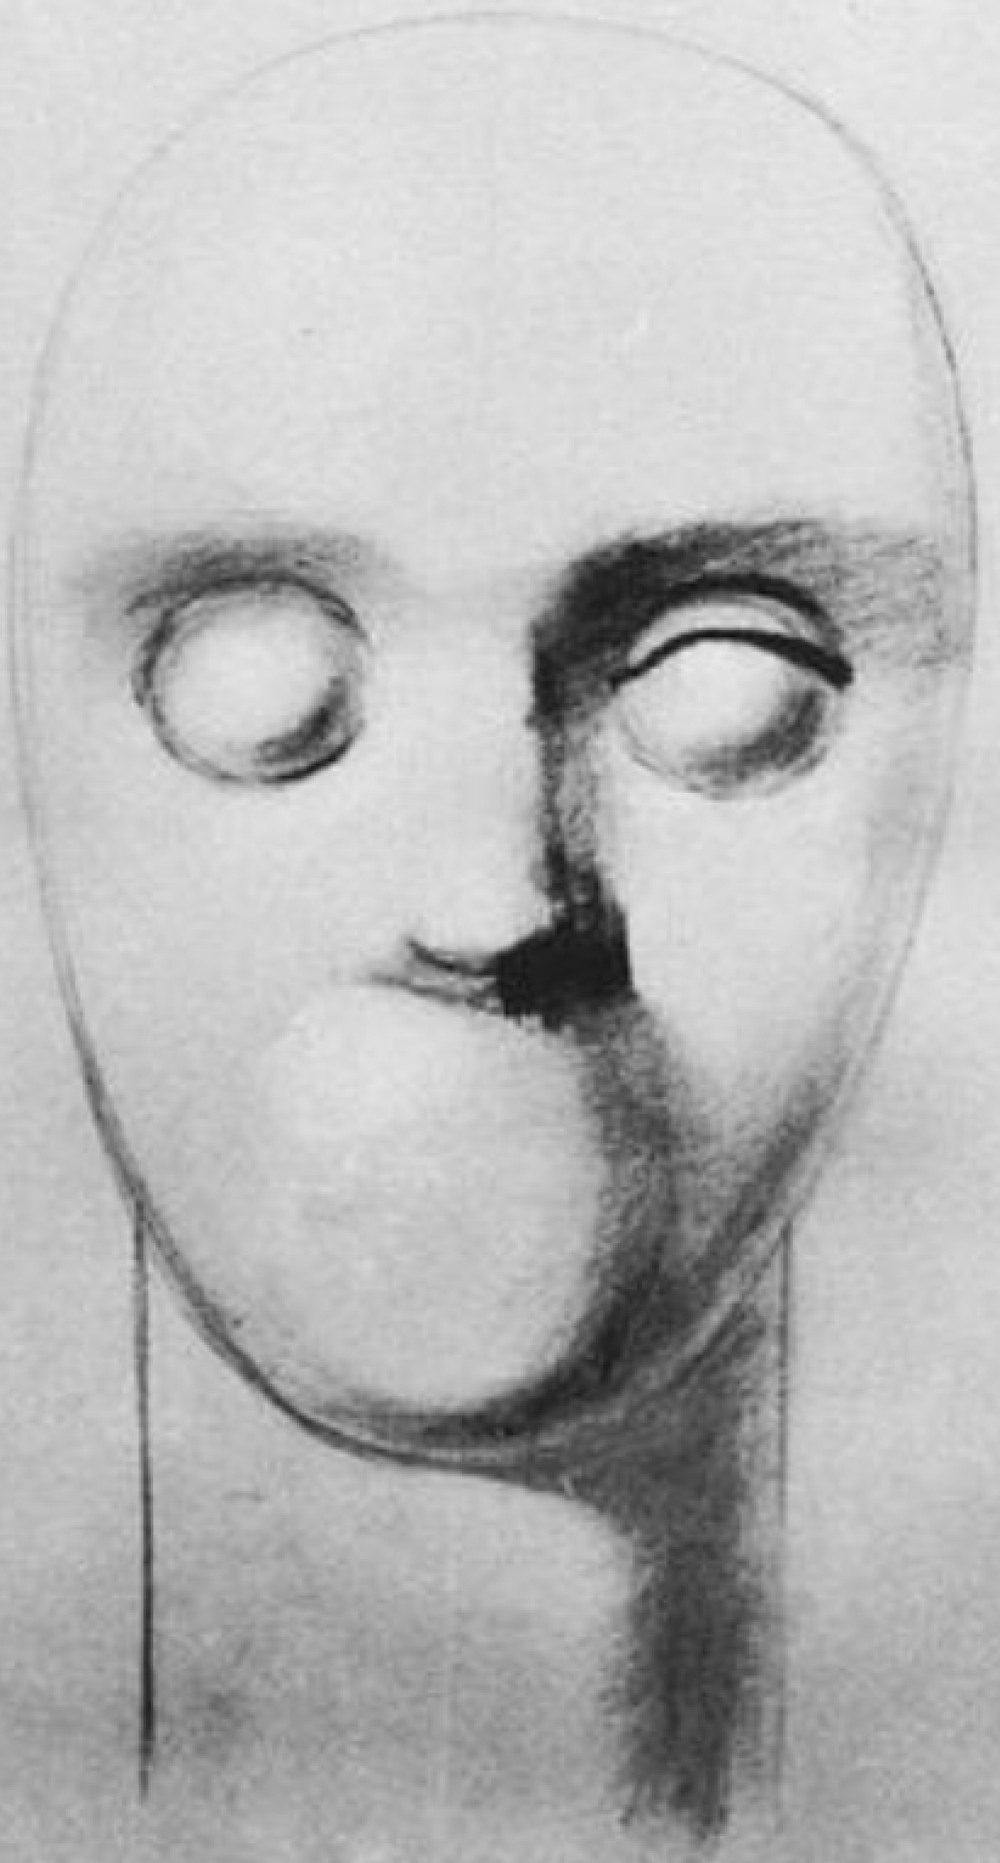
Step 3
In this drawing, hollows had been pressed in the ovoid for eye sockets and the nose form had been built out. This is all done with shading.
Step 4
The arch of the jaw has been suggested coming out of the oval…this is done by shading an oval shape at the bottom of the oval. The base of the nose has been shaped to create the basis of the nostrils. The eyeballs (like spheres or balls) have been drawn into the sockets. And over the surface of the right eyeball the curved line of the upper lid has been drawn.
Step 5
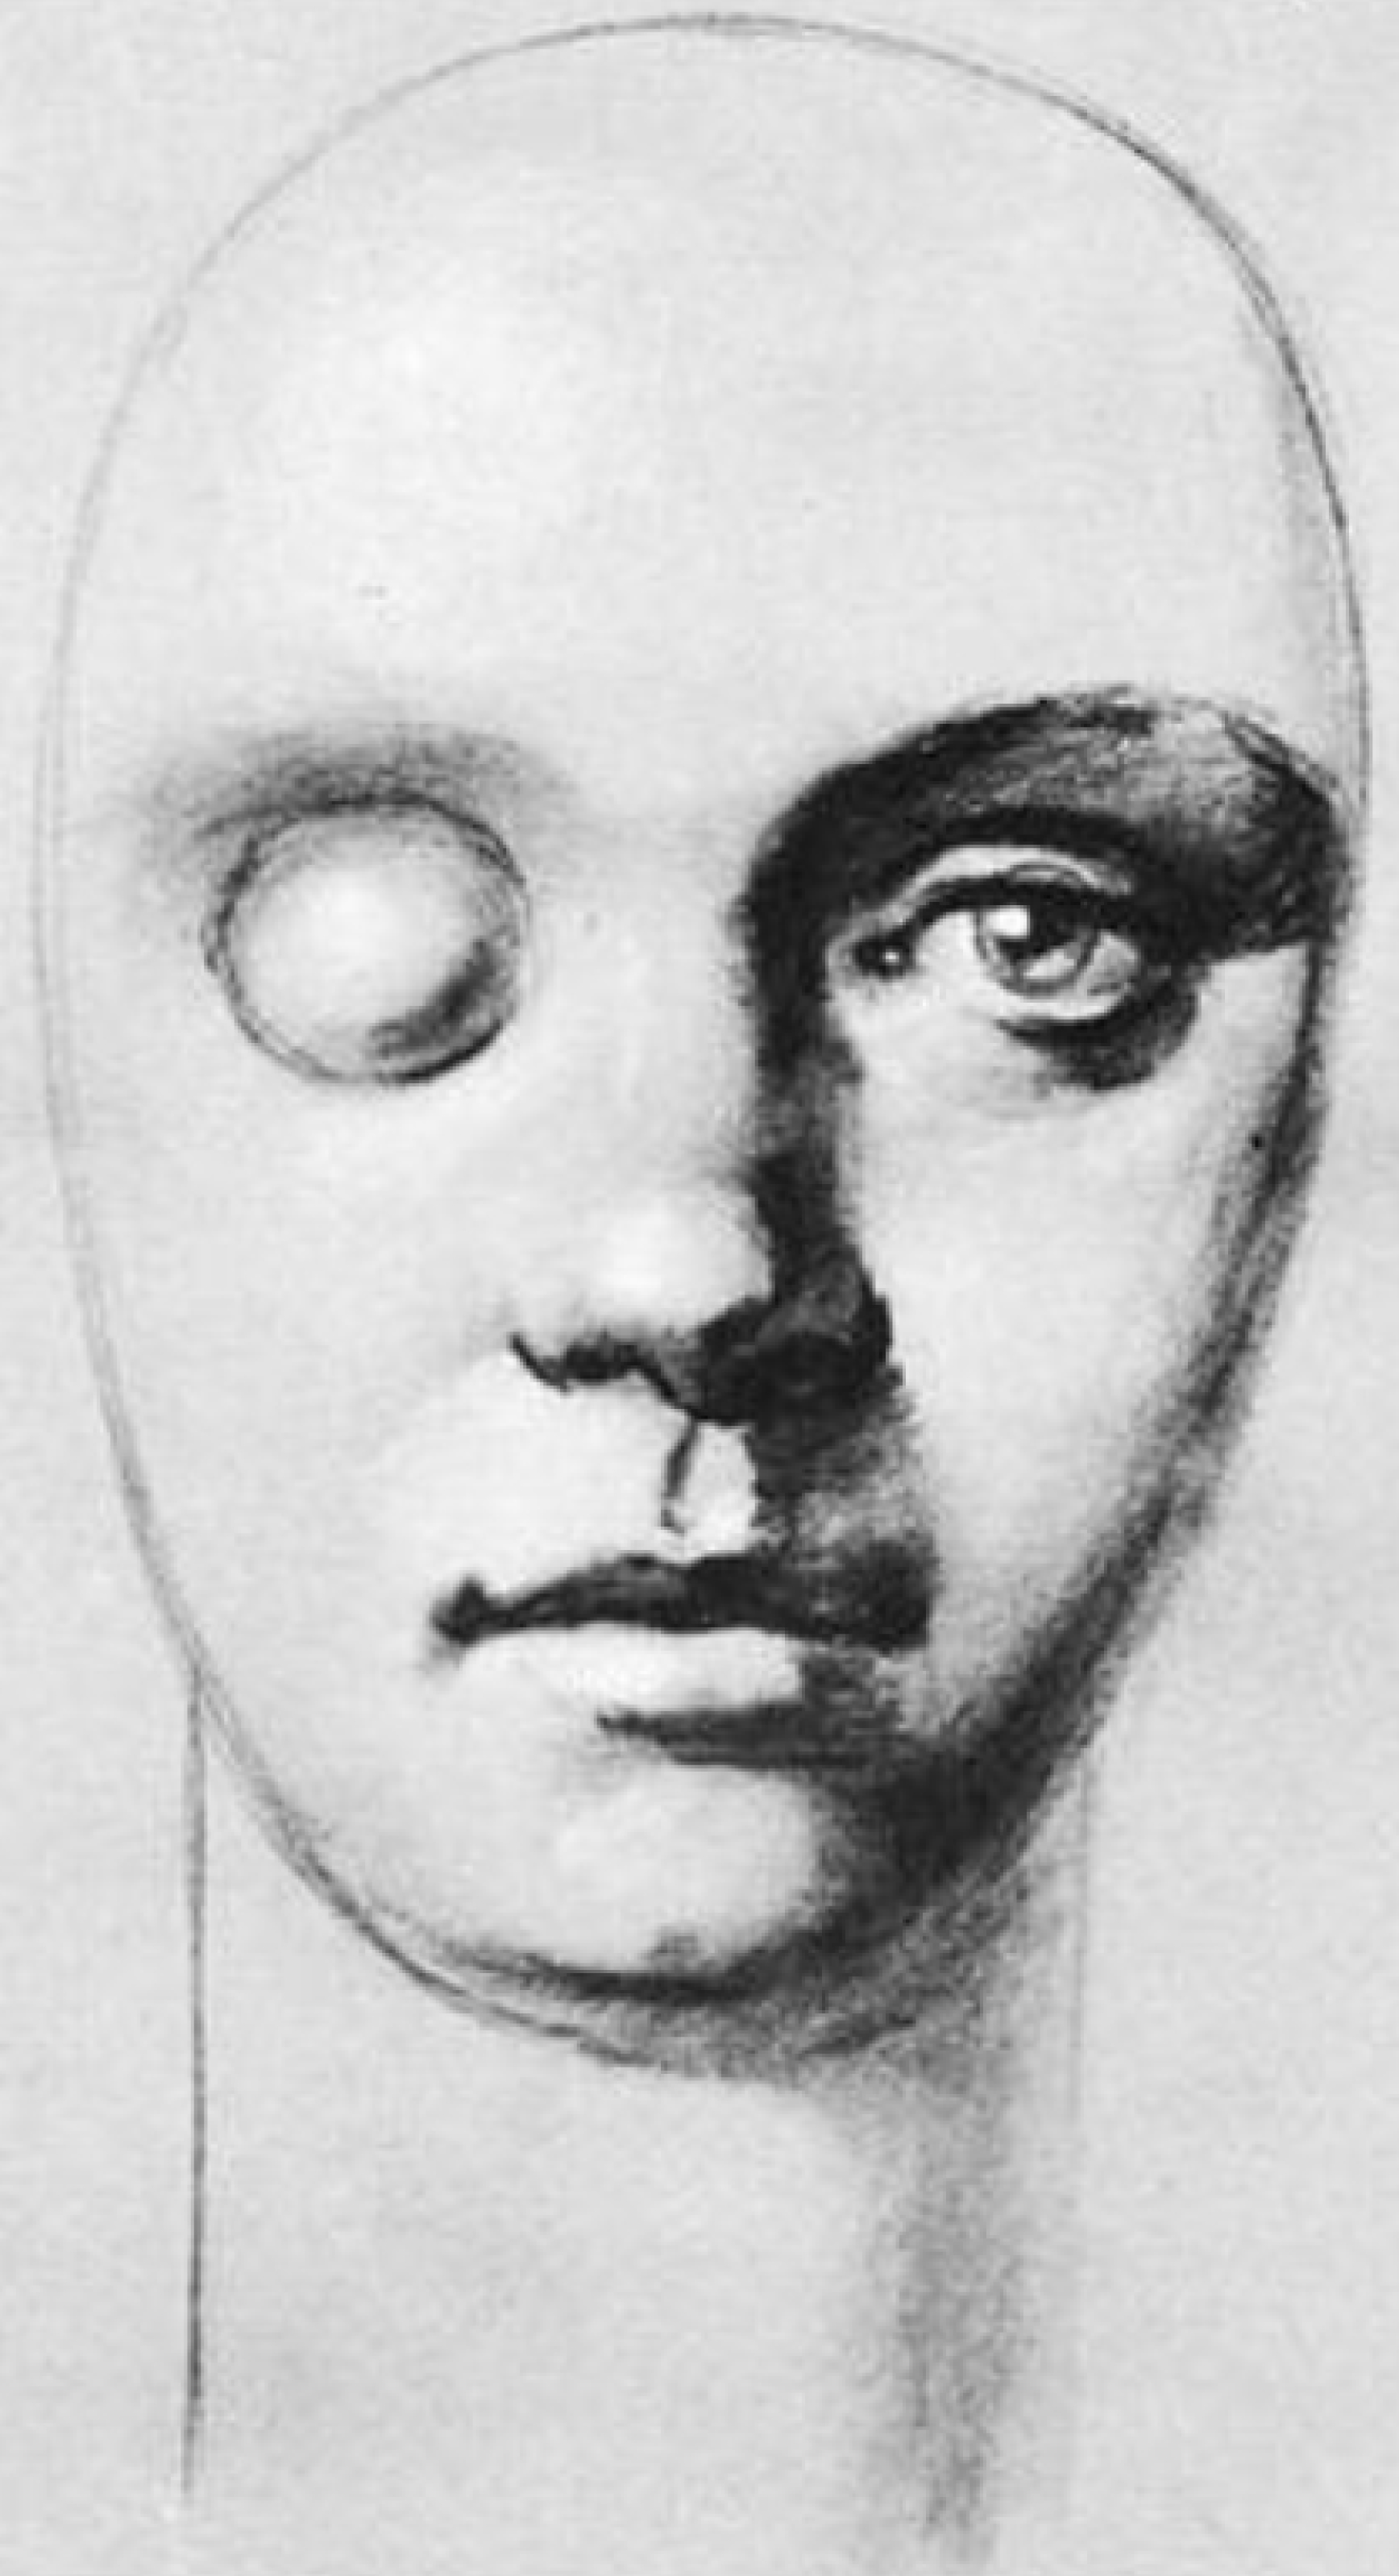
Now the left eye socket is more fully drawn out and the line of the eyebrow is now sharper. The eyelids have been drawn around the ball and the iris is drawn out, about one-third of it being hidden below the lid. The nostrils have been inserted in the base of the nose and the upper jaw more strongly modeled to include the ‘dip’ in the middle. Across the arch of the jaw the mouth has been drawn, the upper lip fairly dark, the lower lip quite
light. The hollow immediately under the lower lip has been ‘carved out’ and the form of the chin developed.
Step 6
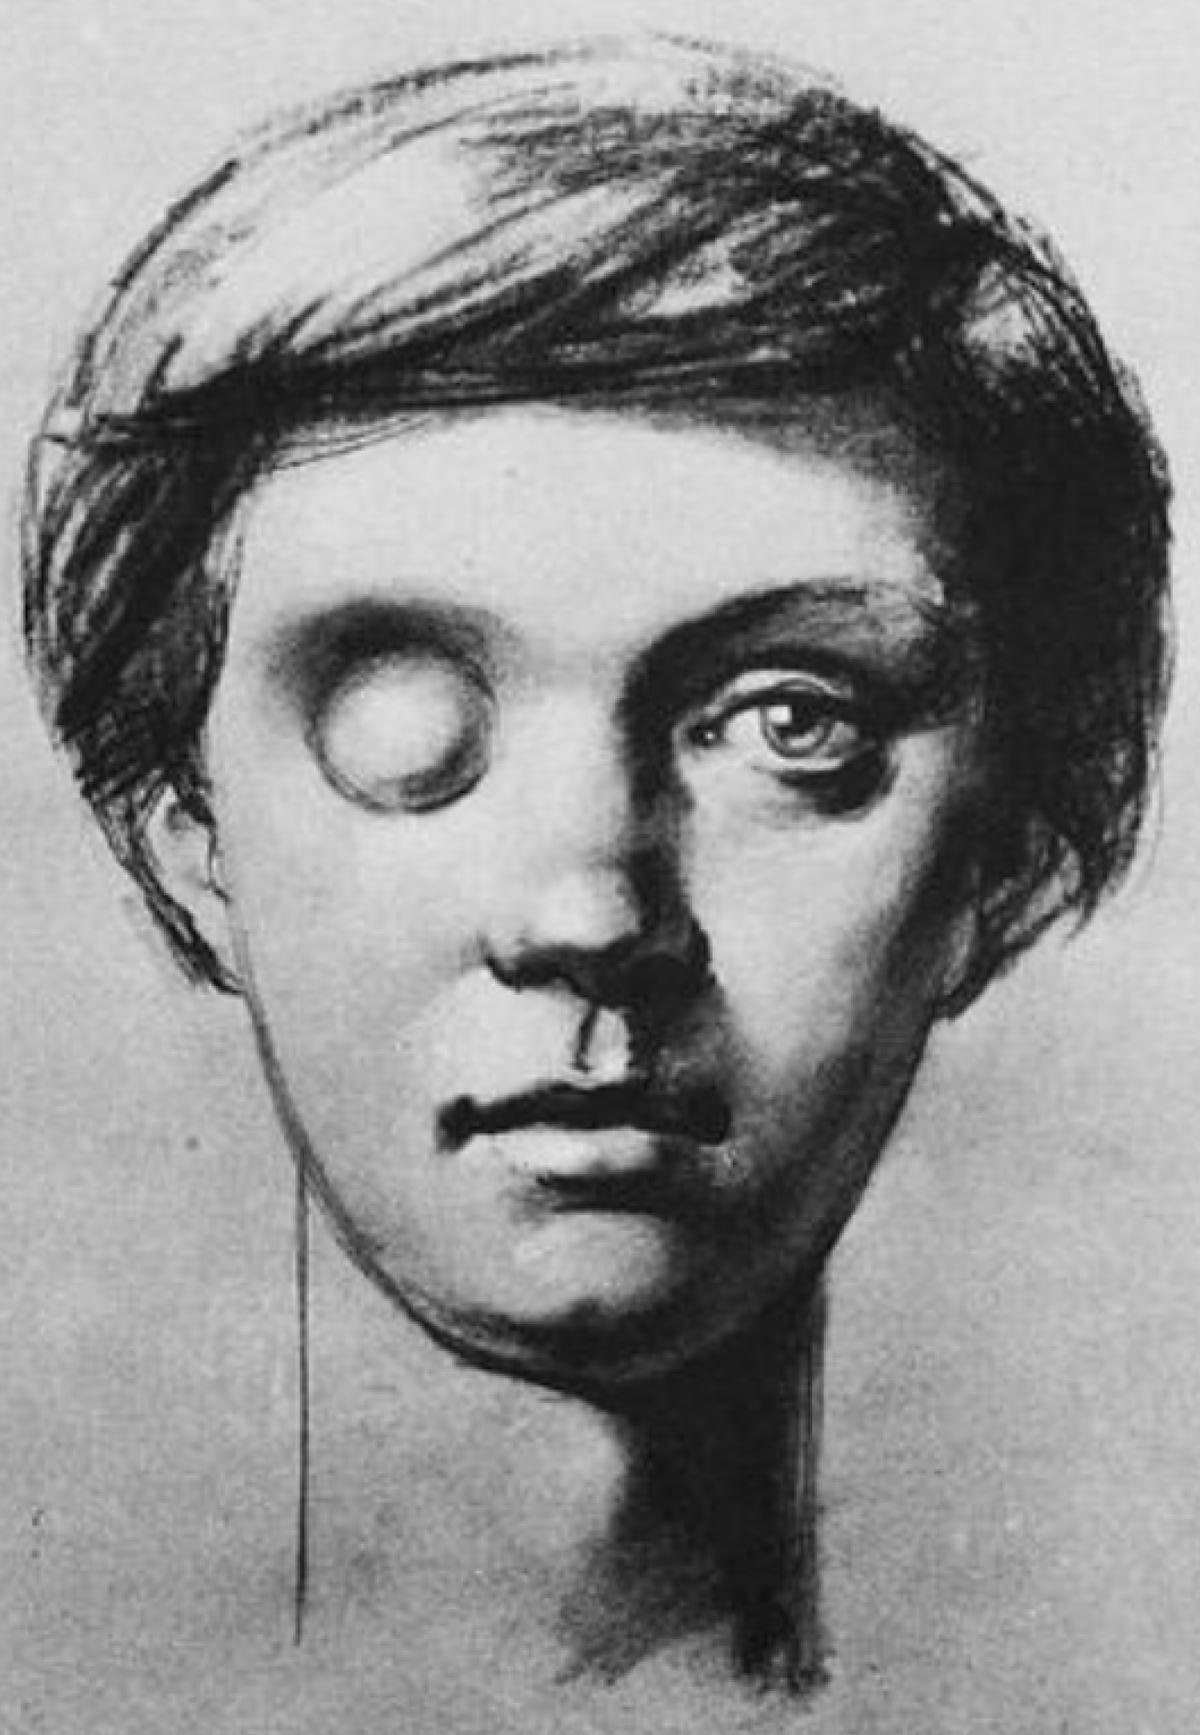
In this last drawing the hair and the ears are drawn in. The shadow of the head across the neck are darkened, and the form of the throat is now seen.
Drawing the Eyes
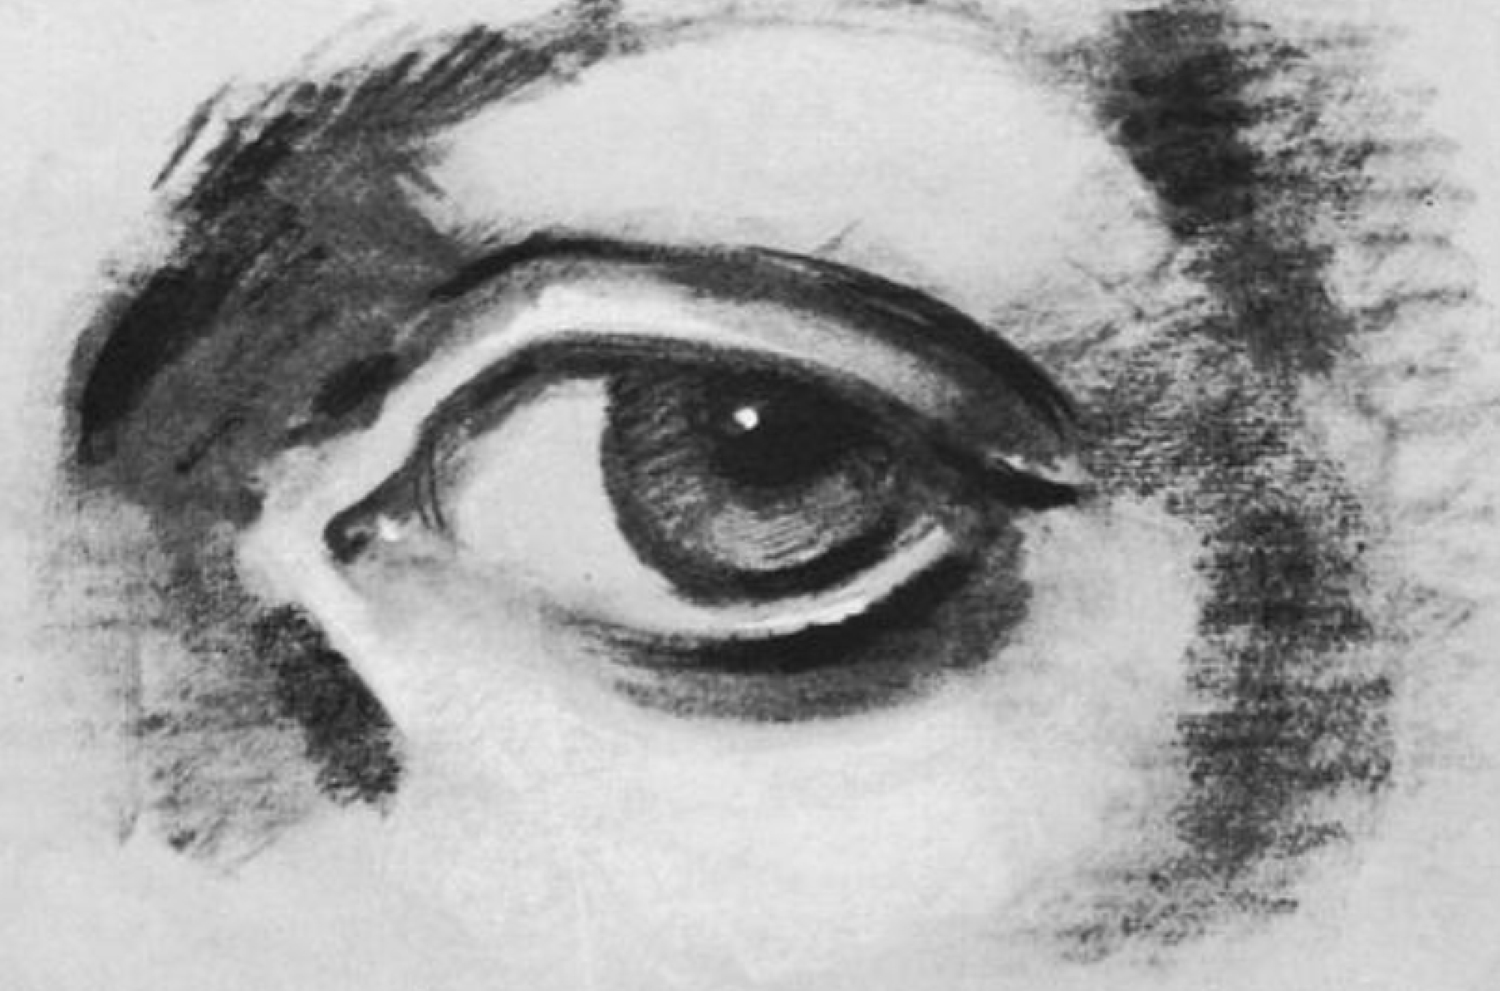
When drawing the eye in its setting it is essential to bear in mind, all the time, the idea of a ball set in a hollow. In the drawing above (where the light comes from the left) the receding plane between nose and eye socket is in deep shadow. The upper lid is ‘wrapped’ around the eyeball partly by observing its curvature, but partly by noticing that the form is gradually turning away from the light. More often than not the light will be above the head and this will cause the line of the upper lid to appear dark for three reasons-/, the thickness of the lid will be in shadow; 2, it is bounded by eyelashes which are often fairly dark except in very blonde persons; and 3,
eyelashes and lid cast their shadow over the upper part of the eyeball. By comparison, under the same lighting conditions the thickness of the lower rim is almost invariably light. This produces a very characteristic pattern in the drawing of the lower rim where it moves across the eyeball; it may be clearly defined where it passes under the colored iris, but will fade into the white of the eye. Any attempt to force this edge results in a hard, insensitive drawing.
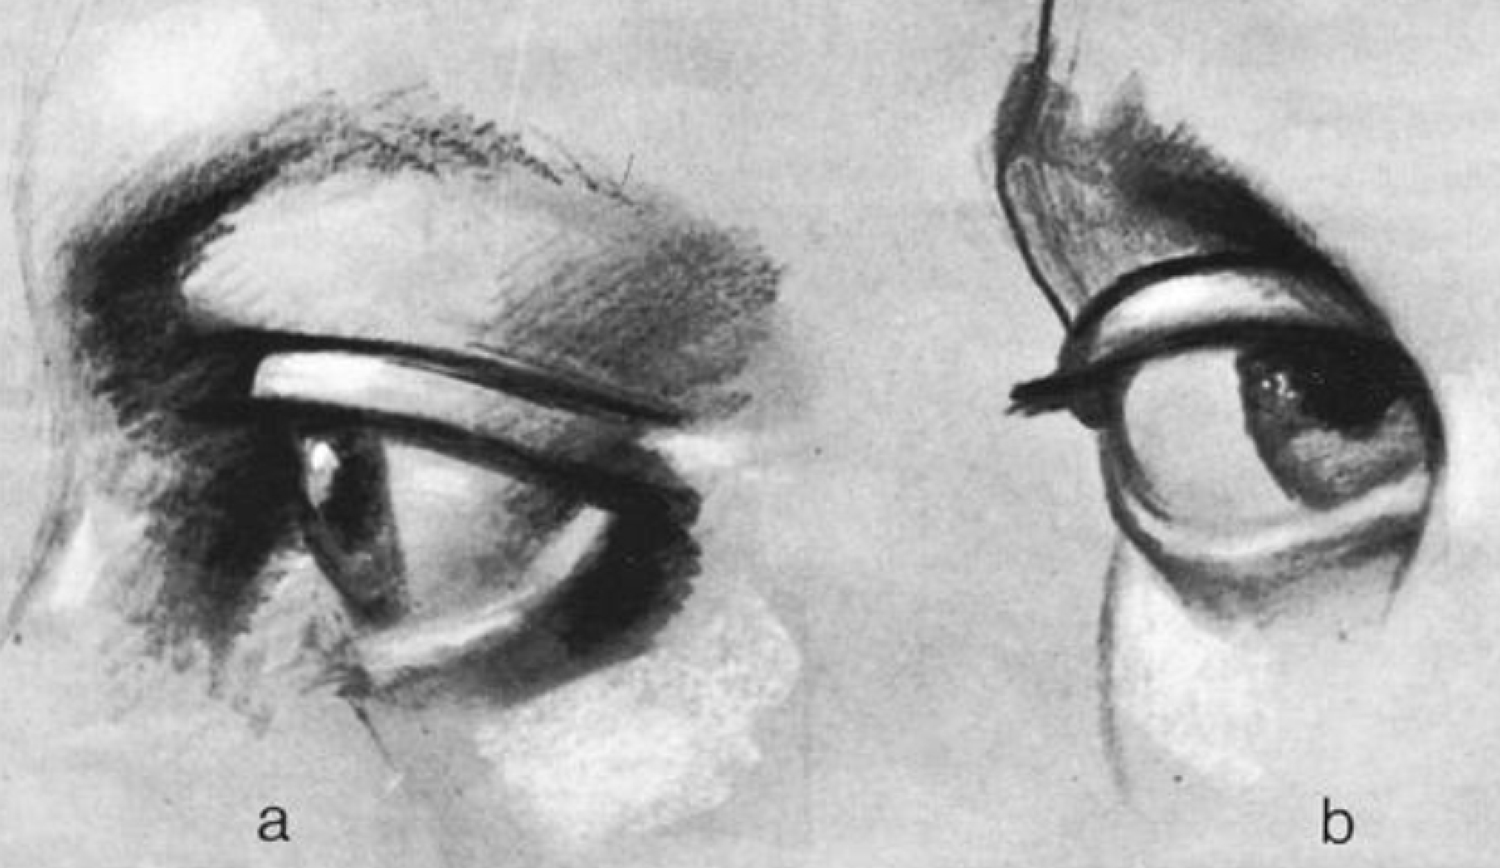
In the side view of the eye (above) I have stressed the overhang of the upper lid beyond the lower, and indicated the irregular shape of the cornea as it moves around the ball. Seen from the front it is quite round, but from the side it projects from the ball surface. It will be seen that whereas the left-hand edge is very full, the
right-hand edge is to a considerable degree a compromise between the curve of the cornea and the curve of the eyeball. The pupil is a hole through which light may pass and it therefore appears dark. This is surrounded by the iris or colored portion. Light shining through the transparent cornea strikes this colored portion and
is reflected outwards. It is characteristic that the brightest part of the color is always diametrically opposite the source of light and the highlight.
The nose
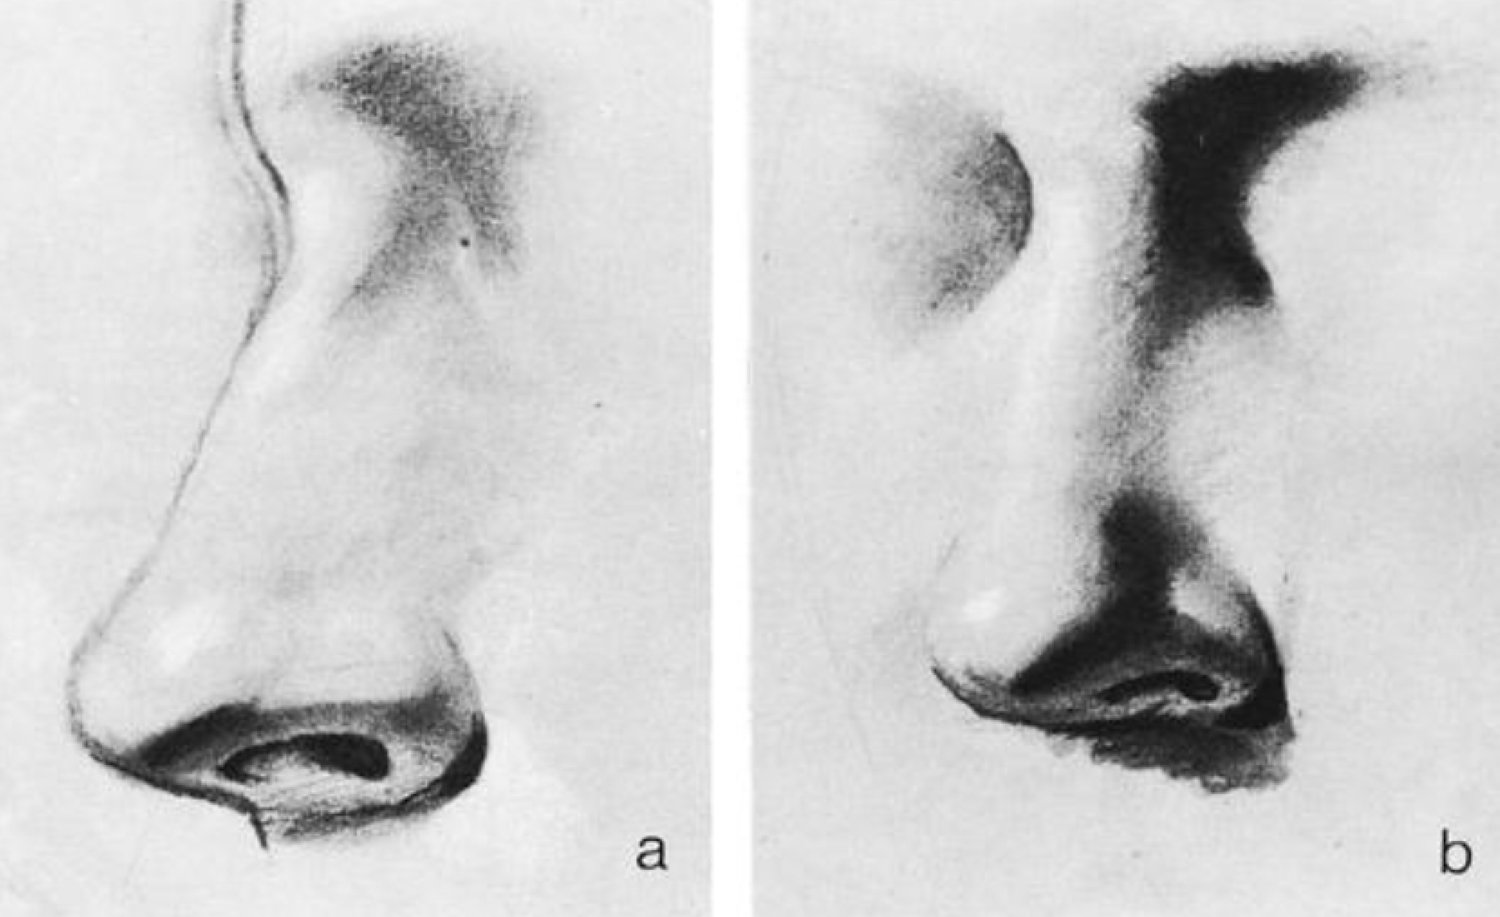
The nose is most easily drawn from the side (above) but comparatively few portraits are painted in profile (the portrait of a woman by Baldovinetti in the National Gallery, London, is a notable example). When drawing the nose in profile it is very important to ensure a realization of the under-plane. The nostril is surrounded by flesh and this flesh has a definite thickness. Too often the edge of the nostril is allowed to serve as the boundary of the under plane. Th is is quite wrong and strictly speaking absurd. In the three-quarter view (b) another frequently occurring phenomenon is the disappearance of the edge of the nose. Where the light pours across the nose, as in the sketch, it will often happen that the color and tone of the nose may be almost exactly the same as that of the far cheek. It may happen that the edge of the nose is strongly silhouetted against the dark shaded part of the far eye socket and is not clearly visible again until the contour turns under into shadow. When this does happen it is very often accompanied by strongly defined shadow down the near side of the nose so that what is lost on one side is restored on the other. In studying the profile of the nose it will be seen that at the top (the bridge) the form is concave whilst at the tip it is convex. Both these areas will normally reflect light back to the artist, thus producing highlights. Inexperienced artists often assume that the projecting shaft of the nose must be very light, but this is not always true. The intensity of light which we see coming from the head (or any object) is more connected with the angle at which it reflects the light back to the viewer than with the amount of light the surface receives. For example, a mirror receiving light can be made to reflect it back to a specific point according to the angle at which it is held.
Great care should be taken to ensure that the nose, having projected outwards from the plane of the face, returns to the face. This may best be done by following carefully the middle axis throughout the length of the nose, round the tip and along the cartilage between the nostrils until it reaches the upper jaw.
Lips / Mouth
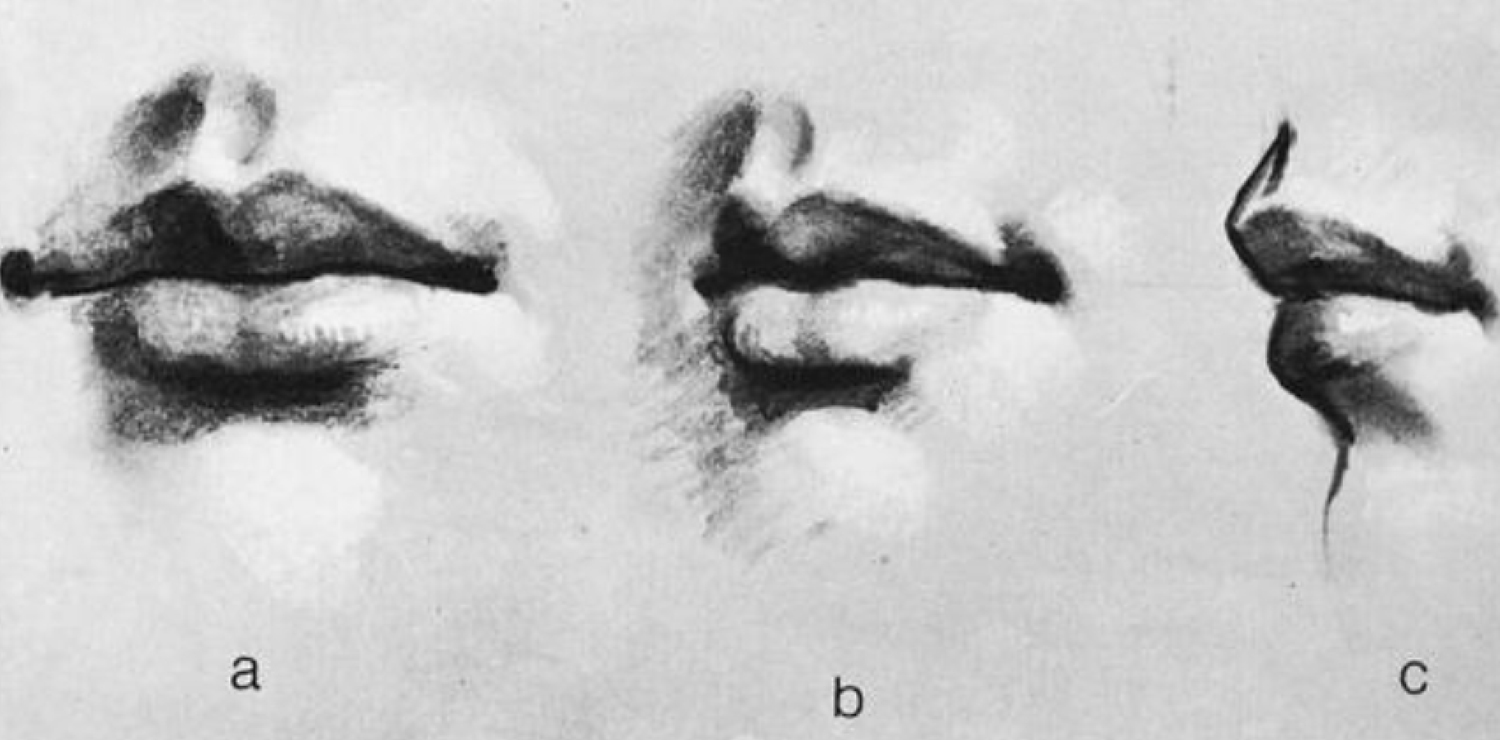
One of the most important features of the frontal jaw area, upper and lower, is the high arch shown in Step 4. This form always rises to a greater or lesser degree out of the general plane of the face, and the mouth would appear to ‘wrap’ round it (in the picture above). The effect of this arch will be apparent in the three-quarter view (b) where the far side of the mouth becomes very foreshortened. Determining the width of the mouth are two almost vertical folds of muscle which vary considerably in prominence but are always important to notice.
In the relationship between the upper and lower lips can be seen. Normally and ideally the upper lip overhangs the lower but th is does not always happen and in portraiture the exact relationship would have to be sought. In normal lighting conditions, i.e. with a top light, the upper lip is in shadow and therefore clearly defined.
The lower lip is much more delicate (unless strongly defined with lipstick) and some parts of it, mainly towards the outside, may often have practically no visible contour (a).
Ears
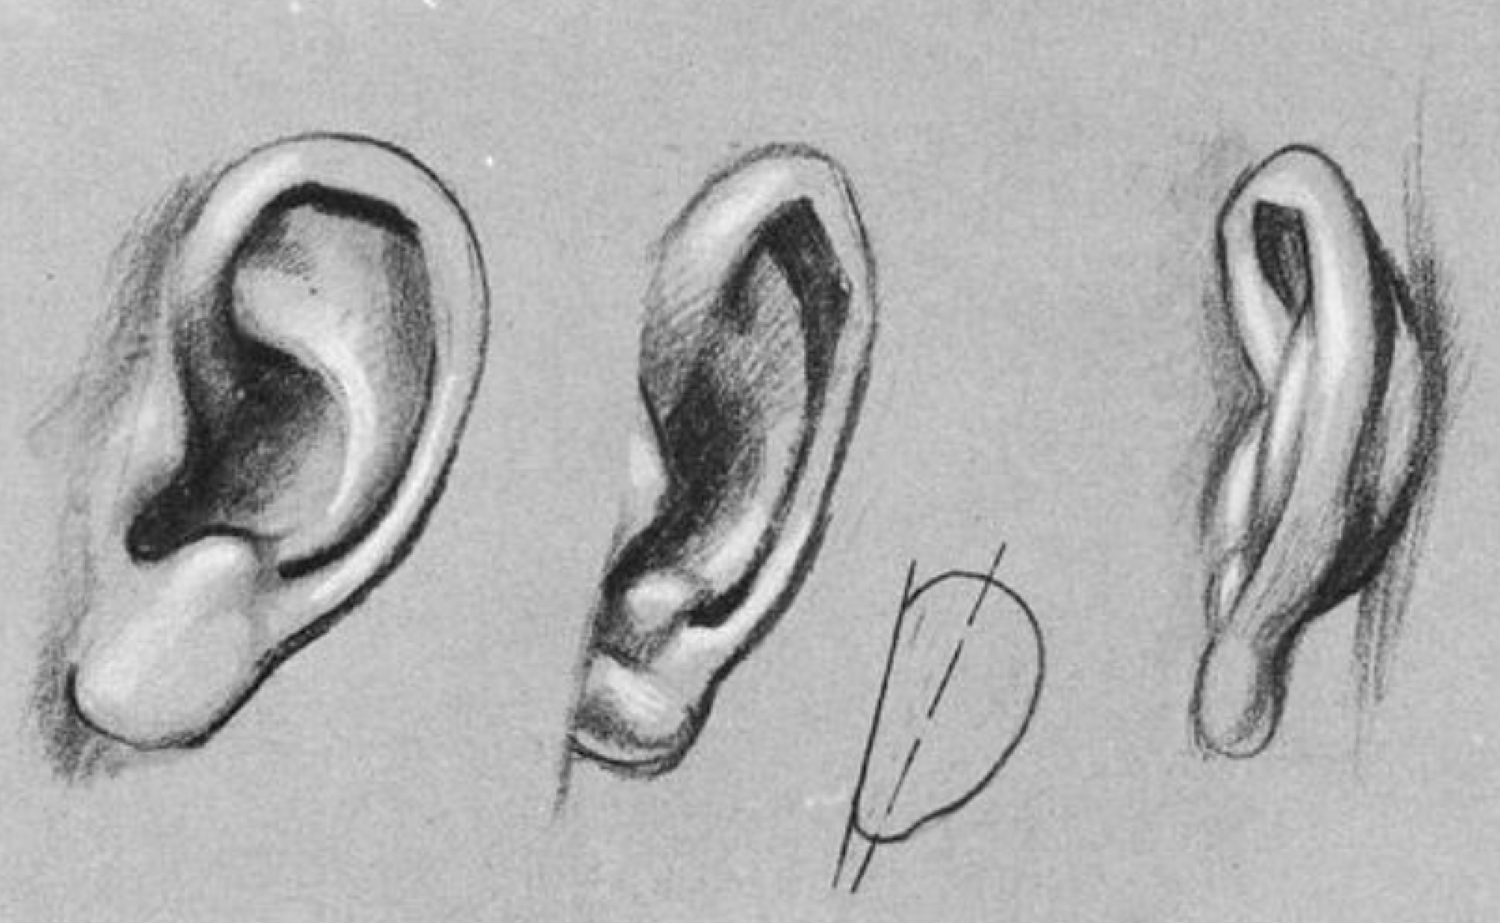
The ear is in two sections, the upper part being mainly a volute of cartilage, the lower (the lobe) mainly fatty tissues. Essentially it is a flat, oval plate, lying close to the side of the cheek. It appears to join on to and continue the line of the jaw bone and therefore it usually has a strongly diagonal axis (fig. 84). Its position in regard to the other features of the head is important. When the head is erect the ear, roughly speaking, is opposite the eyebrow (top) and nostril (bottom). The orifice in the ear is almost exactly opposite the pivotal point of the head, consequently when the head drops the ear will appear to be above the eyebrow, but when the head is raised the line from eyebrow to ear is downward. When drawing the head, the ear should not be neglected. It is as variable in character and position as any other feature and when badly drawn or placed can wreck an otherwise good drawing.
Hair
Hair also calls for thought and study. Most important is the general form which fits closely round the skull like a cap or wig. When this main form is understood the surface rhythms may be examined in terms of the flow of the more important locks of hair. Eventually these locks may be ‘stroked’ to suggest the finer hairs. Beginners often find the form of the hair difficult to express and either leave it untouched or apply a flurry of ‘hairy’ strokes with more hope than conviction-nor is it enough to rely wholly on the ‘shine’ to make it look convincing. In pure drawing the color and shine would be ignored and only the pure form expressed (this would also eliminate color such as the eyebrows, eyelashes, irises and lips). In fact, in portraiture color is often a very vital part of character and it is usual even in monochrome to indicate something of the tonality of all these features.
Spectacles are quite difficult to draw and care must be taken to ensure the correct perspective and also the correct angle for the axes of the lenses. When placed on the face they become very much a part of the person, and there can be no question of drawing the face first without the spectacles. Sometimes the glass lens distorts
the form behind it and this should be observed. The frame almost invariably casts its own shadow over the eye socket and the cheek. This is quite important as it may help to show where the frame touches the face and where it is more distant.
this was decidedly helpful