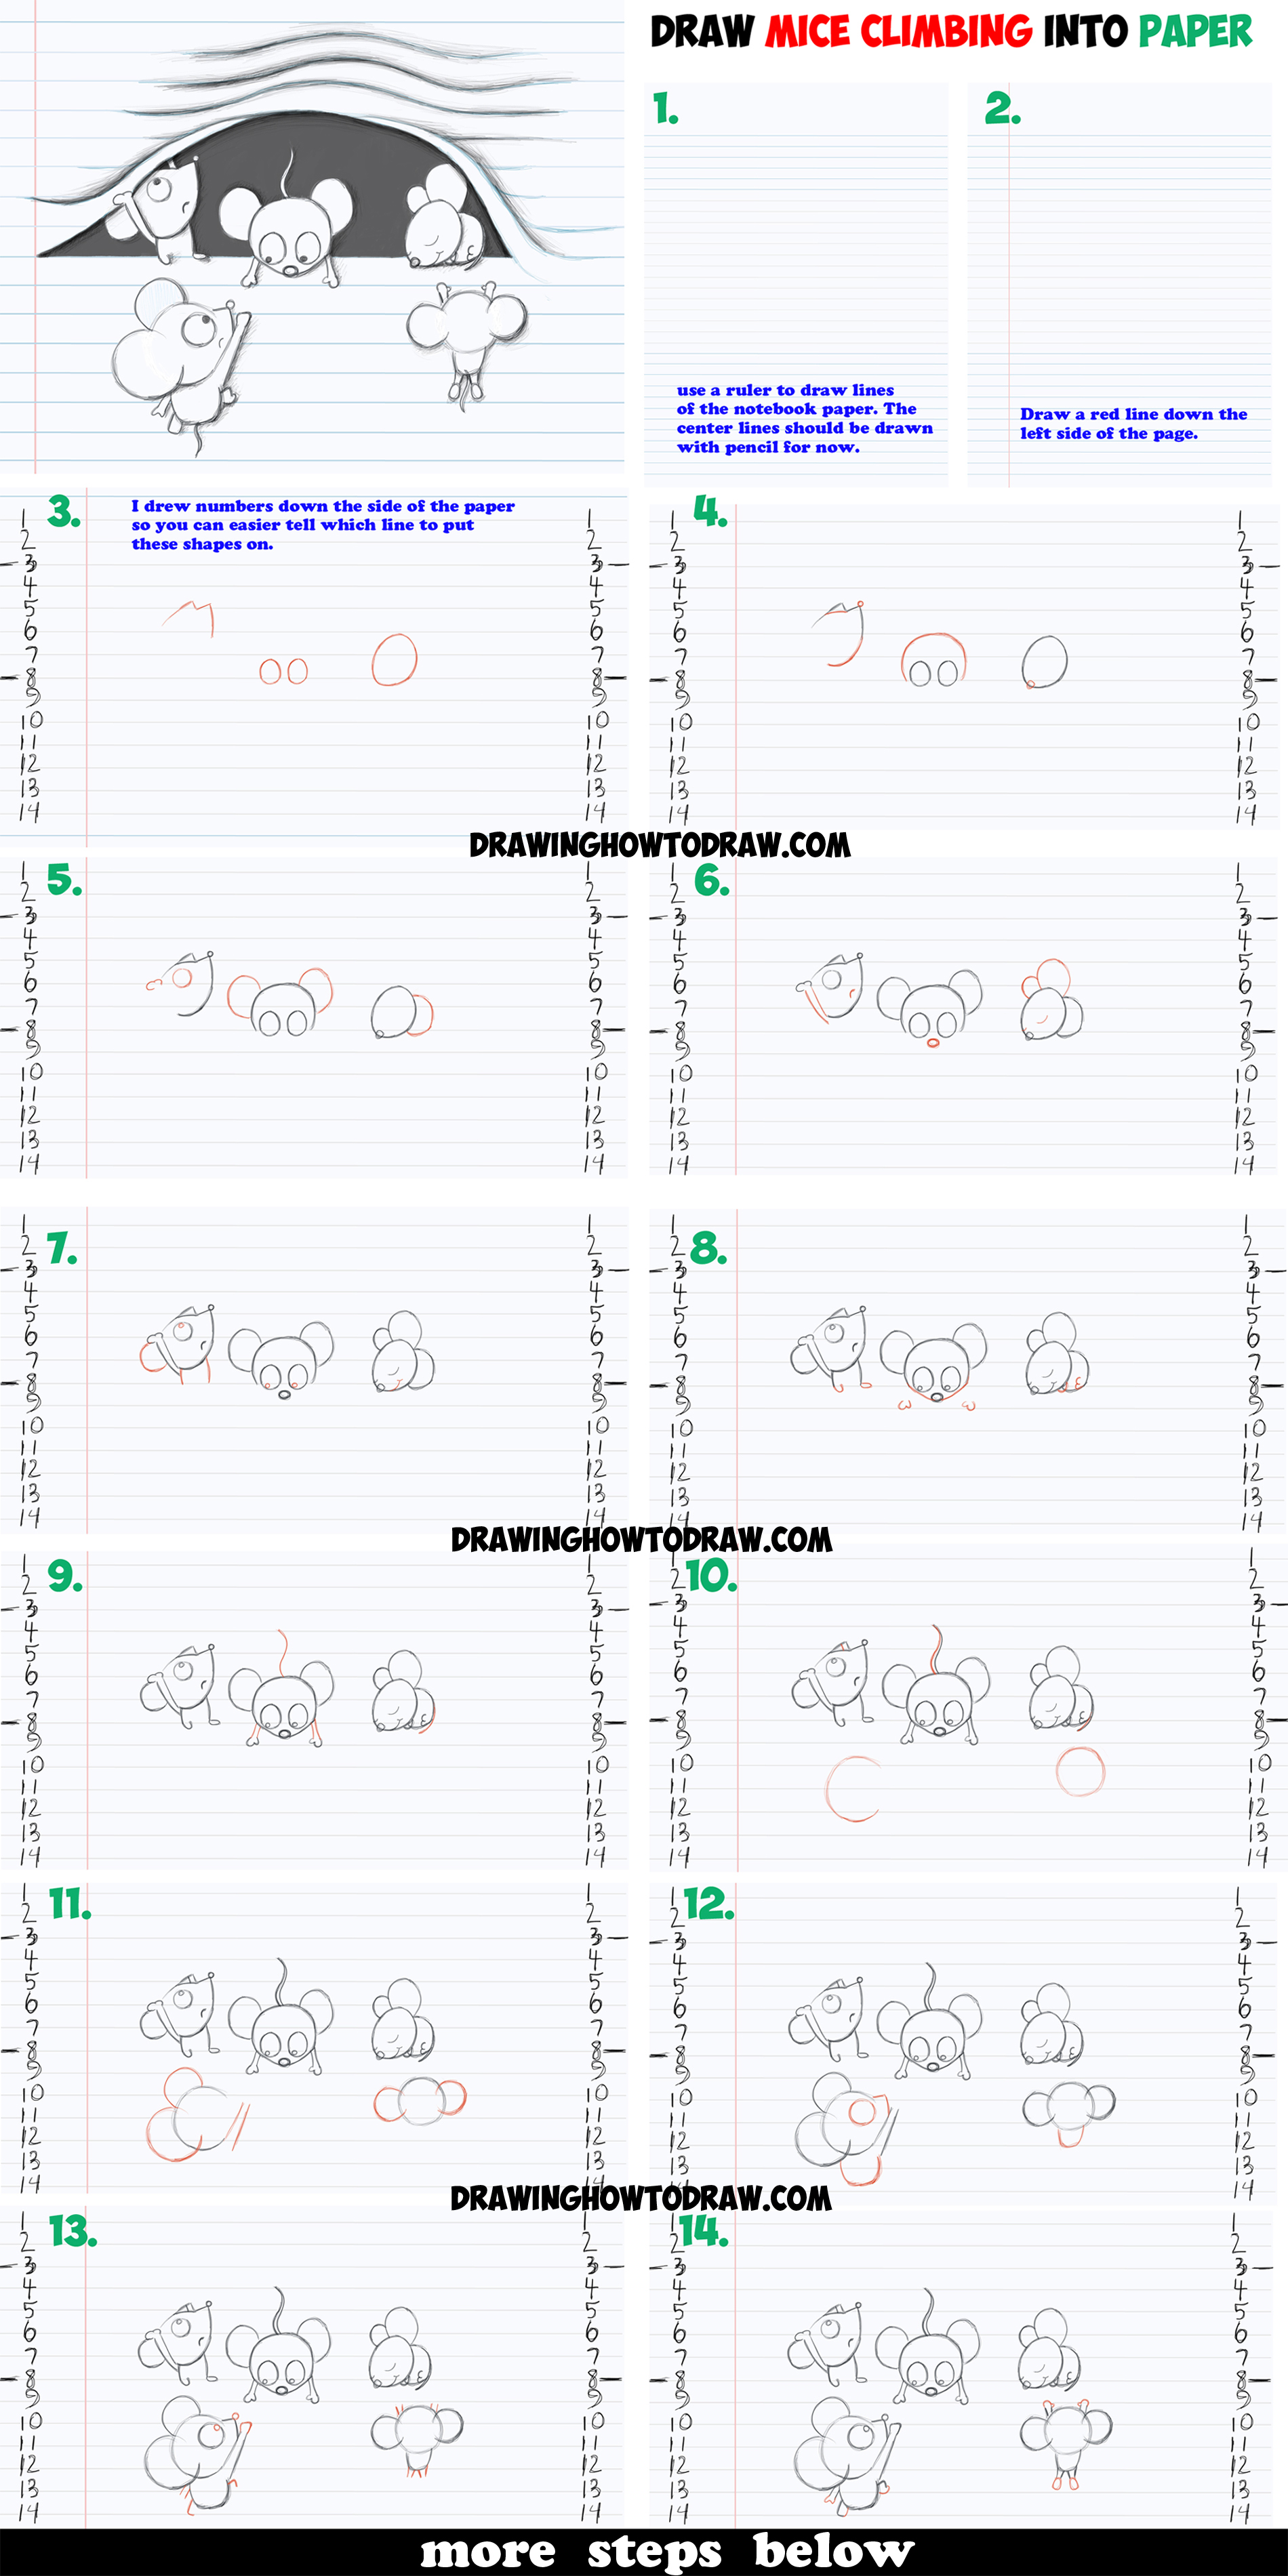
Today I’ll show you how to draw cartoon mice characters climbing under the paper’s lines that have been pushed up on notebook paper. This is a cute optical illusion drawing tutorial for kids to learn how to draw. Drawing the notebook paper is easy enough and then we teach you how to draw the cute cartoon characters. Then we show you how to draw the notebook paper’s lines so that a hole appears for the mice to crawl through. I hope you enjoy this tutorial. If you like to learn how to draw cool stuff, we have plenty more tutorial like this to check out! Happy Drawing!
You Might Also Like Our Other Cool Stuff Tutorials
Learn How to Draw Optical Illusion of Cartoon Mice Characters Climbing Inside of Lined Notebook Paper with Simple Steps Drawing Lesson for Children and Beginners
[ad#draw]
Written-Out Step by Step Drawing Instructions
(Step 1) Get a white piece of paper. Use a ruler to draw lines for notebook paper. You can put a real piece of notebook paper next to your white piece of paper so you can see how to space out the lines. You can draw blue lines for the notebook paper, but not in the center. We need a good 14 lines in the center to be drawn out in pencil. We will need to erase some parts of these lines…that is why they need to be drawn in pencil.
(Step 2) Use a ruler to draw a vertical red line on the left side of the paper.
(Step 3) I numbered the paper on both sides to make it easier for you to see where to draw the mice. These numbers are on the pencil lines in the center of the paper. Draw a letter ‘M’ and 3 ovals.
(Step 4) Draw 2 oval noses. A sideways letter ‘c’ for the center mouse’s face. Draw curved lines on the 1st mouse’s face.
(Step 5) Draw some letter ‘c’ shapes, an oval and a sideways #3 shape.
(Step 6) Draw 2 lines for arms on the 1st mouse. draw an oval for the nose on the 2nd mouse. Draw a sideways #3 shape and a curved line on the 3rd mouse.
(Step 7) Draw a letter ‘C’ shape, an oval and 2 lines on the 1st mouse. Draw 2 ovals in the 2nd mouse’s eyes. Draw a curved letter ‘T’ shape on the 3rd mouse for his mouth.
(Step 8) Draw a letter ‘U’ and an oval on the 1st mouse’s feet. Draw a letter ‘v’ at the bottom of the 1st mouse’s face and two #3 shaped hands as well. Draw a curved line and a backwards #3 on the 3rd mouse.
(Step 9) Draw a ‘?’ shape and 4 lines on the 2nd mouse. Draw a curved line on the 3rd mouse’s tail.
(Step 10) Draw a line on the 1st mouse, another ‘?’ shape for the 2nd mouse’s tail and another curved line on the 3rd mouse’s tail. Start the bottom mice…with a letter ‘C’ and circle.
(Step 11) Lets work on the bottom mice now. Draw a #3 shape for the 1st mouse’s ears and 2 lines for his arm. Draw two letter ‘c’ shapes for ears.
(Step 12) Draw a circle, a sideways letter ‘v’ and a letter ‘U’ on the 1st mouse. Draw a letter ‘U’ body on the 2nd mouse.
(Step 13) Draw some ovals, 2 lines and 2 letter ‘L’ shapes on the 1st mouse. Also draw a curved line for his right hand. Draw 2 lines for each arm and each leg on the 2nd mouse.
(Step 14) Draw a #3 shape for the 1st mouse’s left hand. Also finish up his legs. Draw sideways #3 shaped hands for the 2nd mouse. Draw oval feet on him.
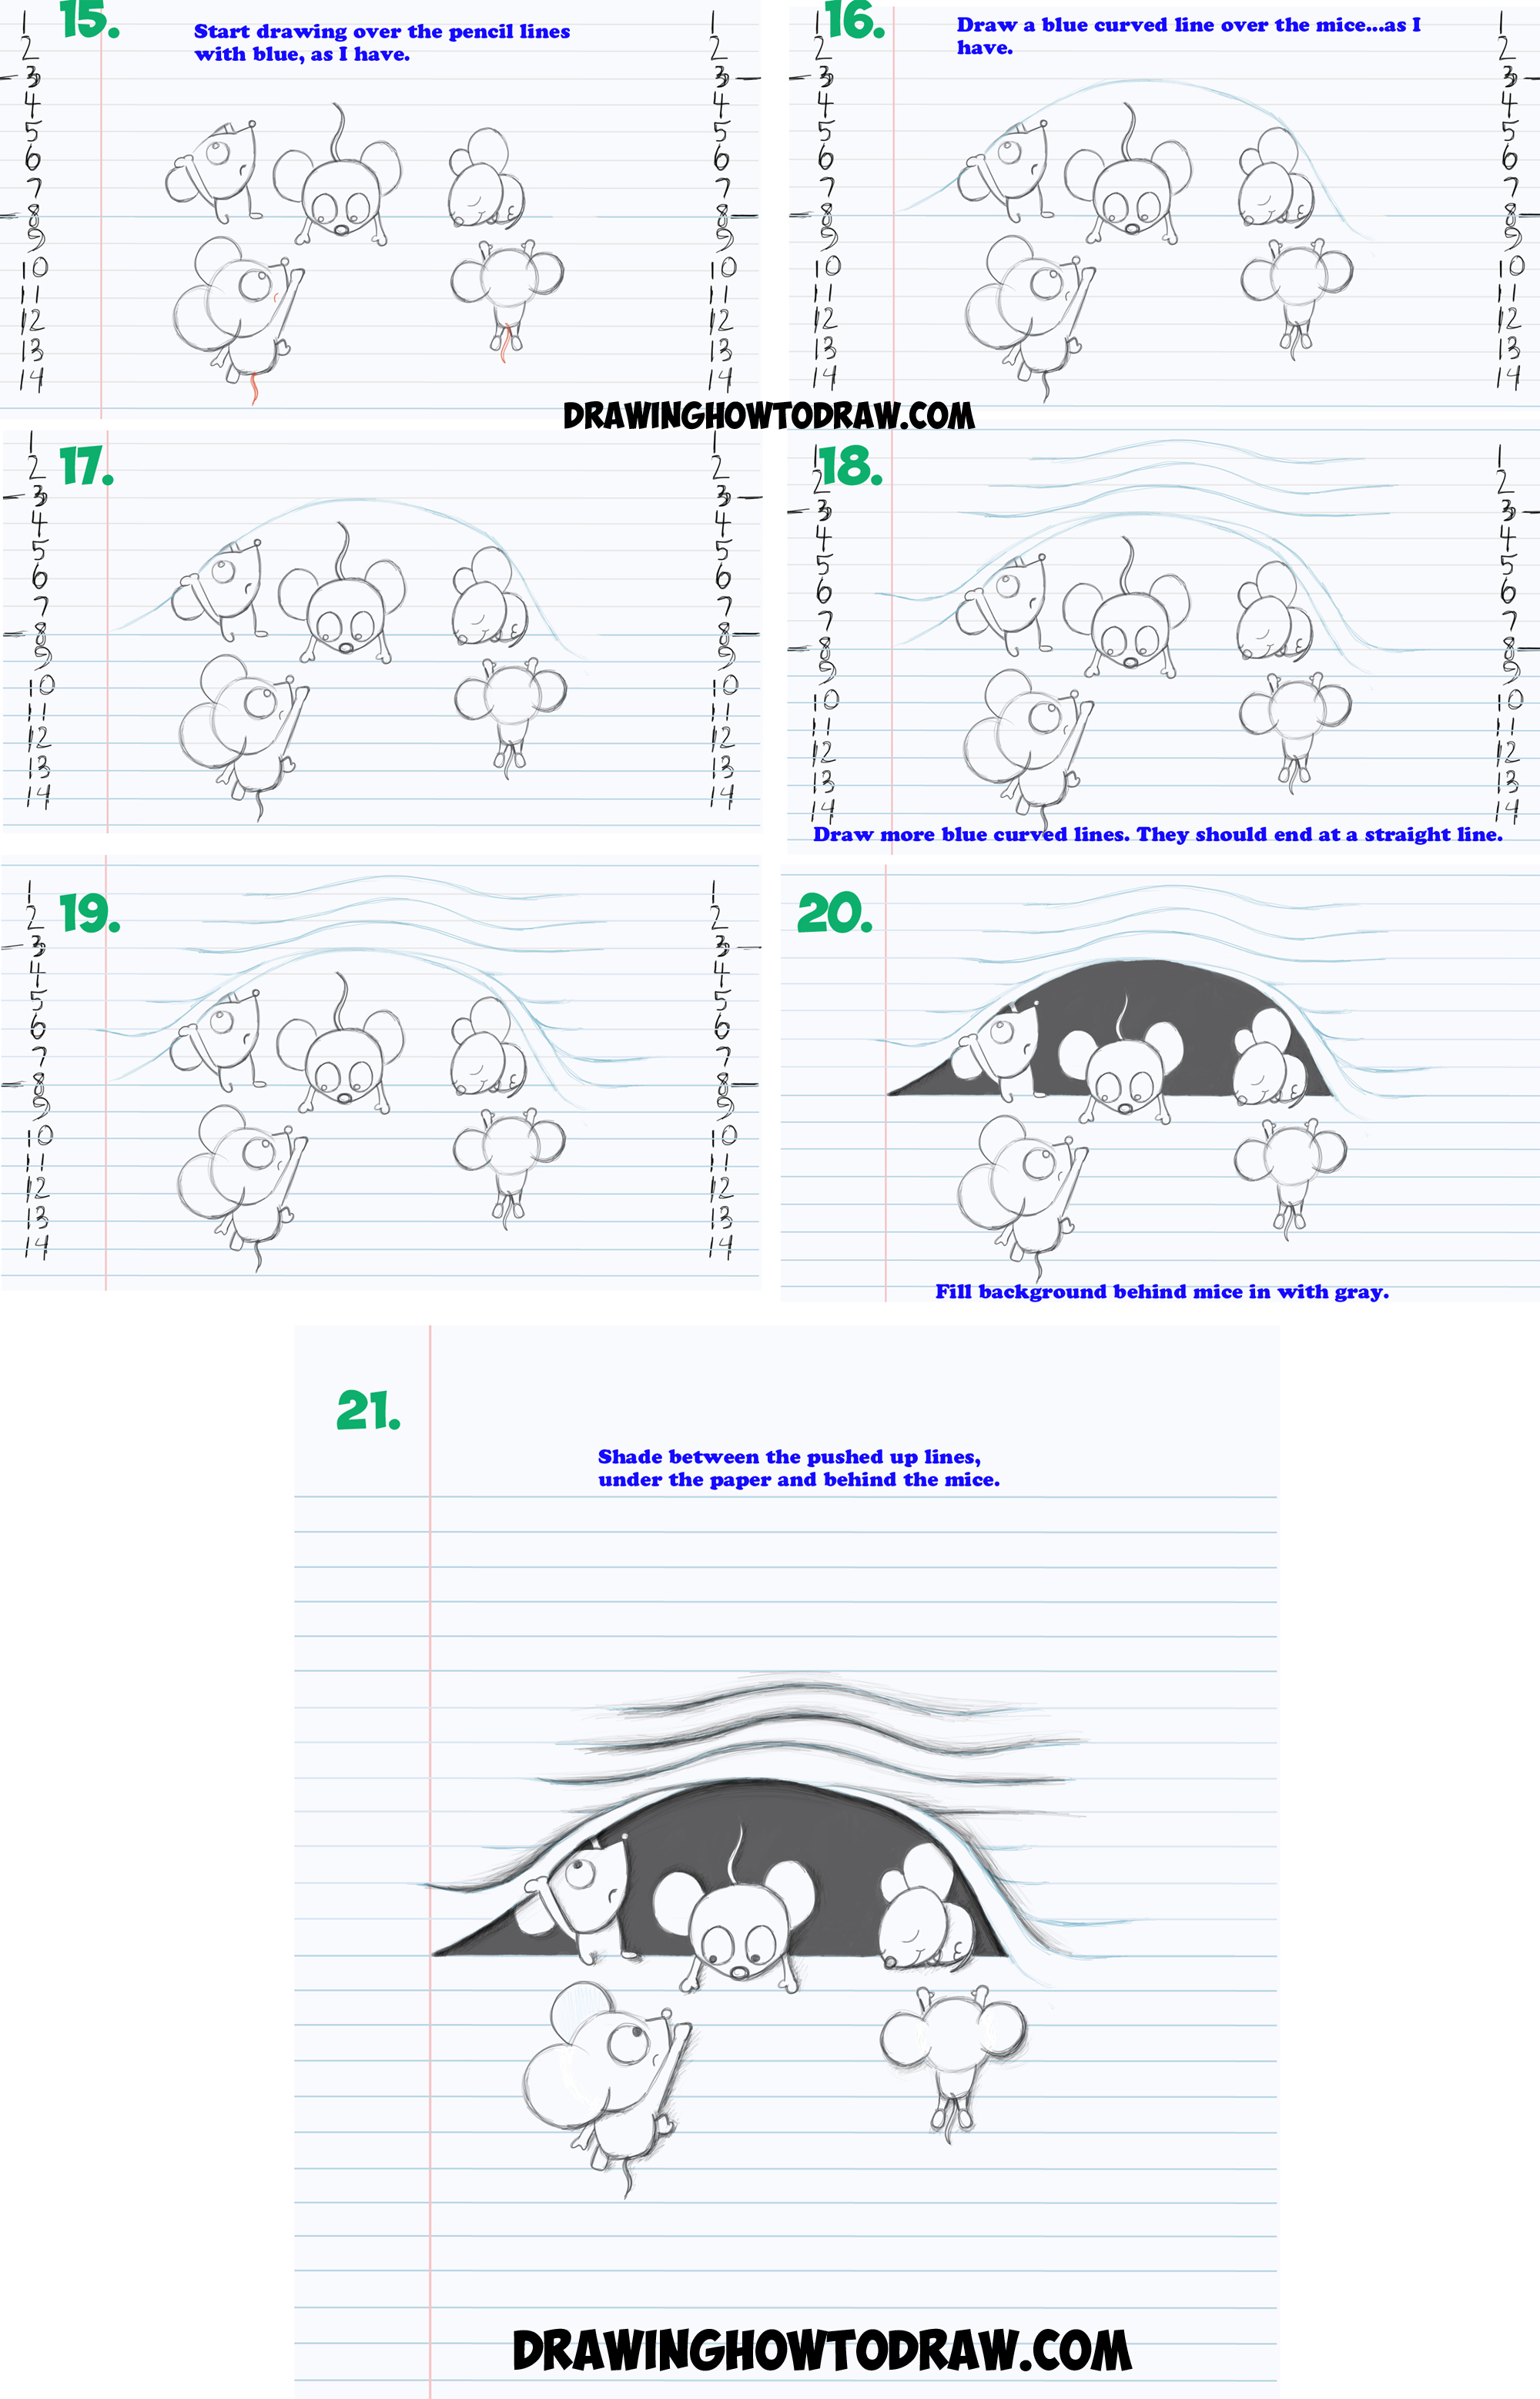
(Step 15) Draw a curved line for the 1st mouse’s frown, as well as a letter ‘s’ tail on both mice. Make the pencil line at the bottom of the top mice blue now.
(Step 16) Draw a curved line over the blue mice, as I have.
(Step 17) Now you can make some of the lines blue, as you see, we didn’t make the ones behind the top mice blue though.
(Step 18) Draw the pushed up curved lines above the original curved line.
(Step 19) Now draw some curved lines to the sides of the original curved line.
(Step 20) Add a gray behind the top mice.
(Step 21) Add shading.
You Might Also Like Our Other Cool Stuff Tutorials
Technorati Tags: optical illusion, optical illusions, cartoon characters, lined paper, notebook paper, paper opening up, paper pushing up, pushed up lines, mice, mouse, cartoon mice, cartoon mouse


