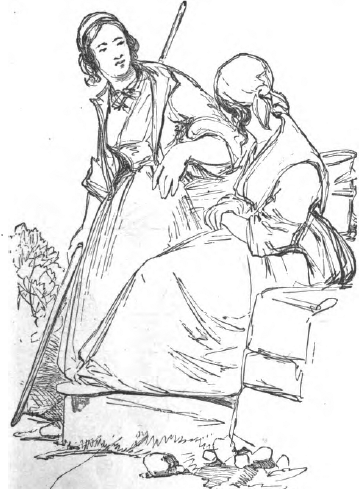
The usual pose of the life class model is a standing one in an easy attitude, the arms hanging by the sides or maybe one bent with the hand resting on the hip. Well and good; for the principles of drawing can best be imparted and grasped by the study of these simple standing poses. Many students are impatient and ill-content with such poses, and are constantly agitating to have the model placed in some “fancy” pose or one that can be utilized in a composition or some work that they have in mind. But one can never get enough of studying the simple standing poses to emphasize the importance of two things in drawing—first, movement, and second, getting the figure standing with the feet well placed on the floor.
Before starting a sketch from life, mark a line at the top and one at the bottom of the paper to show the limits within which you intend to keep the figure. Always do this. A trifling matter, it may seem, but it is best to train yourself to keep the size of the figure as you have determined on at the start. Then, when in pictorial compositions the demands of perspective require that a figure be of a certain size, the doing of it will be much easier. If between the marks limiting the size of the figure any correction is needed, make it within the space marked. For instance, if you find that the legs are too short, do not lengthen your drawing, but make the body shorter.
Getting the proportions and making measurements are perplexing matters. Some advocate first marking off the classical or ideal height and constructing a figure to fit that. This may do when drawing a figure for some practical work. Others begin by first finding out the number of heads (7 or 71/2, as the case may be) that the model before them exhibits. They do this by arm-length measuring. It is done somewhat after this fashion: A pencil is held in the hand so that the thumb is free to move along its edge, the arm extended and the pencil held between the eye and the model. Now the two visual rays from the extremities of a length in question are measured on the pencil by seeing where they cut points on it—one point at the end of the pencil and the other along its edge which is fixed by placing the thumb there. This length is compared to some other similarly ascertained length. So that this way of going about it is in taking the size of the head, relatively, on the pencil and finding out how many times, arithmetically, it goes into the whole height of the figure.
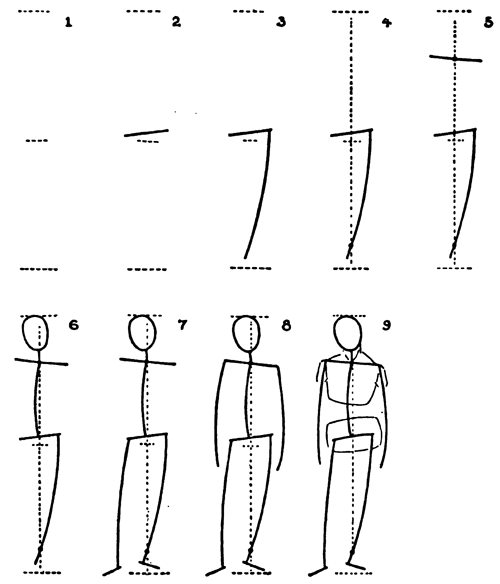
STARTING A LIFE CLASS DRAWING
1. Mark top and bottom of figure and a line half-way between.
2. See where the widest part of the hips comes and indicate its slope.
3. Draw line of action of the supporting leg.
4. Draw a perpendicular line cutting through where the ankle will come.’
5. Mark the position and slope of the shoulders. The center of this line (head of sternum) will cut the perpendicular line.
6. Sketch the head, note especially its poise and that the line for the neck continues into the line for the movement or action of the body.
7. Indicate the action of the other leg. The sketch so far ought to give a suggestion of the general movement of the pose.
8. Draw the lines for the arms.
9. In beginning to outline the body note that the chest is a sort of bony box, and the region of the hips also a sort of box. The movement of the figure has a significant effect on the flexible part of the torso between the more or less fixed forms of chest and hips.
10. As you continue, keep in mind proportions and movement, and see that the figure stands with the feet well placed on the floor.
In working this way, remember that it is absolutely necessary that the arm be extended the same length every time, and the pencil held exactly vertical. Again you must not move but hold yourself in the same position so that the eye is each time at the same level and at the same distance from the model. If it were possible to keep the head fixed like an automaton, the arms moving mechanically and the pencil in the same picture plane, or no change in its distance from the eye, this would be an excellent way of working.
But isn’t it rather mechanical ?
If the student wishes, he may try this pencil measuring. He will discover very soon, however, that after all the eye will be the best judge. How often will he find after a lot of careful “surveying” that his drawing doesn’t look right anyway!
Learn to depend on your own eyes.
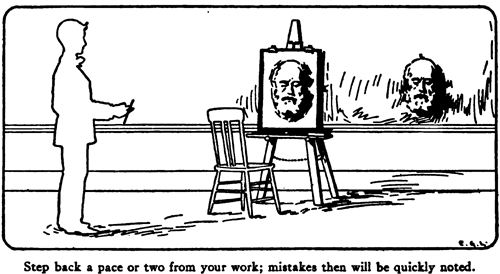
The best way of seeing what is wrong with your drawing is to step back from it a pace or two from time to time, letting critical glances go from the subject to the drawing and from the drawing to the subject. You will then see enough faults—so many, probably, that you will not know where to begin making the corrections.
Another good way , if it can be arranged, is to place the drawing alongside of the subject and view the two from a distance or from the place where you are working.
To continue with the suggestions for drawing from life: After marking lines at the top and bottom for the height of the figure, make another line exactly in the middle of this space. Then on the model see where the half-way point comes. This is often at the widest part of the hips. Indicate here with a line the axis of this widest part. Slant it the way you think it goes.
Before going on with the next stage of the drawing (i. e., indicating the direction of the limbs and the movement in general of the whole figure) it would be well to give a few minutes’ attention to the question of equilibrium.
The center of equilibrium of a figure at rest, without leaning against or holding on to anything, is a perpendicular line cutting through the middle of the neck, and below near the floor, through the ankle of the supporting leg. At the neck, viewed from the front, this line begins at the top of the sternum or breast-bone, and at the ankle—of the supporting leg—cuts through the mass of the ankle bones.
When the figure leans against anything, is in action, or is falling, the line from the head of the sternum to the ankle is not perpendicular. A little experimenting in drawing a few single-line action figures will make this clear.
Since you now understand that a figure in an ordinary standing pose with the weight on one leg has these two points—in the neck and ankle—exactly at the ends of a vertical line, you should begin to observe that the swing, movement, or action (three terms used rather indiscriminately by artists) takes place between the two points. The poise of the head, to be sure, has an important share in this movement. The way it is held must be noted and drawn as part of the action.
You go on with the drawing, now, by sketching in the line of action of the supporting leg. It is not to be drawn as if following precisely the direction of the bones, nor will marking it as going through the exact center of the fleshy mass always indicate it.
No, you must draw it as you feel it to be. And this knowledge will only be grasped and felt by thinking of the line as part of the movement of the whole figure.
Remember this when drawing the figure: The chest and pelvic regions are two box-like forms; nearly fixed and unchanging on account of their bony structures. All movement that takes place in the torso is due to the flexible mass that connects them. When an arm moves, of course the muscles of the shoulder alter or modify somewhat this box outline. And the folds of muscles of the thigh and those running to it vary the outline there a little in certain movements.
But remember these box-like forms.
When drawing from life it is a good plan to put yourself in the same pose as the model; that is to say, imitate, as well as you can, the action, the disposition of the limbs and the poise of the head. This mimicry—it will only be that sometimes, as you will find that different persons have different ways of carrying themselves, and you can perhaps only approximate the pose of the model—will give you a better understanding of the pose and impress itself on you mentally and further the work of picturing it.
Note how, when the hips slant one way, the shoulders, to counterbalance it, incline the other way; and the head,-again to preserve the balance, tilts away from the falling shoulder. This applies to the greater part of poses. Sometimes, though, models deviate from the general.
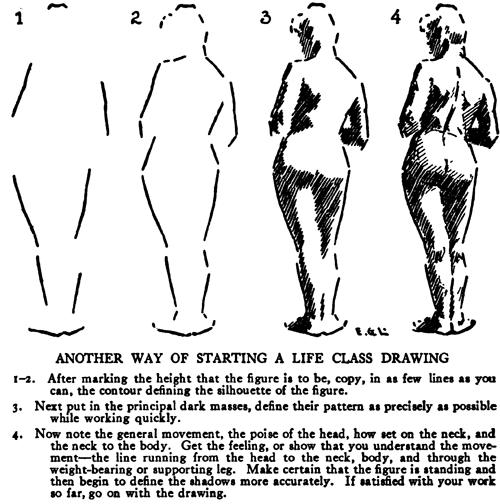
Another Way Of Starting A Life Class Drawing
Mark, as before, top and bottom lines to show intended size of the drawing. Encompass with your eye the whole figure at once. Look on it, mentally, as an area with nothing more than a geometric outline. Try to copy this as you would a simple plane form, employing only direct straight lines. Do not regard the small curves of the form now. Then without delay, and as rapidly as you can, put in the mass of shadow. Follow the pattern of the shadow areas as exactly as possible. Work quickly, because there are more important matters than exact shapes of shadow masses to be looked to first; namely, the pose, action of the figure, and the direction of the limbs, especially that of the supporting leg. After this has been attended to, more attention can be given to the patterns of the shadow masses.
This way of drawing, in merely imitating the differently sized and shaped areas of dark shades, middle tints, and high lights, if carried too far, is somewhat like copying the pattern of a rug. It is, nevertheless, an excellent way of working if you can keep in mind that it is “life” that you are drawing. In going about drawing in this way, and carrying it to extremes, there is a likelihood of the artist becoming nothing but a copyist and looking on the subject as merely a collection of variously formed and tinted patterns, and forgetting the signification of movement, proportions, and character. However, in some unusual poses of the model, this way is useful if combined with the first method advised, in which the figure is built on a simple framework expressive of action, movement, and general proportions.
Technorati Tags: drawing models, drawing live models, drawing people, drawing live people, how to draw models, how to draw people
Today I'll show you how to draw Rick from the Rick and Morty cartoon tv…
Today I'll show you how to draw Morty from the Rick and Morty cartoon tv…
Today I'll show you how to draw the spunky little rabbit, Kuromi, from My Melody…
Today I'll show you how to draw this cute "bean duck" that I found on…
Today I'll show you how to draw Sosuke and Ponyo in a bubble (chibi /kawaii…
Today I'll show you how to draw a Boo from Super Mario Bros in Kawaii…
View Comments
I love it this site has beautiful draws but it don't have winx club drawing so please draw winx club characters
very helpful tutorials
thank you
Hubert
Very good thank you.
good tutorial from wich book are taken the figure? thanks