Page : 1 2
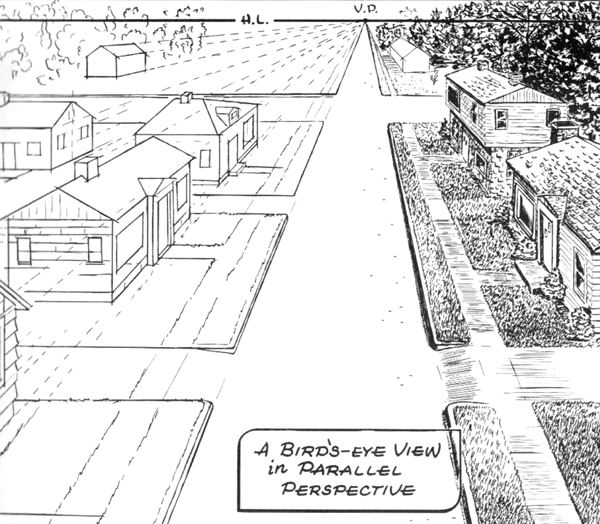
This above picture may seem difficult to you, but don’t let it “scare” you. Never be afraid of drawing! As has been said, it is not my purpose in this to develop master artists, but to show you the way to fun self-creation in art. Therefore, in our lesson we shall take it easy—doing the best we are able to, and not worrying too much about the results.
Study the above illustration, and you will note that the houses are really basically boxes in form—drawn to a single vanishing point. To the left of the picture, you will see the method of constructing the houses, while to the right of the picture are shown suggestions of simple renderings.
In starting to draw this picture first establish your horizon line quite high on your paper, allowing sufficient room for your houses which are shown below eye level. On this horizon line place your vanishing point and proceed to first draw in the street, converging to the vanishing point. Now establish the frames of the houses, first drawing their basic forms in the shapes of boxes; then proceed to add the roofs, and finally the architectural detail.
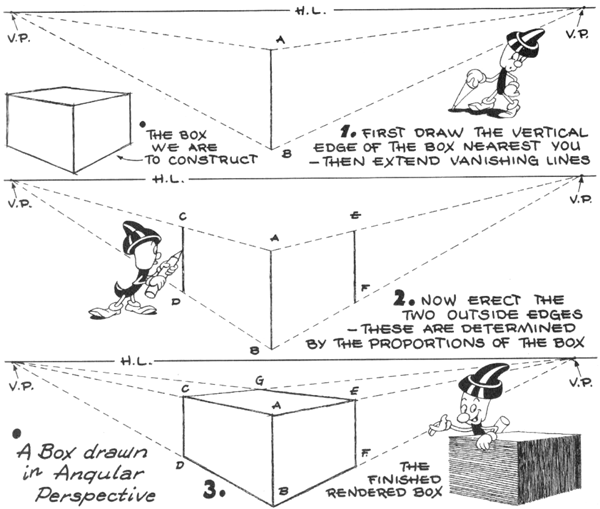
Up to this point we have been concerned only with objects which have been parallel to our line of sight, or what we know as parallel or one-point perspective. Instead of seeing one face of the object parallel to our line of vision (as in true parallel perspective), we shall now learn how to draw objects which are viewed at an angle. Whether the top or bottom of the object may be seen is determined by its relationship to the horizon line. Thus when objects are viewed at an angle we term this angular perspective. In as much as we are now concerned with two sides – an individual vanishing point is needed on the horizon line for the perspective construction of each side. Therefore, to repeat, in angular perspective we use two vanishing points to draw our sides.
In the above diagram the horizon line is drawn first. The two vanishing points are then established in any relationship on this line—preferably at a reasonable distance from each other. If the two vanishing points are too close together the object, while basically correct, appears distorted. Now proceed to construct the box as demonstrated.
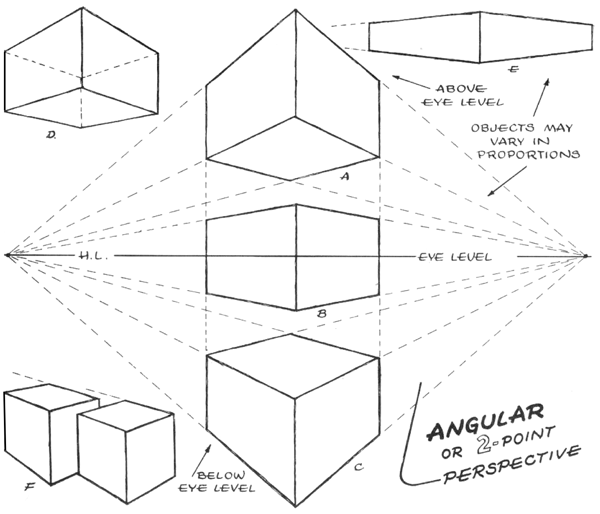
In the further study of drawing objects at an angular view, we shall learn how a box is observed in relationship to its horizon line. In Fig. A, the box is shown above the eye level, in Fig. B, it is on a plane with our eye level, and in Fig. C, it is viewed from an angle below eye level. Particularly notice in diagram C that each side recedes as it is seen in the distance. If these sides were to be extended each would eventually meet at its imaginary vanishing point. This premise would hold true also in the other drawings of the box. To emphasize, we of course know that in actuality the edges of each box are parallel to each other, but in a perspective drawing. they are shown as converging or becoming narrower in height as they recede. In order to create greater interest in compositions, most objects are drawn in angular perspective in pictures, and it is important to remember the above facts. You have been instructed to first establish the edge of the box nearest you—the other edges are determined by the proportions of the object. The top or bottom of the box should be drawn last.
[ad#draw]
The drawing of the building may appear complicated, but it is really not difficult to execute. At the top of the diagram is shown three successive steps in its construction: First, draw a box so constructed that its horizon line is slightly above center; second, add a second box on top of the first—thus forming another tier to the building; third, next to the latter, a third box is added, somewhat larger, which will add height to the building. Make certain that all edges of the boxes vanish to the left and right to their respective vanishing points. Remember that the two vanishing points are both on a single horizon line.
Now that the basic skeleton of our building is constructed, proceed to draw in the windows, doors, etc. Note that as the windows recede into the distance, they appear to be smaller and closer together. Observe this optical illusion through studying an actual building. Windows, etc., on the left side of the building will vanish to the left vanishing point, while those to the right will vanish to the right vanishing point. Note particularly the manner in which the marquis vanishes. Your building may be made more convincing by adding cornices, suggesting texture, etc.
It will be my purpose to make each of these lessons exciting and challenging. More important. is that following this simplified instruction, you can execute these problems with relative ease. Remember, you don’t have to have talent to draw!
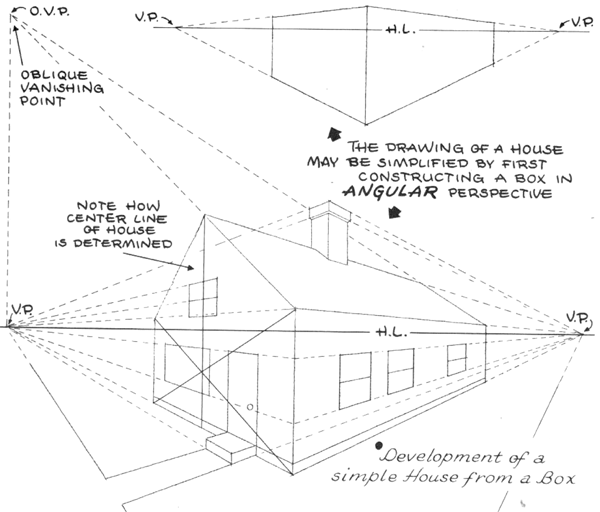
We are continuing to deal with angular perspective. In our top view is shown the basic box construction of the house. Observe that it is drawn both above and below the horizon line.
To start the house, the eye level is first drawn, with the two vanishing points established on it. Keep these two vanishing points as far apart as the width of your paper will allow, thus giving your house convincing proportions. Proceed now to construct your basic box—vanishing each side respectively to its own vanishing point. Now establish the pitch of the roof by drawing diagonals through the front of the house. Any point on the perpendicular through the intersection of the diagonals may be used as a basis for the start of your roof. From this point, vanish the roof to the right vanishing point. Notice particularly that the top edge of the roof is found through a third vanishing point known as the oblique vanishing point (O.V.P.).
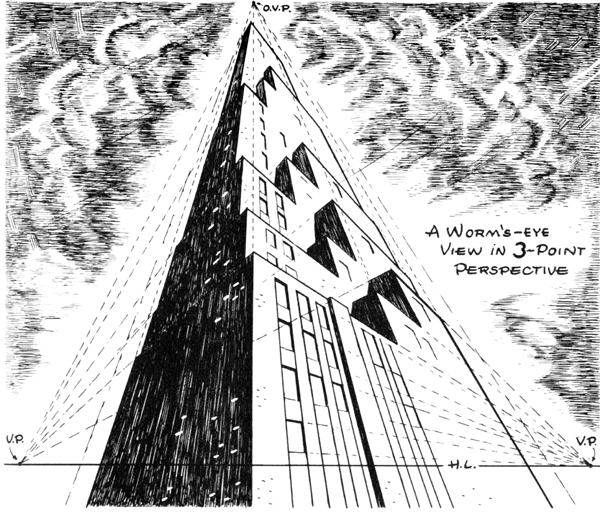
Now we shall make a drawing of a skyscraper looking up at it. This representation in perspective is referred to as a worm’s eye view. We proceed to construct this quite similarly to that of the previous building.
However, in the drawing of the skyscraper, we add a third vanishing point, the oblique vanishing point (O.V.P.). All of the vertical lines will vanish to this point. The horizontal lines will vanish respectively, on each side, to the left and right vanishing points.
In order to accentuate the height of the skyscraper use a low horizon line—keeping your two vanishing points widely separated. If you wish to draw a skyscraper “looking down” on it from above, this may he accomplished by placing your oblique vanishing point considerably beneath the horizon line. Proceed then to construct the building similarly to that of above. Drawing an object from a skyward position is termed a bird’s-eye view.You will find me often repeating myself in these lessons. Please bear with me, as I believe in using repetition as the best type of instruction.
Technorati Tags: perspective drawing, how to draw in perspective, 1 point perspective, 2 point perspective, 3 point perspective, one point perspective, two point perspective, angular perspective, parallel perspective
Page : 1 2
Page: 1 2
Today I'll show you how to draw a super cute Vault Boy from Fallout. Vault…
Today I'll show you how to draw a cute chibi / kawaii bunny rabbit named…
Today I will show you how to draw a Banana Duck from the plush Peach…
Today I'll show you how to draw a cute cartoon monster that is super easy…
Today I'll show you how to draw an adorable kawaii-style dumpster fire with the following…
Today I'll show you how to draw a cute cartoon alien in his UFO. This…
View Comments
turely speaking very very nice.
very nice. very very good
thanks ! good tutorial
I am taking a beginning art class at UH Maui College and would like to be able to print this tutorial out so I can wok on my home work. Is there any way to do that? or save it as a pdf file? I find myself getting confused as I complete my assignment and having this document in front of me would truly help me.
Thank you for your response.
Denni Grace.
Hi Denni. Yes there is a way. On each article there are a bunch of tiny icons under the Title. There is a Plus icon with the word 'more' next to it. When you click on 'more', then scroll to 'print' or 'print friendly'. I hope this helps.
Hi ...on your sample of drawing a table how does one get from stage l to stage 2. I find it confusing with the dotted lines . Can you not give a step by step guide to what you draw after STage 1 (i.e. the original box going to the vanishing points.
Sorry that the dotted lines are confusing to you. I think that if you take a look at this tutorial I did, it will make sooo much more sense. Basically, the dotted lines are showing you that the line is going towards the vanishing point. All the lines are going towards the vanishing point in 1-pt perspective, except for the vertical lines (up and down). But the link above will totally clear that up for you. Please go check it out and let me know if it helps you. Good luck.