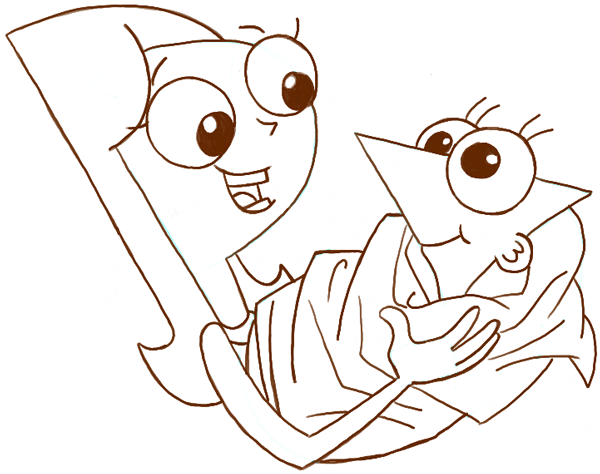
There was at least one episode of Phineas and Ferb where they flashback to a baby Phineas and Ferb. This is a great tutorial that will show you how to draw a younger Candace holding a new baby Phineas in her arms. She is very happy to see her new baby brother, and she doesn’t yet have an urge to get him in trouble. Find out how to draw baby Phineas and young Candace in the following step by step drawing tutorial.
You Might Also Be Interested in Our Other Phineas and Ferb Drawing Tutorials
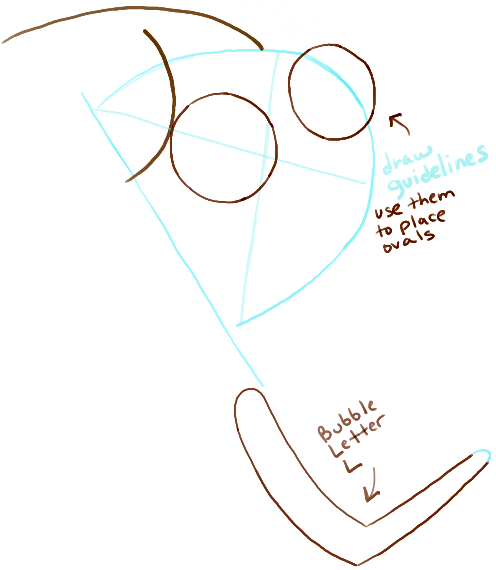
– Lightly draw a letter ‘P’ shape on a slight angle.
– Then draw a capital letter ‘J’ shape on the top of the letter ‘P’.
– Lightly draw an ‘x’ shape inside the face to use as guidelines to help you place facial features in the right places.
– Draw 2 ovals for eyes.
– Draw a bubble letter ‘L’ shape for the arm.
– Draw 2 ovals inside each eye.
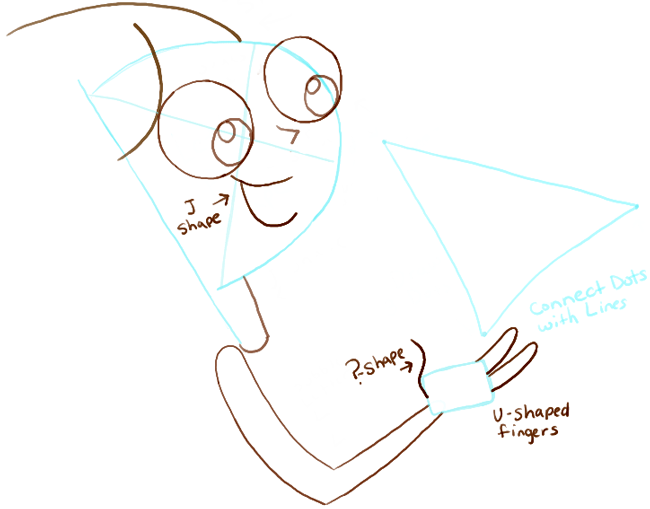
– Draw an ‘L’ shape for the nose.
– Draw a letter ‘J’ shape under the face.
– Lightly draw a rectangle for the hand…also draw 3 dots, as seen in the picture.
– Draw a backwards letter ‘J’ shape for the mouth.
– Draw a question mark shape for the thumb.
– Draw 2 letter ‘U’ shapes for fingers.
– Connect the dots with 2 inwards curved lines and a straight line at the top.
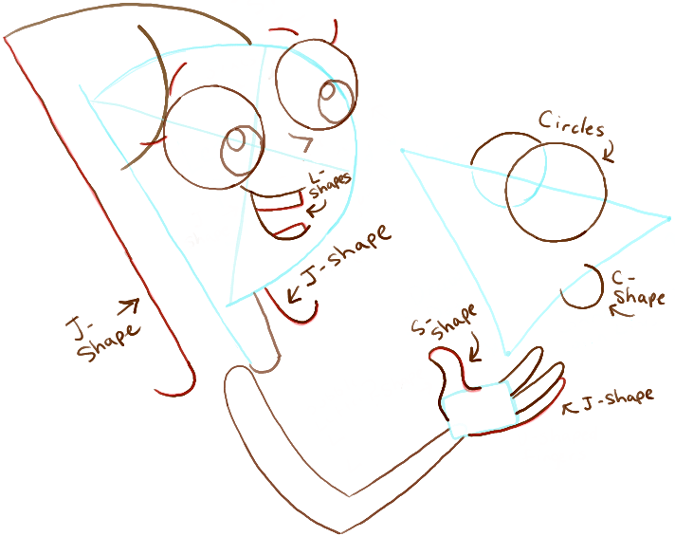
– Draw a second letter ‘S’ shape for the right side of the thumb.
– Draw a letter ‘J’ shape for the last finger.
– Draw a letter ‘C’ shape for Phineas’ ear.
– Draw 2 circles for Phineas’ eyes.
– Draw a tall letter ‘J’ shape for the left side of Candace’s hair….also draw one under her chin.
– Draw 2 letter ‘L’ shapes for Candace’s teeth.
– Draw a few lines over Candace’s eyes.
– Draw a curved line connecting Candace’s hair to her arm.
– Draw a letter ‘C’ shape on the upper right side of her arm.
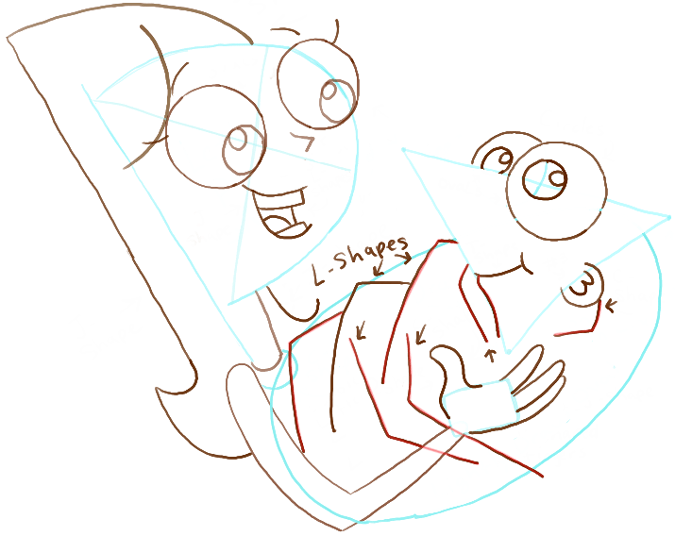
– Draw 2 ovals inside each of Phineas’ eyes.
– Draw a ‘T’ shape for Phineas’ mouth and a #3 shape inside Phineas’ ear.
– Lightly draw a large oval…this will be the area of Phineas’ baby blanket.
– Draw L-shaped wrinkles inside the oval … these will be the wrinkles of the blanket.
– Change the shape of Phineas’ chin – it looks a bit like a question mark shape now.
– Add more wrinkles to his blanket…such as a letter ‘J’ shape, a letter ‘T’ shape and a letter ‘V’ shape…but you can also add random curved lines. Wrinkles don’t need to be exactly the same as the picture you see above.
Now erase guidelines (they were blue in our picture) and darken lines that we kept. You will have a great picture of a young Candace holding baby Phineas. I hope you enjoyed the tutorial.
Technorati Tags: baby phineas, baby phineas and ferb, phineas and ferb, candace, young candace, candace and phineas, how to draw phineas, how to draw baby phineas
Today I'll show you how to draw Rick from the Rick and Morty cartoon tv…
Today I'll show you how to draw Morty from the Rick and Morty cartoon tv…
Today I'll show you how to draw the spunky little rabbit, Kuromi, from My Melody…
Today I'll show you how to draw this cute "bean duck" that I found on…
Today I'll show you how to draw Sosuke and Ponyo in a bubble (chibi /kawaii…
Today I'll show you how to draw a Boo from Super Mario Bros in Kawaii…
View Comments
Too much good thanks for ur help I credit u for ur thinking..
Too much good hats off please bring more u r an artist
Very easy to draw. Thanks for these post. Very helpful with rookies like me.