Most of the drawing Bristols are sold in sheets 22″ x 30″ or 22″ x 28′ or 23′ x 29″, so each sheet, cut in quarters, gives four sheets about 11″ x 14″ or 15″, a good size and proportion for most work of a preliminary character. We advise, too, that all paper used be cut to a uniform size, so far as possible, so the student will gradually form a collection of drawings which will fit well together either in exhibition or in a folio used for their protection. Above all, one should not try to economize by using too cheap a paper.
Thumbtack a sheet of your paper to a drawing board or, as a substitute, lay it on a stiff, firm book or similar support; the hoard is much the better of the two. Sometimes the paper. especially if it is a stiff Bristol, is laid on a smooth table top with nothing else under it. When a drawing board is employed its size is optional, though it is recommended that one not smaller than 16″ x 23″ be used; this is not only large enough for a half sheet of Bristol (about 15″ x 22″) but permits one to work on the quarter sheet without cramping.
When ready to draw, sit in a natural position. It is usually best to sit facing a table with the drawing board on top of it or resting against the edge, and so tipped as to permit the eye to view the entire paper easily. Be sure the sheet is well lighted, with the light falling from the left if possible. If the paper surface is shiny care should be taken that no harmful and disturbing reflection of light is thrown back into the eyes. Place the ink bottle in a convenient position, usually to the right so as to have it within easy reach, but not too near the edge of the table where it might be pushed off onto the floor. Next place a pencil or two and the pens and erasers nearby (and a blotter or rag handy for emergency) and you are ready to begin.
Try to hold the pen naturally, much the same as for writing (though, as we have already said, it will be necessary to vary its position to some extent for different types and directions of line, having it sometimes twisted or turned, sometimes almost vertical, and again more nearly horizontal). Keep the fingers far enough back from the point to prevent them from becoming daubed with ink. Above all do not cramp the lingers tightly onto the penholder.
Before starting the first lines place an extra paper (any clean sheet will do) under the hand to protect the surface of the drawing paper from dirt and moisture. Get the habit of working in this way from the start, seldom allowing the hand to touch the surface of the drawing.
Now dip your pen and confidently begin practicing the simplest types of lines. This does not mean to work hastily or carelessly; on the other hand an attempt should be made to have each line a thing of real feeling and beauty. Too often the beginner is misled by what seem to be carelessly drawn lines made by well-known artists. Lines of this sort are often the result of years of practice and usually very hard to imitate successfully. And remember that some well-known artists are famous in spite of their technique rather than because of it.
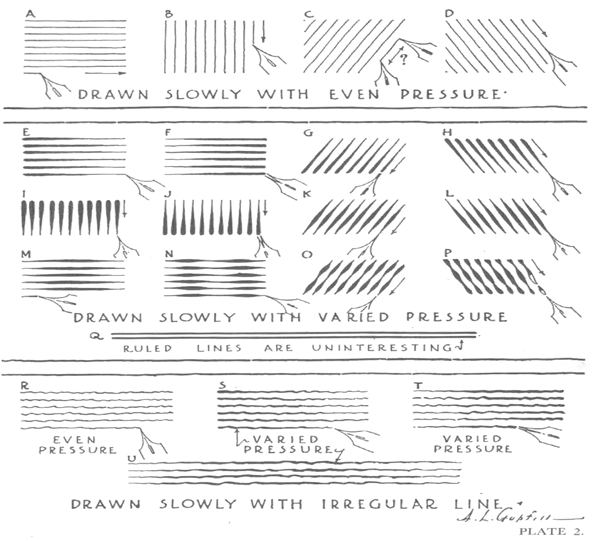
Straight lines offer a natural starting point for this practice. Turn to Plate 2, above, which shows a few practical straight line exercises. As this plate and those immediately following it have been reproduced at the size of the original drawings, and have not been corrected or touched up in any way, each stroke appears almost exactly as drawn. –
Copy these exercises, starting with the horizontal strokes shown at “A.” The arrows indicate the directions in which the original strokes were drawn, and the pen points show about the angles at which the pen was held. It is passible and proper to draw strokes like those at “C” in either of the directions indicated.
If you are left-handed you will naturally reverse most of these exercises, not only on this page but throughout the whole book. Left-handedness, by the way, is seldom a handicap in freehand drawing; some of our best artists are left-handed and at least one of our masters of the pen, Daniel Vierge, was forced, because of a stroke of paralysis, to change from his right hand to his left rather late in life and did so with little detriment to his style, once the adjustment was made.
Draw many strokes similar to those at “A,” “B,” “C,” and “D.” Vary their length and direction. Draw some slowly; some swiftly. Fill several sheets with them. Try different ways of holding the pen. Try different pens if you wish.
As you do these you will probably be able to discover some of your own weaknesses. You may have a tendency to run the lines which are intended to be horizontal up or down hill, or to tip your verticals. You may find it hard to start and stop your strokes just where you wish, or to keep them parallel. If these first troubles are yours it is perhaps because your paper is not directly in front of you, for if you do not look fairly at it you are almost sure to have difficulty. Get it right and then try again.
Following these exercises, done with comparatively even pressure of the pen, make strokes such as those shown from “E” to “P,” tapering or shading each from dark to light or from light to dark. Work with care but do not expect too much mechanical perfection; notice that the ruled lines at “Q” arc too straight and perfect to be interesting. Exercises like these will teach you some of the real capabilities of your pen Sometimes an evident shake or tremor to a line is highly desirable, so make irregular lines also, such as those at “R,” “S,” “T,” and “U,” straight in general direction, some long and some short, some with even and some with varied pressure, and at different slants.
Click on Link Below to Go to the Next Page
Today I'll show you how to draw a super cute Vault Boy from Fallout. Vault…
Today I'll show you how to draw a cute chibi / kawaii bunny rabbit named…
Today I will show you how to draw a Banana Duck from the plush Peach…
Today I'll show you how to draw a cute cartoon monster that is super easy…
Today I'll show you how to draw an adorable kawaii-style dumpster fire with the following…
Today I'll show you how to draw a cute cartoon alien in his UFO. This…