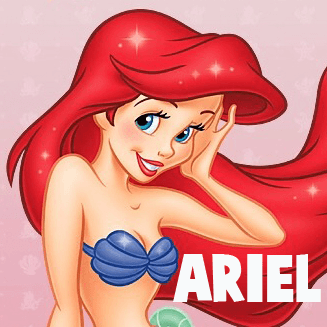
Today I will show you how to draw Ariel from Disney’s The Little Mermaid movie. She is a beautiful red-headed mermaid who falls in love with a prince. She then wishes for legs and lands up marrying the prince. This tutorial will guide you thru the steps with easy-to-follow instructions that I will guide you thru with basic geometric shapes, letters, and numbers.
You Might Also Be Interested in Our Other The Little Mermaid Tutorials
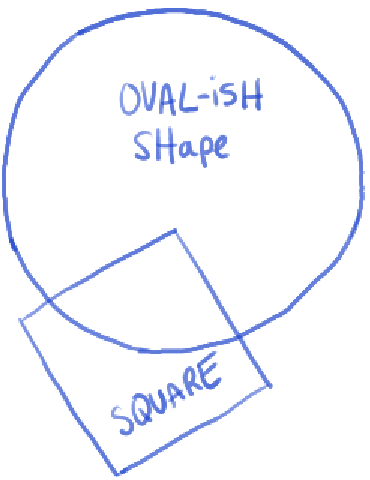
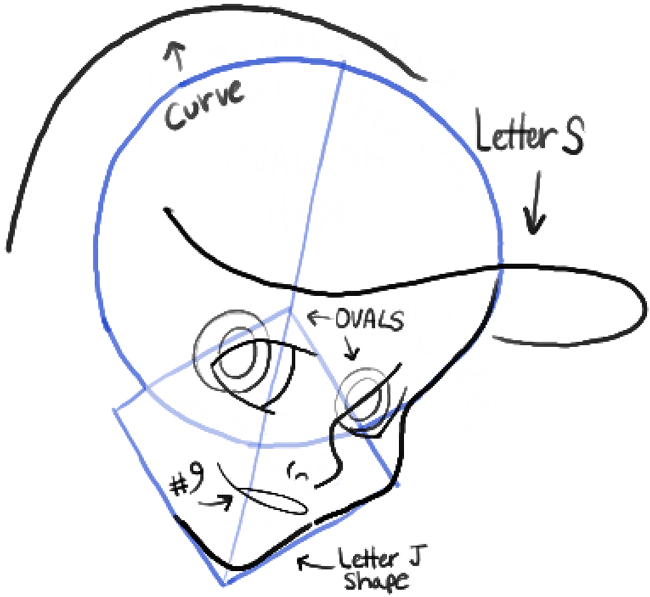
– Lightly draw an oval-shape and a sideways square shape.
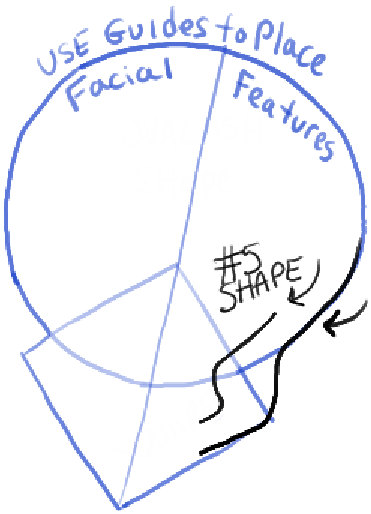
– Lightly draw a guide thru the face.
– Draw a #5-like shape for the nose and the right side of the face.
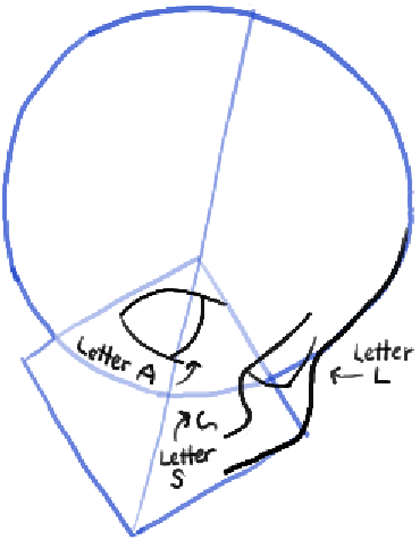
– Draw a sideways letter ‘A’ shape for the left eye.
– Draw a letter ‘L’ shape for the right eye.
– Draw a sideways letter ‘s’ shape for the nostril of the nose.
– Draw a curved line over the top of the head.
– Draw a sideways letter ‘s’ shape on the forehead.
– Draw ovals inside eyes.
– Draw sideways #9-like shape for the top of the mouth.
– Draw a letter ‘J’ shape for the chin.
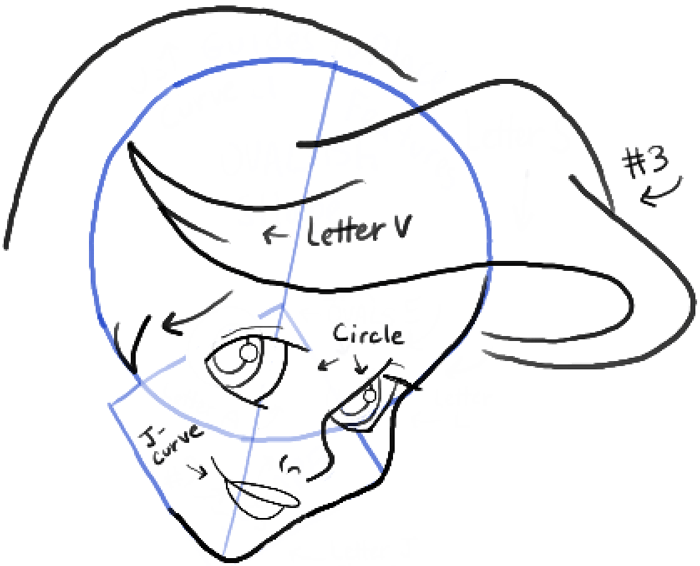
– Draw a #3-like shape on the right-side of the head.
– Draw a few letter ‘v’ shapes.
– Draw circles in the eyes.
– Draw a curved line for the bottom lip.
– Draw a letter ‘c’ shape for the ear.
– Draw curved lines for the neck.
– Draw a letter ‘j’ shaped curve for the bottom lip.
– Draw letter ‘v’ shaped lashes.
– Draw curved eye brows.
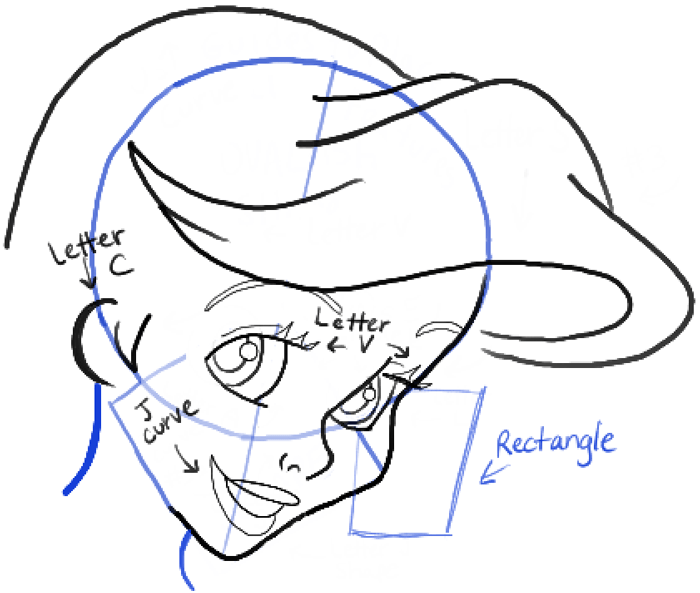
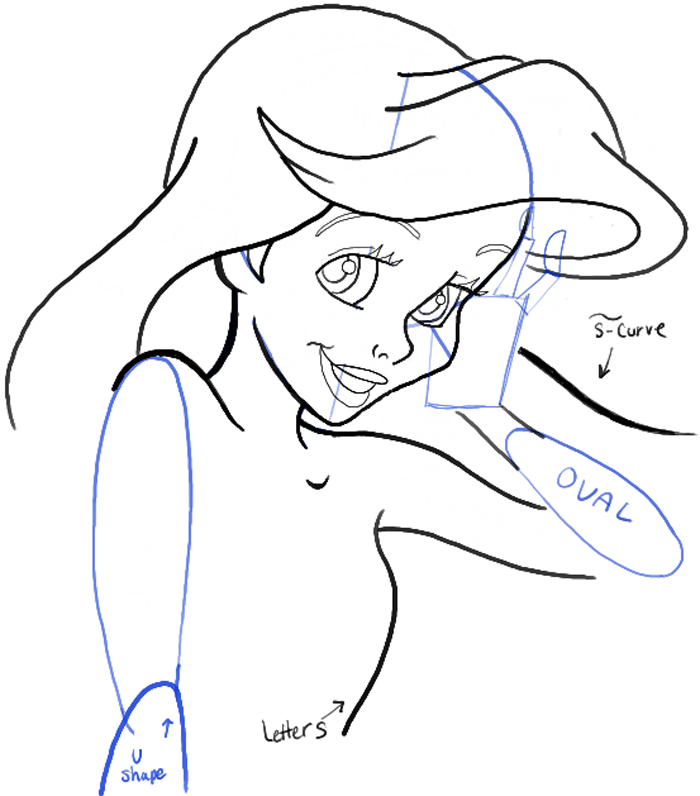
– Lightly draw a rectangle guide for the hand.
– Draw letter ‘s’ curves in a few places.
– Lightly draw rectangle and letter ‘D’ shapes for finger guides.
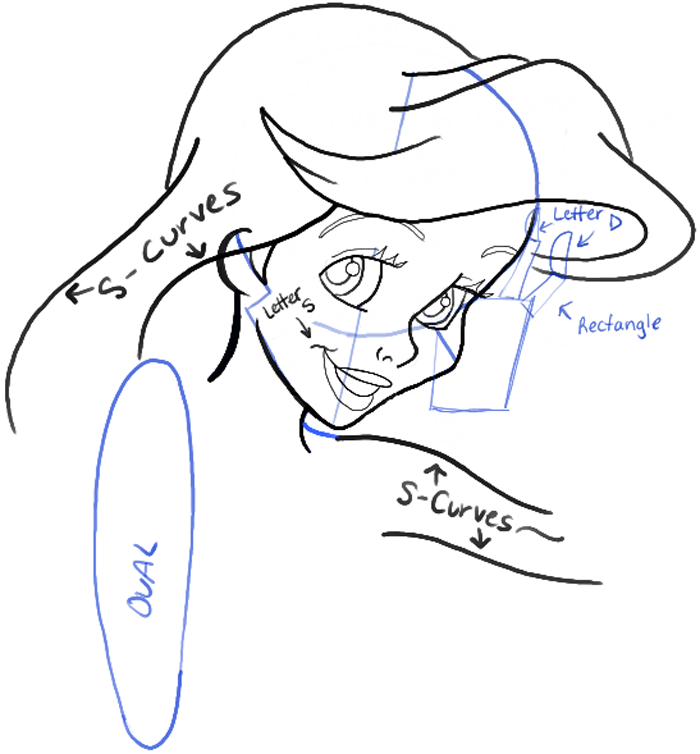
– Lightly draw an oval for the guide of the arm.
– Draw more letter ‘s’ curves.
– Lightly draw an upside down letter ‘u’ shape for part of the guide of the left arm.
– Lightly draw an oval and lines for the right arm’s guides.
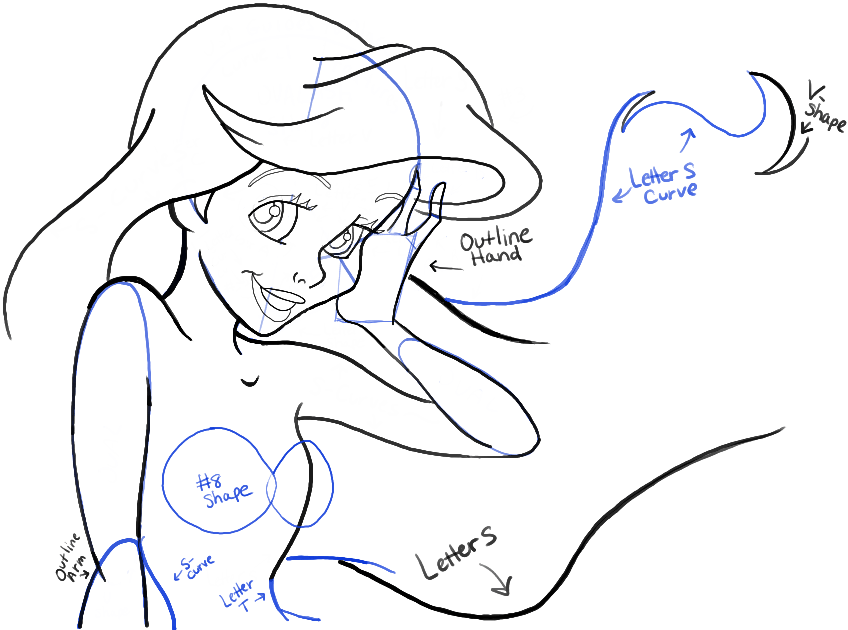
– Outline the right hand’s guides.
– Outline the left arm’s guides.
– Draw a few letter ‘s’ curves.
– Draw ovals together like a #8 for the bra.
– Draw a letter ‘T’ shape on the right side of her belly.
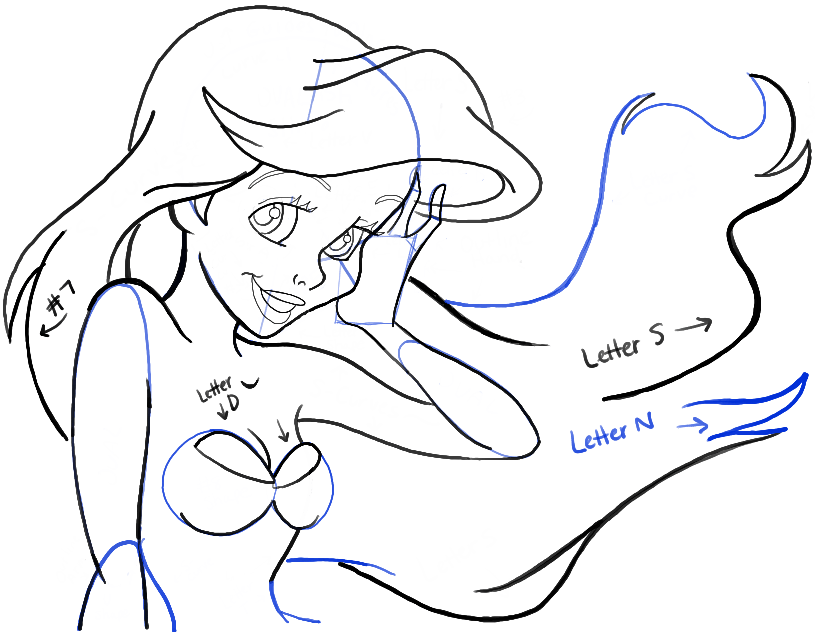
– Draw a letter ‘v’ shape at the end of the hair.
– Draw a few more basic shapes within the hair.
– Draw letter ‘D’ shapes inside the bra.
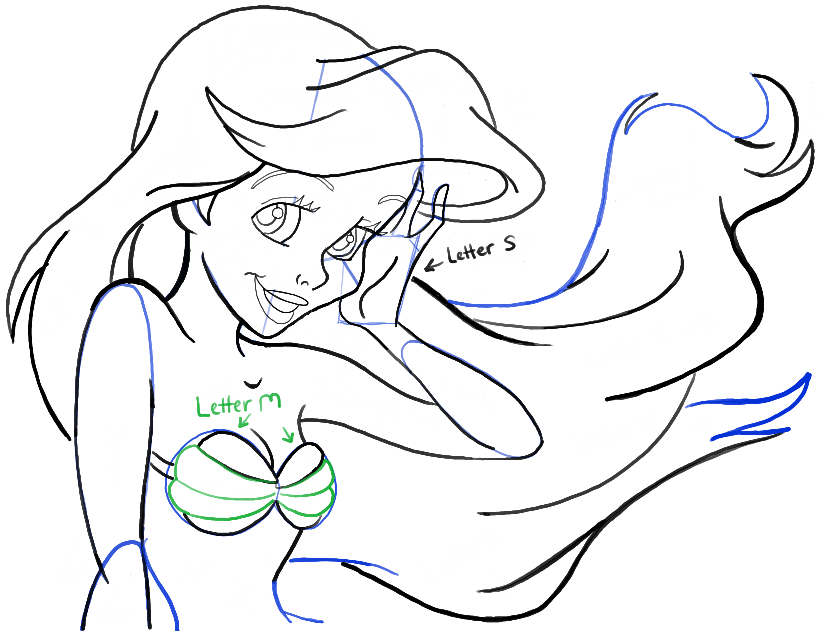
– Lightly draw a letter ‘s’ shape inside the right hand.
– Draw sideways letter ‘m’ shapes inside the bra.
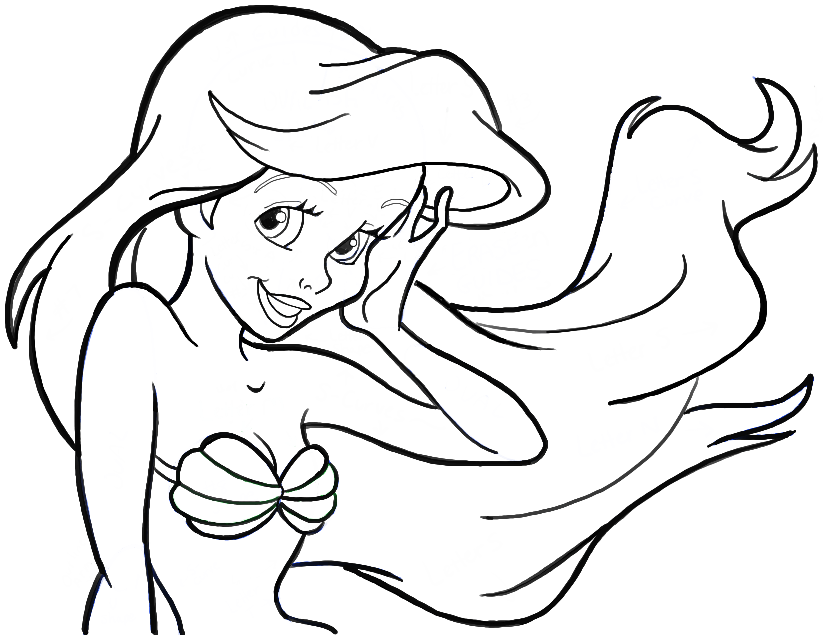
– Now erase guidelines and darken / thicken any lines that need help. I hope that your Ariel turned out great! Come back for more drawing lessons!
You Might Also Be Interested in Our Other The Little Mermaid Tutorials
Technorati Tags: ariel, the little mermaid, drawing ariel, ariel the mermaid, disney
Today I'll show you how to draw Rick from the Rick and Morty cartoon tv…
Today I'll show you how to draw Morty from the Rick and Morty cartoon tv…
Today I'll show you how to draw the spunky little rabbit, Kuromi, from My Melody…
Today I'll show you how to draw this cute "bean duck" that I found on…
Today I'll show you how to draw Sosuke and Ponyo in a bubble (chibi /kawaii…
Today I'll show you how to draw a Boo from Super Mario Bros in Kawaii…
View Comments
I have tried many tutorials to draw Ariel but yours is definitely the best. Thank you, Admin!
Hi! I really love your tutorials and they have helped me a lot! So I was wondering if you could make a tutorial for princess Pocahontas. ❤️?
Thank you! I can't believe I never drew Pocahontas...how silly of me. I will definitely put that on my list, that is a must have.
Hi I really like your tutorials I have drawn Elsa and Ariel and they both looks amazing thanks to you everyone loves them I was wonder if you could draw all the animated characters from scooby doo and scooby doo (if you haven't already) send me the link if you have and if you haven't can u send me the link when your done . Thanks I would really appriciate it
Thanks ,
Emma :)
Hey I love all the tutorials! I was wondering if you could do Link from hyrule warriors? I been really wanting to draw him! But cant find any tutorials :( pleaseeeee
Hi there. Thank you! So this tutorial - https://www.drawinghowtodraw.com/stepbystepdrawinglessons/2011/02/how-to-draw-link-from-the-legend-of-zelda-step-by-step-drawing-tutorial/ - isn't from Hyrule Warriors? Sorry, I haven't played Legend of Zelda in a long time so I'm not sure which Link is from which series. Thank you for taking a look.
Whene you have finishd the drawing
Put a pictures with a colord pictur of the charecter
Sorry, sent the same thing twice.
Ariel ewas my favorite princess but I was picky about her hair color so she turned into my least favorite. After drawing this, she is now my favorite. A few requests, could you draw the little girls from despicable me? The adopted ones? I forgot their names but I think you would know. Love the work. Thanks for all the tutorials.❤️❤️❤️ Million star website
Thanks for your awesome comments. I think it is a great idea to draw the girls...I will put that on my list! <3
Ariel used to be my favorite princess but I was really picky and I didn't like her hair color. Anyways, the tutorial is awesome, love the princesses, love the drawings. And I have a few requests.
Hi! I really enjoy this website, but I was just wondering what you draw with!? Is it a colored pencil then sharpie? Whatever it is, it looks exactly like the cartoon!
Thank you Haley! I used my computer drawing pad. Thanks for your comment!
Hi, I have really enjoyed all the tutorials on here. I was wondering if you guys could make a tutorial for the (animated not real life) Giselle from 'Enchanted' and one for Jane from 'Tarzan'. That would be really, really great and I would appreciate it tons. Thanks! (:
Hi Diane. Here is Jane - https://www.drawinghowtodraw.com/stepbystepdrawinglessons/2014/04/how-to-draw-jane-from-disneys-tarzan-with-easy-step-by-step-tutorial/ and here is Giselle - https://www.drawinghowtodraw.com/stepbystepdrawinglessons/2014/04/how-to-draw-giselle-and-prince-edward-from-enchanted-in-easy-steps-tutorial/
Thanks Diane! I will put those on my list of tutorials to make. Thanks for the suggestions!