There are three principal methods of expression in pictorial work: outline drawing, mass drawing and color work. The most important of these methods to the beginner is mass drawing.
An outline drawing is usually a mere symbol of what it is supposed to represent. Most beginners use outlines too much, and overlook the masses of light and shade. Outlines cannot be properly drawn until the student has an understanding of masses. Carefully observe every object before you attempt to draw it. By squinting or looking at the object through half closed eyes you can get a better idea of the masses of light and shade.
Sketching is the foundation of all pictorial art, by all means carry a sketch pad and pencil with you and make a practice of drawing at least six sketches a day. The sketch habit will develop your ability faster than any course of instruction ever written. Sketch everything that is of interest to you, your sketches may be crude and amateurish but if you will keep at it you will see your work improving every week.
Make sketches of your friends, your pets, the furniture, kitchen utensils, etc. After you have finished a picture hold it before a mirror and look for faults in the reflected picture. This reversed view will often enable you to see mistakes which you would otherwise over look.
When a sketch seems out of proportion redraw and correct it until the picture looks right to you. The ability to see and correct your own mistakes will help you out a great deal more than having some one else point them out to you.
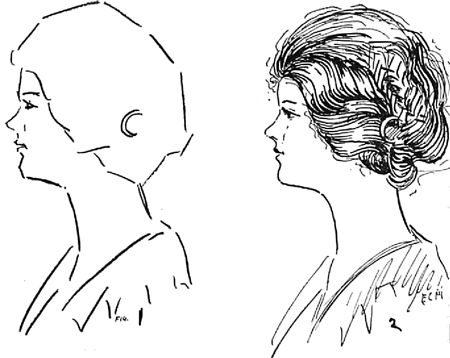
Notice the picture of the girl head, Fig. 1. First we carefully observe the general shape and proportions and block in the form with straight lines. In Fig. 2 the picture has been inked in and the blocking lines erased.
In sketching hold the pencil lightly at some distance from the point and sketch with a free hand. Don’t cramp the fingers around the pencil or bear down heavily.
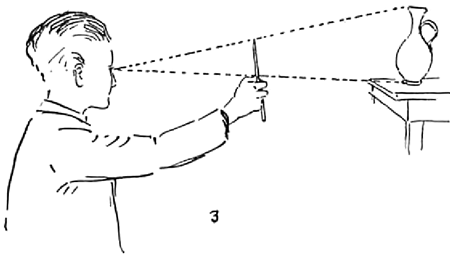
By holding the pencil at arms length and using the thumb nail for an indicator you can measure the proportions of the object you are sketching. See Fig. 3.
Not all artists use this method and some teachers do not approve of it; however you should try it if you have trouble in getting correct proportions.
Also the blocking-in method which I just described is used exclusively in some schools and ignored by others. Zim, the famous caricaturist, makes his sketches in free sweeps using curved lines altogether instead of the blocking-in method.
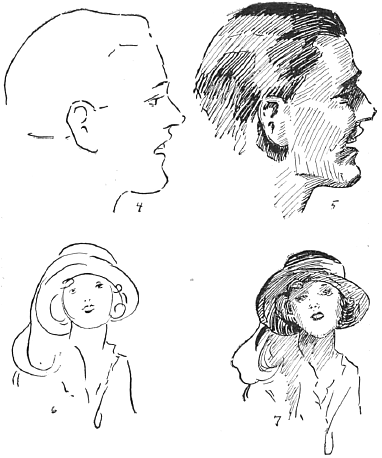
In fact most cartoonists and others who draw from imagination and memory prefer a very free style of sketching. Fig. 6 shows a girl, sketched with a lead pencil from imagination. This style of sketching is not intended for reproduction but as a preliminary layout for pen and ink work. Fig. 7 shows the same sketch inked in and pencil lines erased.
These methods are mostly a matter of taste and personal inclination. I have heard that one of our famous color artists does his pastel cover designs on the floor in preference to using a drawing table.
Methods of working are far less important than constant practice. In making pencil renderings I usually sketch the general proportions with a very hard pencil (About 6 H) and then make the sketch with a soft pencil. (6 B is good.)
I consider three pencils a complete outfit for all work. Use the two just described and a No. 2 such as is usually used for writing purposes. The books that show drawing:- made with a dozen different pencils are published by the pencil manufacturers who naturally want you to buy a full set. The drawings reproduced in such books are not ordinary line cuts or halftones, for a great amount of hand tooling has been done on the cut to get the soft effects.
A real artist seldom uses more than two or three pencils on a sketch. By using one grade of pencil or one kind of pen, brush or crayon on a drawing you give the picture a certain character. But by mixing your mediums, unless you are a very skilled artist, you are almost certain to spoil the picture.
Any paper will do, the regular sketch pads are convenient, or a small unruled linen finish writing tablet, is very good. A piece of art gum makes the best eraser, and that gives you a complete outfit for pencil sketching. -J. N. Darling, better known as “Ding” has this to say about pencil sketching: “Any boy with the average amount of intelligence who will carry around a pad of paper, and a pencil with him all the time, making five or six sketches a day from life, will, in five years have acquired enough skill to take a minor position as a cartoonist, and his success after that will not be slow in coming, if he continues to work hard.”
Make good enlarged copies of the pictures shown in the book, as you go along. Where sizes are marked on the picture, that is the size of the original drawing, where sizes are not marked, make your copies anywhere from two, to six times as large working large or small as best suited to your own taste.
To copy a picture measure its general proportions ; supposing the print is two by three inches, make dots or lines to indicate these proportions on your paper. Suppose you make the picture 6×9 inches, it is best to make your sketch on a piece of thin paper, sketch in the principal proportions first, and put in the details afterward.
Now when your sketch is corrected and finished rub a blue pencil or even a soft lead pencil on the back of the paper. Then lay your clean piece of smooth drawing paper, or bristol board on the drawing board, lay the sketch over it, and fasten down with thumb tacks. Next take a hard pencil and trace the sketch carefully, this will transfer a clean sketch on your drawing paper all ready to ink in. (Do not use carbon paper it is greasy and cannot be erased). See the chapter on pen and ink for further directions on inking in.
Technorati Tags: elementary drawing, outline drawing, drawing outlines, how to draw, drawing lessons, blocking in, drawing tutorials, draw masses, draw outlines
Today I'll show you how to draw Rick from the Rick and Morty cartoon tv…
Today I'll show you how to draw Morty from the Rick and Morty cartoon tv…
Today I'll show you how to draw the spunky little rabbit, Kuromi, from My Melody…
Today I'll show you how to draw this cute "bean duck" that I found on…
Today I'll show you how to draw Sosuke and Ponyo in a bubble (chibi /kawaii…
Today I'll show you how to draw a Boo from Super Mario Bros in Kawaii…
View Comments
nice ones
it help me!!!!