Page : 1 2
Hold a box in your hand in such a position that you only see the front and top of it. Observe that as we view the top, its outer edges appear to converge. This condition is caused by an optical illusion. As the top turns away from us, the relationship between the length and width changes or diminishes. This phenomenon is known as foreshortening. Observe also that as we look at the face of the box, it is seen in its true form. The reason for this is that it is perpendicular to our line of vision.
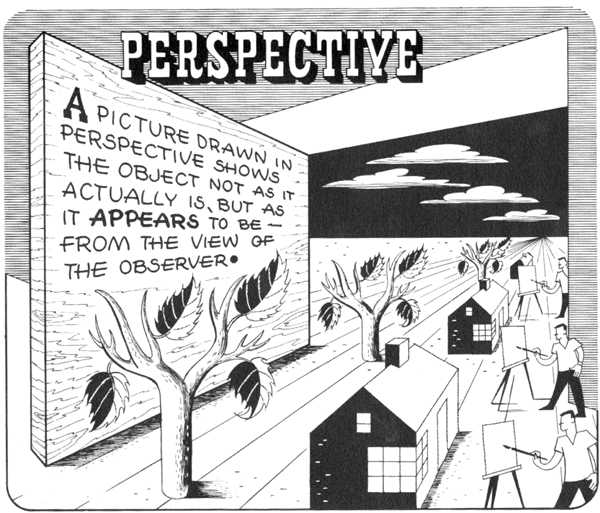
Now from your window look at a house or building. Notice the change in relationships be- tween their sides, dependent upon your viewing position. Also, look down the street or road and you will observe that it seems to converge into the distance. Therefore, when drawing in perspective, we interpret an object as it appears to be, in relationship to our visual position. Were we to draw the object in its true form it would appear distorted. You should observe also that color and lighting conditions change in true perspective. Foreground objects appear more brilliant than those in the background. This is called aerial perspective.
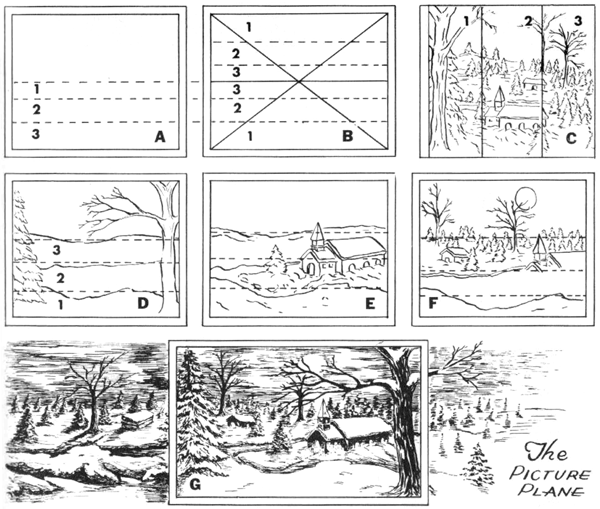
When drawing a picture in perspective, we are concerned with three factors. These are the picture plane, the eye level, and the vanishing point. The picture plane means basically that it is the scene or composition of the picture which we wish to execute within a defined border, or the limits of our paper. If we were to go to a window and think of its casing as a frame—that view, which we would observe within the area of the window frame, would be our picture. Were we further to paint on the glass the view through the window, the window glass would then be considered as our picture plane.
In Fig. A, within the limits of our picture plane, there are shown three divisions which most pictures incorporate in order to give them depth or perspective. These are the foreground (3), the middleground (2). and the background (1). In Fig. B, above, is illustrated how perspective may be suggested in like manner in the sky areas. Figs. C. D, E, and F. illustrate how these are reflected in pictorial form. Lastly, in the lower panel is shown a panoramic view of a winter scene. Portion (G) represents the scene as being selected as our picture plane
The first essential in learning to draw is the study of perspective. In this art fundamental we shall learn how to interpret objects as they appear to us, and not to draw them in their actual forms or sizes.
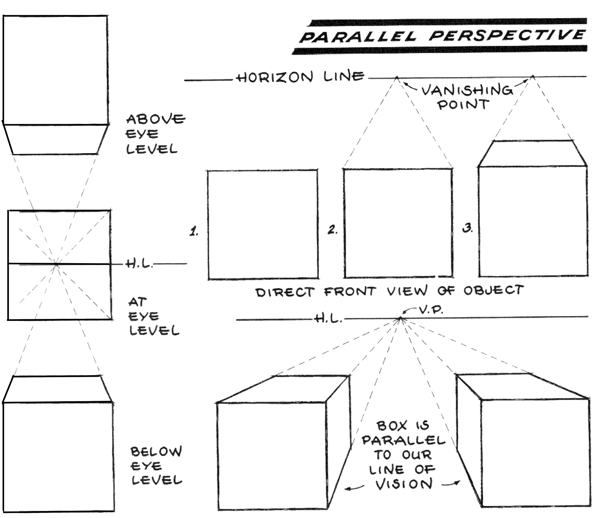
When creating a picture we must first consider our viewpoint as we observe the scene. Are we looking down on the object, up at it, or is it parallel to our line of vision, etc.? This line of vision, or our eye level, is interpreted in perspective as the horizon line (H.L.). Observe that parallel lines of an object seem to converge to this horizon line at a point which is known as the vanishing point (V.P.). Three lines of an object which are at right angles to each other are not drawn in their true lengths, but are shown as they appear to be in lengths relative to the position of the observer. Should we draw objects in their true sizes and shapes they would appear distorted in our pictures. We shall first learn to draw a simple box in various positions. When we have accomplished this it will be a relatively easy step toward drawing almost any inanimate object in perspective.
We think of linear perspective as dealing with lines—such as the edges of a box, building, etc., as opposed to circles in perspective. In starting our study of perspective we shall learn to draw mechanically; that is, using actual horizon lines, vanishing points, etc. It should be stated, however, that artists rarely draw mechanically. They know the rules and forget about them. Until you have a fixed knowledge of perspective it is advisable to draw in all of your vanishing lines, etc. When you are more experienced you will be taught the freehand approach.
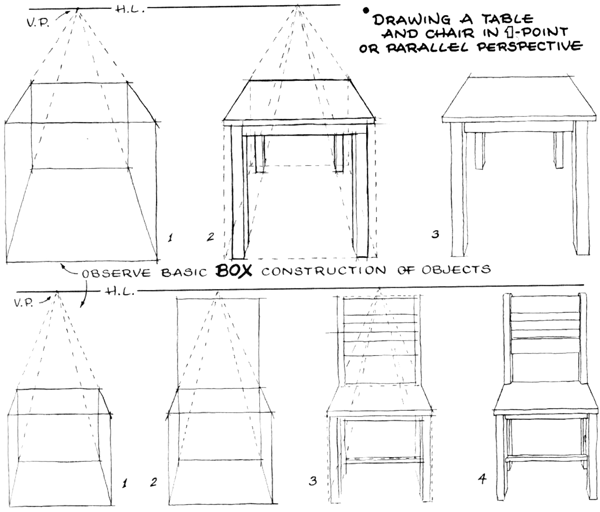
In the above lesson we come back to first drawing our simple box, and in easy steps developing this box into a table or chair. Now you are on your way to learning to draw! After practicing the above exercise you may elaborate on the design of the table and chair—using your own furniture for ideas. Observe that the objects are drawn in parallel perspective; that is, the table and chair are parallel to our line of vision. What is this imaginary eye level called? The horizon line—of course. Practice drawing the table and chair in different relationships to above and below the horizon line.
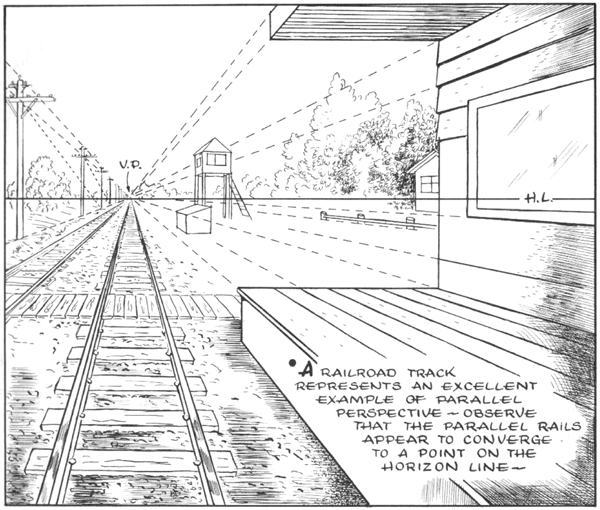
As you have looked directly down a railroad track undoubtedly you have observed that the rails appeared to become narrower in the distance and converge to an imaginary point. Of course, you were aware that the rails were actually parallel, or equidistant to each other, but in observing them, an optical illusion tricked your vision into seeing these rails converge. The railroad track is basic in illustrating what we mean by drawing in perspective.
Our entire picture is constructed in one-point (or parallel) perspective. This means, of course, that all objects vanish to a single point. To space the telephone poles mechanically—first establish the first and second poles. From the top and bottom of the first pole. respectively, draw vanishing lines to the vanishing point. Now draw a center line from the first pole to the vanishing point. From the top of the first pole now draw a line through the intersection of this center line and the second pole. At the point where this diagonal meets the base vanishing line will establish the location of our third pole. Using a similar procedure will locate the positions of the other telephone poles.
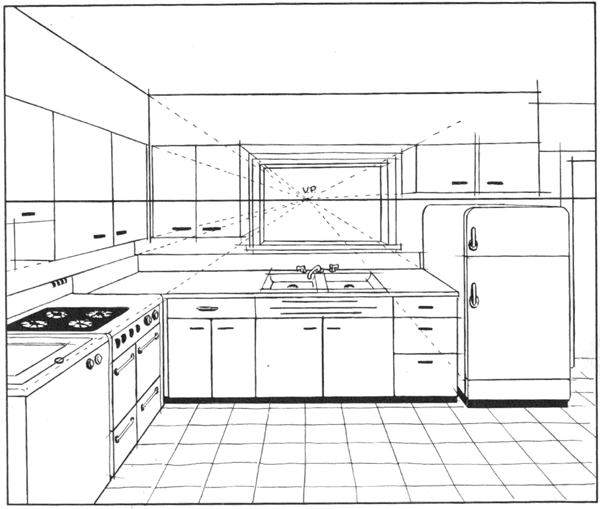
Look at the above picture in Kitchen Interior Design. Our drawing will be again constructed in one-point perspective. All objects (including the floor tiles) vanish to a single point on the horizon line which, as we know by now, is our eye level. Note that the cabinets and intersections of the window frames, which are above the horizon line, converge downward toward the vanishing point. Observe also that all objects below the horizon, such as the stove, refrigerator, etc., converge up to the vanishing point. Refer back to the earlier picture in which the boxes are shown above and below eye level. You will see that the kitchen fixtures are basically constructed from our simple box, with variations only in proportions and detail. When you have executed the above illustration, create your own kitchen design using material from your own kitchen, magazines, newspapers, etc.
To Continue Article, Click on to Next Page
Page : 1 2
Page: 1 2
Today I'll show you how to draw Rick from the Rick and Morty cartoon tv…
Today I'll show you how to draw Morty from the Rick and Morty cartoon tv…
Today I'll show you how to draw the spunky little rabbit, Kuromi, from My Melody…
Today I'll show you how to draw this cute "bean duck" that I found on…
Today I'll show you how to draw Sosuke and Ponyo in a bubble (chibi /kawaii…
Today I'll show you how to draw a Boo from Super Mario Bros in Kawaii…
View Comments
turely speaking very very nice.
very nice. very very good
thanks ! good tutorial
I am taking a beginning art class at UH Maui College and would like to be able to print this tutorial out so I can wok on my home work. Is there any way to do that? or save it as a pdf file? I find myself getting confused as I complete my assignment and having this document in front of me would truly help me.
Thank you for your response.
Denni Grace.
Hi Denni. Yes there is a way. On each article there are a bunch of tiny icons under the Title. There is a Plus icon with the word 'more' next to it. When you click on 'more', then scroll to 'print' or 'print friendly'. I hope this helps.
Hi ...on your sample of drawing a table how does one get from stage l to stage 2. I find it confusing with the dotted lines . Can you not give a step by step guide to what you draw after STage 1 (i.e. the original box going to the vanishing points.
Sorry that the dotted lines are confusing to you. I think that if you take a look at this tutorial I did, it will make sooo much more sense. Basically, the dotted lines are showing you that the line is going towards the vanishing point. All the lines are going towards the vanishing point in 1-pt perspective, except for the vertical lines (up and down). But the link above will totally clear that up for you. Please go check it out and let me know if it helps you. Good luck.